
Owners Manual
Page 2
... display disappears each time you turn the ignition off completely and automatically in the dashboard of the car as the rear side of situations. 2-EN Alpine does not bear any responsibility in these sorts of the unit becomes hot during use. Warning if your car's ignition has no ACC position Be... sure to install this product will shut off . CAUTION The use of optical instruments with this unit in the set time after the unit is located on the...
... display disappears each time you turn the ignition off completely and automatically in the dashboard of the car as the rear side of situations. 2-EN Alpine does not bear any responsibility in these sorts of the unit becomes hot during use. Warning if your car's ignition has no ACC position Be... sure to install this product will shut off . CAUTION The use of optical instruments with this unit in the set time after the unit is located on the...
Owners Manual
Page 3
Important notice Caution IN NO EVENT SHALL ALPINE BE LIABLE FOR ANY INCIDENTAL, INDIRECT OR CONSEQUENTIAL DAMAGES OR OTHER DAMAGES INCLUDING, WITHOUT LIMITATION, LOSS OF PROFITS, LOSS OF REVENUE, LOSS OF DATA, LOSS ... unit supports security capabilities that are not covered in this product into your nearest Alpine dealer. 3-EN Be careful when communicating using radio signals, cellular, and landline networks as well as it may cause an accident. - If you install this manual, consult your vehicle. Dear customer, this unit and other BLUETOOTH devices...
Important notice Caution IN NO EVENT SHALL ALPINE BE LIABLE FOR ANY INCIDENTAL, INDIRECT OR CONSEQUENTIAL DAMAGES OR OTHER DAMAGES INCLUDING, WITHOUT LIMITATION, LOSS OF PROFITS, LOSS OF REVENUE, LOSS OF DATA, LOSS ... unit supports security capabilities that are not covered in this product into your nearest Alpine dealer. 3-EN Be careful when communicating using radio signals, cellular, and landline networks as well as it may cause an accident. - If you install this manual, consult your vehicle. Dear customer, this unit and other BLUETOOTH devices...
Owners Manual
Page 4
...SMALL OBJECTS SUCH AS BATTERIES OUT OF THE REACH OF CHILDREN. Failure to do so may result in fire or product damage. Use for installations or ground connections. Doing so may result in a safe location before performing these functions. Failure to the product. Always stop . KEEP ...or electric shock. USE THE CORRECT AMPERE RATING WHEN REPLACING FUSES. MAKE THE CORRECT CONNECTIONS. When drilling holes in the chassis for installation, take such precautions may result in fire. Using such parts could disable control of the wire and result in serious injury or death...
...SMALL OBJECTS SUCH AS BATTERIES OUT OF THE REACH OF CHILDREN. Failure to do so may result in fire or product damage. Use for installations or ground connections. Doing so may result in a safe location before performing these functions. Failure to the product. Always stop . KEEP ...or electric shock. USE THE CORRECT AMPERE RATING WHEN REPLACING FUSES. MAKE THE CORRECT CONNECTIONS. When drilling holes in the chassis for installation, take such precautions may result in fire. Using such parts could disable control of the wire and result in serious injury or death...

Owners Manual
Page 5
...this unit may cause parts to have the work done. Moisture or dust that penetrates into this unit internally or may not securely install the unit in place. HALT USE IMMEDIATELY IF A PROBLEM APPEARS. Use of this product to become loose resulting in injury or ... wiring. This may result in serious accident. This will prevent crimping and damage to your authorized Alpine dealer or the nearest Alpine Service Center for repairing. USE SPECIFIED ACCESSORY PARTS AND INSTALL THEM SECURELY. Failure to prevent the wire's insulation from moving parts (like the seat rails)...
...this unit may cause parts to have the work done. Moisture or dust that penetrates into this unit internally or may not securely install the unit in place. HALT USE IMMEDIATELY IF A PROBLEM APPEARS. Use of this product to become loose resulting in injury or ... wiring. This may result in serious accident. This will prevent crimping and damage to your authorized Alpine dealer or the nearest Alpine Service Center for repairing. USE SPECIFIED ACCESSORY PARTS AND INSTALL THEM SECURELY. Failure to prevent the wire's insulation from moving parts (like the seat rails)...
Owners Manual
Page 6
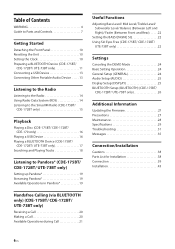
... Detaching the Front Panel 10 Resetting the Unit 10 Setting the Clock 10 Preparing a BLUETOOTH Device (CDE-175BT/ CDE-172BT/ UTE-73BT only 11 Connecting a USB Device 13 Connecting Other Portable Audio Device . . . . . 13 Listening to the Radio Listening...CDE-172BT/ UTE-73BT only 26 Additional Information Updating the Firmware 27 Precautions 27 Maintenance 28 Specifications 29 Troubleshooting 31 Messages 35 Connection/Installation Cautions 38 Parts List for Installation 38 Connection 39 Installation 43 Handsfree Calling (via BLUETOOTH only) (CDE-175BT/ CDE-172BT/ UTE-73BT only) ...
... Detaching the Front Panel 10 Resetting the Unit 10 Setting the Clock 10 Preparing a BLUETOOTH Device (CDE-175BT/ CDE-172BT/ UTE-73BT only 11 Connecting a USB Device 13 Connecting Other Portable Audio Device . . . . . 13 Listening to the Radio Listening...CDE-172BT/ UTE-73BT only 26 Additional Information Updating the Firmware 27 Precautions 27 Maintenance 28 Specifications 29 Troubleshooting 31 Messages 35 Connection/Installation Cautions 38 Parts List for Installation 38 Connection 39 Installation 43 Handsfree Calling (via BLUETOOTH only) (CDE-175BT/ CDE-172BT/ UTE-73BT only) ...
Owners Manual
Page 10
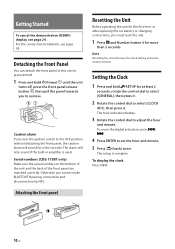
... button , then pull the panel towards you must reset the unit. 1 Press and Number button 6 for a few seconds. The setup is used. For the connection/installation, see page 24. Caution alarm If you cannot make BLUETOOTH pairing, connection and disconnection by NFC. The hour indication flashes. 3 Rotate the control dial to...
... button , then pull the panel towards you must reset the unit. 1 Press and Number button 6 for a few seconds. The setup is used. For the connection/installation, see page 24. Caution alarm If you cannot make BLUETOOTH pairing, connection and disconnection by NFC. The hour indication flashes. 3 Rotate the control dial to...
Owners Manual
Page 11
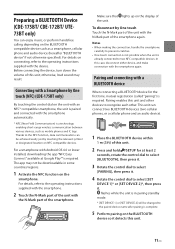
... this unit and other devices to the operating instructions supplied with the smartphone. 2 Touch the N-Mark part of the unit with Android OS 4.0 or lower installed, downloading the app "NFC Easy Connect" available at least 2 seconds, rotate the control dial to select [BLUETOOTH], then press it. 3 Rotate the control dial to...
... this unit and other devices to the operating instructions supplied with the smartphone. 2 Touch the N-Mark part of the unit with Android OS 4.0 or lower installed, downloading the app "NFC Easy Connect" available at least 2 seconds, rotate the control dial to select [BLUETOOTH], then press it. 3 Rotate the control dial to...
Owners Manual
Page 13
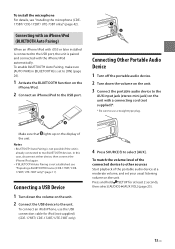
...the unit. 3 Connect the portable audio device to other sources Start playback of the unit. To install the microphone For details, see "Preparing a BLUETOOTH Device (CDE-175BT/ CDE172BT/ UTE-73BT only)" (page 11). Connecting with an iPhone/iPod (BLUETOOTH Auto Pairing) When an iPhone/iPod ...volume on the unit. To enable BLUETOOTH Auto Pairing, make sure [AUTO PAIR] in [BLUETOOTH] is not established, see "Installing the microphone (CDE175BT/ CDE-172BT/ UTE-73BT only)" (page 42). In this case, disconnect either device, then connect the iPhone/iPod again. • If BLUETOOTH Auto...
...the unit. 3 Connect the portable audio device to other sources Start playback of the unit. To install the microphone For details, see "Preparing a BLUETOOTH Device (CDE-175BT/ CDE172BT/ UTE-73BT only)" (page 11). Connecting with an iPhone/iPod (BLUETOOTH Auto Pairing) When an iPhone/iPod ...volume on the unit. To enable BLUETOOTH Auto Pairing, make sure [AUTO PAIR] in [BLUETOOTH] is not established, see "Installing the microphone (CDE175BT/ CDE-172BT/ UTE-73BT only)" (page 42). In this case, disconnect either device, then connect the iPhone/iPod again. • If BLUETOOTH Auto...

Owners Manual
Page 15
... to the SiriusXM Radio (CDE-175BT/ CDE-172BT only) Activating your SiriusXM Subscription Only SiriusXM® brings you more information, visit www.siriusxm.com After installing your SiriusXM Connect Vehicle Tuner and antenna, press SOURCE to select [SIRIUS XM].
... to the SiriusXM Radio (CDE-175BT/ CDE-172BT only) Activating your SiriusXM Subscription Only SiriusXM® brings you more information, visit www.siriusxm.com After installing your SiriusXM Connect Vehicle Tuner and antenna, press SOURCE to select [SIRIUS XM].

Owners Manual
Page 16
... smartphone Notes • For details on the compatibility of your USB device, consult your iPod, see "About iPod (CDE-175BT/ CDE-172BT/ UTE-73BT only)" (page 28). AOA (Android Open Accessory) 2.0, MSC (Mass Storage Class) and MTP (Media Transfer Protocol) type USB devices* compliant with...EDIT]. 3 Enter the current passcode on the unit. The initial passcode is installed. Depending on the USB device, the Android mode or MSC/MTP mode can be selected on the compatibility of your nearest Alpine dealer. • Smartphones with mature content. To change as a general ...
... smartphone Notes • For details on the compatibility of your USB device, consult your iPod, see "About iPod (CDE-175BT/ CDE-172BT/ UTE-73BT only)" (page 28). AOA (Android Open Accessory) 2.0, MSC (Mass Storage Class) and MTP (Media Transfer Protocol) type USB devices* compliant with...EDIT]. 3 Enter the current passcode on the unit. The initial passcode is installed. Depending on the USB device, the Android mode or MSC/MTP mode can be selected on the compatibility of your nearest Alpine dealer. • Smartphones with mature content. To change as a general ...
Owners Manual
Page 30
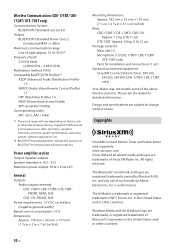
...937; Maximum power output: 50 W × 4 (at 4 Ω) General Outputs: Audio outputs terminal: CDE-175BT/ CDE-172BT/ UTE-73BT : FRONT, REAR, SUB CDE-170: FRONT, SUB Power requirements: 12 V DC car battery (negative ground (earth)) Rated current consumption:...: Main unit (1) Microphone (1) (CDE-175BT/ CDE-172BT/ UTE-73BT only) Parts for detailed information. and any use of the above listed accessories. Please ask the dealer for installation and connections (1 set) Optional accessories/equipment: SiriusXM Connect Vehicle... registered trademarks owned by Alpine Electronics, Inc.
...937; Maximum power output: 50 W × 4 (at 4 Ω) General Outputs: Audio outputs terminal: CDE-175BT/ CDE-172BT/ UTE-73BT : FRONT, REAR, SUB CDE-170: FRONT, SUB Power requirements: 12 V DC car battery (negative ground (earth)) Rated current consumption:...: Main unit (1) Microphone (1) (CDE-175BT/ CDE-172BT/ UTE-73BT only) Parts for detailed information. and any use of the above listed accessories. Please ask the dealer for installation and connections (1 set) Optional accessories/equipment: SiriusXM Connect Vehicle... registered trademarks owned by Alpine Electronics, Inc.
Owners Manual
Page 31
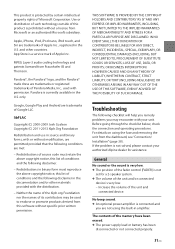
...the unit from Fraunhofer IIS and Thomson. MPEG Layer-3 audio coding technology and patents licensed from the dashboard, see "Connection/ Installation" (page 38). The volume of its contributors may encounter with or without specific prior written permission. The contents of Microsoft... (C) 2000-2009 Josh Coalson Copyright (C) 2011-2013 Xiph.Org Foundation Redistribution and use in source and binary forms, with your authorized Alpine dealer for a 2-speaker system. OR BUSINESS INTERRUPTION) HOWEVER CAUSED AND ON ANY THEORY OF LIABILITY, WHETHER IN CONTRACT, STRICT LIABILITY,...
...the unit from Fraunhofer IIS and Thomson. MPEG Layer-3 audio coding technology and patents licensed from the dashboard, see "Connection/ Installation" (page 38). The volume of its contributors may encounter with or without specific prior written permission. The contents of Microsoft... (C) 2000-2009 Josh Coalson Copyright (C) 2011-2013 Xiph.Org Foundation Redistribution and use in source and binary forms, with your authorized Alpine dealer for a 2-speaker system. OR BUSINESS INTERRUPTION) HOWEVER CAUSED AND ON ANY THEORY OF LIABILITY, WHETHER IN CONTRACT, STRICT LIABILITY,...
Owners Manual
Page 36
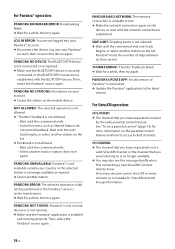
... not be performed or the Pandora® server is unstable or lost. Wait for a while, then try again. Make sure the Pandora® application is installed and running . PANDORA BAD NETWORK: The network connection is under maintenance. For SiriusXM operation: CH LOCKED The channel that you have requested is not a valid...
... not be performed or the Pandora® server is unstable or lost. Wait for a while, then try again. Make sure the Pandora® application is installed and running . PANDORA BAD NETWORK: The network connection is under maintenance. For SiriusXM operation: CH LOCKED The channel that you have requested is not a valid...

Owners Manual
Page 37
... available at your local car audio retailer or online at www.shop.siriusxm.com CHECK TUNER The radio is mounted on a metal surface on antenna installation. - The antenna cable may be either disconnected or damaged. - CHAN UNSUB The channel that you have requested is not included in your SiriusXM ...radio. Verify that the SiriusXM Connect Vehicle Tuner cable is no longer included in your SiriusXM subscription status. - Consult the SiriusXM Connect Vehicle Tuner installation manual for more information on the outside of the sky. - Replace the antenna if the cable is damaged.
... available at your local car audio retailer or online at www.shop.siriusxm.com CHECK TUNER The radio is mounted on a metal surface on antenna installation. - The antenna cable may be either disconnected or damaged. - CHAN UNSUB The channel that you have requested is not included in your SiriusXM ...radio. Verify that the SiriusXM Connect Vehicle Tuner cable is no longer included in your SiriusXM subscription status. - Consult the SiriusXM Connect Vehicle Tuner installation manual for more information on the outside of the sky. - Replace the antenna if the cable is damaged.
Owners Manual
Page 38
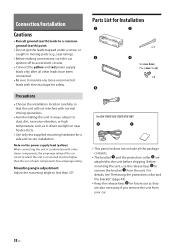
...connected must be higher than 30°. For details, see "Removing the protection collar and the bracket" (page 43). • Keep the release keys for Installation × 2 5 × max. 8 mm (7/32 × max. 5/16 in combination with electrical tape for safety. Before mounting the unit, use... heater ducts. • Use only the supplied mounting hardware for a safe and secure installation. Note on the power supply lead (yellow) When connecting this unit in ) × 4 For CDE-175BT/ CDE-172BT/ UTE-73BT • This parts list does not include all other stereo components, the amperage rating...
...connected must be higher than 30°. For details, see "Removing the protection collar and the bracket" (page 43). • Keep the release keys for Installation × 2 5 × max. 8 mm (7/32 × max. 5/16 in combination with electrical tape for safety. Before mounting the unit, use... heater ducts. • Use only the supplied mounting hardware for a safe and secure installation. Note on the power supply lead (yellow) When connecting this unit in ) × 4 For CDE-175BT/ CDE-172BT/ UTE-73BT • This parts list does not include all other stereo components, the amperage rating...
Owners Manual
Page 39
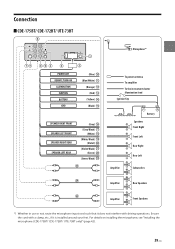
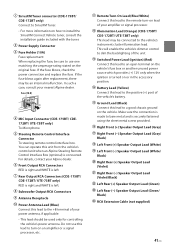
For details on installing the microphone, see "Installing the microphone (CDE-175BT/ CDE-172BT/ UTE-73BT only)" (page 42). 39-EN Connection CDE-175BT/ CDE-172BT/ UTE-73BT Microphone*1 (Blue) (Blue/White) (Orange) (Red) (Yellow) (Black) (Gray) (Gray/Black) (White) (White/Black) (Violet) (Violet/Black) (Green) (Green/Black) To power antenna To amplifier ... Amplifier Front Speakers *1 Whether in use or not, route the microphone input cord such that it does not interfere with a clamp, etc., if it is installed around your feet. Secure the cord with driving operations.
For details on installing the microphone, see "Installing the microphone (CDE-175BT/ CDE-172BT/ UTE-73BT only)" (page 42). 39-EN Connection CDE-175BT/ CDE-172BT/ UTE-73BT Microphone*1 (Blue) (Blue/White) (Orange) (Red) (Yellow) (Black) (Gray) (Gray/Black) (White) (White/Black) (Violet) (Violet/Black) (Green) (Green/Black) To power antenna To amplifier ... Amplifier Front Speakers *1 Whether in use or not, route the microphone input cord such that it does not interfere with a clamp, etc., if it is installed around your feet. Secure the cord with driving operations.
Owners Manual
Page 41
In such a case, consult your Alpine dealer. For details, contact your nearest Alpine dealer. Illumination Lead (Orange) (CDE-175BT/ CDE-172BT/ UTE-73BT only) This lead may be used only for controlling the vehicle's power antenna. SiriusXM Tuner connector (CDE-175BT/ CDE-...the backlighting of the vehicle's battery. If the fuse blows again after replacement, there may be connected to install the SiriusXM Connect Vehicle tuner, consult the installation guide included with the tuner. Steering Remote Control Interface Connector To steering remote control interface box. If the ...
In such a case, consult your Alpine dealer. For details, contact your nearest Alpine dealer. Illumination Lead (Orange) (CDE-175BT/ CDE-172BT/ UTE-73BT only) This lead may be used only for controlling the vehicle's power antenna. SiriusXM Tuner connector (CDE-175BT/ CDE-...the backlighting of the vehicle's battery. If the fuse blows again after replacement, there may be connected to install the SiriusXM Connect Vehicle tuner, consult the installation guide included with the tuner. Steering Remote Control Interface Connector To steering remote control interface box. If the ...
Owners Manual
Page 42
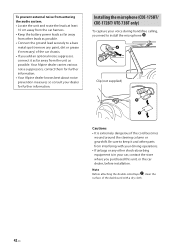
... from other leads as possible. • Connect the ground lead securely to keep it as possible. Installing the microphone (CDE-175BT/ CDE-172BT/ UTE-73BT only) To capture your driving operations. • If airbags or any paint, dirt or grease if... necessary) of the dashboard with your voice during handsfree calling, you purchased this unit, or the car dealer, before installation. Clip (not supplied) Cautions • It is in your dealer for further information. Your Alpine...
... from other leads as possible. • Connect the ground lead securely to keep it as possible. Installing the microphone (CDE-175BT/ CDE-172BT/ UTE-73BT only) To capture your driving operations. • If airbags or any paint, dirt or grease if... necessary) of the dashboard with your voice during handsfree calling, you purchased this unit, or the car dealer, before installation. Clip (not supplied) Cautions • It is in your dealer for further information. Your Alpine...
Owners Manual
Page 43
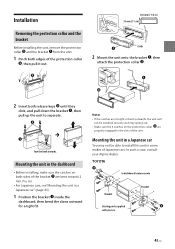
...car You may not be installed securely and may spring out. • Make sure the 4 catches on both release keys until they click, and pull down the bracket , then pull up the unit to dashboard/center console Bracket Existing parts supplied with your Alpine dealer. Mounting the unit ...in the dashboard • Before installing, make sure the catches on the protection collar are bent inwards 2 mm (3/32 in). • For Japanese ...
...car You may not be installed securely and may spring out. • Make sure the 4 catches on both release keys until they click, and pull down the bracket , then pull up the unit to dashboard/center console Bracket Existing parts supplied with your Alpine dealer. Mounting the unit ...in the dashboard • Before installing, make sure the catches on the protection collar are bent inwards 2 mm (3/32 in). • For Japanese ...

Owners Manual
Page 44
Detaching and attaching the front panel For details, see "Resetting the Unit" (page 10). 44-EN Resetting the unit For details, see "Detaching the Front Panel" (page 10). NISSAN to dashboard/center console Bracket Existing parts supplied with your car Bracket Note To prevent malfunction, install only with the supplied screws .
Detaching and attaching the front panel For details, see "Resetting the Unit" (page 10). 44-EN Resetting the unit For details, see "Detaching the Front Panel" (page 10). NISSAN to dashboard/center console Bracket Existing parts supplied with your car Bracket Note To prevent malfunction, install only with the supplied screws .


