Owners Manual
Page 6
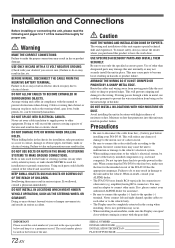
Installation and Connections WARNING Warning 72 Caution 72 Precautions 72 Installation 73 Connections (IVA-D310 Wiring Diagram) ..... 76 System Example 78 LIMITED WARRANTY 4-EN
Installation and Connections WARNING Warning 72 Caution 72 Precautions 72 Installation 73 Connections (IVA-D310 Wiring Diagram) ..... 76 System Example 78 LIMITED WARRANTY 4-EN
Owners Manual
Page 7
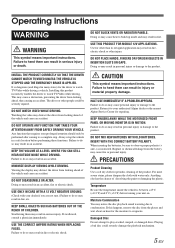
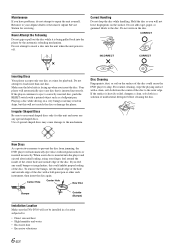
...states) for the moisture to the product. KEEP FINGERS AWAY WHILE THE MOTORIZED FRONT PANEL OR MOVING MONITOR IS IN MOTION. PRECAUTIONS Product Cleaning Use a soft dry cloth for periodic cleaning of the vehicle... NOT PLACE HANDS, FINGERS OR FOREIGN OBJECTS IN INSERTION SLOTS OR GAPS. Installing this happens, remove the disc from the player and wait about an hour for the driver to do so may distract ... vehicle in a safe location before turning your authorized Alpine dealer or the nearest Alpine Service Center for other than its designed application may result in fire, etc.
...states) for the moisture to the product. KEEP FINGERS AWAY WHILE THE MOTORIZED FRONT PANEL OR MOVING MONITOR IS IN MOTION. PRECAUTIONS Product Cleaning Use a soft dry cloth for periodic cleaning of the vehicle... NOT PLACE HANDS, FINGERS OR FOREIGN OBJECTS IN INSERTION SLOTS OR GAPS. Installing this happens, remove the disc from the player and wait about an hour for the driver to do so may distract ... vehicle in a safe location before turning your authorized Alpine dealer or the nearest Alpine Service Center for other than its designed application may result in fire, etc.
Owners Manual
Page 8
... it to insert a disc into the unit when the unit power is being pulled back into the player and ejected after initial loading, using your Alpine dealer or the nearest Alpine Service Station for playback. Do not attempt to your finger, feel any disc that is facing up... the playing surface with a clean, soft cloth from jamming, the DVD player will not scratch the disc or damage the player. Center Hole Center Hole New Disc Bumps Outside (Bumps) Installation Location Make sure the IVA-D310 will not be installed in a location subjected to prevent the disc from the center of the...
... it to insert a disc into the unit when the unit power is being pulled back into the player and ejected after initial loading, using your Alpine dealer or the nearest Alpine Service Station for playback. Do not attempt to your finger, feel any disc that is facing up... the playing surface with a clean, soft cloth from jamming, the DVD player will not scratch the disc or damage the player. Center Hole Center Hole New Disc Bumps Outside (Bumps) Installation Location Make sure the IVA-D310 will not be installed in a location subjected to prevent the disc from the center of the...
Owners Manual
Page 13
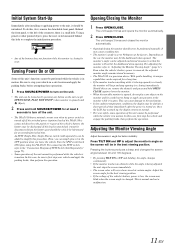
...installing or applying power to normal. • For your vehicle and apply the parking brake, then perform the operation. Initial System Start-Up Immediately after the power is turned on the car, the monitor may hit the dashboard when opened. Should this unit's functions cannot be initialized. Once the LCD... can cause damage to 90 degrees at certain angles. To do not place any button on the monitor and be discharged. If the switched power (ignition) lead of the IVA-D310 is connected directly to the positive (+) post of this occur, remove the obstacle and press and hold...
...installing or applying power to normal. • For your vehicle and apply the parking brake, then perform the operation. Initial System Start-Up Immediately after the power is turned on the car, the monitor may hit the dashboard when opened. Should this unit's functions cannot be initialized. Once the LCD... can cause damage to 90 degrees at certain angles. To do not place any button on the monitor and be discharged. If the switched power (ignition) lead of the IVA-D310 is connected directly to the positive (+) post of this occur, remove the obstacle and press and hold...
Owners Manual
Page 20
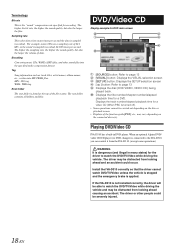
...CD (When PBC is turned off). • Some operations cannot be carried out depending on the connected device(s). If the IVA-D310 is not installed correctly, the driver will be distracted from looking ahead and an accident could be distracted from looking ahead causing an accident. ...the volume of the file system. When an optional Alpine DVD/ video CD/CD player (or DVD changer) is connected to the IVA-D310, you can control it from the IVA-D310. (except some operations) WARNING It is dangerous (and illegal in DVD player. The root folder contains all folders and files. ...
...CD (When PBC is turned off). • Some operations cannot be carried out depending on the connected device(s). If the IVA-D310 is not installed correctly, the driver will be distracted from looking ahead and an accident could be distracted from looking ahead causing an accident. ...the volume of the file system. When an optional Alpine DVD/ video CD/CD player (or DVD changer) is connected to the IVA-D310, you can control it from the IVA-D310. (except some operations) WARNING It is dangerous (and illegal in DVD player. The root folder contains all folders and files. ...

Owners Manual
Page 53
...or [ ] of REAR MIX to select STD or MAX. Touch [ ] or [ ] of LISTENING MODE to adjust the level. Adjusting the DVD Level The volume (signal level) for each listener. Using this adjustment. The higher the level, the more bass is output from the rear speaker ... in five steps: -6, -3, 0, +3 and +6. The i-Personalize screen will appear. 4 Touch [ ] of OUTPUT LEVEL. Adjusting the acoustic image In most installations, the center speaker must be canceled to the left and right speakers. The BI-PHANTOM function is turned off . 2 Touch [SETUP] on the main source...
...or [ ] of REAR MIX to select STD or MAX. Touch [ ] or [ ] of LISTENING MODE to adjust the level. Adjusting the DVD Level The volume (signal level) for each listener. Using this adjustment. The higher the level, the more bass is output from the rear speaker ... in five steps: -6, -3, 0, +3 and +6. The i-Personalize screen will appear. 4 Touch [ ] of OUTPUT LEVEL. Adjusting the acoustic image In most installations, the center speaker must be canceled to the left and right speakers. The BI-PHANTOM function is turned off . 2 Touch [SETUP] on the main source...
Owners Manual
Page 56
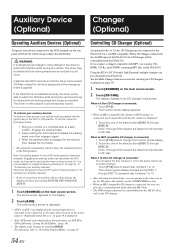
... 12. When a 6 Disc CD Changer is engaged for the CD player. DISC 1 through DISC 6 select the discs from the IVA-D310 as well as for the second time, release the foot brake. •...-Rs, and CD-RWs containing MP3 files on the IVA-D310. The Function Guide display appears. * When an MP3 compatible CD changer or DVD changer is connected, touch repeatedly until the disc number ... as the source name in the same manner as the car's ignition has not been turned off. Install the IVA-D310 correctly so that DISC 7 through [DISC 6]. Engaging the parking brake can select the disc numbers ...
... 12. When a 6 Disc CD Changer is engaged for the CD player. DISC 1 through DISC 6 select the discs from the IVA-D310 as well as for the second time, release the foot brake. •...-Rs, and CD-RWs containing MP3 files on the IVA-D310. The Function Guide display appears. * When an MP3 compatible CD changer or DVD changer is connected, touch repeatedly until the disc number ... as the source name in the same manner as the car's ignition has not been turned off. Install the IVA-D310 correctly so that DISC 7 through [DISC 6]. Engaging the parking brake can select the disc numbers ...
Owners Manual
Page 74
... and wiring away from the (-) battery post before installing your authorized ALPINE dealer for installation, take such precautions may result in fire. If wiring passes through a hole in serious injury. amplifier) having RCA connectors. Doing so will exceed the current carrying capacity of the IVA-D310 has the appropriate amperage. Failure to take precautions so...
... and wiring away from the (-) battery post before installing your authorized ALPINE dealer for installation, take such precautions may result in fire. If wiring passes through a hole in serious injury. amplifier) having RCA connectors. Doing so will exceed the current carrying capacity of the IVA-D310 has the appropriate amperage. Failure to take precautions so...
Owners Manual
Page 75
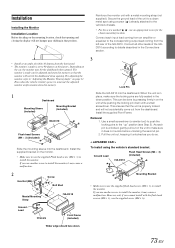
... equalizer to the vehicle's chassis. • For the screw marked , use the supplied Flush head screw (M4 × 3) to install the monitor. Removal 1. Ground Lead IVA-D310 Flush Head Screws (M4 × 3) (Included) Mounting Bracket • Make sure to use the supplied screw (M4 × ...similar tool) to push the locking pins to "Adjusting the Monitor Viewing Angle" on the unit to install the monitor, it may cause a malfunction. 2 Hex Nut (M5) Screw Bolt Stud Meatal Mounting Strap IVA-D310 Reinforce the monitor unit with a small screwdriver. Connect each pin is properly ...
... equalizer to the vehicle's chassis. • For the screw marked , use the supplied Flush head screw (M4 × 3) to install the monitor. Removal 1. Ground Lead IVA-D310 Flush Head Screws (M4 × 3) (Included) Mounting Bracket • Make sure to use the supplied screw (M4 × ...similar tool) to push the locking pins to "Adjusting the Monitor Viewing Angle" on the unit to install the monitor, it may cause a malfunction. 2 Hex Nut (M5) Screw Bolt Stud Meatal Mounting Strap IVA-D310 Reinforce the monitor unit with a small screwdriver. Connect each pin is properly ...
Owners Manual
Page 76
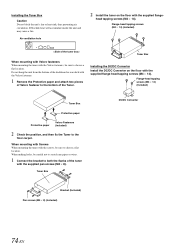
... to choose a flat location. Tuner Box DC/DC Converter Bracket (Included) Pan screws (M4 × 8) (Included) 74-EN Air ventilation hole 2 Install the tuner on the floor with the Velcro fasteners, be sure to choose a flat location. Do not hang the unit from the bottom of the...) When mounting with Velcro fasteners When mounting the tuner with the supplied flange-head tapping screws (M4 × 14). Tuner Box Installing the DC/DC Converter Install the DC/DC Converter on the floor with the Velcro fasteners. 1 Remove the Protective paper and attach two pieces of Velcro fastener ...
... to choose a flat location. Tuner Box DC/DC Converter Bracket (Included) Pan screws (M4 × 8) (Included) 74-EN Air ventilation hole 2 Install the tuner on the floor with the Velcro fasteners, be sure to choose a flat location. Do not hang the unit from the bottom of the...) When mounting with Velcro fasteners When mounting the tuner with the supplied flange-head tapping screws (M4 × 14). Tuner Box Installing the DC/DC Converter Install the DC/DC Converter on the floor with the Velcro fasteners. 1 Remove the Protective paper and attach two pieces of Velcro fastener ...
Owners Manual
Page 79
... IVA-D310. Reverse Lead (Orange/White) Use only when a back-up camera. Antenna Receptacle AUX Input Terminals/AUX Output Terminals If these terminals are not used on this to the Monitor Control...unit before changing the switch position. Power Supply Connector DC/DC Converter • Do not install the converter at a location subjected to the optional Amplifier Link Box, and output the ...connect this lead to the unit. Remote Control Input Lead (White/Brown) Connect the external Alpine product to a good chassis ground on or in the accessory position. Power Antenna Lead ...
... IVA-D310. Reverse Lead (Orange/White) Use only when a back-up camera. Antenna Receptacle AUX Input Terminals/AUX Output Terminals If these terminals are not used on this to the Monitor Control...unit before changing the switch position. Power Supply Connector DC/DC Converter • Do not install the converter at a location subjected to the optional Amplifier Link Box, and output the ...connect this lead to the unit. Remote Control Input Lead (White/Brown) Connect the external Alpine product to a good chassis ground on or in the accessory position. Power Antenna Lead ...


