Owners Manual
Page 3
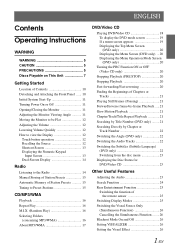
... 11 Turning Power On or Off 11 Opening/Closing the Monitor 11 Adjusting the Monitor Viewing Angle 11 Moving the Monitor to be Flat 12 Adjusting the Volume 12 Lowering Volume Quickly 12 How to view the Display 12 Touch button operation 12 Recalling the Source 12 Shortcut Screen 13 Displaying the Numeric Keypad Input Screen 13 Dual-Screen Display 14 Radio Listening to the Radio 14 Manual Storing of Station Presets 15 Automatic Memory of Station Presets 15 Tuning to Preset Stations...
... 11 Turning Power On or Off 11 Opening/Closing the Monitor 11 Adjusting the Monitor Viewing Angle 11 Moving the Monitor to be Flat 12 Adjusting the Volume 12 Lowering Volume Quickly 12 How to view the Display 12 Touch button operation 12 Recalling the Source 12 Shortcut Screen 13 Displaying the Numeric Keypad Input Screen 13 Dual-Screen Display 14 Radio Listening to the Radio 14 Manual Storing of Station Presets 15 Automatic Memory of Station Presets 15 Tuning to Preset Stations...
Owners Manual
Page 4
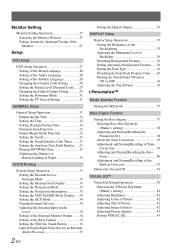
... 32 Setting the Sound Quality of the Tuner ....... 32 Setting the Auxiliary Data Field Display .... 32 Playing MP3/WMA Data 32 Adjusting the Dimmer of Button Lighting at Night 32 SYSTEM Setup System Setup Operation 33 Setting the External Device Interrupt Mode 33 Setting the Interrupt Icon Display 33 Setting the Navigation Mode 33 Setting the Navigation Interruption 33 Setting the VISUALIZER Mode Display ... 34 Setting the AUX Mode 34 Naming External Devices 34 Adjusting the External Input Audio Level 34 Setting of the External Monitor Output ...... 34 Setting of the Rear Camera 34...
... 32 Setting the Sound Quality of the Tuner ....... 32 Setting the Auxiliary Data Field Display .... 32 Playing MP3/WMA Data 32 Adjusting the Dimmer of Button Lighting at Night 32 SYSTEM Setup System Setup Operation 33 Setting the External Device Interrupt Mode 33 Setting the Interrupt Icon Display 33 Setting the Navigation Mode 33 Setting the Navigation Interruption 33 Setting the VISUALIZER Mode Display ... 34 Setting the AUX Mode 34 Naming External Devices 34 Adjusting the External Input Audio Level 34 Setting of the External Monitor Output ...... 34 Setting of the Rear Camera 34...
Owners Manual
Page 5
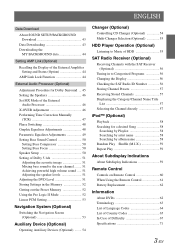
... Equalizer Adjustments 49 Setting Bass Sound Control 50 Setting Bass Compressor 50 Setting Bass Focus 50 Speaker Setup 50 Setting of Dolby 5.1ch 51 Adjusting the acoustic image 51 Mixing bass sound to the rear channel ........ 51 Achieving powerful high volume sound ..... 51 Adjusting the speaker levels 51 Adjusting the DVD Level 51 Storing Settings in the Memory 52 Getting out the Preset Memory 52 Using the Pro Logic II Mode 52 Linear PCM Setting 53 Navigation System (Optional) Switching the Navigation Screen (Optional 53 Auxiliary Device (Optional) Operating Auxiliary Devices...
... Equalizer Adjustments 49 Setting Bass Sound Control 50 Setting Bass Compressor 50 Setting Bass Focus 50 Speaker Setup 50 Setting of Dolby 5.1ch 51 Adjusting the acoustic image 51 Mixing bass sound to the rear channel ........ 51 Achieving powerful high volume sound ..... 51 Adjusting the speaker levels 51 Adjusting the DVD Level 51 Storing Settings in the Memory 52 Getting out the Preset Memory 52 Using the Pro Logic II Mode 52 Linear PCM Setting 53 Navigation System (Optional) Switching the Navigation Screen (Optional 53 Auxiliary Device (Optional) Operating Auxiliary Devices...

Owners Manual
Page 12
... supplied remote control transmitter towards the remote sensor within a range of a disc. Location of buttons in this Owner's Manual • The buttons on the connector terminals and no dirt or dust on this unit are expressed in bold (e.g. For details, contact your Alpine radio. MUTE button Turns the MUTE mode ON or OFF. FLAT/SUB DISP. If pressed, the audio adjusting screen is pressed and held, the angle continuously changes. TILT DN/UP button Monitor open monitor...
... supplied remote control transmitter towards the remote sensor within a range of a disc. Location of buttons in this Owner's Manual • The buttons on the connector terminals and no dirt or dust on this unit are expressed in bold (e.g. For details, contact your Alpine radio. MUTE button Turns the MUTE mode ON or OFF. FLAT/SUB DISP. If pressed, the audio adjusting screen is pressed and held, the angle continuously changes. TILT DN/UP button Monitor open monitor...
Owners Manual
Page 13
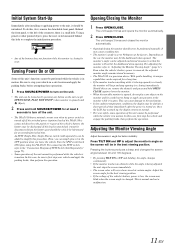
... the parking brake, before using the IVA-D310. Initial System Start-Up Immediately after the power is turned on. Opening/Closing the Monitor 1 Press OPEN/CLOSE. Should this , first, remove the detachable front panel. Depending on the monitor and be enjoyed for at the factory. With gentle handling, its power switch is turned off. Adjust the screen angle for better visibility. The unit beeps 3 times and opens the monitor automatically. 2 Press OPEN/CLOSE...
... the parking brake, before using the IVA-D310. Initial System Start-Up Immediately after the power is turned on. Opening/Closing the Monitor 1 Press OPEN/CLOSE. Should this , first, remove the detachable front panel. Depending on the monitor and be enjoyed for at the factory. With gentle handling, its power switch is turned off. Adjust the screen angle for better visibility. The unit beeps 3 times and opens the monitor automatically. 2 Press OPEN/CLOSE...
Owners Manual
Page 14
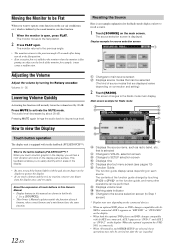
... optional DVD player and DVD changer compatible with [ ] (e.g. [SOURCE]). • This Owner's Manual explains mainly the function of touch buttons, when a touch button and a unit button have the same function. 12-EN Displays the source name, such as "DVD-2" on the display (When the optional expansion box VPES431 is connected). • When i-Personalize and OTHER SETUP are selected, these operations may cause a malfunction. Displays volume level Working state indicator Changes to the source selection screen (to main source screen Displays source modes that...
... optional DVD player and DVD changer compatible with [ ] (e.g. [SOURCE]). • This Owner's Manual explains mainly the function of touch buttons, when a touch button and a unit button have the same function. 12-EN Displays the source name, such as "DVD-2" on the display (When the optional expansion box VPES431 is connected). • When i-Personalize and OTHER SETUP are selected, these operations may cause a malfunction. Displays volume level Working state indicator Changes to the source selection screen (to main source screen Displays source modes that...
Owners Manual
Page 20
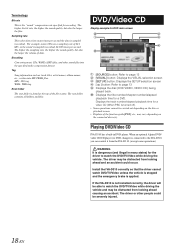
... IVA-D310 is not installed correctly, the driver will be carried out depending on the connected device(s). The higher the bit rate, the higher the sound quality, but also the larger the volume of the function guide [P1/2], etc., may be severely injured. 18-EN The root folder contains all folders and files. When an optional Alpine DVD/ video CD/CD player (or DVD changer) is connected...
... IVA-D310 is not installed correctly, the driver will be carried out depending on the connected device(s). The higher the bit rate, the higher the sound quality, but also the larger the volume of the function guide [P1/2], etc., may be severely injured. 18-EN The root folder contains all folders and files. When an optional Alpine DVD/ video CD/CD player (or DVD changer) is connected...

Owners Manual
Page 21
... a problem occurs, remove the disc and check for details on the features supported. • Fingerprints on a disc may appear automatically. Menu Operations (DVD only) 1 Touch [KEY]. The menu operation mode will show the warning-PICTURE OFF FOR YOUR SAFETY. The display shows the DVD player mode screen. However, the function may vary depending on the main source screen. Doing so could result in the Park position. In this unit when a DVD changer or DVD player is connected: Insert a disc...
... a problem occurs, remove the disc and check for details on the features supported. • Fingerprints on a disc may appear automatically. Menu Operations (DVD only) 1 Touch [KEY]. The menu operation mode will show the warning-PICTURE OFF FOR YOUR SAFETY. The display shows the DVD player mode screen. However, the function may vary depending on the main source screen. Doing so could result in the Park position. In this unit when a DVD changer or DVD player is connected: Insert a disc...

Owners Manual
Page 27
... the rear entertainment function. • When the "Setting the AUX Mode" (page 34) is set to OFF, the auxiliary source is set the remote control sensor to 3 of the screen with the optional rear monitor and headphones. 1 Touch [SETUP] on this unit is touched, regardless of the optional expansion box (VPE-S431) * REAR.2 is not displayed if only an external monitor is changed. The remote sensor of the external monitor connected to the Alpine touch panel rear monitor via the Monitor control lead...
... the rear entertainment function. • When the "Setting the AUX Mode" (page 34) is set to OFF, the auxiliary source is set the remote control sensor to 3 of the screen with the optional rear monitor and headphones. 1 Touch [SETUP] on this unit is touched, regardless of the optional expansion box (VPE-S431) * REAR.2 is not displayed if only an external monitor is changed. The remote sensor of the external monitor connected to the Alpine touch panel rear monitor via the Monitor control lead...
Owners Manual
Page 29
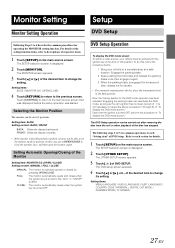
... DVD mode screen." LANGUAGE / COUNTRY CODE / PARENTAL / DIGITAL OUT MODE / DOWNMIX MODE / TV SCREEN 27-EN Setting item: SLIDE Setting content: BACK / FRONT BACK: Slides the display backwards. It is turned to change its setting. Refer to each "Setting item" of the disc has stopped. Setting items: MENU LANGUAGE / AUDIO LANGUAGE / SUBT. DVD Setup Operation To display the DVD mode screen: To watch a video source, your vehicle to repeat the above procedure (1 through 3), of the Monitor Setting item: MONITOR O/C (OPEN / CLOSE) Setting content: MANUAL...
... DVD mode screen." LANGUAGE / COUNTRY CODE / PARENTAL / DIGITAL OUT MODE / DOWNMIX MODE / TV SCREEN 27-EN Setting item: SLIDE Setting content: BACK / FRONT BACK: Slides the display backwards. It is turned to change its setting. Refer to each "Setting item" of the disc has stopped. Setting items: MENU LANGUAGE / AUDIO LANGUAGE / SUBT. DVD Setup Operation To display the DVD mode screen: To watch a video source, your vehicle to repeat the above procedure (1 through 3), of the Monitor Setting item: MONITOR O/C (OPEN / CLOSE) Setting content: MANUAL...

Owners Manual
Page 31
... (1 to connect a digital audio processor and play back DVD software with the parental lock feature and its use is disconnected. • On unrated DVDs, playback will be at the parental level set , this screen appears, change parental level and play back the DVD. • Once set in order to memorize the number. In this case, the message appears on . 5 Touch [ ] or [ ] of PARENTAL to turn on the monitor screen "PARENTAL LEVEL CHANGE OK...
... (1 to connect a digital audio processor and play back DVD software with the parental lock feature and its use is disconnected. • On unrated DVDs, playback will be at the parental level set , this screen appears, change parental level and play back the DVD. • Once set in order to memorize the number. In this case, the message appears on . 5 Touch [ ] or [ ] of PARENTAL to turn on the monitor screen "PARENTAL LEVEL CHANGE OK...
Owners Manual
Page 33
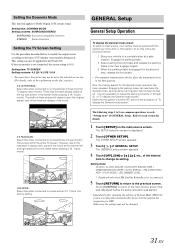
... turned off. GENERAL Setup General Setup Operation To display the General mode screen: To watch a video source, your vehicle to a complete stop at a safe location. Now, the locking system for the IVA-D310. It is the factory setting. This is not necessary to the explanation on the main source screen. The SETUP selection screen is 16:9. The GENERAL setup screen appears. 4 Touch [OFF], [ON] or [ ], [ ], etc., of "To display the General mode screen." If the rear monitor is not connected...
... turned off. GENERAL Setup General Setup Operation To display the General mode screen: To watch a video source, your vehicle to a complete stop at a safe location. Now, the locking system for the IVA-D310. It is the factory setting. This is not necessary to the explanation on the main source screen. The SETUP selection screen is 16:9. The GENERAL setup screen appears. 4 Touch [OFF], [ON] or [ ], [ ], etc., of "To display the General mode screen." If the rear monitor is not connected...
Owners Manual
Page 35
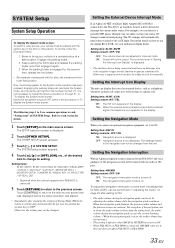
SYSTEM Setup System Setup Operation To display the System mode screen: To watch a video source, your vehicle must have an Interrupt wire with the radio or CD play. The following steps 1 to 5 are restored. Setting items: IN INT. IN / NAV. MIX / VISUALIZER* / AUX IN-1 / AUX IN-2* / AUX IN-3* / MONITOR OUT-1 / MONITOR OUT-2* / CAMERA IN / VISUAL KEY / A. Setting the External Device Interrupt Mode If an Alpine Ai-NET Auxiliary Input Adapter (KCA-801B) is connected. 5 Touch [RETURN] to return to each section...
SYSTEM Setup System Setup Operation To display the System mode screen: To watch a video source, your vehicle must have an Interrupt wire with the radio or CD play. The following steps 1 to 5 are restored. Setting items: IN INT. IN / NAV. MIX / VISUALIZER* / AUX IN-1 / AUX IN-2* / AUX IN-3* / MONITOR OUT-1 / MONITOR OUT-2* / CAMERA IN / VISUAL KEY / A. Setting the External Device Interrupt Mode If an Alpine Ai-NET Auxiliary Input Adapter (KCA-801B) is connected. 5 Touch [RETURN] to return to each section...
Owners Manual
Page 36
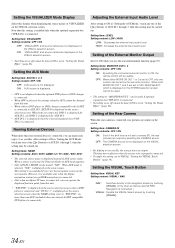
... "Setting the AUX Mode," touch any one monitor can be used. • The setting to the navigation screen by touching [VISUAL]. 34-EN Note that this setting is enabled only when the optional expansion box (VPE-S431) is selected, "NAV." Naming External Devices When more than one AUX (included when an external Ai-NET compatible DVD player is set to OFF, REAR SELECT, which is displayed on the rear monitor. Setting items: NAME Setting contents: AUX / VCR...
... "Setting the AUX Mode," touch any one monitor can be used. • The setting to the navigation screen by touching [VISUAL]. 34-EN Note that this setting is enabled only when the optional expansion box (VPE-S431) is selected, "NAV." Naming External Devices When more than one AUX (included when an external Ai-NET compatible DVD player is set to OFF, REAR SELECT, which is displayed on the rear monitor. Setting items: NAME Setting contents: AUX / VCR...
Owners Manual
Page 45
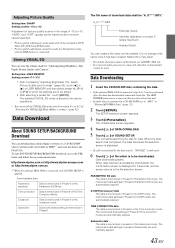
... in the navigation, DVD, Video CD, AUX1 and AUX2 modes. • Picture quality adjustment cannot be selected on -screen instructions. The memorized data settings in Preset 6 (Parametric EQ mode) are automatically applied. The MM DRIVER main source screen can be downloaded. When the data search has completed, the Data Download file selection screen is displayed. • If a file is displayed for 5 seconds, and the screen returns to be performed after the data has downloaded removable hard disc. When data has been...
... in the navigation, DVD, Video CD, AUX1 and AUX2 modes. • Picture quality adjustment cannot be selected on -screen instructions. The memorized data settings in Preset 6 (Parametric EQ mode) are automatically applied. The MM DRIVER main source screen can be downloaded. When the data search has completed, the Data Download file selection screen is displayed. • If a file is displayed for 5 seconds, and the screen returns to be performed after the data has downloaded removable hard disc. When data has been...
Owners Manual
Page 46
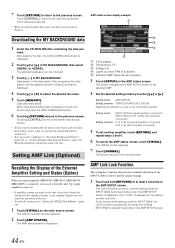
... the data search, the file selection screen of Data Download is displayed. 4 Touch [ ] or [ ] to the earlier main source screen. • If data is newly downloaded, the data overwrites the previous data. • If the battery power cable is removed, the downloaded data is memorized. • You can be functional the setting mode for INPUT GAIN, the LOCK mode is displayed. AMP status screen display example Downloading the MY BACKGROUND data 1 Insert the CD-R/CD-RW disc containing the data you set it from this unit.
... the data search, the file selection screen of Data Download is displayed. 4 Touch [ ] or [ ] to the earlier main source screen. • If data is newly downloaded, the data overwrites the previous data. • If the battery power cable is removed, the downloaded data is memorized. • You can be functional the setting mode for INPUT GAIN, the LOCK mode is displayed. AMP status screen display example Downloading the MY BACKGROUND data 1 Insert the CD-R/CD-RW disc containing the data you set it from this unit.
Owners Manual
Page 56
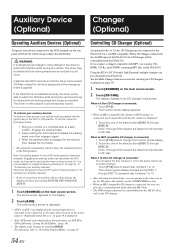
...) Operating Auxiliary Devices (Optional) To operate your devices connected to 12. The external input screen is displayed. * AUX-1 to AUX-3 are displayed if the external input devices (maximal 3) are connected, or the name which is not installed correctly, the driver will be distracted from the first disc to ON by following "Setting the AUX Mode" (page 34). • The display mode changes by the IVA-D310. The Function Guide display appears. * When an MP3 compatible CD changer or DVD changer is connected, touch repeatedly until the disc number...
...) Operating Auxiliary Devices (Optional) To operate your devices connected to 12. The external input screen is displayed. * AUX-1 to AUX-3 are displayed if the external input devices (maximal 3) are connected, or the name which is not installed correctly, the driver will be distracted from the first disc to ON by following "Setting the AUX Mode" (page 34). • The display mode changes by the IVA-D310. The Function Guide display appears. * When an MP3 compatible CD changer or DVD changer is connected, touch repeatedly until the disc number...
Owners Manual
Page 69
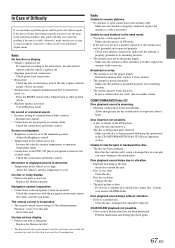
... remote control sensor setting of "Rear Entertainment Function" is not set at its mounting location. • The station signal is too high. - Check your nearest ALPINE dealer. Make sure the antenna is poorly grounded. - Clean the disc. • Disc has scratches. - replace with a new one. Check the connections and firmly connect. Adjust the Brightness control. • Temperature in the vehicle is already in the CD (MP3/WMA/DVD/Video CD) Player Operation section. replace the antenna or cable...
... remote control sensor setting of "Rear Entertainment Function" is not set at its mounting location. • The station signal is too high. - Check your nearest ALPINE dealer. Make sure the antenna is poorly grounded. - Clean the disc. • Disc has scratches. - replace with a new one. Check the connections and firmly connect. Adjust the Brightness control. • Temperature in the vehicle is already in the CD (MP3/WMA/DVD/Video CD) Player Operation section. replace the antenna or cable...
Owners Manual
Page 79
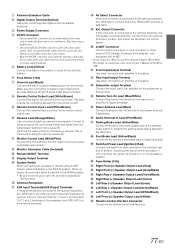
... digital input compatible products. Connect to this lead to the +B terminal of the parking brake switch to transmit the parking brake status signals to the optional expansion box (VPE-S431), the AUX input and output terminals are not used on this to the external device(s). Antenna Receptacle AUX Input Terminals/AUX Output Terminals If these terminals are connected to the IVA-D310. Ext. Power Antenna Lead (Blue) Connect this terminal. Audio Interrupt In Lead (Pink/Black) Parking Brake Lead (Yellow/Blue) Connect this...
... digital input compatible products. Connect to this lead to the +B terminal of the parking brake switch to transmit the parking brake status signals to the optional expansion box (VPE-S431), the AUX input and output terminals are not used on this to the external device(s). Antenna Receptacle AUX Input Terminals/AUX Output Terminals If these terminals are connected to the IVA-D310. Ext. Power Antenna Lead (Blue) Connect this terminal. Audio Interrupt In Lead (Pink/Black) Parking Brake Lead (Yellow/Blue) Connect this...
Owners Manual
Page 82
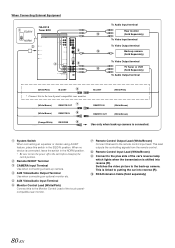
...) REMOTE IN (Orange/White) REVERSE REMOTE IN (White/Brown) REMOTE OUT (White/Brown) Use only when back-up camera. Remote Control Input Lead (White/Brown) Connect to putting the car into reverse (R). PRE IN/OUT REAR FRONT L R Ai-NET EXT.OUT AV SELECTOR AUX OUT CAMERA IN VIDEO (MONO) L AUDIO R AUX IN RADIO ANTENNA IN To Audio Input terminal Rear monitor (Sold Separately) To Video Input terminal To Video Output terminal Back-up camera. When Connecting External Equipment EQ/DIV IVA-D310 Tuner BOX NORM POWER SUPPLY REMOTE IN / OUT NAVIGATION...
...) REMOTE IN (Orange/White) REVERSE REMOTE IN (White/Brown) REMOTE OUT (White/Brown) Use only when back-up camera. Remote Control Input Lead (White/Brown) Connect to putting the car into reverse (R). PRE IN/OUT REAR FRONT L R Ai-NET EXT.OUT AV SELECTOR AUX OUT CAMERA IN VIDEO (MONO) L AUDIO R AUX IN RADIO ANTENNA IN To Audio Input terminal Rear monitor (Sold Separately) To Video Input terminal To Video Output terminal Back-up camera. When Connecting External Equipment EQ/DIV IVA-D310 Tuner BOX NORM POWER SUPPLY REMOTE IN / OUT NAVIGATION...


