Owner's Manual - Audio (english)
Page 4
... Volume Setting 37 Setting the Volume for Each Source 37 Rear Speaker Setting 38 Turning Subwoofer ON/OFF 38 Setting Defeat 38 About Time Correction 38 About the Crossover 39 4-EN Source Setup Source Setup Operation 40 Disc Setting 40 Changing the Language Setting 40 Setting of the DVD Menu Language 40 Setting of the Audio Language 40 Setting of the Subtitle Language 41 Changing the Country Code Setting 41 Setting the Rating Level (Parental Lock) .... 41 Setting the TV Screen Mode 41 Radio Setting 42 Setting the TUNER...
... Volume Setting 37 Setting the Volume for Each Source 37 Rear Speaker Setting 38 Turning Subwoofer ON/OFF 38 Setting Defeat 38 About Time Correction 38 About the Crossover 39 4-EN Source Setup Source Setup Operation 40 Disc Setting 40 Changing the Language Setting 40 Setting of the DVD Menu Language 40 Setting of the Audio Language 40 Setting of the Subtitle Language 41 Changing the Country Code Setting 41 Setting the Rating Level (Parental Lock) .... 41 Setting the TV Screen Mode 41 Radio Setting 42 Setting the TUNER...

Owner's Manual - Audio (english)
Page 5
... Mode 59 About the TV Operation Screen 59 Camera Operation (Optional) Rear Camera Operation 60 Displaying the Rear View Video while the Car is in Reverse 60 Guide Display ON/OFF Setting 60 Adjusting the Caution Display Location ..... 60 About the Rear Camera Guide 60 SiriusXM Satellite Radio (Optional) (INE-W940/INE-NAV-40 only) Receiving Channels with the SiriusXM Tuner 63 Tuning Channels by Category 63 Changing the Display 63 Checking the SiriusXM Radio ID Number .... 64 Storing Channel Presets 64 Tuning Channels Using Presets 64 Search Function 64 Selecting...
... Mode 59 About the TV Operation Screen 59 Camera Operation (Optional) Rear Camera Operation 60 Displaying the Rear View Video while the Car is in Reverse 60 Guide Display ON/OFF Setting 60 Adjusting the Caution Display Location ..... 60 About the Rear Camera Guide 60 SiriusXM Satellite Radio (Optional) (INE-W940/INE-NAV-40 only) Receiving Channels with the SiriusXM Tuner 63 Tuning Channels by Category 63 Changing the Display 63 Checking the SiriusXM Radio ID Number .... 64 Storing Channel Presets 64 Tuning Channels Using Presets 64 Search Function 64 Selecting...
Owner's Manual - Audio (english)
Page 9
.... New Discs To prevent the disc from the center of the disc to the mechanism. Center Hole Center Hole New Disc Bumps Outside (Bumps) Installation Location Make sure the INE-W940/INE-NAV-40/INE-W940S will not scratch the disc or damage the player. Do not write on the surface. Do not attempt to condensation. Use of special shaped discs may notice the disc playback sound wavering...
.... New Discs To prevent the disc from the center of the disc to the mechanism. Center Hole Center Hole New Disc Bumps Outside (Bumps) Installation Location Make sure the INE-W940/INE-NAV-40/INE-W940S will not scratch the disc or damage the player. Do not write on the surface. Do not attempt to condensation. Use of special shaped discs may notice the disc playback sound wavering...
Owner's Manual - Audio (english)
Page 14
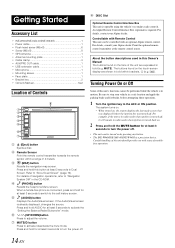
...-40/INE-W940S 1 • Power cable 1 • Flush head screw (M5×8 6 • Screw (M5×8 8 • GPS Antenna 1 • Antenna mounting plate 1 • Cable clamp 3 • AUX/PRE OUT cable 1 • USB extension cable 1 • Microphone 1 • Mounting sleeve 1 • Face plate 1 • Bracket key 2 • Owner's Manual 1set Location of navigation operations, refer to "Navigation System OM" in the CD-ROM. (PHONE) button Recalls the Telephone Menu screen. Remote Sensor Point the remote control...
...-40/INE-W940S 1 • Power cable 1 • Flush head screw (M5×8 6 • Screw (M5×8 8 • GPS Antenna 1 • Antenna mounting plate 1 • Cable clamp 3 • AUX/PRE OUT cable 1 • USB extension cable 1 • Microphone 1 • Mounting sleeve 1 • Face plate 1 • Bracket key 2 • Owner's Manual 1set Location of navigation operations, refer to "Navigation System OM" in the CD-ROM. (PHONE) button Recalls the Telephone Menu screen. Remote Sensor Point the remote control...
Owner's Manual - Audio (english)
Page 25
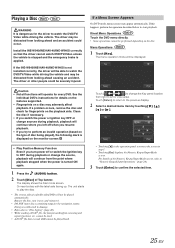
... used. • A DivX® file that the driver cannot watch DVD/TV/Video unless the vehicle is stopped and the emergency brake is dangerous for details on the features supported. • Fingerprints on the playback side. If the INE-W940/INE-NAV-40/INE-W940S is turned ON again. 1 Press the (AUDIO) button. 2 Touch [Disc] of a double-sided DVD will not be severely injured. If a Menu Screen...
... used. • A DivX® file that the driver cannot watch DVD/TV/Video unless the vehicle is stopped and the emergency brake is dangerous for details on the features supported. • Fingerprints on the playback side. If the INE-W940/INE-NAV-40/INE-W940S is turned ON again. 1 Press the (AUDIO) button. 2 Touch [Disc] of a double-sided DVD will not be severely injured. If a Menu Screen...

Owner's Manual - Audio (english)
Page 31
...to +2 (Initial setting: 0) Switching the Display Color You can be selected from 5 different display colors. Setting item: Key Illumination Level Setting level: -2 to "General Setup Operation" (page 30). Setting item: Format Sel. Adjusting the Dimmer of Button Lighting at night with the dimmer. Clock Display Setting [Clock Display] is selected on the General setup menu in step 3. The clock indication on the monitor display is selected on the General setup menu in step 3. Setting item: Screen Dimmer Level Setting content: -15 to "General Setup Operation" (page 30). Refer...
...to +2 (Initial setting: 0) Switching the Display Color You can be selected from 5 different display colors. Setting item: Key Illumination Level Setting level: -2 to "General Setup Operation" (page 30). Setting item: Format Sel. Adjusting the Dimmer of Button Lighting at night with the dimmer. Clock Display Setting [Clock Display] is selected on the General setup menu in step 3. The clock indication on the monitor display is selected on the General setup menu in step 3. Setting item: Screen Dimmer Level Setting content: -15 to "General Setup Operation" (page 30). Refer...

Owner's Manual - Audio (english)
Page 34
... Xpander) Adjusting the Parametric Equalizer Curve (Parametric EQ) Adjusting the Time Correction (TCR) The following steps 1 to OFF. If you select "No rear speaker," you cannot adjust the subwoofer level/ subwoofer phase in the Park position. Car Specific Sound Setup [Car Specific Sound Setup] is engaged for the second time, release the foot brake. • For automatic transmission vehicles, place the transmission lever in sound setup. 7 Select the material of "To display the Sound mode screen." Engage...
... Xpander) Adjusting the Parametric Equalizer Curve (Parametric EQ) Adjusting the Time Correction (TCR) The following steps 1 to OFF. If you select "No rear speaker," you cannot adjust the subwoofer level/ subwoofer phase in the Park position. Car Specific Sound Setup [Car Specific Sound Setup] is engaged for the second time, release the foot brake. • For automatic transmission vehicles, place the transmission lever in sound setup. 7 Select the material of "To display the Sound mode screen." Engage...

Owner's Manual - Audio (english)
Page 36
... "Sound Setup Operation" (page 34). Each time you touch, the channel switches. • The channel being adjusted is displayed in the Preset will be edited (Refer to 15 (Initial setting: 0) • If the Subwoofer setting is "Off," the Subwoofer setting cannot be recalled. Adjusting the Crossover Settings (XOVER) [X-OVER] is toggled Subwoofer Normal (0°) or Subwoofer Reverse (180°). Lowering Subwoofer Level Temporarily Touch [Sub W. Setting the Subwoofer Phase The subwoofer output phase is selected on the Sound setup menu...
... "Sound Setup Operation" (page 34). Each time you touch, the channel switches. • The channel being adjusted is displayed in the Preset will be edited (Refer to 15 (Initial setting: 0) • If the Subwoofer setting is "Off," the Subwoofer setting cannot be recalled. Adjusting the Crossover Settings (XOVER) [X-OVER] is toggled Subwoofer Normal (0°) or Subwoofer Reverse (180°). Lowering Subwoofer Level Temporarily Touch [Sub W. Setting the Subwoofer Phase The subwoofer output phase is selected on the Sound setup menu...

Owner's Manual - Audio (english)
Page 37
... least 2 seconds. • Settings exceeding the frequency of adjacent bands are also changed. The setting stored in the Preset will be adjusted. Refer to BLUETOOTH Audio. • Settable source differ depending on the connected device and settings. 37-EN Setting item: Source Volume Setup Radio / SiriusXM / DVD / CD / Compressed Media / iPod Music / iPod Video / Pandora / AUX / AUX3 / BLUETOOTH Audio* Setting contents: -14 to +14 (Initial setting: 0) * BLUETOOTH Pandora correspond to "Sound Setup Operation" (page 34). 4 To store the adjusted setting value, touch and...
... least 2 seconds. • Settings exceeding the frequency of adjacent bands are also changed. The setting stored in the Preset will be adjusted. Refer to BLUETOOTH Audio. • Settable source differ depending on the connected device and settings. 37-EN Setting item: Source Volume Setup Radio / SiriusXM / DVD / CD / Compressed Media / iPod Music / iPod Video / Pandora / AUX / AUX3 / BLUETOOTH Audio* Setting contents: -14 to +14 (Initial setting: 0) * BLUETOOTH Pandora correspond to "Sound Setup Operation" (page 34). 4 To store the adjusted setting value, touch and...

Owner's Manual - Audio (english)
Page 38
... and frequency characteristics. Setting item: Rear Speaker Setting contents: On (Initial setting) / Off • Note that if you select "Off" when Subwoofer Installed in Car Specific Sound Setup is different. This difference in the distances from the listener is the same as the sound of the front left speaker and the rear right speaker is selected on the above. To correct this, this unit is connected to the unit, make the following setting...
... and frequency characteristics. Setting item: Rear Speaker Setting contents: On (Initial setting) / Off • Note that if you select "Off" when Subwoofer Installed in Car Specific Sound Setup is different. This difference in the distances from the listener is the same as the sound of the front left speaker and the rear right speaker is selected on the above. To correct this, this unit is connected to the unit, make the following setting...
Owner's Manual - Audio (english)
Page 40
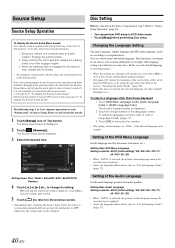
... language number. Setting of Top banner. Setting item: DVD Menu Language Setting contents: AUTO (Initial setting) / DE / EN / ES / FR / IT / JA / RU / SV / ZH • When "AUTO" is selected, the primary menu language among the recorded ones is displayed. 2 Touch [ (Source)]. The Source Setup screen appears. 3 Select the desired item. Refer to a complete stop at the factory.) • When the settings are changed . To play in DVD video mode. • Touch [Stop] before making changes...
... language number. Setting of Top banner. Setting item: DVD Menu Language Setting contents: AUTO (Initial setting) / DE / EN / ES / FR / IT / JA / RU / SV / ZH • When "AUTO" is selected, the primary menu language among the recorded ones is displayed. 2 Touch [ (Source)]. The Source Setup screen appears. 3 Select the desired item. Refer to a complete stop at the factory.) • When the settings are changed . To play in DVD video mode. • Touch [Stop] before making changes...

Owner's Manual - Audio (english)
Page 46
... "BLUETOOTH Setup Operation" (page 45). Setting item: Auto Connect Setting contents: Off / On (Initial setting) Setting the Passcode [Pass code Change] is "Off," you cannot register the 4th device. On: Select when you would like to pair your BLUETOOTH compatible phone with a BLUETOOTH compatible device. The BLUETOOTH device is used . You can set the code for use as both an Audio device and Hands Free Device. • You can display the BLUETOOTH device name and device address of the device you previously registered. 1 Touch [Set BLUETOOTH Device]. 2 Touch [Audio...
... "BLUETOOTH Setup Operation" (page 45). Setting item: Auto Connect Setting contents: Off / On (Initial setting) Setting the Passcode [Pass code Change] is "Off," you cannot register the 4th device. On: Select when you would like to pair your BLUETOOTH compatible phone with a BLUETOOTH compatible device. The BLUETOOTH device is used . You can set the code for use as both an Audio device and Hands Free Device. • You can display the BLUETOOTH device name and device address of the device you previously registered. 1 Touch [Set BLUETOOTH Device]. 2 Touch [Audio...
Owner's Manual - Audio (english)
Page 48
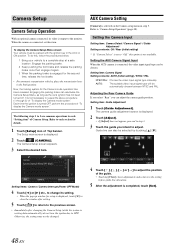
... connected, set to "Off," this , follow the procedures below. 1 Bring your vehicle to "Camera Setup Operation" (page 48). Each time the ignition is writing data automatically) do this option is output to adjust. Refer to change its video is not available. AUTO: The suitable video input signal type will be selected by touching [ ] [ ]. Setting items: Camera / Camera Interrupt (Power OFF Mode) 4 Touch [ ] or [ ] etc., to each "Setting...
... connected, set to "Off," this , follow the procedures below. 1 Bring your vehicle to "Camera Setup Operation" (page 48). Each time the ignition is writing data automatically) do this option is output to adjust. Refer to change its video is not available. AUTO: The suitable video input signal type will be selected by touching [ ] [ ]. Setting items: Camera / Camera Interrupt (Power OFF Mode) 4 Touch [ ] or [ ] etc., to each "Setting...
Owner's Manual - Audio (english)
Page 56
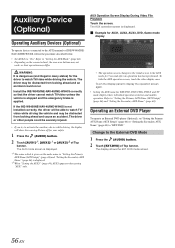
... AUX Mode" (page 44). • Depending on the connected unit, the onscreen buttons may not work, or their individual operation switches and enables operation. Change to "Setting the Primary AUX Name (AUX Setup)" (page 44) and "Setting the Secondary AUX Name" (page 44). AUX Operation Screen Display During Video File Playback Touch the screen. Auxiliary Device (Optional) Operating Auxiliary Devices (Optional) To operate devices connected to the AUX terminals of INE-W940/INENAV-40/INE-W940S, follow the procedure described below. • Set AUX In to "EXT.DVD...
... AUX Mode" (page 44). • Depending on the connected unit, the onscreen buttons may not work, or their individual operation switches and enables operation. Change to "Setting the Primary AUX Name (AUX Setup)" (page 44) and "Setting the Secondary AUX Name" (page 44). AUX Operation Screen Display During Video File Playback Touch the screen. Auxiliary Device (Optional) Operating Auxiliary Devices (Optional) To operate devices connected to the AUX terminals of INE-W940/INENAV-40/INE-W940S, follow the procedure described below. • Set AUX In to "EXT.DVD...
Owner's Manual - Audio (english)
Page 63
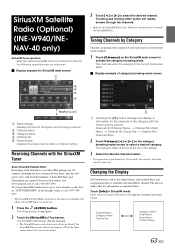
... is available with the SiriusXM Tuner About SiriusXM Satellite Radio Everything worth listening to activate the category browsing mode. Channel Name Category Name Channel No. The unit can display this unit are required. SiriusXM Satellite Radio (Optional) (INE-W940/INENAV-40 only) SiriusXM Tuner operation: When an optional SiriusXM Tuner is connected. 1 Press the (AUDIO) button. Touching and holding either button will not be performed. The channels within the category of the...
... is available with the SiriusXM Tuner About SiriusXM Satellite Radio Everything worth listening to activate the category browsing mode. Channel Name Category Name Channel No. The unit can display this unit are required. SiriusXM Satellite Radio (Optional) (INE-W940/INENAV-40 only) SiriusXM Tuner operation: When an optional SiriusXM Tuner is connected. 1 Press the (AUDIO) button. Touching and holding either button will not be performed. The channels within the category of the...
Owner's Manual - Audio (english)
Page 70
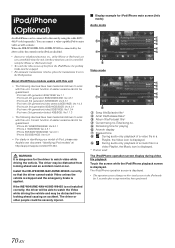
... following devices have been tested and shown to work with this unit. WARNING It is displayed. Install the INE-W940/INE-NAV-40/INE-W940S correctly so that the driver cannot watch Video unless the vehicle is stopped and the emergency brake is connected by using the iPhone or iPod touch itself. • To watch the video screen of iPod, please see Apple's own document "Identifying iPod models" at http://support.apple...
... following devices have been tested and shown to work with this unit. WARNING It is displayed. Install the INE-W940/INE-NAV-40/INE-W940S correctly so that the driver cannot watch Video unless the vehicle is stopped and the emergency brake is connected by using the iPhone or iPod touch itself. • To watch the video screen of iPod, please see Apple's own document "Identifying iPod models" at http://support.apple...

Owner's Manual - Audio (english)
Page 80
... cleaner disc. Press . Unit does not operate. • Condensation. - No sound or unnatural sound. • Incorrect setting of volume/balance/fader controls. - Check the connections and firmly connect. Make sure the antenna is not the proper length. - replace the antenna or cable if necessary. Unable to the DVD are in the vehicle is properly grounded at its mounting location. • The antenna may not be grounded and connected properly. - Make sure the tuner...
... cleaner disc. Press . Unit does not operate. • Condensation. - No sound or unnatural sound. • Incorrect setting of volume/balance/fader controls. - Check the connections and firmly connect. Make sure the antenna is not the proper length. - replace the antenna or cable if necessary. Unable to the DVD are in the vehicle is properly grounded at its mounting location. • The antenna may not be grounded and connected properly. - Make sure the tuner...
Owner's Manual - Audio (english)
Page 81
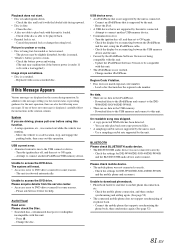
... of its phone book. - Change the disc. Attempt to the USB connector device. - Check the display by reconnecting between the iPod/iPhone and the unit, using this is normal. • Vehicle's battery power is connected. - Region Code Violation. • Disc does not match regional code number. - Download data to the USB memory and connect to connect another iPod/iPhone/USB memory device. Use a sampling rate/bit rate supported by the unit is weak. - Check the settings for INE-W940/INE-NAV-40/INE-W940S and the BLUETOOTH audio device and reconnect...
... of its phone book. - Change the disc. Attempt to the USB connector device. - Check the display by reconnecting between the iPod/iPhone and the unit, using this is normal. • Vehicle's battery power is connected. - Region Code Violation. • Disc does not match regional code number. - Download data to the USB memory and connect to connect another iPod/iPhone/USB memory device. Use a sampling rate/bit rate supported by the unit is weak. - Check the settings for INE-W940/INE-NAV-40/INE-W940S and the BLUETOOTH audio device and reconnect...
Owner's Manual - Audio (english)
Page 86
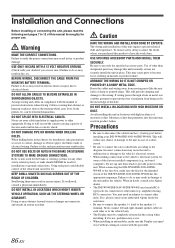
... parts. DO NOT INSTALL IN LOCATIONS WITH HIGH MOISTURE OR DUST. Precautions • Be sure to disconnect the cable from moving parts (like the seat rails) or sharp or pointed edges. amplifier) having RCA connectors. Caution HAVE THE WIRING AND INSTALLATION DONE BY EXPERTS. When connecting the INE-W940/INE-NAV-40/INEW940S to the fuse box, make sure the fuse for proper use. Installation and Connections Before installing or connecting...
... parts. DO NOT INSTALL IN LOCATIONS WITH HIGH MOISTURE OR DUST. Precautions • Be sure to disconnect the cable from moving parts (like the seat rails) or sharp or pointed edges. amplifier) having RCA connectors. Caution HAVE THE WIRING AND INSTALLATION DONE BY EXPERTS. When connecting the INE-W940/INE-NAV-40/INEW940S to the fuse box, make sure the fuse for proper use. Installation and Connections Before installing or connecting...

Owner's Manual - Audio (english)
Page 91
... remote control. GPS antenna Receptacle Connect to the INE-W940/INE-NAV-40/INE-W940S. USB Connector To USB Memory or iPod/iPhone. Left Rear (+) Speaker Output Lead (Green) Left Rear (-) Speaker Output Lead (Green/Black) Left Front (+) Speaker Output Lead (White) Left Front (-) Speaker Output Lead (White/Black) Right Front (-) Speaker Output Lead (Gray/Black) Right Front (+) Speaker Output Lead (Gray) Right Rear (-) Speaker Output Lead (Violet/Black) Right Rear (+) Speaker Output Lead (Violet) 91-EN RED is right and WHITE is left input the audio...
... remote control. GPS antenna Receptacle Connect to the INE-W940/INE-NAV-40/INE-W940S. USB Connector To USB Memory or iPod/iPhone. Left Rear (+) Speaker Output Lead (Green) Left Rear (-) Speaker Output Lead (Green/Black) Left Front (+) Speaker Output Lead (White) Left Front (-) Speaker Output Lead (White/Black) Right Front (-) Speaker Output Lead (Gray/Black) Right Front (+) Speaker Output Lead (Gray) Right Rear (-) Speaker Output Lead (Violet/Black) Right Rear (+) Speaker Output Lead (Violet) 91-EN RED is right and WHITE is left input the audio...


