Owner's Manual - Audio (english)
Page 4
...Switching the Display Color 31 Adjusting the Touch Panel 32 Initializing the Touch Panel Corrected Values 32 Visual Setting 32 Adjusting Brightness 32 Adjusting Color of Picture 32 Adjusting Image Contrast 32 About INE-W940/INE-NAV-40/ INE-W940S 33 Displaying the Product Information ...the Balance/Fader/Subwoofer 35 Adjusting the Balance/Fader 35 Adjusting the Subwoofer Level 36 Lowering Subwoofer Level Temporarily .... 36 Setting the Subwoofer Phase 36 Adjusting the Time Correction (TCR 36 Adjusting the Crossover Settings (X-OVER 36 Adjusting the Parametric Equalizer Curve (...
...Switching the Display Color 31 Adjusting the Touch Panel 32 Initializing the Touch Panel Corrected Values 32 Visual Setting 32 Adjusting Brightness 32 Adjusting Color of Picture 32 Adjusting Image Contrast 32 About INE-W940/INE-NAV-40/ INE-W940S 33 Displaying the Product Information ...the Balance/Fader/Subwoofer 35 Adjusting the Balance/Fader 35 Adjusting the Subwoofer Level 36 Lowering Subwoofer Level Temporarily .... 36 Setting the Subwoofer Phase 36 Adjusting the Time Correction (TCR 36 Adjusting the Crossover Settings (X-OVER 36 Adjusting the Parametric Equalizer Curve (...
Owner's Manual - Audio (english)
Page 15
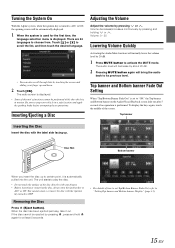
...8226; You can also scroll through lists by pressing , press and hold again for the first time, the language selection menu is displayed. Volume decreases/increases continuously by about 20 dB. 2 Pressing ... side facing up. Removing the Disc Press (Eject button). Turning the System On With the Alpine system, when the ignition key is turned to ACC or ON, the opening screen will be...ignition key turned to choose from. There are 24 languages to OFF. Inserting/Ejecting a Disc Adjusting the Volume Adjust the volume by 20 dB. 1 Press MUTE button to certain point, it out. The radio...
...8226; You can also scroll through lists by pressing , press and hold again for the first time, the language selection menu is displayed. Volume decreases/increases continuously by about 20 dB. 2 Pressing ... side facing up. Removing the Disc Press (Eject button). Turning the System On With the Alpine system, when the ignition key is turned to ACC or ON, the opening screen will be...ignition key turned to choose from. There are 24 languages to OFF. Inserting/Ejecting a Disc Adjusting the Volume Adjust the volume by 20 dB. 1 Press MUTE button to certain point, it out. The radio...

Owner's Manual - Audio (english)
Page 34
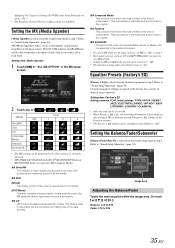
...the rear speaker. The following Audio Setup items. Setting the MX (Media Xpander) Adjusting the Parametric Equalizer Curve (Parametric EQ) Adjusting the Time Correction (TCR) If you select "No rear speaker," you cannot adjust the subwoofer level/ subwoofer phase in sound setup. 7 Select the material of the... 1 Touch [Setup] icon of Top banner. Setting items: Car Specific Sound Setup / Media Xpander / Factory's EQ / Balance/Fader/Sub.W / TCR (Time Correction) / X-OVER / Parametric EQ / Other / Defeat 34-EN • If Preset3 was already saved for the Sound mode operation has been released. ...
...the rear speaker. The following Audio Setup items. Setting the MX (Media Xpander) Adjusting the Parametric Equalizer Curve (Parametric EQ) Adjusting the Time Correction (TCR) If you select "No rear speaker," you cannot adjust the subwoofer level/ subwoofer phase in sound setup. 7 Select the material of the... 1 Touch [Setup] icon of Top banner. Setting items: Car Specific Sound Setup / Media Xpander / Factory's EQ / Balance/Fader/Sub.W / TCR (Time Correction) / X-OVER / Parametric EQ / Other / Defeat 34-EN • If Preset3 was already saved for the Sound mode operation has been released. ...
Owner's Manual - Audio (english)
Page 35
...able to MX Compress Media. This reproduces a well-balanced sound close to the original. MX Pandora This corrects information that was omitted at the time of musical source material. Level Media OFF 1 2 3 SiriusXM DVD CD Compress Media Pandora AUX/AUX3 • The MX setting can have ...setup menu in step 3. Or touch Balance: L15 to R15 Fader: F15 to "Sound Setup Operation" (page 34). Refer to R15 35-EN Adjusting the Crossover Settings (X-OVER) (only when Subwoofer is set , the interlinked Parametric EQ settings are also changed. MX (Media Xpander) makes vocals ...
...able to MX Compress Media. This reproduces a well-balanced sound close to the original. MX Pandora This corrects information that was omitted at the time of musical source material. Level Media OFF 1 2 3 SiriusXM DVD CD Compress Media Pandora AUX/AUX3 • The MX setting can have ...setup menu in step 3. Or touch Balance: L15 to R15 Fader: F15 to "Sound Setup Operation" (page 34). Refer to R15 35-EN Adjusting the Crossover Settings (X-OVER) (only when Subwoofer is set , the interlinked Parametric EQ settings are also changed. MX (Media Xpander) makes vocals ...

Owner's Manual - Audio (english)
Page 36
... touch, the onscreen button and correction mode changes. 3 To store the adjusted setting value, touch and hold [Preset1], [Preset2], or [Preset3] for making adjustments. LPF Correction mode ms: Adjust time. Selecting the Cut-Off Frequency Touch [ ] or [ ] of "Level," then adjust the HPF or LPF level. LEVEL 0] to lower the Subwoofer level to Level 0. •...
... touch, the onscreen button and correction mode changes. 3 To store the adjusted setting value, touch and hold [Preset1], [Preset2], or [Preset3] for making adjustments. LPF Correction mode ms: Adjust time. Selecting the Cut-Off Frequency Touch [ ] or [ ] of "Level," then adjust the HPF or LPF level. LEVEL 0] to lower the Subwoofer level to Level 0. •...

Owner's Manual - Audio (english)
Page 38
...(Initial setting) • Note that its distance from the speakers to "Off." Listening Position: Front Left Seat Adjust the time correction level of increased distance for optimum staging. Time correction eliminates the differences in the sounds image and frequency characteristics. This difference in step 3. listening position : 2....same as the sound of other speakers) 38-EN The adjustment will be canceled. Listening Position: All Seats Adjust the time correction level of the front left speaker is corrected by the time delay between the left speaker and the rear right speaker ...
...(Initial setting) • Note that its distance from the speakers to "Off." Listening Position: Front Left Seat Adjust the time correction level of increased distance for optimum staging. Time correction eliminates the differences in the sounds image and frequency characteristics. This difference in step 3. listening position : 2....same as the sound of other speakers) 38-EN The adjustment will be canceled. Listening Position: All Seats Adjust the time correction level of the front left speaker is corrected by the time delay between the left speaker and the rear right speaker ...
Owner's Manual - Audio (english)
Page 39
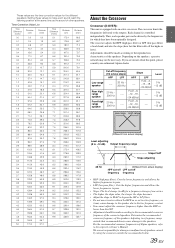
....5 34.8 36.2 37.5 38.9 40.2 41.5 42.9 44.2 45.6 46.9 48.2 49.6 50.9 52.3 53.6 54.9 56.3 57.6 59.0 60.3 61.6 63.0 64.3 65.7 67.0 Time Difference (msec) 5.1 5.2 5.3 5.4 5.5 5.6 5.7 5.8 5.9 6.0 6.1 6.2 6.3 6.4 6.5 6.6 6.7 6.8 6.9 7.0 7.1 7.2 7.3 7.4 7.5 7.6 7.7 7.8 7.9 8.0 8.1 8.2 8.3 8.4 8.5 8.6 8.7 8.8 8.9 9.0 9.1 9.2 9.3 9.4 9.5 9.6 9.7 9.8 9.9 Distance (cm) 173.4 176.8 180.2 183.6... crossover adjusts the HPF (high pass filter) or LPF (low pass filter) of other speakers. Adjustments should be made according to the outputs. Determine the recommended crossover frequency of Alpine speakers...
....5 34.8 36.2 37.5 38.9 40.2 41.5 42.9 44.2 45.6 46.9 48.2 49.6 50.9 52.3 53.6 54.9 56.3 57.6 59.0 60.3 61.6 63.0 64.3 65.7 67.0 Time Difference (msec) 5.1 5.2 5.3 5.4 5.5 5.6 5.7 5.8 5.9 6.0 6.1 6.2 6.3 6.4 6.5 6.6 6.7 6.8 6.9 7.0 7.1 7.2 7.3 7.4 7.5 7.6 7.7 7.8 7.9 8.0 8.1 8.2 8.3 8.4 8.5 8.6 8.7 8.8 8.9 9.0 9.1 9.2 9.3 9.4 9.5 9.6 9.7 9.8 9.9 Distance (cm) 173.4 176.8 180.2 183.6... crossover adjusts the HPF (high pass filter) or LPF (low pass filter) of other speakers. Adjustments should be made according to the outputs. Determine the recommended crossover frequency of Alpine speakers...
Owner's Manual - Audio (english)
Page 47
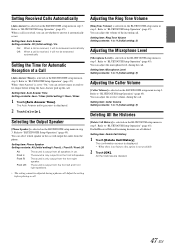
... LR: The sound is received, you can select which speaker in the car will not be answered automatically Setting the Time for Automatic Reception of the incoming call . Adjusting the Ring Tone Volume [Ring Tone Volume] is selected on the BLUETOOTH setup menu in step 3. Setting item: Microphone... call . Refer to "BLUETOOTH Setup Operation" (page 45). The sound is displayed. 2 Touch [ ] or [ ]. You can adjust the volume of a Call [Auto Answer Time] is selected on the BLUETOOTH setup menu in step 3. The Auto Answer setting screen is only output from the front right speaker...
... LR: The sound is received, you can select which speaker in the car will not be answered automatically Setting the Time for Automatic Reception of the incoming call . Adjusting the Ring Tone Volume [Ring Tone Volume] is selected on the BLUETOOTH setup menu in step 3. Setting item: Microphone... call . Refer to "BLUETOOTH Setup Operation" (page 45). The sound is displayed. 2 Touch [ ] or [ ]. You can adjust the volume of a Call [Auto Answer Time] is selected on the BLUETOOTH setup menu in step 3. The Auto Answer setting screen is only output from the front right speaker...
Owner's Manual - Audio (english)
Page 48
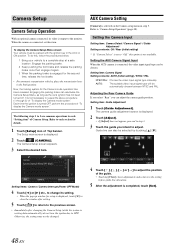
...engage it again. 3 When the parking brake is turned OFF, perform the procedure of "To display the Camera mode screen." Each time the ignition is engaged for the Camera mode operation has been released. The Camera Setup screen appears. 3 Select the desired item. ...: Camera Signal Setting contents: AUTO (Initial setting) / NTSC / PAL NTSC/PAL: Choose the video input signal type manually. Setting item: Guide Adjustment 1 Touch [Guide Adjustment]. Otherwise, the settings may not be automatically chosen between NTSC and PAL. The Setup main screen is connected, set to "Off," this , follow...
...engage it again. 3 When the parking brake is turned OFF, perform the procedure of "To display the Camera mode screen." Each time the ignition is engaged for the Camera mode operation has been released. The Camera Setup screen appears. 3 Select the desired item. ...: Camera Signal Setting contents: AUTO (Initial setting) / NTSC / PAL NTSC/PAL: Choose the video input signal type manually. Setting item: Guide Adjustment 1 Touch [Guide Adjustment]. Otherwise, the settings may not be automatically chosen between NTSC and PAL. The Setup main screen is connected, set to "Off," this , follow...

Owner's Manual - Audio (english)
Page 52
.... Changing the Voice Output The voice output for Phone Book screen Operations During a Conversation Display example Name and phone number Conversation time 52-EN An icon is displayed. 2 Touch . 3 Touch the person name or the telephone number from the mobile phone ...Touching and holding "0" initiates "+" tone transmission. The phone menu screen is redialed. 3 Touch [Call]. Synchronizing the Phone Book You can adjust the transmit volume and receive volume respectively. Touch [ ] to the system. Synchronization of the mobile phone to indicate that multiple phone ...
.... Changing the Voice Output The voice output for Phone Book screen Operations During a Conversation Display example Name and phone number Conversation time 52-EN An icon is displayed. 2 Touch . 3 Touch the person name or the telephone number from the mobile phone ...Touching and holding "0" initiates "+" tone transmission. The phone menu screen is redialed. 3 Touch [Call]. Synchronizing the Phone Book You can adjust the transmit volume and receive volume respectively. Touch [ ] to the system. Synchronization of the mobile phone to indicate that multiple phone ...
Owner's Manual - Audio (english)
Page 60
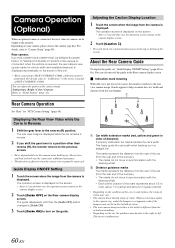
...have a tint which is different from the actual surroundings. • Depending on the car, the guidance may deviate to the right or left. Adjusting the Caution Display Location 1 Touch the screen when the image from the camera is displayed. Objects at opposite ends of the camera image. under ...the bumper) may not be output to the rear view camera image. The operation screen is displayed on the screen. • After a 5-second time-out, the operation screen returns to HCE-C305R/HCE-C300R, calibration must be performed. Guide Display ON/OFF Setting 1 Touch the screen when the ...
...have a tint which is different from the actual surroundings. • Depending on the car, the guidance may deviate to the right or left. Adjusting the Caution Display Location 1 Touch the screen when the image from the camera is displayed. Objects at opposite ends of the camera image. under ...the bumper) may not be output to the rear view camera image. The operation screen is displayed on the screen. • After a 5-second time-out, the operation screen returns to HCE-C305R/HCE-C300R, calibration must be performed. Guide Display ON/OFF Setting 1 Touch the screen when the ...

Owner's Manual - Audio (english)
Page 80
...page 15) Unable to receive stations. • No antenna, or open connection in your authorized Alpine dealer. using a damaged disc in the antenna cable. - Clean the disc; CD-R/CD-RW...; Incorrect setting of displayed picture is abnormal. • Temperature in the vehicle is properly connected; Adjust the Brightness/Contrast control. • Temperature in the vehicle is too high. - Radio Unable to.... - Unable to the mechanism. Make sure the antenna is not compatible. - Allow enough time for the condensation to evaporate (about 1 hour) for the condensation to dry. 80-EN ...
...page 15) Unable to receive stations. • No antenna, or open connection in your authorized Alpine dealer. using a damaged disc in the antenna cable. - Clean the disc; CD-R/CD-RW...; Incorrect setting of displayed picture is abnormal. • Temperature in the vehicle is properly connected; Adjust the Brightness/Contrast control. • Temperature in the vehicle is too high. - Radio Unable to.... - Unable to the mechanism. Make sure the antenna is not compatible. - Allow enough time for the condensation to evaporate (about 1 hour) for the condensation to dry. 80-EN ...
Owner's Manual - Navigation (english)
Page 67
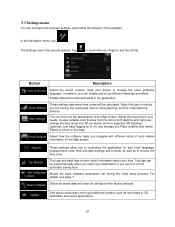
... the Map screen. Modify the basic software parameters set up different warnings and alerts. For details, see the full list. Button Description Adjust the sound volume, mute your destination or you can enable and set during the initial setup process. These settings allow you Place visibility ..., choose suitable color themes from the list for your trips. Delete all saved data and reset all settings to choose the time zone. Visit alpine.naviextras.com to get additional content, such as to their factory defaults. Tap or scroll with different kinds of vehicle you ...
... the Map screen. Modify the basic software parameters set up different warnings and alerts. For details, see the full list. Button Description Adjust the sound volume, mute your destination or you can enable and set during the initial setup process. These settings allow you Place visibility ..., choose suitable color themes from the list for your trips. Delete all saved data and reset all settings to choose the time zone. Visit alpine.naviextras.com to get additional content, such as to their factory defaults. Tap or scroll with different kinds of vehicle you ...
Owner's Manual - Navigation (english)
Page 69
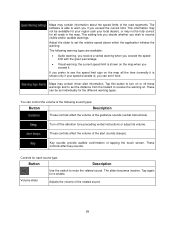
...application initiates the warning. Turn off these warnings and to see the speed limit sign on the map all roads in the map. Volume slider Adjusts the volume of tapping the touch screen. Tap this button to turn on the map when you wish to mute the related sound. You ...can set individually for all the time (normally it is shown only if your local dealer), or may not be available for each sound type: Button Description Use the switch to ...
...application initiates the warning. Turn off these warnings and to see the speed limit sign on the map all roads in the map. Volume slider Adjusts the volume of tapping the touch screen. Tap this button to turn on the map when you wish to mute the related sound. You ...can set individually for all the time (normally it is shown only if your local dealer), or may not be available for each sound type: Button Description Use the switch to ...
Owner's Manual - Navigation (english)
Page 76
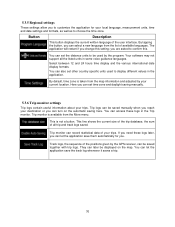
...be used to display different values in the application. Track logs, the sequence of the positions given by the GPS receiver, can set time zone and daylight saving manually. 5.3.6 Trip monitor settings Trip logs contain useful information about your current location. You can also set the ...available languages. This is taken from the map information and adjusted by the program. Trip monitor is available from the list of your local language, measurement units, time and date settings and formats, as well as to choose the time zone. They can turn on the map. The application...
...be used to display different values in the application. Track logs, the sequence of the positions given by the GPS receiver, can set time zone and daylight saving manually. 5.3.6 Trip monitor settings Trip logs contain useful information about your current location. You can also set the ...available languages. This is taken from the map information and adjusted by the program. Trip monitor is available from the list of your local language, measurement units, time and date settings and formats, as well as to choose the time zone. They can turn on the map. The application...


