Owners Manual
Page 1
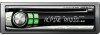
... Printed in China (Y) 68-04123Z36-A Colombo 8, 20090 Trezzano Sul Naviglio (MI), Italy Phone 02-484781 ALPINE ELECTRONICS DE ESPAÑA, S.A. R MP3 CD Receiver EN CDE-9846 FR FM/AM CD Receiver CDE-9842 ES • OWNER'S MANUAL Please read before using this equipment. • MODE D'EMPLOI Veuillez lire avant d'utiliser cet appareil. • MANUAL...
... Printed in China (Y) 68-04123Z36-A Colombo 8, 20090 Trezzano Sul Naviglio (MI), Italy Phone 02-484781 ALPINE ELECTRONICS DE ESPAÑA, S.A. R MP3 CD Receiver EN CDE-9846 FR FM/AM CD Receiver CDE-9842 ES • OWNER'S MANUAL Please read before using this equipment. • MODE D'EMPLOI Veuillez lire avant d'utiliser cet appareil. • MANUAL...
Owners Manual
Page 4
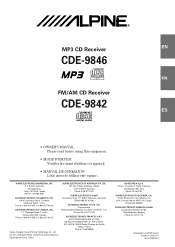
... improving sound quality. For routine cleaning, wipe the playing surface with a clean, soft cloth from jamming, "ERROR" will be installed in Alpine CD players. PRECAUTIONS Never Attempt the Following Do not grip or pull out the disc while it is facing up when you insert the disc...to insert a disc into the player by the automatic reloading mechanism. Transparent Sheet Disc Stabilizer Continued 3-EN Installation Location Make sure the CDE-9846/CDE-9842 will influence the thickness and/or diameter of special shape discs may cause damage to the disc. Do not attempt to use round ...
... improving sound quality. For routine cleaning, wipe the playing surface with a clean, soft cloth from jamming, "ERROR" will be installed in Alpine CD players. PRECAUTIONS Never Attempt the Following Do not grip or pull out the disc while it is facing up when you insert the disc...to insert a disc into the player by the automatic reloading mechanism. Transparent Sheet Disc Stabilizer Continued 3-EN Installation Location Make sure the CDE-9846/CDE-9842 will influence the thickness and/or diameter of special shape discs may cause damage to the disc. Do not attempt to use round ...
Owners Manual
Page 5
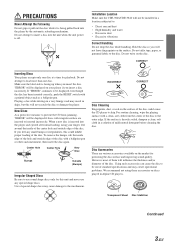
...CDs which a recording failed or a re-recording was closed (finalized). • Finalize the CD-R/CD-RW if necessary, and attempt playback again. CDE-9846 CDE-9842 CD CD-TEXT MP3 \ \ \ \ Use only compact discs with fingerprints, CDs exposed to extreme temperatures or sunlight (e.g., left in the car or...correct performance cannot be able to play on this unit: Flawed CDs, CDs with the label side showing the CD logo marks below. (CDE-9846 only) If you may damage the CD and you use commercially available disc accessories. An independent license for a long time. mp3licensing....
...CDs which a recording failed or a re-recording was closed (finalized). • Finalize the CD-R/CD-RW if necessary, and attempt playback again. CDE-9846 CDE-9842 CD CD-TEXT MP3 \ \ \ \ Use only compact discs with fingerprints, CDs exposed to extreme temperatures or sunlight (e.g., left in the car or...correct performance cannot be able to play on this unit: Flawed CDs, CDs with the label side showing the CD logo marks below. (CDE-9846 only) If you may damage the CD and you use commercially available disc accessories. An independent license for a long time. mp3licensing....
Owners Manual
Page 6
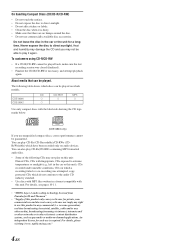
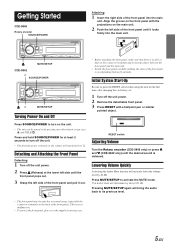
...the groove on the front panel with a ballpoint pen or similar pointed object. 1 RESET switch Adjusting Volume Turn the Rotary encoder (CDE-9846 only) or press 4 and 3 (CDE-9842 only) until the front panel pops out. 3 Grasp the left side until the desired sound is turned on, the volume will ... Remove the detachable front panel. 3 Press RESET with the projections on the back of the front panel into the main unit. 2 1 MUTE/SETUP CDE-9842 4 SOURCE/POWER 3 MUTE/SETUP Turning Power On and Off Press SOURCE/POWER to turn off the unit. • The first time power is obtained.
...the groove on the front panel with a ballpoint pen or similar pointed object. 1 RESET switch Adjusting Volume Turn the Rotary encoder (CDE-9846 only) or press 4 and 3 (CDE-9842 only) until the front panel pops out. 3 Grasp the left side until the desired sound is turned on, the volume will ... Remove the detachable front panel. 3 Press RESET with the projections on the back of the front panel into the main unit. 2 1 MUTE/SETUP CDE-9842 4 SOURCE/POWER 3 MUTE/SETUP Turning Power On and Off Press SOURCE/POWER to turn off the unit. • The first time power is obtained.
Owners Manual
Page 7
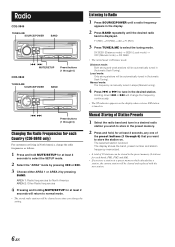
... TUNE/A.ME SOURCE/POWER BAND g f MUTE/SETUP Preset buttons (1 through 6) CDE-9842 TUNE/A.ME SOURCE/POWER BAND Listening to Radio 1 Press SOURCE/POWER until a radio frequency appears in the display. 2 Press BAND repeatedly until the desired radio ... in North America, change the setting. FM1, FM2 and AM). • If you change the radio frequencies as follows. 1 Press and hold , for each Country (CDE-9846 only) For customers not living in the preset memory (6 stations for at least 2 seconds to select the tuning mode. DX SEEK (Distance mode) →...
... TUNE/A.ME SOURCE/POWER BAND g f MUTE/SETUP Preset buttons (1 through 6) CDE-9842 TUNE/A.ME SOURCE/POWER BAND Listening to Radio 1 Press SOURCE/POWER until a radio frequency appears in the display. 2 Press BAND repeatedly until the desired radio ... in North America, change the setting. FM1, FM2 and AM). • If you change the radio frequencies as follows. 1 Press and hold , for each Country (CDE-9846 only) For customers not living in the preset memory (6 stations for at least 2 seconds to select the tuning mode. DX SEEK (Distance mode) →...
Owners Manual
Page 9
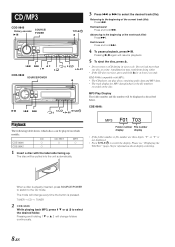
... at a time. When a disc is already inserted, press SOURCE/POWER to switch to select the desired folder. CD/MP3 CDE-9846 Rotary encoder -/J SOURCE/ POWER TITLE/ c g f 8 2 1 9 3 CDE-9842 SOURCE/POWER 45 6 c -/J g f 45 6 TITLE/ Playback The following table shows which discs can play discs containing ...at least 2 seconds. The mode will change folders continuously. 8-EN TUNER → CD → TUNER 2 CDE-9846: While playing back MP3, press 1 9 or 8 2 to the CD mode. CDE-9846 CDE-9842 CD CD-TEXT MP3 \ \ \ \ 1 Insert a disc with MP3): • The CD-player can...
... at a time. When a disc is already inserted, press SOURCE/POWER to switch to select the desired folder. CD/MP3 CDE-9846 Rotary encoder -/J SOURCE/ POWER TITLE/ c g f 8 2 1 9 3 CDE-9842 SOURCE/POWER 45 6 c -/J g f 45 6 TITLE/ Playback The following table shows which discs can play discs containing ...at least 2 seconds. The mode will change folders continuously. 8-EN TUNER → CD → TUNER 2 CDE-9846: While playing back MP3, press 1 9 or 8 2 to the CD mode. CDE-9846 CDE-9842 CD CD-TEXT MP3 \ \ \ \ 1 Insert a disc with MP3): • The CD-player can...

Owners Manual
Page 13
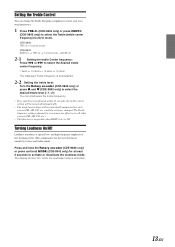
... will boost only frequencies near the center frequency. 2-3 Setting the bass level: Turn the Rotary encoder (CDE-9846 only) or press 4 and 3 (CDE-9842 only) to ON. 12-EN CDE-9846: BASS LV ↔ normal CDE-9842: BASS LV → TRE LV → normal mode → BASS LV 2-1 Setting the bass center...adjusted settings of frequencies above and below the center frequency. A wide setting will be adjusted. 2 Turn the Rotary encoder (MODE) (CDE-9846 only) or press 4 and 3 (CDE-9842 only) until the desired sound is obtained in each source (FM, AM, CD, etc.) until the setting is set to the ...
... will boost only frequencies near the center frequency. 2-3 Setting the bass level: Turn the Rotary encoder (CDE-9846 only) or press 4 and 3 (CDE-9842 only) to ON. 12-EN CDE-9846: BASS LV ↔ normal CDE-9842: BASS LV → TRE LV → normal mode → BASS LV 2-1 Setting the bass center...adjusted settings of frequencies above and below the center frequency. A wide setting will be adjusted. 2 Turn the Rotary encoder (MODE) (CDE-9846 only) or press 4 and 3 (CDE-9842 only) until the desired sound is obtained in each source (FM, AM, CD, etc.) until the setting is set to the ...
Owners Manual
Page 14
... sources (FM, AM, CD, etc.). • This function is inoperable when DEFT is set to activate or deactivate the loudness mode. CDE-9846: TRE LV ↔ normal mode CDE-9842: BASS LV → TRE LV → normal mode → BASS LV 2-1 Setting the treble Center frequency: Press g or f...for each source (FM, AM, CD, etc.) until the setting is emphasized. 2-2 Setting the treble level: Turn the Rotary encoder (CDE-9846 only) or press 4 and 3 (CDE-9842 only) to bass and treble sound. Setting the Treble Control You can emphasize the treble frequency. • If no operation is activated...
... sources (FM, AM, CD, etc.). • This function is inoperable when DEFT is set to activate or deactivate the loudness mode. CDE-9846: TRE LV ↔ normal mode CDE-9842: BASS LV → TRE LV → normal mode → BASS LV 2-1 Setting the treble Center frequency: Press g or f...for each source (FM, AM, CD, etc.) until the setting is emphasized. 2-2 Setting the treble level: Turn the Rotary encoder (CDE-9846 only) or press 4 and 3 (CDE-9842 only) to bass and treble sound. Setting the Treble Control You can emphasize the treble frequency. • If no operation is activated...
Owners Manual
Page 15
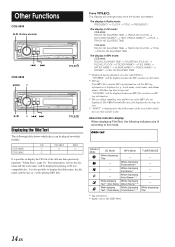
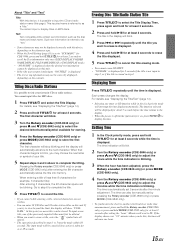
...NO TEXT" will change every time the button is ignored. While displaying Text*2 (Disc Name) While displaying Text*2 (Track Name) MP3 Mode - CDE-9846 CDE-9842 CD CD-TEXT MP3 \ \ \ \ It is displayed (e.g., track name, artist name, and album name). The display will be displayed if..." is also possible to display the folder name, the file name, and the tag, etc., while playing MP3 files. Other Functions CDE-9846 -/J Rotary encoder g f CDE-9842 MODE 4 TITLE/ -/J 3 gf TITLE/ Displaying the Title/Text The following indicators are displayed. Press TITLE/ . The display in Radio...
...NO TEXT" will change every time the button is ignored. While displaying Text*2 (Disc Name) While displaying Text*2 (Track Name) MP3 Mode - CDE-9846 CDE-9842 CD CD-TEXT MP3 \ \ \ \ It is displayed (e.g., track name, artist name, and album name). The display will be displayed if..." is also possible to display the folder name, the file name, and the tag, etc., while playing MP3 files. Other Functions CDE-9846 -/J Rotary encoder g f CDE-9842 MODE 4 TITLE/ -/J 3 gf TITLE/ Displaying the Title/Text The following indicators are displayed. Press TITLE/ . The display in Radio...
Owners Manual
Page 16
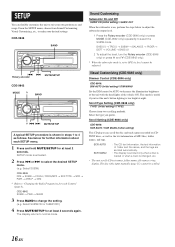
... the time indication is blinking. 3 When the hour has been adjusted, press the Rotary encoder (CDE-9846 only) or press MODE (CDE-9842 only). 4 Turn the Rotary encoder (CDE-9846 only) or press 4 and 3 (CDE-9842 only) to store the first character. The time is automatically set 5 seconds after setting the "hour... 1 Press TITLE/ to the next character. You cannot input titles for at least 2 seconds while the time is displayed. 4 Press and hold MODE (CDE-9842 only) for at least 2 seconds. Setting Time 1 In the Clock priority mode, press and hold -/J for MP3 discs. 1 Press TITLE/ and select...
... the time indication is blinking. 3 When the hour has been adjusted, press the Rotary encoder (CDE-9846 only) or press MODE (CDE-9842 only). 4 Turn the Rotary encoder (CDE-9846 only) or press 4 and 3 (CDE-9842 only) to store the first character. The time is automatically set 5 seconds after setting the "hour... 1 Press TITLE/ to the next character. You cannot input titles for at least 2 seconds while the time is displayed. 4 Press and hold MODE (CDE-9842 only) for at least 2 seconds. Setting Time 1 In the Clock priority mode, press and hold -/J for MP3 discs. 1 Press TITLE/ and select...
Owners Manual
Page 17
... recorded on , perform the steps below for at night. See below to adjust the subwoofer output level. 1 Press the Rotary encoder (CDE-9846 only) or press MODE (CDE-9842 only) repeatedly to OFF, its level cannot be scrolled. 16-EN BASS LV → TRE LV → SUBW* → BALANCE... → FADER → DEFT → VOLUME → BASS LV 2 To adjust the level, turn the Rotary encoder (CDE-9846 only) or press 4 and 3 (CDE-9842 only). * When the subwoofer mode is changed, etc. • The unit scrolls CD text names, folder names, file names or tag display....
... recorded on , perform the steps below for at night. See below to adjust the subwoofer output level. 1 Press the Rotary encoder (CDE-9846 only) or press MODE (CDE-9842 only) repeatedly to OFF, its level cannot be scrolled. 16-EN BASS LV → TRE LV → SUBW* → BALANCE... → FADER → DEFT → VOLUME → BASS LV 2 To adjust the level, turn the Rotary encoder (CDE-9846 only) or press 4 and 3 (CDE-9842 only). * When the subwoofer mode is changed, etc. • The unit scrolls CD text names, folder names, file names or tag display....

Owners Manual
Page 21
...may result in fire, etc. IMPORTANT Please record the serial number of your Alpine dealer. • The CDE-9846/CDE-9842 uses female RCA-type jacks for the intended circuit of the CDE-9846/CDE-9842 has the appropriate amperage. Using such parts could disable control of the vehicle ... of this manual thoroughly for this unit. Incorrect connections may result in doubt, consult your unit in compliance with your CDE-9846/CDE-9842. When connecting the CDE-9846/CDE-9842 to the fuse box, make the proper connections may cause the unit to malfunction or damage to the vehicle's electrical ...
...may result in fire, etc. IMPORTANT Please record the serial number of your Alpine dealer. • The CDE-9846/CDE-9842 uses female RCA-type jacks for the intended circuit of the CDE-9846/CDE-9842 has the appropriate amperage. Using such parts could disable control of the vehicle ... of this manual thoroughly for this unit. Incorrect connections may result in doubt, consult your unit in compliance with your CDE-9846/CDE-9842. When connecting the CDE-9846/CDE-9842 to the fuse box, make the proper connections may cause the unit to malfunction or damage to the vehicle's electrical ...
Owners Manual
Page 22
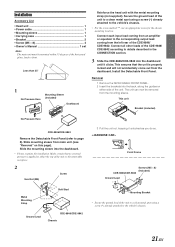
...as you do so. Install the Detachable Front Panel. Front Frame Screws (M5 × 8) (Included) CDE-9846/CDE-9842 Ground Lead * Mounting Bracket • Secure the ground lead of the CDE-9846/ CDE-9842 according to the vehicle's chassis. • For the screw marked **, use an appropriate screw for the... removed from the mounting sleeve. Slide mounting sleeve from the left rear of the unit. This unit Bracket (included) No Pressure Here CDE-9846/CDE-9842 Remove the Detachable Front Panel (refer to the vehicle's chassis. 21-EN Less than 35° 1 No Pressure Here Mounting Sleeve...
...as you do so. Install the Detachable Front Panel. Front Frame Screws (M5 × 8) (Included) CDE-9846/CDE-9842 Ground Lead * Mounting Bracket • Secure the ground lead of the CDE-9846/ CDE-9842 according to the vehicle's chassis. • For the screw marked **, use an appropriate screw for the... removed from the mounting sleeve. Slide mounting sleeve from the left rear of the unit. This unit Bracket (included) No Pressure Here CDE-9846/CDE-9842 Remove the Detachable Front Panel (refer to the vehicle's chassis. 21-EN Less than 35° 1 No Pressure Here Mounting Sleeve...


