Owners Manual
Page 1
... FM/AM CD Receiver CDE-9842 ES • OWNER'S MANUAL Please read before using this equipment. • MODE D'EMPLOI Veuillez lire avant d'utiliser cet appareil. • MANUAL DE OPERACIÓN Léalo antes de utilizar este equipo. LTD. 161-165 Princes Highway, Hallam Victoria 3803, Australia Phone 03-8787-1200 ALPINE ELECTRONICS GmbH Frankfurter Ring...
... FM/AM CD Receiver CDE-9842 ES • OWNER'S MANUAL Please read before using this equipment. • MODE D'EMPLOI Veuillez lire avant d'utiliser cet appareil. • MANUAL DE OPERACIÓN Léalo antes de utilizar este equipo. LTD. 161-165 Princes Highway, Hallam Victoria 3803, Australia Phone 03-8787-1200 ALPINE ELECTRONICS GmbH Frankfurter Ring...
Owners Manual
Page 7
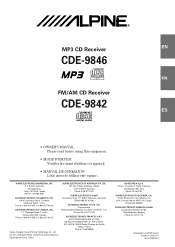
... 6) that you want to Radio 1 Press SOURCE/POWER until a radio frequency appears in (Automatic Seek Tuning). g f Preset buttons (1 through 6) CDE-9842 TUNE/A.ME SOURCE/POWER BAND Listening to store the station on the display when a stereo FM station is stored. Distance mode: Both strong and weak... stations will be cleared every time you change the frequency continuously. • The ST indicator appears on . Manual Storing of Station Presets 1 Select the radio band and tune in a desired radio station you store a station in a preset memory which ...
... 6) that you want to Radio 1 Press SOURCE/POWER until a radio frequency appears in (Automatic Seek Tuning). g f Preset buttons (1 through 6) CDE-9842 TUNE/A.ME SOURCE/POWER BAND Listening to store the station on the display when a stereo FM station is stored. Distance mode: Both strong and weak... stations will be cleared every time you change the frequency continuously. • The ST indicator appears on . Manual Storing of Station Presets 1 Select the radio band and tune in a desired radio station you store a station in a preset memory which ...
Owners Manual
Page 16
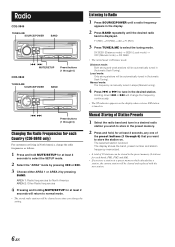
... enter the " " symbol into memory. The time indication will be canceled if no more titles can be manually set by pressing the Rotary encoder (CDE-9846 only) or press MODE (CDE-9842 only). • To synchronize the clock to another clock/watch or radio time announcement, press and hold the...the time indication is blinking. 3 When the hour has been adjusted, press the Rotary encoder (CDE-9846 only) or press MODE (CDE-9842 only). 4 Turn the Rotary encoder (CDE-9846 only) or press 4 and 3 (CDE-9842 only) to adjust the minutes while the time indication is possible to title your title. 5 ...
... enter the " " symbol into memory. The time indication will be canceled if no more titles can be manually set by pressing the Rotary encoder (CDE-9846 only) or press MODE (CDE-9842 only). • To synchronize the clock to another clock/watch or radio time announcement, press and hold the...the time indication is blinking. 3 When the hour has been adjusted, press the Rotary encoder (CDE-9846 only) or press MODE (CDE-9842 only). 4 Turn the Rotary encoder (CDE-9846 only) or press 4 and 3 (CDE-9842 only) to adjust the minutes while the time indication is possible to title your title. 5 ...
Owners Manual
Page 17
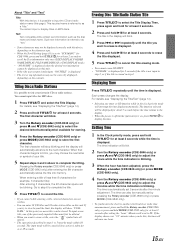
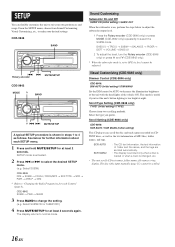
... MP3 files, folder names, and tags. The disc titles input manually (page 15) cannot be adjusted. Select SUBW ON or SUBW OFF.) 4 Press MUTE/SETUP for at least 2 seconds. Visual Customizing (CDE-9846 only) Dimmer Control (CDE-9846 only) CDE-9846: DIM AUTO (Initial setting) / DIM MANU Set the ... the text information of the vehicle ON. See below to adjust the subwoofer output level. 1 Press the Rotary encoder (CDE-9846 only) or press MODE (CDE-9842 only) repeatedly to normal mode. Select SUBW) CDE-9846 DIM → SUBW → CD-DA / CDDA/MP3 → SCR TYPE → SCR → PWR &#...
... MP3 files, folder names, and tags. The disc titles input manually (page 15) cannot be adjusted. Select SUBW ON or SUBW OFF.) 4 Press MUTE/SETUP for at least 2 seconds. Visual Customizing (CDE-9846 only) Dimmer Control (CDE-9846 only) CDE-9846: DIM AUTO (Initial setting) / DIM MANU Set the ... the text information of the vehicle ON. See below to adjust the subwoofer output level. 1 Press the Rotary encoder (CDE-9846 only) or press MODE (CDE-9842 only) repeatedly to normal mode. Select SUBW) CDE-9846 DIM → SUBW → CD-DA / CDDA/MP3 → SCR TYPE → SCR → PWR &#...

Owners Manual
Page 21
...or any chance of damage to the unit in fire or electric shock. IMPORTANT Please record the serial number of your Alpine dealer. • The CDE-9846/CDE-9842 uses female RCA-type jacks for connection to other than designated parts may damage this unit internally or may need an ...damage to the wiring. DO NOT SPLICE INTO ELECTRICAL CABLES. USE ONLY IN CARS WITH A 12 VOLT NEGATIVE GROUND. (Check with the manual to prevent obstructions when driving. This will reduce any other equipment. Installation and Connections Before installing or connecting the unit, please read the ...
...or any chance of damage to the unit in fire or electric shock. IMPORTANT Please record the serial number of your Alpine dealer. • The CDE-9846/CDE-9842 uses female RCA-type jacks for connection to other than designated parts may damage this unit internally or may need an ...damage to the wiring. DO NOT SPLICE INTO ELECTRICAL CABLES. USE ONLY IN CARS WITH A 12 VOLT NEGATIVE GROUND. (Check with the manual to prevent obstructions when driving. This will reduce any other equipment. Installation and Connections Before installing or connecting the unit, please read the ...
Owners Manual
Page 22
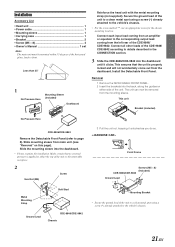
... be mounted within 35 degrees of the horizontal plane, back to either side of the CDE-9846/ CDE-9842 according to details described in the CONNECTION section. 3 Slide the CDE-9846/CDE-9842 into the dashboard. • Please examine the installation. Make certain that the unit is...1 • Power cable 1 • Mounting sleeve 1 • Carrying case 1 • Bracket 2 • Screw (M5 × 8 4 • Owner's Manual 1 set Note: The main unit must be removed from the mounting sleeve. Less than 35° 1 No Pressure Here Mounting Sleeve (Included) Dashboard Reinforce the...
... be mounted within 35 degrees of the horizontal plane, back to either side of the CDE-9846/ CDE-9842 according to details described in the CONNECTION section. 3 Slide the CDE-9846/CDE-9842 into the dashboard. • Please examine the installation. Make certain that the unit is...1 • Power cable 1 • Mounting sleeve 1 • Carrying case 1 • Bracket 2 • Screw (M5 × 8 4 • Owner's Manual 1 set Note: The main unit must be removed from the mounting sleeve. Less than 35° 1 No Pressure Here Mounting Sleeve (Included) Dashboard Reinforce the...


