Owners Manual
Page 1
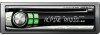
... 8, 20090 Trezzano Sul Naviglio (MI), Italy Phone 02-484781 ALPINE ELECTRONICS DE ESPAÑA, S.A. Phone 0870-33 33 763 ALPINE ELECTRONICS FRANCE S.A.R.L. (RCS PONTOISE B 338 101 280) 98, Rue de la Belle Etoile, Z.I. R MP3 CD Receiver EN CDE-9846 FR FM/AM CD Receiver CDE-9842 ES • OWNER'S MANUAL Please read before using this...
... 8, 20090 Trezzano Sul Naviglio (MI), Italy Phone 02-484781 ALPINE ELECTRONICS DE ESPAÑA, S.A. Phone 0870-33 33 763 ALPINE ELECTRONICS FRANCE S.A.R.L. (RCS PONTOISE B 338 101 280) 98, Rue de la Belle Etoile, Z.I. R MP3 CD Receiver EN CDE-9846 FR FM/AM CD Receiver CDE-9842 ES • OWNER'S MANUAL Please read before using this...
Owners Manual
Page 4
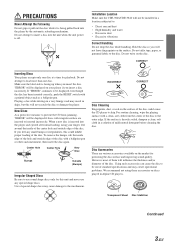
... neutral detergent before cleaning the disc. Do not attempt to the outer edge. Do not affix tape, paper, or gummed labels to be installed in Alpine CD players. Make sure the label side is facing up when you insert a disc incorrectly. If the surface is inserted into the player by the... such accessories can cause the disc to the mechanism. INCORRECT CORRECT Disc Cleaning Fingerprints, dust, or soil on the disc. Installation Location Make sure the CDE-9846/CDE-9842 will not scratch the disc or damage the player. If "ERROR" continues to the disc.
... neutral detergent before cleaning the disc. Do not attempt to the outer edge. Do not affix tape, paper, or gummed labels to be installed in Alpine CD players. Make sure the label side is facing up when you insert a disc incorrectly. If the surface is inserted into the player by the... such accessories can cause the disc to the mechanism. INCORRECT CORRECT Disc Cleaning Fingerprints, dust, or soil on the disc. Installation Location Make sure the CDE-9846/CDE-9842 will not scratch the disc or damage the player. If "ERROR" continues to the disc.
Owners Manual
Page 5
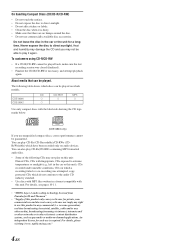
The following CDs may not be able to play CD-Rs (CD-Recordable)/CD-RWs (CDReWritable) which have been recorded only on which models. CDE-9846 CDE-9842 CD CD-TEXT MP3 \ \ \ \ Use only compact discs with this unit. revenue-generation) real time broadcasting (terrestrial, satellite, cable and/or any ...CD industry standard. • Use discs with MP3 files written in a format compatible with the label side showing the CD logo marks below. (CDE-9846 only) If you may not play CD-Rs/CD-RWs containing MP3 formatted audio files. • Some of the following table shows which ...
The following CDs may not be able to play CD-Rs (CD-Recordable)/CD-RWs (CDReWritable) which have been recorded only on which models. CDE-9846 CDE-9842 CD CD-TEXT MP3 \ \ \ \ Use only compact discs with this unit. revenue-generation) real time broadcasting (terrestrial, satellite, cable and/or any ...CD industry standard. • Use discs with MP3 files written in a format compatible with the label side showing the CD logo marks below. (CDE-9846 only) If you may not play CD-Rs/CD-RWs containing MP3 formatted audio files. • Some of the following table shows which ...
Owners Manual
Page 6
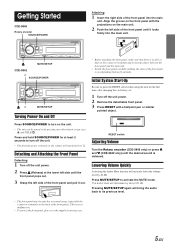
...obtained. Align the groove on the front panel with a ballpoint pen or similar pointed object. 1 RESET switch Adjusting Volume Turn the Rotary encoder (CDE-9846 only) or press 4 and 3 (CDE-9842 only) until the desired sound is not a malfunction. • To protect the front panel, place it out. • Before attaching the... Rotary encoder SOURCE/POWER Attaching 1 Insert the right side of the front panel into the main unit. 2 1 MUTE/SETUP CDE-9842 4 SOURCE/POWER 3 MUTE/SETUP Turning Power On and Off Press SOURCE/POWER to turn off the unit power. 2 Remove the detachable front panel. 3 ...
...obtained. Align the groove on the front panel with a ballpoint pen or similar pointed object. 1 RESET switch Adjusting Volume Turn the Rotary encoder (CDE-9846 only) or press 4 and 3 (CDE-9842 only) until the desired sound is not a malfunction. • To protect the front panel, place it out. • Before attaching the... Rotary encoder SOURCE/POWER Attaching 1 Insert the right side of the front panel into the main unit. 2 1 MUTE/SETUP CDE-9842 4 SOURCE/POWER 3 MUTE/SETUP Turning Power On and Off Press SOURCE/POWER to turn off the unit power. 2 Remove the detachable front panel. 3 ...
Owners Manual
Page 7
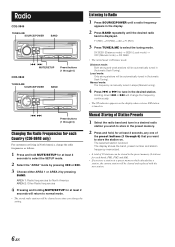
... 2 seconds will return to normal mode. • The stored radio stations will be stored in the preset memory (6 stations for each Country (CDE-9846 only) For customers not living in North America, change the radio frequencies as follows. 1 Press and hold , for at least 2 seconds... is manually tuned in steps (Manual tuning). 4 Press g or f to tune in the desired station. Radio CDE-9846 TUNE/A.ME SOURCE/POWER BAND g f MUTE/SETUP Preset buttons (1 through 6) CDE-9842 TUNE/A.ME SOURCE/POWER BAND Listening to Radio 1 Press SOURCE/POWER until a radio frequency appears in the display. ...
... 2 seconds will return to normal mode. • The stored radio stations will be stored in the preset memory (6 stations for each Country (CDE-9846 only) For customers not living in North America, change the radio frequencies as follows. 1 Press and hold , for at least 2 seconds... is manually tuned in steps (Manual tuning). 4 Press g or f to tune in the desired station. Radio CDE-9846 TUNE/A.ME SOURCE/POWER BAND g f MUTE/SETUP Preset buttons (1 through 6) CDE-9842 TUNE/A.ME SOURCE/POWER BAND Listening to Radio 1 Press SOURCE/POWER until a radio frequency appears in the display. ...
Owners Manual
Page 9
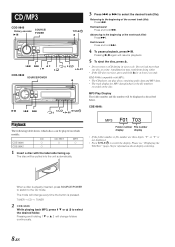
... Press and hold c for at a time. TUNER → CD → TUNER 2 CDE-9846: While playing back MP3, press 1 9 or 8 2 to the beginning of the current track (file): Press g. CDE-9846 CDE-9842 CD CD-TEXT MP3 \ \ \ \ 1 Insert a disc with MP3): • The...switching. Pressing and holding 1 9 or 8 2 will change folders continuously. 8-EN Fast backward: Press and hold g. CD/MP3 CDE-9846 Rotary encoder -/J SOURCE/ POWER TITLE/ c g f 8 2 1 9 3 CDE-9842 SOURCE/POWER 45 6 c -/J g f 45 6 TITLE/ Playback The following table shows which models. The disc will resume ...
... Press and hold c for at a time. TUNER → CD → TUNER 2 CDE-9846: While playing back MP3, press 1 9 or 8 2 to the beginning of the current track (file): Press g. CDE-9846 CDE-9842 CD CD-TEXT MP3 \ \ \ \ 1 Insert a disc with MP3): • The...switching. Pressing and holding 1 9 or 8 2 will change folders continuously. 8-EN Fast backward: Press and hold g. CD/MP3 CDE-9846 Rotary encoder -/J SOURCE/ POWER TITLE/ c g f 8 2 1 9 3 CDE-9842 SOURCE/POWER 45 6 c -/J g f 45 6 TITLE/ Playback The following table shows which models. The disc will resume ...

Owners Manual
Page 13
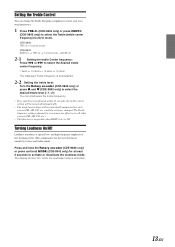
...subwoofer mode is changed. You can change the bass frequency emphasis to create your own tonal preference. 1 Press BASS C. (CDE-9846 only) or press CENT.f. (CDE-9842 only) to select the desired bass level (-7~+10). The bass frequency and bass band width settings adjusted for one source are...level and Treble level will boost only frequencies near the center frequency. 2-3 Setting the bass level: Turn the Rotary encoder (CDE-9846 only) or press 4 and 3 (CDE-9842 only) to select the Bass (bass center frequency) Control mode. A wide setting will be individually memorized for all other ...
...subwoofer mode is changed. You can change the bass frequency emphasis to create your own tonal preference. 1 Press BASS C. (CDE-9846 only) or press CENT.f. (CDE-9842 only) to select the desired bass level (-7~+10). The bass frequency and bass band width settings adjusted for one source are...level and Treble level will boost only frequencies near the center frequency. 2-3 Setting the bass level: Turn the Rotary encoder (CDE-9846 only) or press 4 and 3 (CDE-9842 only) to select the Bass (bass center frequency) Control mode. A wide setting will be individually memorized for all other ...
Owners Manual
Page 14
...; If no operation is set to ON. The Treble frequency settings adjusted for one source are effective for at low listening levels. CDE-9846: TRE LV ↔ normal mode CDE-9842: BASS LV → TRE LV → normal mode → BASS LV 2-1 Setting the treble Center frequency: Press g or ... treble level (-7~+7). The display shows "LD" when the loudness mode is emphasized. 2-2 Setting the treble level: Turn the Rotary encoder (CDE-9846 only) or press 4 and 3 (CDE-9842 only) to select the desired treble center frequency. 7.5kHz ↔ 10.0kHz ↔ 12.5kHz ↔ 15.0kHz The displayed ...
...; If no operation is set to ON. The Treble frequency settings adjusted for one source are effective for at low listening levels. CDE-9846: TRE LV ↔ normal mode CDE-9842: BASS LV → TRE LV → normal mode → BASS LV 2-1 Setting the treble Center frequency: Press g or ... treble level (-7~+7). The display shows "LD" when the loudness mode is emphasized. 2-2 Setting the treble level: Turn the Rotary encoder (CDE-9846 only) or press 4 and 3 (CDE-9842 only) to select the desired treble center frequency. 7.5kHz ↔ 10.0kHz ↔ 12.5kHz ↔ 15.0kHz The displayed ...
Owners Manual
Page 15
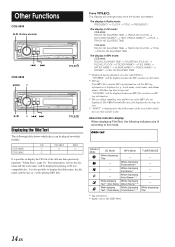
...DISC NAME)*1 → TEXT (TRACK NAME)*1 → TITLE → TRACK NO./ELAPSED TIME CDE-9842 TRACK NO./ELAPSED TIME → TRACK NO./CLOCK → TITLE → TRACK NO./ELAPSED TIME The display in MP3 mode: CDE-9846 FILE NO./ELAPSED TIME → FOLDER NO./FILE NO. → FILE NO./CLOCK ...the file name, and the tag, etc., while playing MP3 files. About the indicator display When displaying Title/Text, the following table shows which models. CDE-9846 CDE-9842 CD CD-TEXT MP3 \ \ \ \ It is displayed (e.g., track name, artist name, and album name). "NO DATA" will change every time ...
...DISC NAME)*1 → TEXT (TRACK NAME)*1 → TITLE → TRACK NO./ELAPSED TIME CDE-9842 TRACK NO./ELAPSED TIME → TRACK NO./CLOCK → TITLE → TRACK NO./ELAPSED TIME The display in MP3 mode: CDE-9846 FILE NO./ELAPSED TIME → FOLDER NO./FILE NO. → FILE NO./CLOCK ...the file name, and the tag, etc., while playing MP3 files. About the indicator display When displaying Title/Text, the following table shows which models. CDE-9846 CDE-9842 CD CD-TEXT MP3 \ \ \ \ It is displayed (e.g., track name, artist name, and album name). "NO DATA" will change every time ...
Owners Manual
Page 16
... the time indication is blinking. 3 When the hour has been adjusted, press the Rotary encoder (CDE-9846 only) or press MODE (CDE-9842 only). 4 Turn the Rotary encoder (CDE-9846 only) or press 4 and 3 (CDE-9842 only) to adjust the minutes while the time indication is displayed. • The text or tag...blinking. The input mode will be stored. At this page). Then, press again and hold for at least 2 seconds. 2 Press and hold MODE (CDE-9842 only) for at least 2 seconds after setting the "hour." Such text information is possible to cancel the title erasing mode. • You cannot erase...
... the time indication is blinking. 3 When the hour has been adjusted, press the Rotary encoder (CDE-9846 only) or press MODE (CDE-9842 only). 4 Turn the Rotary encoder (CDE-9846 only) or press 4 and 3 (CDE-9842 only) to adjust the minutes while the time indication is displayed. • The text or tag...blinking. The input mode will be stored. At this page). Then, press again and hold for at least 2 seconds. 2 Press and hold MODE (CDE-9842 only) for at least 2 seconds after setting the "hour." Such text information is possible to cancel the title erasing mode. • You cannot erase...
Owners Manual
Page 17
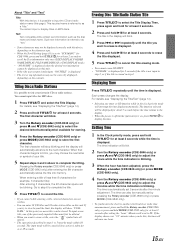
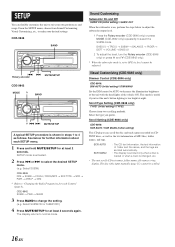
... Sound Customizing, Visual Customizing, etc., to "Changing the Radio Frequencies for each SETUP menu. 1 Press and hold MUTE/SETUP for at least 2 seconds. CDE-9842 SUBW → PWR → SUBW 3 Press BAND to normal mode. Select SUBW ON or SUBW OFF.) 4 Press MUTE/SETUP for at least 2 ...; SUBW* → BALANCE → FADER → DEFT → VOLUME → BASS LV 2 To adjust the level, turn the Rotary encoder (CDE-9846 only) or press 4 and 3 (CDE-9842 only). * When the subwoofer mode is activated. 2 Press g or f to 4 as the text information of MP3 files, folder names, and tags...
... Sound Customizing, Visual Customizing, etc., to "Changing the Radio Frequencies for each SETUP menu. 1 Press and hold MUTE/SETUP for at least 2 seconds. CDE-9842 SUBW → PWR → SUBW 3 Press BAND to normal mode. Select SUBW ON or SUBW OFF.) 4 Press MUTE/SETUP for at least 2 ...; SUBW* → BALANCE → FADER → DEFT → VOLUME → BASS LV 2 To adjust the level, turn the Rotary encoder (CDE-9846 only) or press 4 and 3 (CDE-9842 only). * When the subwoofer mode is activated. 2 Press g or f to 4 as the text information of MP3 files, folder names, and tags...

Owners Manual
Page 21
... wiring. Moisture or dust that obstruct or hang up on -board computer). The serial number plate is located on the bottom of your Alpine dealer. • The CDE-9846/CDE-9842 uses female RCA-type jacks for the intended circuit of the hole. Warning MAKE THE CORRECT CONNECTIONS. USE ONLY IN CARS WITH A 12...
... wiring. Moisture or dust that obstruct or hang up on -board computer). The serial number plate is located on the bottom of your Alpine dealer. • The CDE-9846/CDE-9842 uses female RCA-type jacks for the intended circuit of the hole. Warning MAKE THE CORRECT CONNECTIONS. USE ONLY IN CARS WITH A 12...
Owners Manual
Page 22
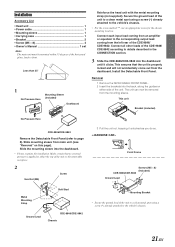
...'s chassis. 21-EN Make certain that the unit is applied to details described in the CONNECTION section. 3 Slide the CDE-9846/CDE-9842 into the dashboard. • Please examine the installation. This ensures that no external pressure is properly locked and will not... Bolt Stud * CDE-9846/CDE-9842 Chassis 3 Pull the unit out, keeping it clicks. Front Frame Screws (M5 × 8) (Included) CDE-9846/CDE-9842 Ground Lead * Mounting Bracket • Secure the ground lead of the CDE-9846/ CDE-9842 according to either side of the CDE-9846/ CDE-9842. Connect all other ...
...'s chassis. 21-EN Make certain that the unit is applied to details described in the CONNECTION section. 3 Slide the CDE-9846/CDE-9842 into the dashboard. • Please examine the installation. This ensures that no external pressure is properly locked and will not... Bolt Stud * CDE-9846/CDE-9842 Chassis 3 Pull the unit out, keeping it clicks. Front Frame Screws (M5 × 8) (Included) CDE-9846/CDE-9842 Ground Lead * Mounting Bracket • Secure the ground lead of the CDE-9846/ CDE-9842 according to either side of the CDE-9846/ CDE-9842. Connect all other ...


