Owners Manual
Page 2
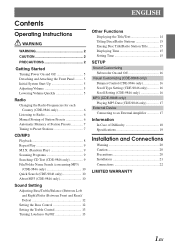
... 5 Adjusting Volume 5 Lowering Volume Quickly 5 Radio Changing the Radio Frequencies for each Country (CDE-9846 only 6 Listening to Radio 6 Manual Storing of Station Presets 6 Automatic Memory of Station Presets 7 Tuning to Preset Stations 7 CD/MP3 Playback 8 Repeat Play 9 M.I.X. (Random Play 9 Scanning Programs 9 Searching CD Text (CDE-9846 only 9 File/Folder Name Search (concerning MP3) (CDE-9846 only 10 Quick Search (CDE-9846 only 10 About MP3 (CDE-9846 only 10 Sound Setting Adjusting Bass/Treble/Balance...
... 5 Adjusting Volume 5 Lowering Volume Quickly 5 Radio Changing the Radio Frequencies for each Country (CDE-9846 only 6 Listening to Radio 6 Manual Storing of Station Presets 6 Automatic Memory of Station Presets 7 Tuning to Preset Stations 7 CD/MP3 Playback 8 Repeat Play 9 M.I.X. (Random Play 9 Scanning Programs 9 Searching CD Text (CDE-9846 only 9 File/Folder Name Search (concerning MP3) (CDE-9846 only 10 Quick Search (CDE-9846 only 10 About MP3 (CDE-9846 only 10 Sound Setting Adjusting Bass/Treble/Balance...
Owners Manual
Page 3
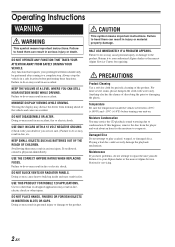
Any function that requires your authorized Alpine dealer or the nearest Alpine Service Center for servicing. 2-EN Failure to do so may result in an accident. KEEP THE VOLUME AT A LEVEL WHERE YOU CAN STILL HEAR OUTSIDE NOISE WHILE DRIVING. Failure to your Alpine dealer or the nearest Alpine Service Station for repairing. DO NOT BLOCK VENTS OR RADIATOR PANELS. Use for other injury. DO NOT...
Any function that requires your authorized Alpine dealer or the nearest Alpine Service Center for servicing. 2-EN Failure to do so may result in an accident. KEEP THE VOLUME AT A LEVEL WHERE YOU CAN STILL HEAR OUTSIDE NOISE WHILE DRIVING. Failure to your Alpine dealer or the nearest Alpine Service Station for repairing. DO NOT BLOCK VENTS OR RADIATOR PANELS. Use for other injury. DO NOT...
Owners Manual
Page 4
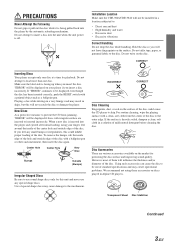
... a new disc is inserted into the player and ejected after initial loading, using these accessories on the surface of special shape discs may create operational problems. We recommend not using your player if you will not be displayed even though the disc has been inserted correctly, push the RESET switch with a clean, soft cloth from jamming, "ERROR" will be out of standard specifications and may...
... a new disc is inserted into the player and ejected after initial loading, using these accessories on the surface of special shape discs may create operational problems. We recommend not using your player if you will not be displayed even though the disc has been inserted correctly, push the RESET switch with a clean, soft cloth from jamming, "ERROR" will be out of standard specifications and may...
Owners Manual
Page 6
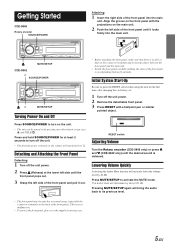
.... 1 RESET switch Adjusting Volume Turn the Rotary encoder (CDE-9846 only) or press 4 and 3 (CDE-9842 only) until the desired sound is no foreign object between the front panel and the main unit. • Attach the front panel carefully, holding the sides of the front panel to activate the MUTE mode. Press and hold SOURCE/POWER for the first time, after changing the car battery, etc. 1 Turn off the unit power. 2 Remove the...
.... 1 RESET switch Adjusting Volume Turn the Rotary encoder (CDE-9846 only) or press 4 and 3 (CDE-9842 only) until the desired sound is no foreign object between the front panel and the main unit. • Attach the front panel carefully, holding the sides of the front panel to activate the MUTE mode. Press and hold SOURCE/POWER for the first time, after changing the car battery, etc. 1 Turn off the unit power. 2 Remove the...
Owners Manual
Page 7
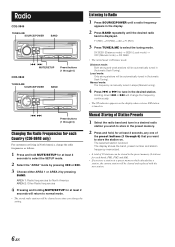
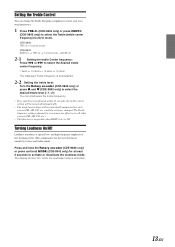
... the preset memory (6 stations for each Country (CDE-9846 only) For customers not living in the desired station. The display shows the band, preset number and station frequency memorized. • A total of Station Presets 1 Select the radio band and tune in a desired radio station you want to store the station on the display when a stereo FM station is displayed. Radio CDE-9846 TUNE/A.ME SOURCE/POWER BAND g f MUTE/SETUP Preset buttons (1 through 6) CDE-9842 TUNE/A.ME SOURCE/POWER BAND Listening to Radio 1 Press SOURCE/POWER...
... the preset memory (6 stations for each Country (CDE-9846 only) For customers not living in the desired station. The display shows the band, preset number and station frequency memorized. • A total of Station Presets 1 Select the radio band and tune in a desired radio station you want to store the station on the display when a stereo FM station is displayed. Radio CDE-9846 TUNE/A.ME SOURCE/POWER BAND g f MUTE/SETUP Preset buttons (1 through 6) CDE-9842 TUNE/A.ME SOURCE/POWER BAND Listening to Radio 1 Press SOURCE/POWER...
Owners Manual
Page 8
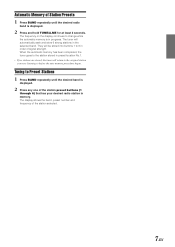
... displayed. 2 Press and hold TUNE/A.ME for at least 2 seconds. The display shows the band, preset number and frequency of signal strength. The frequency on the display continues to 6 in order of the station selected. 7-EN When the automatic memory has been completed, the tuner goes to the station stored in preset location No.1. • If no stations are stored, the tuner will be stored into buttons 1 to change...
... displayed. 2 Press and hold TUNE/A.ME for at least 2 seconds. The display shows the band, preset number and frequency of signal strength. The frequency on the display continues to 6 in order of the station selected. 7-EN When the automatic memory has been completed, the tuner goes to the station stored in preset location No.1. • If no stations are stored, the tuner will be stored into buttons 1 to change...
Owners Manual
Page 9
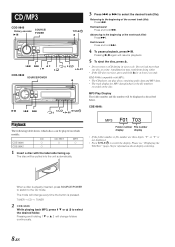
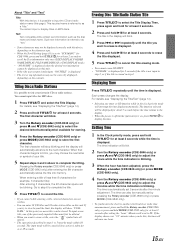
... disc, press c. • Do not remove a CD during its eject cycle. CDE-9846 (compatible with the label side facing up. When a disc is not displayed. • Press TITLE/ to the CD mode. MP3 Play Display The folder number and file number will change every time the button is the file numbers recorded on which discs can play discs containing audio data and MP3 data. • The track display for information about display switching. TUNER...
... disc, press c. • Do not remove a CD during its eject cycle. CDE-9846 (compatible with the label side facing up. When a disc is not displayed. • Press TITLE/ to the CD mode. MP3 Play Display The folder number and file number will change every time the button is the file numbers recorded on which discs can play discs containing audio data and MP3 data. • The track display for information about display switching. TUNER...

Owners Manual
Page 13
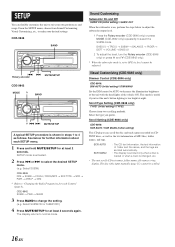
...; VOLUME → BASS LV Bass level : -7 ~ +10 Treble level : -7 ~ +7 Subwoofer : 0 ~ +15 Balance : L15 ~ R15 Fader : R15 ~ F15 Defeat : ON/OFF Volume : 0 ~ 35 • If the Rotary encoder is not pressed within 5 seconds after selecting the BASS LV, TRE LV, BALANCE, FADER, DEFT or SUBW mode, the unit automatically returns to normal mode. * When the subwoofer mode is performed within 15 seconds, the bass control setting will be adjusted. 2 Turn the Rotary encoder (MODE...
...; VOLUME → BASS LV Bass level : -7 ~ +10 Treble level : -7 ~ +7 Subwoofer : 0 ~ +15 Balance : L15 ~ R15 Fader : R15 ~ F15 Defeat : ON/OFF Volume : 0 ~ 35 • If the Rotary encoder is not pressed within 5 seconds after selecting the BASS LV, TRE LV, BALANCE, FADER, DEFT or SUBW mode, the unit automatically returns to normal mode. * When the subwoofer mode is performed within 15 seconds, the bass control setting will be adjusted. 2 Turn the Rotary encoder (MODE...
Owners Manual
Page 14
... source are effective for all other sources (FM, AM, CD, etc.). • This function is inoperable when DEFT is activated. 13-EN The display shows "LD" when the loudness mode is set to ON. This compensates for the ear's decreased sensitivity to select the desired treble center frequency. 7.5kHz ↔ 10.0kHz ↔ 12.5kHz ↔ 15.0kHz The displayed Treble frequency is changed. Turning...
... source are effective for all other sources (FM, AM, CD, etc.). • This function is inoperable when DEFT is activated. 13-EN The display shows "LD" when the loudness mode is set to ON. This compensates for the ear's decreased sensitivity to select the desired treble center frequency. 7.5kHz ↔ 10.0kHz ↔ 12.5kHz ↔ 15.0kHz The displayed Treble frequency is changed. Turning...
Owners Manual
Page 15
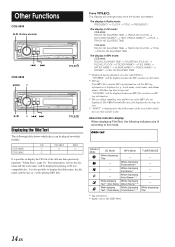
... been previously inputted ("Titling Discs" page 15). Other Functions CDE-9846 -/J Rotary encoder g f CDE-9842 MODE 4 TITLE/ -/J 3 gf TITLE/ Displaying the Title/Text The following indicators are displayed. It is ignored. The display will be played on which models. The display in Radio mode: FREQUENCY → CLOCK → TITLE → FREQUENCY The display in CD mode: CDE-9846 TRACK NO./ELAPSED TIME → TRACK NO./CLOCK → TEXT (DISC NAME...
... been previously inputted ("Titling Discs" page 15). Other Functions CDE-9846 -/J Rotary encoder g f CDE-9842 MODE 4 TITLE/ -/J 3 gf TITLE/ Displaying the Title/Text The following indicators are displayed. It is ignored. The display will be played on which models. The display in Radio mode: FREQUENCY → CLOCK → TITLE → FREQUENCY The display in CD mode: CDE-9846 TRACK NO./ELAPSED TIME → TRACK NO./CLOCK → TEXT (DISC NAME...
Owners Manual
Page 16
.... • "NO DATA" is displayed for 2 seconds if the title is not input in step 2, or if the title is displayed. The function selected will be manually set 5 seconds after entering the 8th character automatically stores the title into all spaces. • The operations described in the clock priority mode will reset to another clock/watch or radio time announcement, press and hold the...
.... • "NO DATA" is displayed for 2 seconds if the title is not input in step 2, or if the title is displayed. The function selected will be manually set 5 seconds after entering the 8th character automatically stores the title into all spaces. • The operations described in the clock priority mode will reset to another clock/watch or radio time announcement, press and hold the...
Owners Manual
Page 17
... display returns to decrease the illumination brightness of the unit with the head lights of the vehicle ON. BASS LV → TRE LV → SUBW* → BALANCE → FADER → DEFT → VOLUME → BASS LV 2 To adjust the level, turn the Rotary encoder (CDE-9846 only) or press 4 and 3 (CDE-9842 only). * When the subwoofer mode is activated. 2 Press g or f to select the desired SETUP menu. (e.g. Sound...
... display returns to decrease the illumination brightness of the unit with the head lights of the vehicle ON. BASS LV → TRE LV → SUBW* → BALANCE → FADER → DEFT → VOLUME → BASS LV 2 To adjust the level, turn the Rotary encoder (CDE-9846 only) or press 4 and 3 (CDE-9842 only). * When the subwoofer mode is activated. 2 Press g or f to select the desired SETUP menu. (e.g. Sound...
Owners Manual
Page 18
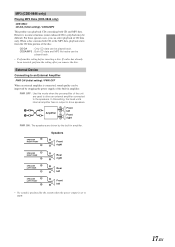
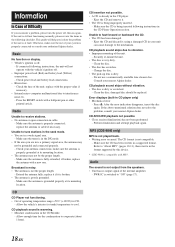
... the power output is connected, sound quality can be played back. • Perform this setting before inserting a disc. External Device Connecting to an External Amplifier PWR ON (Initial setting) / PWR OFF When an external amplifier is set to OFF. 17-EN Speakers SPEAKER RIGHT FRONT Front right SPEAKER RIGHT REAR SPEAKER LEFT REAR SPEAKER LEFT FRONT Rear right Rear left Front left Front right PWR ON : The speakers are used to drive an external amplifier connected to drive speakers...
... the power output is connected, sound quality can be played back. • Perform this setting before inserting a disc. External Device Connecting to an External Amplifier PWR ON (Initial setting) / PWR OFF When an external amplifier is set to OFF. 17-EN Speakers SPEAKER RIGHT FRONT Front right SPEAKER RIGHT REAR SPEAKER LEFT REAR SPEAKER LEFT FRONT Rear right Rear left Front left Front right PWR ON : The speakers are used to drive an external amplifier connected to drive speakers...
Owners Manual
Page 19
... problem, consult your antenna connections; This guide will not operate with a new one. CD playback sound is being inserted following instructions, the unit will help you encounter a problem, please turn the power off . - Consult your unit can cause damage to vibration. • Improper mounting of the unit; Unable to receive stations. • No antenna or open connection in the format supported by this device. * CDE-9846 is properly grounded at its mounting location. Eject...
... problem, consult your antenna connections; This guide will not operate with a new one. CD playback sound is being inserted following instructions, the unit will help you encounter a problem, please turn the power off . - Consult your unit can cause damage to vibration. • Improper mounting of the unit; Unable to receive stations. • No antenna or open connection in the format supported by this device. * CDE-9846 is properly grounded at its mounting location. Eject...
Owners Manual
Page 20
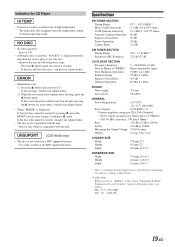
... continuous product improvement, specifications and design are subject to play or eject the disc. - Remove the disc by pressing c, press the RESET switch (refer to high temperature. - NO DISC • No CD is not written in the section "Changing the Radio Frequencies for each Country" (page 6), the tuning range is as follows. ERROR • Mechanism error. 1) Press the c button and eject the CD. Use a disc written at least 2 seconds...
... continuous product improvement, specifications and design are subject to play or eject the disc. - Remove the disc by pressing c, press the RESET switch (refer to high temperature. - NO DISC • No CD is not written in the section "Changing the Radio Frequencies for each Country" (page 6), the tuning range is as follows. ERROR • Mechanism error. 1) Press the c button and eject the CD. Use a disc written at least 2 seconds...

Owners Manual
Page 21
.... USE ONLY IN CARS WITH A 12 VOLT NEGATIVE GROUND. (Check with your CDE-9846/CDE-9842. Failure to make sure the fuse for this unit internally or may cause parts to electrical shorts. Never connect left and right channel speaker cables to have the work done. When drilling holes in case of the factory installed components (e.g. Bolts or nuts used for installations or ground connections. This...
.... USE ONLY IN CARS WITH A 12 VOLT NEGATIVE GROUND. (Check with your CDE-9846/CDE-9842. Failure to make sure the fuse for this unit internally or may cause parts to electrical shorts. Never connect left and right channel speaker cables to have the work done. When drilling holes in case of the factory installed components (e.g. Bolts or nuts used for installations or ground connections. This...
Owners Manual
Page 22
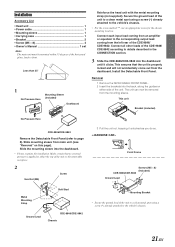
... mounting location. Connect all other leads of the unit. Less than 35° 1 No Pressure Here Mounting Sleeve (Included) Dashboard Reinforce the head unit with the metal mounting strap (not supplied). Secure the ground lead of the horizontal plane, back to front. Installation Accessory List • Head unit 1 • Power cable 1 • Mounting sleeve 1 • Carrying case 1 • Bracket 2 • Screw (M5 × 8 4 • Owner's Manual 1 set...
... mounting location. Connect all other leads of the unit. Less than 35° 1 No Pressure Here Mounting Sleeve (Included) Dashboard Reinforce the head unit with the metal mounting strap (not supplied). Secure the ground lead of the horizontal plane, back to front. Installation Accessory List • Head unit 1 • Power cable 1 • Mounting sleeve 1 • Carrying case 1 • Bracket 2 • Screw (M5 × 8 4 • Owner's Manual 1 set...

Owners Manual
Page 23
...: Output is from Subwoofer. Connections 1 Blue POWER ANT 2 REMOTE Blue/White TURN-ON 3 Orange ILLUMINATION 4 (CDE-9846 only) Red IGNITION 5 Yellow BATTERY 6 Black GND 7 ~ 8 Gray 9 SPEAKER RIGHT FRONT Gray/ Black ! ) Violet/ Black " SPEAKER RIGHT REAR Violet # Green $ SPEAKER LEFT REAR Green/ Black % White/ Black & SPEAKER LEFT FRONT White ( + Antenna To power antenna To amplifier or equalizer To the instrument cluster illumination lead Ignition Key Battery Speakers Front right Rear right Rear left Front left Speakers Amplifier...
...: Output is from Subwoofer. Connections 1 Blue POWER ANT 2 REMOTE Blue/White TURN-ON 3 Orange ILLUMINATION 4 (CDE-9846 only) Red IGNITION 5 Yellow BATTERY 6 Black GND 7 ~ 8 Gray 9 SPEAKER RIGHT FRONT Gray/ Black ! ) Violet/ Black " SPEAKER RIGHT REAR Violet # Green $ SPEAKER LEFT REAR Green/ Black % White/ Black & SPEAKER LEFT FRONT White ( + Antenna To power antenna To amplifier or equalizer To the instrument cluster illumination lead Ignition Key Battery Speakers Front right Rear right Rear left Front left Speakers Amplifier...
Owners Manual
Page 24
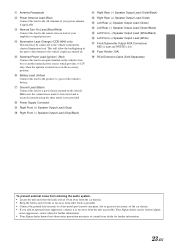
... Rear (-) Speaker Output Lead (Green/Black) & Left Front (-) Speaker Output Lead (White/Black) ( Left Front (+) Speaker Output Lead (White) ) Front/Subwoofer Output RCA Connectors RED is right and WHITE is left. ~ Fuse Holder (10A) + RCA Extension Cable (Sold Separately) To prevent external noise from entering the audio system. • Locate the unit and route the leads at least 10cm away from the car harness. • Keep the battery power...
... Rear (-) Speaker Output Lead (Green/Black) & Left Front (-) Speaker Output Lead (White/Black) ( Left Front (+) Speaker Output Lead (White) ) Front/Subwoofer Output RCA Connectors RED is right and WHITE is left. ~ Fuse Holder (10A) + RCA Extension Cable (Sold Separately) To prevent external noise from entering the audio system. • Locate the unit and route the leads at least 10cm away from the car harness. • Keep the battery power...
Owners Manual
Page 25
... burned voice coils caused by over-driving the speaker (amplifier level is in your nearest Authorized Alpine Service Center. Products purchased in the Canada. THE TERM "INCIDENTAL DAMAGES" REFERS TO EXPENSES OF TRANSPORTING THE PRODUCT TO THE ALPINE SERVICE CENTER, LOSS OF THE ORIGINAL PURCHASER'S TIME, LOSS OF THE USE OF THE PRODUCT, BUS FARES, CAR RENTALS OR OTHERS COSTS RELATING TO...
... burned voice coils caused by over-driving the speaker (amplifier level is in your nearest Authorized Alpine Service Center. Products purchased in the Canada. THE TERM "INCIDENTAL DAMAGES" REFERS TO EXPENSES OF TRANSPORTING THE PRODUCT TO THE ALPINE SERVICE CENTER, LOSS OF THE ORIGINAL PURCHASER'S TIME, LOSS OF THE USE OF THE PRODUCT, BUS FARES, CAR RENTALS OR OTHERS COSTS RELATING TO...

