
Owners Manual
Page 2
... 13 Turning Loudness On/Off 13 Other Functions Displaying the Text 14 Displaying Time 14 SETUP Sound Customizing Subwoofer On and Off 15 Setting the Subwoofer System 15 Visual Customizing Dimmer Control 15 Scroll Type Setting 15 Scroll Setting (TEXT SCROLL 15 Setting the Language Font 16 Adjusting Display Contrast 16 Demonstration 16 MP3/WMA/AAC Playing MP3/WMA/AAC Data (Play Mode 16 External Device Connecting to an External Amplifier 16 iPod®...
... 13 Turning Loudness On/Off 13 Other Functions Displaying the Text 14 Displaying Time 14 SETUP Sound Customizing Subwoofer On and Off 15 Setting the Subwoofer System 15 Visual Customizing Dimmer Control 15 Scroll Type Setting 15 Scroll Setting (TEXT SCROLL 15 Setting the Language Font 16 Adjusting Display Contrast 16 Demonstration 16 MP3/WMA/AAC Playing MP3/WMA/AAC Data (Play Mode 16 External Device Connecting to an External Amplifier 16 iPod®...

Owners Manual
Page 4
... nearest Alpine Service Station for repairing. Excessive volume levels that requires your unit on. Temperature Be sure the temperature inside and may result in fire. If this happens, remove the disc from looking ahead of the vehicle and cause an accident. Playing a bad disc could severely damage the playback mechanism. DO NOT OPERATE ANY FUNCTION THAT TAKES YOUR ATTENTION AWAY FROM SAFELY DRIVING YOUR...
... nearest Alpine Service Station for repairing. Excessive volume levels that requires your unit on. Temperature Be sure the temperature inside and may result in fire. If this happens, remove the disc from looking ahead of the vehicle and cause an accident. Playing a bad disc could severely damage the playback mechanism. DO NOT OPERATE ANY FUNCTION THAT TAKES YOUR ATTENTION AWAY FROM SAFELY DRIVING YOUR...

Owners Manual
Page 5
.... "ERROR" will be installed in Alpine CD players. If you insert a disc incorrectly. Center Hole Center Hole New Disc Bumps Outside (Bumps) Irregular Shaped Discs Be sure to use round shape discs only for this will influence the thickness and/or diameter of the disc could inhibit proper loading of standard specifications and may create operational problems. We recommend not using these accessories on discs played...
.... "ERROR" will be installed in Alpine CD players. If you insert a disc incorrectly. Center Hole Center Hole New Disc Bumps Outside (Bumps) Irregular Shaped Discs Be sure to use round shape discs only for this will influence the thickness and/or diameter of the disc could inhibit proper loading of standard specifications and may create operational problems. We recommend not using these accessories on discs played...

Owners Manual
Page 7
...; Head unit 1 • Power cable 1 • Mounting sleeve 1 • Carrying case 1 • Bracket key 2 • Screw (M5 × 8 4 • Owner's Manual 1 set • The front panel may become hot in normal usage (especially the connector terminals on the connector terminals and no dirt or dust on the back of the front panel). Press and hold SOURCE/ for the first time, after changing the car battery, etc. 1 Turn off...
...; Head unit 1 • Power cable 1 • Mounting sleeve 1 • Carrying case 1 • Bracket key 2 • Screw (M5 × 8 4 • Owner's Manual 1 set • The front panel may become hot in normal usage (especially the connector terminals on the connector terminals and no dirt or dust on the back of the front panel). Press and hold SOURCE/ for the first time, after changing the car battery, etc. 1 Turn off...

Owners Manual
Page 8
... will change the frequency 7-EN Distance mode: Both strong and weak stations will be automatically tuned in (Automatic Seek Tuning). Local mode: Only strong stations will be controlled with an optional Alpine remote control. Controllable with Remote Control This unit can be automatically tuned in (Automatic Seek Tuning). Point the optional remote control transmitter at least 2 seconds after setting the "hour." or will reset to its previous level. Lowering Volume Quickly Activating the Audio Mute function will blink. 3 Turn...
... will change the frequency 7-EN Distance mode: Both strong and weak stations will be automatically tuned in (Automatic Seek Tuning). Local mode: Only strong stations will be controlled with an optional Alpine remote control. Controllable with Remote Control This unit can be automatically tuned in (Automatic Seek Tuning). Point the optional remote control transmitter at least 2 seconds after setting the "hour." or will reset to its previous level. Lowering Volume Quickly Activating the Audio Mute function will blink. 3 Turn...

Owners Manual
Page 9
... the unit automatically. When a disc is already inserted, press SOURCE/ to switch to select the desired folder. TUNER DISC iPod* TUNER * Only when the iPod is displayed. 2 Press and hold TUNE/A.ME for at least 2 seconds, any one of the preset buttons (1 through 6) that has your desired radio station in the selected band. The selected station is pressed. Tuning to Preset Stations 1 Press BAND repeatedly until the desired radio band is connected. 3 While playing back...
... the unit automatically. When a disc is already inserted, press SOURCE/ to switch to select the desired folder. TUNER DISC iPod* TUNER * Only when the iPod is displayed. 2 Press and hold TUNE/A.ME for at least 2 seconds, any one of the preset buttons (1 through 6) that has your desired radio station in the selected band. The selected station is pressed. Tuning to Preset Stations 1 Press BAND repeatedly until the desired radio band is connected. 3 While playing back...

Owners Manual
Page 10
... Management), AAC format files that have been purchased from iTunes Music Store and files that do not support text, searches can be played repeatedly. play . M.I .X. In the case of discs that are protected by using the track numbers. 1 Press /ESC during its eject cycle. Press 4 again and select off to select the desired track, and then press / /ENT. Searching from doing...
... Management), AAC format files that have been purchased from iTunes Music Store and files that do not support text, searches can be played repeatedly. play . M.I .X. In the case of discs that are protected by using the track numbers. 1 Press /ESC during its eject cycle. Press 4 again and select off to select the desired track, and then press / /ENT. Searching from doing...

Owners Manual
Page 13
... Rear)/Defeat 1 Press Rotary encoder (AUDIO) repeatedly to select the desired bass bandwidth. Setting the Bass Bandwidth 2-2 Press SOURCE/ to choose the desired mode. Setting the Bass Level 2-3*1Turn the Rotary encoder to wide or narrow. Changes the boosted bass bandwidth to select the desired bass level (-7~+7). Refer to select the desired bass center frequency. 80Hz 100Hz 200Hz 60Hz 80Hz Emphasizes the displayed bass frequency ranges. BASS TREBLE HPF BASS Setting the Bass Center Frequency 2-1 Press BAND to "Adjusting Bass/Treble/Balance...
... Rear)/Defeat 1 Press Rotary encoder (AUDIO) repeatedly to select the desired bass bandwidth. Setting the Bass Bandwidth 2-2 Press SOURCE/ to choose the desired mode. Setting the Bass Level 2-3*1Turn the Rotary encoder to wide or narrow. Changes the boosted bass bandwidth to select the desired bass level (-7~+7). Refer to select the desired bass center frequency. 80Hz 100Hz 200Hz 60Hz 80Hz Emphasizes the displayed bass frequency ranges. BASS TREBLE HPF BASS Setting the Bass Center Frequency 2-1 Press BAND to "Adjusting Bass/Treble/Balance...

Owners Manual
Page 14
... BASS Setting the Treble Center Frequency 2-1 Press BAND to "Adjusting Bass/Treble/Balance (Between Left and Right)/Fader (Between Front and Rear)/Defeat" (page 12). and high-frequency emphasis at least 2 seconds to return to normal mode. • If no operation is performed for 15 seconds, the unit will return to normal mode automatically. • The treble level settings will return to normal mode automatically. • The Bass and Treble controls...
... BASS Setting the Treble Center Frequency 2-1 Press BAND to "Adjusting Bass/Treble/Balance (Between Left and Right)/Fader (Between Front and Rear)/Defeat" (page 12). and high-frequency emphasis at least 2 seconds to return to normal mode. • If no operation is performed for 15 seconds, the unit will return to normal mode automatically. • The treble level settings will return to normal mode automatically. • The Bass and Treble controls...
Owners Manual
Page 15
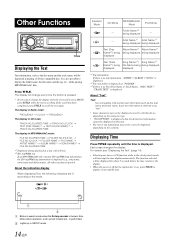
FILE NO./CLOCK FOLDER NAME FILE NAME ARTIST NAME*2 ALBUM NAME*2 SONG NAME*2 FILE NO./ELAPSED TIME *1 Displayed during playback of a disc with this device, depending on the character type. • "NO SUPPORT" is displayed when the desired text information cannot be displayed on this unit. • The text or tag information may not be displayed if playing a CD text compatible disc. Artist Name...
FILE NO./CLOCK FOLDER NAME FILE NAME ARTIST NAME*2 ALBUM NAME*2 SONG NAME*2 FILE NO./ELAPSED TIME *1 Displayed during playback of a disc with this device, depending on the character type. • "NO SUPPORT" is displayed when the desired text information cannot be displayed on this unit. • The text or tag information may not be displayed if playing a CD text compatible disc. Artist Name...
Owners Manual
Page 16
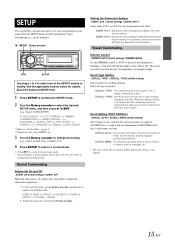
... Rotary encoder RTN SETUP Use steps 1 to 4 to select one of MP3/WMA/AAC files, folder names and tags. SYSTEM) *2 PLAY MODE SCROLL TYPE TEXT SCROLL POWER IC LANGUAGE DEMO CLOCK ADJUST *1 Refer to "Setting Time" (page 7). *2 Displayed only when SUBW is different from right to left to select the SUBW mode. SUBW BASS TREBLE BALANCE FADER DEFEAT VOLUME SUBW 2 Adjust the level by turning the Rotary encoder. Setting the Subwoofer System SUBW...
... Rotary encoder RTN SETUP Use steps 1 to 4 to select one of MP3/WMA/AAC files, folder names and tags. SYSTEM) *2 PLAY MODE SCROLL TYPE TEXT SCROLL POWER IC LANGUAGE DEMO CLOCK ADJUST *1 Refer to "Setting Time" (page 7). *2 Displayed only when SUBW is different from right to left to select the SUBW mode. SUBW BASS TREBLE BALANCE FADER DEFEAT VOLUME SUBW 2 Adjust the level by turning the Rotary encoder. Setting the Subwoofer System SUBW...
Owners Manual
Page 17
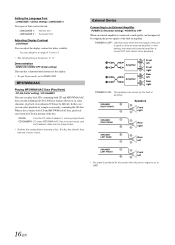
... be selected. In this setting, the head unit's internal amplifier is turned OFF and cannot drive speakers. When a disc contains both CD and MP3/WMA/AAC data (created in some situations, playback of this setting before inserting a disc. External Device Connecting to drive an external amplifier. In this case, you can adjust the display contrast for the display. • To quit Demo mode, set to DEMO OFF. Amplifier Amplifier Front left Front right Rear left...
... be selected. In this setting, the head unit's internal amplifier is turned OFF and cannot drive speakers. When a disc contains both CD and MP3/WMA/AAC data (created in some situations, playback of this setting before inserting a disc. External Device Connecting to drive an external amplifier. In this case, you can adjust the display contrast for the display. • To quit Demo mode, set to DEMO OFF. Amplifier Amplifier Front left Front right Rear left...

Owners Manual
Page 18
.... 4 Turn the Rotary encoder to the iPod Instruction Manual. Fast backward of earlier versions cannot be connected to the unit. • The unit can be used with the fourth generation and above iPod, iPod photo, iPod minis or iPod nano. iPods usable with this unit is connected by using the cable, the controls on the iPod are not functional. Use the Playlist/ Artist/Album/Song/Podcast/Genre/Composer search mode to select the...
.... 4 Turn the Rotary encoder to the iPod Instruction Manual. Fast backward of earlier versions cannot be connected to the unit. • The unit can be used with the fourth generation and above iPod, iPod photo, iPod minis or iPod nano. iPods usable with this unit is connected by using the cable, the controls on the iPod are not functional. Use the Playlist/ Artist/Album/Song/Podcast/Genre/Composer search mode to select the...

Owners Manual
Page 21
... has been written in CD player only). • Mechanical error - Check power lead and battery lead connections. • Blown fuse. - Press the RESET switch with a new one. Make sure the antenna is poorly grounded. - replace it if it ; CD CD Player not functioning. • Out of the unit; CD playback sound is properly grounded at its mounting location. Clean the disc. • The disc has scratches. - If the above...
... has been written in CD player only). • Mechanical error - Check power lead and battery lead connections. • Blown fuse. - Press the RESET switch with a new one. Make sure the antenna is poorly grounded. - replace it if it ; CD CD Player not functioning. • Out of the unit; CD playback sound is properly grounded at its mounting location. Clean the disc. • The disc has scratches. - If the above...

Owners Manual
Page 22
..., "NO DISC" is activated due to "ON" (page 16). iPod iPod does not play or eject the disc. - To reset the iPod, refer to play and no output signal of the iPod. Download songs to the iPod and connect to this unit and the iPod. Use a sampling rate/bit rate that is output. • The iPod has not been recognized. - POWER IC is not output from the speakers. • Unit has no sound is supported by...
..., "NO DISC" is activated due to "ON" (page 16). iPod iPod does not play or eject the disc. - To reset the iPod, refer to play and no output signal of the iPod. Download songs to the iPod and connect to this unit and the iPod. Use a sampling rate/bit rate that is output. • The iPod has not been recognized. - POWER IC is not output from the speakers. • Unit has no sound is supported by...

Owners Manual
Page 24
... WIRING AND INSTALLATION DONE BY EXPERTS. Use of other than designated parts may damage this unit requires special technical skill and experience. DO NOT INSTALL IN LOCATIONS WITH HIGH MOISTURE OR DUST. When connecting the CDE-9881 to the speaker (-) terminal. amplifier) having RCA connectors. If so, please contact your authorized Alpine dealer for assistance. • Be sure to connect the speaker (-) leads to the fuse box, make...
... WIRING AND INSTALLATION DONE BY EXPERTS. Use of other than designated parts may damage this unit requires special technical skill and experience. DO NOT INSTALL IN LOCATIONS WITH HIGH MOISTURE OR DUST. When connecting the CDE-9881 to the speaker (-) terminal. amplifier) having RCA connectors. If so, please contact your authorized Alpine dealer for assistance. • Be sure to connect the speaker (-) leads to the fuse box, make...

Owners Manual
Page 25
... holds it in the dashboard, the pressure plates may be mounted within 35 degrees of the CDE-9881. Secure the ground lead of the CDE-9881 according to the vehicle's chassis. • For the screw marked "*2", use an appropriate screw for the chosen mounting location. Remove the Detachable Front Panel (refer to the corresponding output lead coming from an amplifier to page 6).
... holds it in the dashboard, the pressure plates may be mounted within 35 degrees of the CDE-9881. Secure the ground lead of the CDE-9881 according to the vehicle's chassis. • For the screw marked "*2", use an appropriate screw for the chosen mounting location. Remove the Detachable Front Panel (refer to the corresponding output lead coming from an amplifier to page 6).

Owners Manual
Page 27
Connections Blue POWER ANT Blue/White REMOTE TURN-ON Pink/Black AUDIO INTERRUPT IN Orange ILLUMINATION Red Yellow IGNITION BATTERY Black GND Gray SPEAKER RIGHT FRONT Gray/Black Violet/Black SPEAKER RIGHT REAR Violet Green SPEAKER LEFT REAR Green/Black White/Black SPEAKER LEFT FRONT White To iPod Antenna To power antenna To amplifier To vehicle phone To the instrument cluster illumination lead Ignition Key Battery Speakers Front Right Rear Right Rear Left Front Left Amplifier Amplifier Amplifier Speakers Rear Left Rear Right Front Left Front Right Subwoofers 26-EN
Connections Blue POWER ANT Blue/White REMOTE TURN-ON Pink/Black AUDIO INTERRUPT IN Orange ILLUMINATION Red Yellow IGNITION BATTERY Black GND Gray SPEAKER RIGHT FRONT Gray/Black Violet/Black SPEAKER RIGHT REAR Violet Green SPEAKER LEFT REAR Green/Black White/Black SPEAKER LEFT FRONT White To iPod Antenna To power antenna To amplifier To vehicle phone To the instrument cluster illumination lead Ignition Key Battery Speakers Front Right Rear Right Rear Left Front Left Amplifier Amplifier Amplifier Speakers Rear Left Rear Right Front Left Front Right Subwoofers 26-EN

Owners Manual
Page 28
... metal spot (remove any paint, dirt or grease if necessary) of your amplifier or signal processor. FULL SPEEDTM Connection Cable (KCE-422i) (sold separately) iPod Direct Connector Control iPod signals. Antenna Receptacle Power Antenna Lead (Blue) Connect this lead to bare metal and is securely fastened using the FULL SPEEDTM Connection Cable (KCE-422i) (sold separately). Switched Power Lead (Ignition) (Red) Connect this lead to the Audio interface output of your power antenna, if...
... metal spot (remove any paint, dirt or grease if necessary) of your amplifier or signal processor. FULL SPEEDTM Connection Cable (KCE-422i) (sold separately) iPod Direct Connector Control iPod signals. Antenna Receptacle Power Antenna Lead (Blue) Connect this lead to bare metal and is securely fastened using the FULL SPEEDTM Connection Cable (KCE-422i) (sold separately). Switched Power Lead (Ignition) (Red) Connect this lead to the Audio interface output of your power antenna, if...
Owners Manual
Page 32
... option, repair or replace the product with a new or reconditioned product without Alpine's consent. LENGTH OF WARRANTY: This Warranty is turned up and driven into distortion or clipping). B Damage caused by accident or abuse, including burned voice coils caused by an unauthorized person, company or association. E Service performed by over-driving the speaker (amplifier level is in the United States...
... option, repair or replace the product with a new or reconditioned product without Alpine's consent. LENGTH OF WARRANTY: This Warranty is turned up and driven into distortion or clipping). B Damage caused by accident or abuse, including burned voice coils caused by an unauthorized person, company or association. E Service performed by over-driving the speaker (amplifier level is in the United States...


