TravelMate 4730/4730G Quick Guide
Page 5
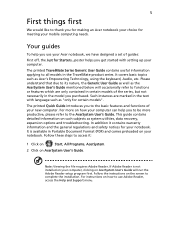
... help you use Adobe Reader, access the Help and Support menu. Follow the instructions on your notebook. It covers basic topics such as "only for your notebook. It is not installed on your computer, clicking on AcerSystem User's Guide. For instructions on such subjects as the AcerSystem User's Guide mentioned below will run the Adobe Reader setup program first. The printed Quick Guide introduces you for making an Acer notebook your choice...
... help you use Adobe Reader, access the Help and Support menu. Follow the instructions on your notebook. It covers basic topics such as "only for your notebook. It is not installed on your computer, clicking on AcerSystem User's Guide. For instructions on such subjects as the AcerSystem User's Guide mentioned below will run the Adobe Reader setup program first. The printed Quick Guide introduces you for making an Acer notebook your choice...
TravelMate 4730/4730G Quick Guide
Page 9
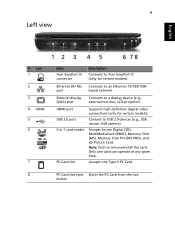
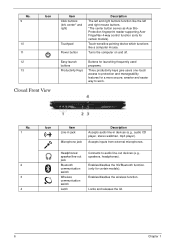
External display (VGA) port Connects to remove/install the card. Note: Push to a display device (e.g., external monitor, LCD projector). HDMI port USB 2.0 port 5-in-1 card reader PC Card slot Supports high definition digital video connections (only for certain models). Connect to an Ethernet 10/100/1000based network. Accepts one card can operate at any given time. Only one Type II PC Card. 8 PC Card slot eject Ejects the PC Card from the slot. button 9 Left view English 12 3 4 5 6 78 # Icon 1 2 3 4 HDMI 5 6 7 Item Acer EasyPort IV connector Description ...
External display (VGA) port Connects to remove/install the card. Note: Push to a display device (e.g., external monitor, LCD projector). HDMI port USB 2.0 port 5-in-1 card reader PC Card slot Supports high definition digital video connections (only for certain models). Connect to an Ethernet 10/100/1000based network. Accepts one card can operate at any given time. Only one Type II PC Card. 8 PC Card slot eject Ejects the PC Card from the slot. button 9 Left view English 12 3 4 5 6 78 # Icon 1 2 3 4 HDMI 5 6 7 Item Acer EasyPort IV connector Description ...
TravelMate 4730/4730G Quick Guide
Page 12
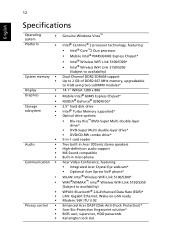
... GS* 2.5" hard disk drive Intel® Turbo Memory supported* Optical drive options: • Blu-ray Disc™/DVD-Super Multi double-layer drive* • DVD-Super Multi double-layer drive* • DVD/CD-RW combo drive* 5-in-1 card reader Two built-in Acer 3DSonic stereo speakers High-definition audio support MS-Sound compatible Built-in microphone Acer Video Conference, featuring: • Integrated Acer Crystal Eye webcam* • Optional Acer Xpress VoIP phone* WLAN: Intel® Wireless WiFi Link 5100...
... GS* 2.5" hard disk drive Intel® Turbo Memory supported* Optical drive options: • Blu-ray Disc™/DVD-Super Multi double-layer drive* • DVD-Super Multi double-layer drive* • DVD/CD-RW combo drive* 5-in-1 card reader Two built-in Acer 3DSonic stereo speakers High-definition audio support MS-Sound compatible Built-in microphone Acer Video Conference, featuring: • Integrated Acer Crystal Eye webcam* • Optional Acer Xpress VoIP phone* WLAN: Intel® Wireless WiFi Link 5100...

TravelMate 4730/4730G Service Guide
Page 7
...12 Windows Keys 13 Hot Keys 14 Special Key 15 Using the System Utilities 16 Acer GridVista (dual-display compatible 16 Hardware Specifications and Configurations 18 System Utilities 25 BIOS Setup Utility 25 Navigating the BIOS Utility 25 Information 26 Main 27 Advanced 28 Security 30 Power 33 Boot 35 Exit 36 BIOS Flash Utility 37 Remove HDD/BIOS Utility 39 Machine Disassembly and Replacement 43 Disassembly Requirements 43 General Information 44 Pre-disassembly Instructions 44 Disassembly Process 44 External Module Disassembly Process 45 External Modules Disassembly...
...12 Windows Keys 13 Hot Keys 14 Special Key 15 Using the System Utilities 16 Acer GridVista (dual-display compatible 16 Hardware Specifications and Configurations 18 System Utilities 25 BIOS Setup Utility 25 Navigating the BIOS Utility 25 Information 26 Main 27 Advanced 28 Security 30 Power 33 Boot 35 Exit 36 BIOS Flash Utility 37 Remove HDD/BIOS Utility 39 Machine Disassembly and Replacement 43 Disassembly Requirements 43 General Information 44 Pre-disassembly Instructions 44 Disassembly Process 44 External Module Disassembly Process 45 External Modules Disassembly...
TravelMate 4730/4730G Service Guide
Page 8
... Port 103 Replacing the Mainboard 105 Replacing the Modem Module 106 Replacing the Bluetooth Board 107 Replacing the Right Speaker Module 107 Replacing the Launch Board 109 Replacing the Finger Print Reader 110 Replacing the Touch Pad Bracket 110 Replacing the Left Speaker Module 111 Replacing the Upper Cover 111 Replacing the LCD Module 113 Replacing the Antenna Cables 115 Replacing the Keyboard 117 Replacing the Switch Cover 117 Replacing the WLAN Module 119 Replacing the Hard Disk Drive Module 119 Replacing the DIMM Modules 120 Replacing the ODD Module 121 Replacing...
... Port 103 Replacing the Mainboard 105 Replacing the Modem Module 106 Replacing the Bluetooth Board 107 Replacing the Right Speaker Module 107 Replacing the Launch Board 109 Replacing the Finger Print Reader 110 Replacing the Touch Pad Bracket 110 Replacing the Left Speaker Module 111 Replacing the Upper Cover 111 Replacing the LCD Module 113 Replacing the Antenna Cables 115 Replacing the Keyboard 117 Replacing the Switch Cover 117 Replacing the WLAN Module 119 Replacing the Hard Disk Drive Module 119 Replacing the DIMM Modules 120 Replacing the ODD Module 121 Replacing...
TravelMate 4730/4730G Service Guide
Page 9
... Port 80 POST Codes 142 POST Keys and Messages 144 Jumper and Connector Locations 145 Top View 145 Bottom View 146 Clearing Password Check and BIOS Recovery 147 Clearing Password Check 147 BIOS Recovery by Crisis Disk 148 FRU (Field Replaceable Unit) List 149 TravelMate 4730/4730G Exploded Diagrams 150 Main Module 150 LCD Module 151 TravelMate 4730/4730G FRU List 152 Model Definition and Configuration 166 TravelMate 4730/4730G Series 166 Test Compatible Components 175 Microsoft® Windows® Vista...
... Port 80 POST Codes 142 POST Keys and Messages 144 Jumper and Connector Locations 145 Top View 145 Bottom View 146 Clearing Password Check and BIOS Recovery 147 Clearing Password Check 147 BIOS Recovery by Crisis Disk 148 FRU (Field Replaceable Unit) List 149 TravelMate 4730/4730G Exploded Diagrams 150 Main Module 150 LCD Module 151 TravelMate 4730/4730G FRU List 152 Model Definition and Configuration 166 TravelMate 4730/4730G Series 166 Test Compatible Components 175 Microsoft® Windows® Vista...
TravelMate 4730/4730G Service Guide
Page 16
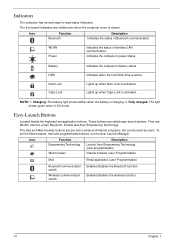
... inputs from external microphones. Enables/disables the wireless function. Easy-launch buttons Productivity Keys Buttons for launching frequently used programs. Three productivity keys give users one-touch access to protection and manageability features for a more secure, smarter and easier way to audio line-out devices (e.g., speakers, headphones). Touch-sensitive pointing device which functions like the left and right mouse buttons. *The center button serves as Acer BioProtection fingerprint reader supporting Acer FingerNav 4-way control function (only for certain models). No...
... inputs from external microphones. Enables/disables the wireless function. Easy-launch buttons Productivity Keys Buttons for launching frequently used programs. Three productivity keys give users one-touch access to protection and manageability features for a more secure, smarter and easier way to audio line-out devices (e.g., speakers, headphones). Touch-sensitive pointing device which functions like the left and right mouse buttons. *The center button serves as Acer BioProtection fingerprint reader supporting Acer FingerNav 4-way control function (only for certain models). No...
TravelMate 4730/4730G Service Guide
Page 20
... users. Lights up when Caps Lock is active. Fully charged: The light shows green when in AC mode. WLAN Power Indicates the status of Bluetooth communication. Enables/disables the wireless function. 10 Chapter 1 Indicates the computer's power status. Easy-Launch Buttons Located beside the keyboard are : WLAN, Internet, email, Bluetooth, Arcade and Acer Empowering Technology. Indicates when the hard disk drive is activated. Lights up when Num Lock is closed. They are application buttons. To set to -read status indicators: The front panel indicators...
... users. Lights up when Caps Lock is active. Fully charged: The light shows green when in AC mode. WLAN Power Indicates the status of Bluetooth communication. Enables/disables the wireless function. 10 Chapter 1 Indicates the computer's power status. Easy-Launch Buttons Located beside the keyboard are : WLAN, Internet, email, Bluetooth, Arcade and Acer Empowering Technology. Indicates when the hard disk drive is activated. Lights up when Num Lock is closed. They are application buttons. To set to -read status indicators: The front panel indicators...
TravelMate 4730/4730G Service Guide
Page 35
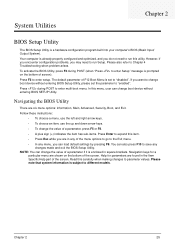
... Exit. Help for a particular menu are in the Item Specific Help part of the menu options to go to enter Setup" message is a hardware configuration program built into your computer's BIOS (Basic Input/ Output System). Follow these instructions: • To choose a menu, use the left and right arrow keys. • To choose an item, use the up and down arrow keys. • To change boot device without entering BIOS Setup Utility, please set to "disabled".
... Exit. Help for a particular menu are in the Item Specific Help part of the menu options to go to enter Setup" message is a hardware configuration program built into your computer's BIOS (Basic Input/ Output System). Follow these instructions: • To choose a menu, use the left and right arrow keys. • To choose an item, use the up and down arrow keys. • To change boot device without entering BIOS Setup Utility, please set to "disabled".
TravelMate 4730/4730G Service Guide
Page 36
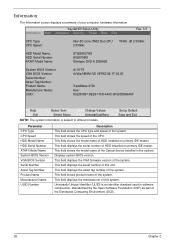
...). 26 Chapter 2 InsydeH20 Setup Utility Information Main Advanced Security Power Boot Exit Rev. 3.5 CPU Type: CPU Speed: Intel (R) Core (TM)2 Duo CPU 2.53GHz T9400 @ 2.53GHz HDD Model Name: HDD Serial Number: ATAPI Model Name: ST9250827AS 5RG01NK8 Slimtype DVD A DS8A2S System BIOS Version: VGA BIOS Version: Serial Number: Asset Tag Number: Product Name: Manufacturer Name: UUID: v0.16-T6 nVidia NB9M-GS VER62.98.1F.00.00 TravelMate 4730 Acer DCEB0597-DE29-11D3-444C...
...). 26 Chapter 2 InsydeH20 Setup Utility Information Main Advanced Security Power Boot Exit Rev. 3.5 CPU Type: CPU Speed: Intel (R) Core (TM)2 Duo CPU 2.53GHz T9400 @ 2.53GHz HDD Model Name: HDD Serial Number: ATAPI Model Name: ST9250827AS 5RG01NK8 Slimtype DVD A DS8A2S System BIOS Version: VGA BIOS Version: Serial Number: Asset Tag Number: Product Name: Manufacturer Name: UUID: v0.16-T6 nVidia NB9M-GS VER62.98.1F.00.00 TravelMate 4730 Acer DCEB0597-DE29-11D3-444C...
TravelMate 4730/4730G Service Guide
Page 40
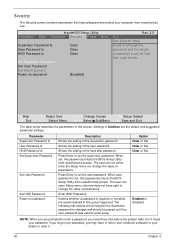
...set , this password protects the BIOS Setup Utility from unauthorized use. If you forget your password, you may have right to reset it. 30 Chapter 2 Parameter Supervisor Password Is User Password Is HDD Password Is Set Supervisor Password Set User Password Set HDD Password Power on password [Enabled] Rev. 3.5 Exit Item Specific Help Install or Change the password and the length of parameters. The following sub-options are prompted to set , this password protects the BIOS Setup Utility from unauthorized access. Settings in this screen. The user can enter Setup menu...
...set , this password protects the BIOS Setup Utility from unauthorized use. If you forget your password, you may have right to reset it. 30 Chapter 2 Parameter Supervisor Password Is User Password Is HDD Password Is Set Supervisor Password Set User Password Set HDD Password Power on password [Enabled] Rev. 3.5 Exit Item Specific Help Install or Change the password and the length of parameters. The following sub-options are prompted to set , this password protects the BIOS Setup Utility from unauthorized access. Settings in this screen. The user can enter Setup menu...
TravelMate 4730/4730G Service Guide
Page 41
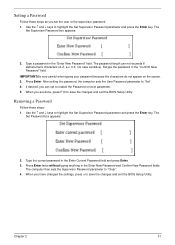
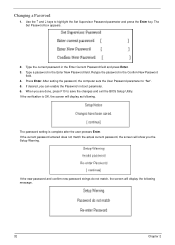
... the changes and exit the BIOS Setup Utility. Chapter 2 31 Press Enter. The Set Password box appears: 2. Use the ↑ and ↓ keys to "Set". 4. Type a password in the "Confirm New Password" field. Retype the password in the "Enter New Password" field. IMPORTANT:Be very careful when typing your password because the characters do not appear on boot parameter. 5. Setting a Password Follow these steps: 1. The password length can opt to enable the Password on the screen. 3. If...
... the changes and exit the BIOS Setup Utility. Chapter 2 31 Press Enter. The Set Password box appears: 2. Use the ↑ and ↓ keys to "Set". 4. Type a password in the "Confirm New Password" field. Retype the password in the "Enter New Password" field. IMPORTANT:Be very careful when typing your password because the characters do not appear on boot parameter. 5. Setting a Password Follow these steps: 1. The password length can opt to enable the Password on the screen. 3. If...
TravelMate 4730/4730G Service Guide
Page 42
... New Password field. 4. After setting the password, the computer sets the User Password parameter to save the changes and exit the BIOS Setup Utility. If the current password entered does not match the actual current password, the screen will display as following message. 32 Chapter 2 Use the ↑ and ↓ keys to highlight the Set Supervisor Password parameter and press the Enter key. Changing a Password 1. The password setting is OK, the screen will show you can enable the Password...
... New Password field. 4. After setting the password, the computer sets the User Password parameter to save the changes and exit the BIOS Setup Utility. If the current password entered does not match the actual current password, the screen will display as following message. 32 Chapter 2 Use the ↑ and ↓ keys to highlight the Set Supervisor Password parameter and press the Enter key. Changing a Password 1. The password setting is OK, the screen will show you can enable the Password...
TravelMate 4730/4730G Service Guide
Page 47
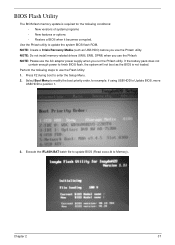
...; New versions of system programs • New features or options • Restore a BIOS when it becomes corrupted. BIOS Flash Utility The BIOS flash memory update is not loaded. If the battery pack does not contain enough power to use the Flash Utility: 1. NOTE: Create a Crisis Recovery Media (such as the BIOS is required for example, if using USB HDD to Update BIOS, move USB HDD to Memory). Chapter 2 37 Use the Phlash utility to enter the Setup Menu. 2. Press F2 during boot to update the system BIOS flash ROM.
...; New versions of system programs • New features or options • Restore a BIOS when it becomes corrupted. BIOS Flash Utility The BIOS flash memory update is not loaded. If the battery pack does not contain enough power to use the Flash Utility: 1. NOTE: Create a Crisis Recovery Media (such as the BIOS is required for example, if using USB HDD to Update BIOS, move USB HDD to Memory). Chapter 2 37 Use the Phlash utility to enter the Setup Menu. 2. Press F2 during boot to update the system BIOS flash ROM.
TravelMate 4730/4730G Service Guide
Page 133
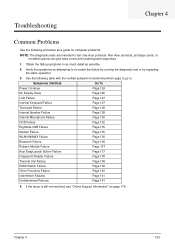
... Acer products. Troubleshooting Chapter 4 Common Problems Use the following table with the verified symptom to determine which page to go to. Non-Acer products, prototype cards, or modified options can give false errors and invalid system responses. 1. Symptoms (Verified) Go To Power On Issue Page 124 No Display Issue Page 125 LCD Failure Page 127 Internal Keyboard Failure Page 127 Touchpad Failure Page 128 Internal...
... Acer products. Troubleshooting Chapter 4 Common Problems Use the following table with the verified symptom to determine which page to go to. Non-Acer products, prototype cards, or modified options can give false errors and invalid system responses. 1. Symptoms (Verified) Go To Power On Issue Page 124 No Display Issue Page 125 LCD Failure Page 127 Internal Keyboard Failure Page 127 Touchpad Failure Page 128 Internal...
TravelMate 4730/4730G Service Guide
Page 135
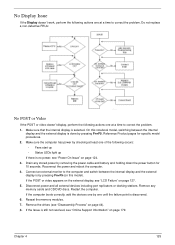
... boots correctly, add the devices one by pressing Fn+F5 (on page 179. Remove the drives (see "LCD Failure" on page 44). 8. Reference Product pages for 10 seconds. Connect an external monitor to the computer and switch between the internal display and the external display is by one until the failure point is no power, see "Online Support Information" on this notebook model, switching between the internal display and the external display...
... boots correctly, add the devices one by pressing Fn+F5 (on page 179. Remove the drives (see "LCD Failure" on page 44). 8. Reference Product pages for 10 seconds. Connect an external monitor to the computer and switch between the internal display and the external display is by one until the failure point is no power, see "Online Support Information" on this notebook model, switching between the internal display and the external display...
TravelMate 4730/4730G Service Guide
Page 136
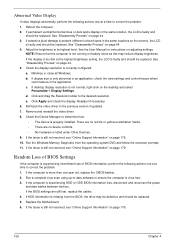
... the highest brightness setting, the LCD is faulty and should be replaced. There are no device conflicts. • No hardware is virus free. 3. Replace the Motherboard. 6. Roll back the video driver to ensure the computer is listed under Other Devices. 9. If the computer is experiencing HDD or ODD BIOS information loss, disconnect and reconnect the power and data cables between devices. If extensive pixel damage is correctly configured: a. Run...
... the highest brightness setting, the LCD is faulty and should be replaced. There are no device conflicts. • No hardware is virus free. 3. Replace the Motherboard. 6. Roll back the video driver to ensure the computer is listed under Other Devices. 9. If the computer is experiencing HDD or ODD BIOS information loss, disconnect and reconnect the power and data cables between devices. If extensive pixel damage is correctly configured: a. Run...
TravelMate 4730/4730G Service Guide
Page 141
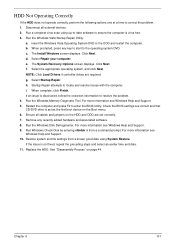
... the BIOS settings are required. Run the Windows Disk Defragmenter. For more information see Windows Help and Support. 5. See "Disassembly Process" on the Boot menu. 6. c. Select Repair your computer. Select the appropriate operating system, and click Next. h. Remove any key to start to ensure the computer is set correctly. 7. The Install Windows screen displays. NOTE: Click Load Drivers if controller drives are correct and that CD/DVD drive is virus free. 3. Ensure all external devices. 2. Replace the HDD. i. HDD Not Operating...
... the BIOS settings are required. Run the Windows Disk Defragmenter. For more information see Windows Help and Support. 5. See "Disassembly Process" on the Boot menu. 6. c. Select Repair your computer. Select the appropriate operating system, and click Next. h. Remove any key to start to ensure the computer is set correctly. 7. The Install Windows screen displays. NOTE: Click Load Drivers if controller drives are correct and that CD/DVD drive is virus free. 3. Ensure all external devices. 2. Replace the HDD. i. HDD Not Operating...
TravelMate 4730/4730G Service Guide
Page 150
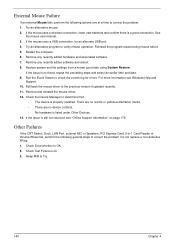
... Card, 5-in-1 Card Reader or Volume Wheel fail, perform the following actions one at a time to correct the problem. 1. Check Drive whether is not fixed, repeat the preceding steps and select an earlier time and date. 9. Swap M/B to correct the problem. If the mouse uses a USB connection, try an alternate USB port. 4. If the issue is OK. 2. Remove and reinstall the mouse driver. 12. If the mouse uses a wireless connection, insert new batteries...
... Card, 5-in-1 Card Reader or Volume Wheel fail, perform the following actions one at a time to correct the problem. 1. Check Drive whether is not fixed, repeat the preceding steps and select an earlier time and date. 9. Swap M/B to correct the problem. If the mouse uses a USB connection, try an alternate USB port. 4. If the issue is OK. 2. Remove and reinstall the mouse driver. 12. If the mouse uses a wireless connection, insert new batteries...
TravelMate 4730/4730G Service Guide
Page 192
... LCD Failure 127 LCD Module Disassembly Flowchart 88 LCD Panel 93 lower cover 49 M Main Unit Disassembly Flowchart 58 Mainboard 79 media access on indicator 10 MediaTouch Button Failure 138 Memory Check 124 Model Definition 166 Modem Failure 135 Modem Module 78 N No Display Issue 125 Notebook Manager hotkey 14 num lock on indicator 10 O ODD Failure 132 Online Support Information 179 optical drive module 56 P Panel 5 Bottom 9 left 5 PC Card 10 Port 80 POST Codes 142 POST Codes Port...
... LCD Failure 127 LCD Module Disassembly Flowchart 88 LCD Panel 93 lower cover 49 M Main Unit Disassembly Flowchart 58 Mainboard 79 media access on indicator 10 MediaTouch Button Failure 138 Memory Check 124 Model Definition 166 Modem Failure 135 Modem Module 78 N No Display Issue 125 Notebook Manager hotkey 14 num lock on indicator 10 O ODD Failure 132 Online Support Information 179 optical drive module 56 P Panel 5 Bottom 9 left 5 PC Card 10 Port 80 POST Codes 142 POST Codes Port...


