TravelMate 3200 Service Guide
Page 23
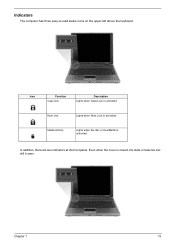
Indicators The computer has three easy-to-read status icons on the upper-left above the keyboard. Icon Function Description Chapter 1 15 In addition, there are two indicators at the front panel. Media Activity Lights when the disc or AcerMedia is closed, the state or features can still b seen. Even when the cover is activated. Num lock Lights when Num Lock is activated. Icon Icon FuFnucnticotnion Caps lock Description Description Lights when Caps Lock is activated.
Indicators The computer has three easy-to-read status icons on the upper-left above the keyboard. Icon Function Description Chapter 1 15 In addition, there are two indicators at the front panel. Media Activity Lights when the disc or AcerMedia is closed, the state or features can still b seen. Even when the cover is activated. Num lock Lights when Num Lock is activated. Icon Icon FuFnucnticotnion Caps lock Description Description Lights when Caps Lock is activated.
TravelMate 3200 Service Guide
Page 38
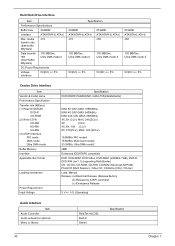
...-ROM DVD-R CD-ROM (2) Write CD-R CD-RW HS-RW US-RW (3) ATAPI Interface PIO mode DMA mode Ultra DMA mode Buffer Memory Interface Applicable disc format Loading mechanism Power Requirement Input Voltage Specification DVD/CDRW PANASONIC UJDA-755(24x24x8x24x) MAX 8X CAV (MAX 10800kB/s) MAX 4X CAV (MAX 5400kB/s) MAX...
...-ROM DVD-R CD-ROM (2) Write CD-R CD-RW HS-RW US-RW (3) ATAPI Interface PIO mode DMA mode Ultra DMA mode Buffer Memory Interface Applicable disc format Loading mechanism Power Requirement Input Voltage Specification DVD/CDRW PANASONIC UJDA-755(24x24x8x24x) MAX 8X CAV (MAX 10800kB/s) MAX 4X CAV (MAX 5400kB/s) MAX...
TravelMate 3200 Service Guide
Page 42
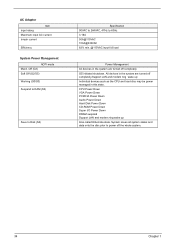
... Efficiency System Power Management ACPI mode Mech. All devices in the system are turned off completely. System saves all system states and data onto the disc prior to 63Hz 3.16A 50A@115VAC 100A@230VAC 83% min. @115VAC input full load Power Management All devices in this state. Off (G3) Soft Off... Down CD-ROM Power Down Super I/O Power Down DRAM suspand Support LAN and modem ring wake up Individual devices such as the CPU and hard disc may be power managed in the system are turned off the whole system. 34 Chapter 1 OS initiated shutdown.
... Efficiency System Power Management ACPI mode Mech. All devices in the system are turned off completely. System saves all system states and data onto the disc prior to 63Hz 3.16A 50A@115VAC 100A@230VAC 83% min. @115VAC input full load Power Management All devices in this state. Off (G3) Soft Off... Down CD-ROM Power Down Super I/O Power Down DRAM suspand Support LAN and modem ring wake up Individual devices such as the CPU and hard disc may be power managed in the system are turned off the whole system. 34 Chapter 1 OS initiated shutdown.
TravelMate 3200 Service Guide
Page 45
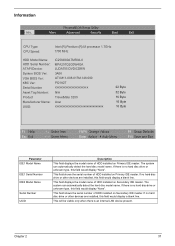
...display a blank line. Information . If no hard disc drive or unknown type, this field would display "None". If no hard disc drive or unknown type, this field would display "None". If there is no hard disc drive or other devices are installed, this field would... Asset Tag Number: Product Manufacturer Name: UUID: IC25N080ATMR04-0 MPA201Q2G0W4GA UJDA755 DVD/CDRW 3A06 ATI M11-008.017M.146.000 PQ1A27 xxxxxxxxxxxxxxxxxxxxxx N/A TravelMate 3200 Acer xxxxxxxxxxxxxxxxxxxxxxxxxxxxxxxx 22 Byte 32 Byte 16 Byte 16 Byte 16 Byte F1 Help Esc Exit ↑ ↓ Select Item ← →...
...display a blank line. Information . If no hard disc drive or unknown type, this field would display "None". If no hard disc drive or unknown type, this field would display "None". If there is no hard disc drive or other devices are installed, this field would... Asset Tag Number: Product Manufacturer Name: UUID: IC25N080ATMR04-0 MPA201Q2G0W4GA UJDA755 DVD/CDRW 3A06 ATI M11-008.017M.146.000 PQ1A27 xxxxxxxxxxxxxxxxxxxxxx N/A TravelMate 3200 Acer xxxxxxxxxxxxxxxxxxxxxxxxxxxxxxxx 22 Byte 32 Byte 16 Byte 16 Byte 16 Byte F1 Help Esc Exit ↑ ↓ Select Item ← →...
TravelMate 3200 Service Guide
Page 47
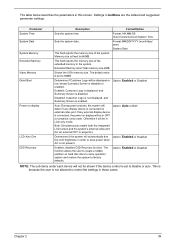
... on display will be in CRT (or projector) only mode. Settings in this screen. This is because the user is connected, the power on hard disc drive to store operation system and restore the system to 64MB Determines if Customer Logo will be displayed or not; Chapter 2 39 Parameter System Time...
... on display will be in CRT (or projector) only mode. Settings in this screen. This is because the user is connected, the power on hard disc drive to store operation system and restore the system to 64MB Determines if Customer Logo will be displayed or not; Chapter 2 39 Parameter System Time...
TravelMate 3200 Service Guide
Page 59
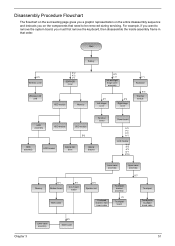
... hinge cover assembly K*1 Left hinger cover K*2 Right hinge cover F*1 Keyboard K*5 Thermal module HDD assembly HDD bracket ODD module B*2 Function board HDD assembly HDD bracket Optical disc drive Optical bracket Power board A*2 F*3 A*2 A*1 LCD module K*2 K*3 A*2 G*1 E*10 Memory K*1 Modem board K*1 3 in that need to be removed during servicing. Disassembly Procedure Flowchart The flowchart on...
... hinge cover assembly K*1 Left hinger cover K*2 Right hinge cover F*1 Keyboard K*5 Thermal module HDD assembly HDD bracket ODD module B*2 Function board HDD assembly HDD bracket Optical disc drive Optical bracket Power board A*2 F*3 A*2 A*1 LCD module K*2 K*3 A*2 G*1 E*10 Memory K*1 Modem board K*1 3 in that need to be removed during servicing. Disassembly Procedure Flowchart The flowchart on...

TravelMate 3200 Service Guide
Page 71
Disassembling the Optical Drive Module 1. Detach the ODD bracket. Disconnect the HDD cable then remove it. Remove the two screws holding the HDD bracket on the other side. 3. Disassembling the External Modules Disassembling the HDD Module 1. Remove the two screws holding the ODD bracket. 2. Detach the hard disc drive from the HDD bracket. 4. Chapter 3 63 Remove the two screws holding the HDD bracket on one side. 2.
Disassembling the Optical Drive Module 1. Detach the ODD bracket. Disconnect the HDD cable then remove it. Remove the two screws holding the HDD bracket on the other side. 3. Disassembling the External Modules Disassembling the HDD Module 1. Remove the two screws holding the ODD bracket. 2. Detach the hard disc drive from the HDD bracket. 4. Chapter 3 63 Remove the two screws holding the HDD bracket on one side. 2.

TravelMate 3200 User's Guide
Page 8
2 Customizing my computer 35 Expanding through options 37 Connectivity options 37 Upgrade options 43 Using system utilities 45 Acer eManager 45 Launch Manager 46 BIOS Utility 46 D to D Recovery (Disc to Disc) 47 Multilingual operating system installation 47 Restore without a Recovery CD 47 Setup password and exit 48 3 Troubleshooting my computer 49 Frequently-asked questions 51 Troubleshooting tips 54 Error messages 55 Requesting service 56 ITW 56 Before you call 57 Appendix A Specifications 59 Appendix B Regulation & safety notices 65 Index 81
2 Customizing my computer 35 Expanding through options 37 Connectivity options 37 Upgrade options 43 Using system utilities 45 Acer eManager 45 Launch Manager 46 BIOS Utility 46 D to D Recovery (Disc to Disc) 47 Multilingual operating system installation 47 Restore without a Recovery CD 47 Setup password and exit 48 3 Troubleshooting my computer 49 Frequently-asked questions 51 Troubleshooting tips 54 Error messages 55 Requesting service 56 ITW 56 Before you call 57 Appendix A Specifications 59 Appendix B Regulation & safety notices 65 Index 81

TravelMate 3200 User's Guide
Page 33
..., it will remain permanent. You can play after which the last region code set will play DVD discs of that region only. Recovering your computer. 1 Eject the DVD tray and insert a DVD movie disc; When you launch the DVD player for DVD movie region code information. 2 The DVD movie will... U.S.S.R., parts of Africa, India People's Republic of China Note: To change the region code, insert a DVD movie of a different region into 6 regions. DVD discs are divided into the DVD drive. English 25 Playing DVD movies When the DVD drive module is set to input the region code. then close...
..., it will remain permanent. You can play after which the last region code set will play DVD discs of that region only. Recovering your computer. 1 Eject the DVD tray and insert a DVD movie disc; When you launch the DVD player for DVD movie region code information. 2 The DVD movie will... U.S.S.R., parts of Africa, India People's Republic of China Note: To change the region code, insert a DVD movie of a different region into 6 regions. DVD discs are divided into the DVD drive. English 25 Playing DVD movies When the DVD drive module is set to input the region code. then close...

TravelMate 3200 User's Guide
Page 35
...are taking the computer to a client's office or a different building, you tips and hints on Turn Off. English 27 Moving around with your TravelMate This section gives you may choose to shut down the computer: 1 Click on Start, Turn Off Computer. 2 Click on things to consider when...desk to a meeting room" Preparing the computer Before moving the computer, close the display cover to place it in progress. 2 Remove any media or compact disc from the drive(s). 3 Shut down the operating system. 4 Turn off the computer. 5 Close the display cover. 6 Disconnect the cord from external accessories...
...are taking the computer to a client's office or a different building, you tips and hints on Turn Off. English 27 Moving around with your TravelMate This section gives you may choose to shut down the computer: 1 Click on Start, Turn Off Computer. 2 Click on things to consider when...desk to a meeting room" Preparing the computer Before moving the computer, close the display cover to place it in progress. 2 Remove any media or compact disc from the drive(s). 3 Shut down the operating system. 4 Turn off the computer. 5 Close the display cover. 6 Disconnect the cord from external accessories...
TravelMate 3200 User's Guide
Page 36
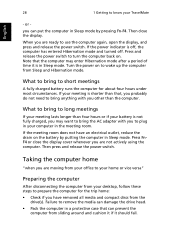
... switch to turn the computer back on the battery by pressing Fn-F4. If the meeting room does not have removed all media and compact discs from Sleep and Hibernation mode. What to bring to long meetings If your meeting lasts longer than the computer. Taking the computer home "when you... for the trip home: • Check if you have an electrical outlet, reduce the drain on . Then press and release the power switch. If your TravelMate English - 28 1 Getting to know your meeting is shorter than that, you probably do not need to bring anything with you to plug in Sleep...
... switch to turn the computer back on the battery by pressing Fn-F4. If the meeting room does not have removed all media and compact discs from Sleep and Hibernation mode. What to bring to long meetings If your meeting lasts longer than the computer. Taking the computer home "when you... for the trip home: • Check if you have an electrical outlet, reduce the drain on . Then press and release the power switch. If your TravelMate English - 28 1 Getting to know your meeting is shorter than that, you probably do not need to bring anything with you to plug in Sleep...
TravelMate 3200 User's Guide
Page 55
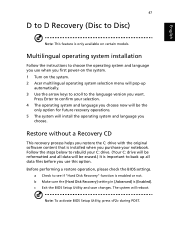
English 47 D to D Recovery (Disc to Disc) Note: This feature is enabled or not. Restore without a Recovery CD This recovery process helps you restore the C: drive with the original software content that ... system will be reformatted and all data files before you want. a Check to see if "Hard Disk Recovery" function is only available on the system. 2 Acer multilingual operating system selection menu will pop-up all data will install the operating system and language you choose. The system will be erased.) It...
English 47 D to D Recovery (Disc to Disc) Note: This feature is enabled or not. Restore without a Recovery CD This recovery process helps you restore the C: drive with the original software content that ... system will be reformatted and all data files before you want. a Check to see if "Hard Disk Recovery" function is only available on the system. 2 Acer multilingual operating system selection menu will pop-up all data will install the operating system and language you choose. The system will be erased.) It...
TravelMate 3200 User's Guide
Page 61
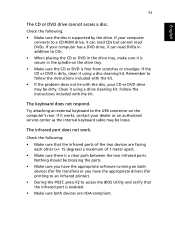
...infrared ports of 1 meter apart. • Make sure there is free from scratches or smudges. Check the following : • Make sure the disc is enabled. • Make sure both devices (for file transfers) or you have the appropriate software running on the computer's rear. The keyboard ...does not respond. English 53 The CD or DVD drive cannot access a disc. Remember to the USB connector on both devices are facing each other (+/- 15 degrees) a maximum of the two devices are IrDA-compliant. ...
...infrared ports of 1 meter apart. • Make sure there is free from scratches or smudges. Check the following : • Make sure the disc is enabled. • Make sure both devices (for file transfers) or you have the appropriate software running on the computer's rear. The keyboard ...does not respond. English 53 The CD or DVD drive cannot access a disc. Remember to the USB connector on both devices are facing each other (+/- 15 degrees) a maximum of the two devices are IrDA-compliant. ...


