
TravelMate 3200 Service Guide
Page 46
... Advanced Security Boot Exit System Time: System Date: System Memory: Extended Memory: Video Memory Quiet Boot: Power on Display: Network Boot: F12 Boot Menu: D2D Recovery: Item Specific Help [13:20:53] [07/09/2004] , , or 640 KB selects field. PhoenixBIOS Setup Utility Info.
... Advanced Security Boot Exit System Time: System Date: System Memory: Extended Memory: Video Memory Quiet Boot: Power on Display: Network Boot: F12 Boot Menu: D2D Recovery: Item Specific Help [13:20:53] [07/09/2004] , , or 640 KB selects field. PhoenixBIOS Setup Utility Info.
TravelMate 3200 Service Guide
Page 47
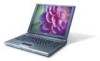
... LCD only mode. The table below describes the parameters in these cases. shows Summary Screen is fixed to factory defaults. Enables, disables D2D Recovery function. This is because the user is connected on display will not be in order to create a hidden partition on display LCD Auto Dim... D2D Recovery Description Format/Option Sets the system time. The default value is connected, the power on external video port. If any external display device ...
... LCD only mode. The table below describes the parameters in these cases. shows Summary Screen is fixed to factory defaults. Enables, disables D2D Recovery function. This is because the user is connected on display will not be in order to create a hidden partition on display LCD Auto Dim... D2D Recovery Description Format/Option Sets the system time. The default value is connected, the power on external video port. If any external display device ...
TravelMate 3200 Service Guide
Page 55
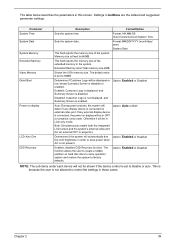
... the Phlash. Fellow the steps below to finish BIOS flash, you run the Phlash. 1. NOTE: If you do not have a crisis recovery diskette at hand, then you should create a Crisis Recovery Diskette before you use the AC adaptor power supply when you may not boot the system because the BIOS is required...
... the Phlash. Fellow the steps below to finish BIOS flash, you run the Phlash. 1. NOTE: If you do not have a crisis recovery diskette at hand, then you should create a Crisis Recovery Diskette before you use the AC adaptor power supply when you may not boot the system because the BIOS is required...
TravelMate 3200 Service Guide
Page 81
... Setup System Management Mode (SMM) area Display external L2 cache size Load custom defaults (optional) Display shadow-area message Display possible high address for UMB recovery Display error messages Check for configuration errors Check for keyboard errors Set up hardware interrupt vectors Initialize coprocessor if present Disable onboard Super I/O ports and...
... Setup System Management Mode (SMM) area Display external L2 cache size Load custom defaults (optional) Display shadow-area message Display possible high address for UMB recovery Display error messages Check for configuration errors Check for keyboard errors Set up hardware interrupt vectors Initialize coprocessor if present Disable onboard Super I/O ports and...
TravelMate 3200 Service Guide
Page 83
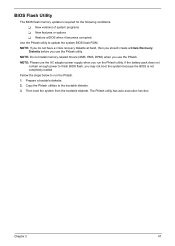
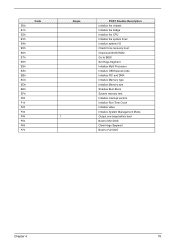
... F4h F5h F6h F7h Beeps 1 POST Routine Description Initialize the chipset Initialize the bridge Initialize the CPU Initialize the system timer Initialize system I/O Check force recovery boot Checksum BIOS ROM Go to BIOS Set Huge Segment Initialize Multi Processor Initialize OEM special code Initialize PIC and DMA Initialize Memory type Initialize...
... F4h F5h F6h F7h Beeps 1 POST Routine Description Initialize the chipset Initialize the bridge Initialize the CPU Initialize the system timer Initialize system I/O Check force recovery boot Checksum BIOS ROM Go to BIOS Set Huge Segment Initialize Multi Processor Initialize OEM special code Initialize PIC and DMA Initialize Memory type Initialize...

TravelMate 3200 User's Guide
Page 8
2 Customizing my computer 35 Expanding through options 37 Connectivity options 37 Upgrade options 43 Using system utilities 45 Acer eManager 45 Launch Manager 46 BIOS Utility 46 D to D Recovery (Disc to Disc) 47 Multilingual operating system installation 47 Restore without a Recovery CD 47 Setup password and exit 48 3 Troubleshooting my computer 49 Frequently-asked questions 51 Troubleshooting tips 54 Error messages 55 Requesting service 56 ITW 56 Before you call 57 Appendix A Specifications 59 Appendix B Regulation & safety notices 65 Index 81
2 Customizing my computer 35 Expanding through options 37 Connectivity options 37 Upgrade options 43 Using system utilities 45 Acer eManager 45 Launch Manager 46 BIOS Utility 46 D to D Recovery (Disc to Disc) 47 Multilingual operating system installation 47 Restore without a Recovery CD 47 Setup password and exit 48 3 Troubleshooting my computer 49 Frequently-asked questions 51 Troubleshooting tips 54 Error messages 55 Requesting service 56 ITW 56 Before you call 57 Appendix A Specifications 59 Appendix B Regulation & safety notices 65 Index 81
TravelMate 3200 User's Guide
Page 55
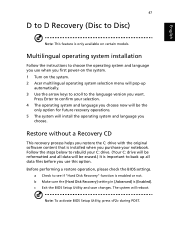
... system and language you choose. Before performing a restore operation, please check the BIOS settings. a Check to see if "Hard Disk Recovery" function is [Enabled]. The system will pop-up automatically. 3 Use the arrow keys to scroll to the language version you want....Turn on certain models. Restore without a Recovery CD This recovery process helps you restore the C: drive with the original software content that is only available on the system. 2 Acer multilingual operating system selection menu will reboot. English 47 D to D Recovery (Disc to Disc) Note: This feature...
... system and language you choose. Before performing a restore operation, please check the BIOS settings. a Check to see if "Hard Disk Recovery" function is [Enabled]. The system will pop-up automatically. 3 Use the arrow keys to scroll to the language version you want....Turn on certain models. Restore without a Recovery CD This recovery process helps you restore the C: drive with the original software content that is only available on the system. 2 Acer multilingual operating system selection menu will reboot. English 47 D to D Recovery (Disc to Disc) Note: This feature...

TravelMate 3200 User's Guide
Page 56
..." to setup password or press "F5" to reboot your system. Press any key to reboot...", hit any key to exit the system recovery process when "Acer Self-Configuration Preload" window appears. The screen will be asked to reenter your hard drive. If "F5" is displayed. 5 Enter six... 0s and continue. 6 "Acer Self-Configuration Preload" window appears. 7 Use the arrow keys to scroll through the items (operating system versions) and press "Enter" to enter the recovery process. 4 The message "The system has password protection. Please enter 000000:" is...
..." to setup password or press "F5" to reboot your system. Press any key to reboot...", hit any key to exit the system recovery process when "Acer Self-Configuration Preload" window appears. The screen will be asked to reenter your hard drive. If "F5" is displayed. 5 Enter six... 0s and continue. 6 "Acer Self-Configuration Preload" window appears. 7 Use the arrow keys to scroll through the items (operating system versions) and press "Enter" to enter the recovery process. 4 The message "The system has password protection. Please enter 000000:" is...


