TravelMate 3200 Service Guide
Page 7
... Keys 23 Touchpad 25 Touchpad Basics 25 Hardware Specifications and Configurations 27 Chapter 2 System Utilities 35 BIOS Setup Utility 35 Navigating the BIOS Utility 36 Information 37 Main 38 Advanced 40 Security 41 Boot 45 Exit 46 BIOS Flash Utility 47 Chapter 3 Machine Disassembly and Replacement 49 General Information 50 Before You Begin 50 Disassembly Procedure Flowchart 51 Removing the Battery Pack 53 Removing the Wireless LAN Card/the HDD Module/the ODD Module /and the LCD module 54 Removing the Wireless LAN Card...
... Keys 23 Touchpad 25 Touchpad Basics 25 Hardware Specifications and Configurations 27 Chapter 2 System Utilities 35 BIOS Setup Utility 35 Navigating the BIOS Utility 36 Information 37 Main 38 Advanced 40 Security 41 Boot 45 Exit 46 BIOS Flash Utility 47 Chapter 3 Machine Disassembly and Replacement 49 General Information 50 Before You Begin 50 Disassembly Procedure Flowchart 51 Removing the Battery Pack 53 Removing the Wireless LAN Card/the HDD Module/the ODD Module /and the LCD module 54 Removing the Wireless LAN Card...
TravelMate 3200 Service Guide
Page 8
... BIOS Beep Codes 72 Index of Symptom-to-FRU Error Message 76 Intermittent Problems 80 Undetermined Problems 81 Chapter 5 Jumper and Connector Locations 83 Top View 83 Bottom View 85 Chapter 6 FRU (Field Replaceable Unit) List 87 Exploded Diagram 88 Appendix A Model Definition and Configuration 96 TravelMate 3200 Series 96 Appendix B Test Compatible Components 97 Microsoft® Windows® XP Pro Environment Test 98 Appendix C Online Support...
... BIOS Beep Codes 72 Index of Symptom-to-FRU Error Message 76 Intermittent Problems 80 Undetermined Problems 81 Chapter 5 Jumper and Connector Locations 83 Top View 83 Bottom View 85 Chapter 6 FRU (Field Replaceable Unit) List 87 Exploded Diagram 88 Appendix A Model Definition and Configuration 96 TravelMate 3200 Series 96 Appendix B Test Compatible Components 97 Microsoft® Windows® XP Pro Environment Test 98 Appendix C Online Support...

TravelMate 3200 Service Guide
Page 9
... Mbps Fast Ethernet connection T Fast infrared wireless communication T Two USB 2.0 (Universal Serial Bus) ports T IEEE 1394 port T InvilinkTM 802.11b/g or IInvilinkTM 802.11a/b/g wireless LAN (manufacturing optional) T Bluetooth ready (manufacturing optional) T SD/MMC/MS memory card reader T 100-pin port replicator connector Keyboard and Pointing Device T 84/85-key Windows keyboard T Ergonomically-centered touchpad pointing device with dual soDimm modules T 40 GB and above high-capacity, Enhanced-IDE hard disk T Advanced Configuration Power Interface (ACPI) power management system.
... Mbps Fast Ethernet connection T Fast infrared wireless communication T Two USB 2.0 (Universal Serial Bus) ports T IEEE 1394 port T InvilinkTM 802.11b/g or IInvilinkTM 802.11a/b/g wireless LAN (manufacturing optional) T Bluetooth ready (manufacturing optional) T SD/MMC/MS memory card reader T 100-pin port replicator connector Keyboard and Pointing Device T 84/85-key Windows keyboard T Ergonomically-centered touchpad pointing device with dual soDimm modules T 40 GB and above high-capacity, Enhanced-IDE hard disk T Advanced Configuration Power Interface (ACPI) power management system.
TravelMate 3200 Service Guide
Page 16
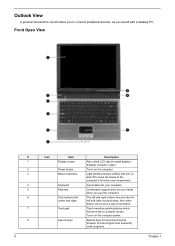
Front Open View # 1 2 3 4 5 6 7 8 8 Icon Item Display screen Power button Status indicators Keyboard Palmrest Click buttons (left and right mouse buttons; Turns on and off to connect peripheral devices, as a 4-way scroll button. Special keys for your computer. Light-Emitting Diodes (LEDs) that turn on the computer. the center button serves as you would with a desktop PC. Comfortable support area for launching Internet browser, E-mail program and frequently used programs. Chapter 1 Turns on the computer power. Outlook...
Front Open View # 1 2 3 4 5 6 7 8 8 Icon Item Display screen Power button Status indicators Keyboard Palmrest Click buttons (left and right mouse buttons; Turns on and off to connect peripheral devices, as a 4-way scroll button. Special keys for your computer. Light-Emitting Diodes (LEDs) that turn on the computer. the center button serves as you would with a desktop PC. Comfortable support area for launching Internet browser, E-mail program and frequently used programs. Chapter 1 Turns on the computer power. Outlook...
TravelMate 3200 Service Guide
Page 35
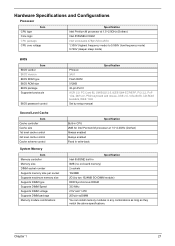
... control 2st level cache control Cache scheme control System Memory Item Memory controller Memory size DIMM socket number Supports memory size per socket Supports maximum memory size Supports DIMM type Supports DIMM Speed Supports DIMM voltage Supports DIMM package Memory module combinations Specification Phneoix 3A01 Flash ROM 512KB 32-pin PLCC ACPI 2.0, PC Card 95, SM BIOS 2.0, IEEE1284-ECP/EPP, PCI 2.2, PnP 1.0a, DMI 2.0, PS/2 keyboard and mouse, USB 2.0, VGA BIOS, CD-ROM bootable, IEEE 1394 Set by setup manual Specification Built-in CPU...
... control 2st level cache control Cache scheme control System Memory Item Memory controller Memory size DIMM socket number Supports memory size per socket Supports maximum memory size Supports DIMM type Supports DIMM Speed Supports DIMM voltage Supports DIMM package Memory module combinations Specification Phneoix 3A01 Flash ROM 512KB 32-pin PLCC ACPI 2.0, PC Card 95, SM BIOS 2.0, IEEE1284-ECP/EPP, PCI 2.2, PnP 1.0a, DMI 2.0, PS/2 keyboard and mouse, USB 2.0, VGA BIOS, CD-ROM bootable, IEEE 1394 Set by setup manual Specification Built-in CPU...
TravelMate 3200 Service Guide
Page 47
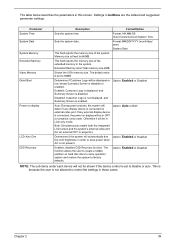
... the user to create a hidden partition on external video port. Option: Enabled or Disabled NOTE: The sub-items under each device will automatically dim Option: Enabled or Disabled the LCD brightness in order to control the settings in CRT (or projector) only mode. Extended Memory size=Total memory size-2MB Shows the VGA memory size. Format: HH:MM:SS (hour:minute:second) System Time Sets the system date. The default value is fixed to factory defaults. Settings in this screen. Disabled...
... the user to create a hidden partition on external video port. Option: Enabled or Disabled NOTE: The sub-items under each device will automatically dim Option: Enabled or Disabled the LCD brightness in order to control the settings in CRT (or projector) only mode. Extended Memory size=Total memory size-2MB Shows the VGA memory size. Format: HH:MM:SS (hour:minute:second) System Time Sets the system date. The default value is fixed to factory defaults. Settings in this screen. Disabled...
TravelMate 3200 Service Guide
Page 48
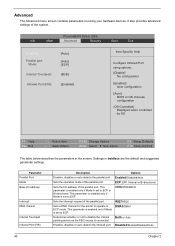
... boldface are the default and suggested parameter settings. Main Advanced Security Boot Exit Serial Port Parallel port: Mode: Internal Touchpad: Infrared Port (FIR): [Auto] [Auto] [ECP] [Both] [Enabled] Item Specific Help Configure Infrared Port using options: [Disable] No configuration [Enabled] User configuration [Auto] BIOS or OS chooses configuration (OS Controlled) Displayed when controlled by OS F1 Help Esc Exit ↑ ↓ Select Item ← → Select Menu F5/F6 Change Values Enter Select 4 Sub- Parameter Parallel Port Mode Base I /O address of...
... boldface are the default and suggested parameter settings. Main Advanced Security Boot Exit Serial Port Parallel port: Mode: Internal Touchpad: Infrared Port (FIR): [Auto] [Auto] [ECP] [Both] [Enabled] Item Specific Help Configure Infrared Port using options: [Disable] No configuration [Enabled] User configuration [Auto] BIOS or OS chooses configuration (OS Controlled) Displayed when controlled by OS F1 Help Esc Exit ↑ ↓ Select Item ← → Select Menu F5/F6 Change Values Enter Select 4 Sub- Parameter Parallel Port Mode Base I /O address of...
TravelMate 3200 Service Guide
Page 49
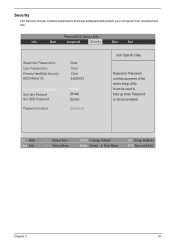
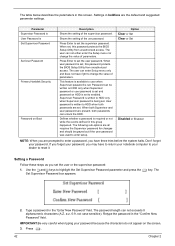
... Change Values Enter Select 4 Sub-Menu F9 Setup Defaults F10 Save and Exit Chapter 2 41 Security The Security screen contains parameters that help safeguard and protect your computer from unauthorized use. It can be used to boot up when Password on Boot Clear Clear Clear 43883467 [Enter] [Enter] [Enter] [Disabled] Item Specific Help Supervisor Password controls accesses of the whole setup utility. PhoenixBIOS Setup Utility Info. Main Advanced Security Boot Exit Supervisor Password Is: User Password Is: Primary HardDisk Security: HDD...
... Change Values Enter Select 4 Sub-Menu F9 Setup Defaults F10 Save and Exit Chapter 2 41 Security The Security screen contains parameters that help safeguard and protect your computer from unauthorized use. It can be used to boot up when Password on Boot Clear Clear Clear 43883467 [Enter] [Enter] [Enter] [Disabled] Item Specific Help Supervisor Password controls accesses of the whole setup utility. PhoenixBIOS Setup Utility Info. Main Advanced Security Boot Exit Supervisor Password Is: User Password Is: Primary HardDisk Security: HDD...
TravelMate 3200 Service Guide
Page 50
... password protects the BIOS Setup Utility from unauthorized access. Supervisor Password is written to set . Defines whether a password is set , this password protects the BIOS Setup Utility from unauthorized access. Shows the setting of parameters. When set to reset it. Password can unlock the HDD. When both passwords can be grayed out if the user password was used to enter a password, you have to return your notebook computer to change the value of the uer password. The following sub-options...
... password protects the BIOS Setup Utility from unauthorized access. Supervisor Password is written to set . Defines whether a password is set , this password protects the BIOS Setup Utility from unauthorized access. Shows the setting of parameters. When set to reset it. Password can unlock the HDD. When both passwords can be grayed out if the user password was used to enter a password, you have to return your notebook computer to change the value of the uer password. The following sub-options...
TravelMate 3200 Service Guide
Page 51
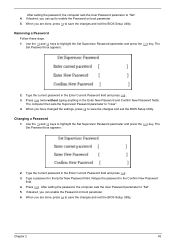
... the e key. Use the w and y keys to "Clear". 4. After setting the password, the computer sets the User Password parameter to "Set". 5. Type the current password in the Confirm New Password field. 4. After setting the password, the computer sets the User Password parameter to "Set". 4. Chapter 2 43 When you can opt to save the changes and exit the BIOS Setup Utility. Press e. If desired, you have changed the settings, press u to save the changes and exit the BIOS Setup Utility. Removing a Password Follow...
... the e key. Use the w and y keys to "Clear". 4. After setting the password, the computer sets the User Password parameter to "Set". 5. Type the current password in the Confirm New Password field. 4. After setting the password, the computer sets the User Password parameter to "Set". 4. Chapter 2 43 When you can opt to save the changes and exit the BIOS Setup Utility. Press e. If desired, you have changed the settings, press u to save the changes and exit the BIOS Setup Utility. Removing a Password Follow...
TravelMate 3200 Service Guide
Page 54
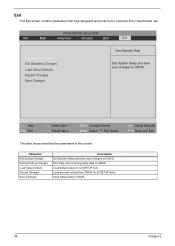
... Change Values Enter Select 4 Sub-Menu F9 Setup Defaults F10 Save and Exit The table below describes the parameters in this screen. Load previous values from unauthorized use. PhoenixBIOS Setup Utility Info. Load default values for all SETUP item. Main Advanced Security Boot Exit Exit Saving Changes Exit Dicarding Changes Load Setup Defaults Discard Changes Save Changes Item Specific Help Exit System Setup and save your changes to CMOS. Exit utility without saving setup...
... Change Values Enter Select 4 Sub-Menu F9 Setup Defaults F10 Save and Exit The table below describes the parameters in this screen. Load previous values from unauthorized use. PhoenixBIOS Setup Utility Info. Load default values for all SETUP item. Main Advanced Security Boot Exit Exit Saving Changes Exit Dicarding Changes Load Setup Defaults Discard Changes Save Changes Item Specific Help Exit System Setup and save your changes to CMOS. Exit utility without saving setup...
TravelMate 3200 Service Guide
Page 81
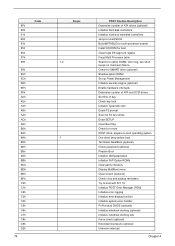
... devices Initialize all video adapters in system QuietBoot start (optional) Shadow video BIOS ROM Display BIOS copyright notice Display CPU type and speed Initialize EISA board Test keyboard Set key click if enabled Test for unexpected interrupts Initialize POST display service Display prompt "Press F2 to enter SETUP" Disable CPU cache Test RAM between 512 and 640 KB Test extended memory Test extended memory address lines Jump to User Patch1 Configure advanced cache registers Initialize Multi Processor APIC Enable external and CPU caches Setup...
... devices Initialize all video adapters in system QuietBoot start (optional) Shadow video BIOS ROM Display BIOS copyright notice Display CPU type and speed Initialize EISA board Test keyboard Set key click if enabled Test for unexpected interrupts Initialize POST display service Display prompt "Press F2 to enter SETUP" Disable CPU cache Test RAM between 512 and 640 KB Test extended memory Test extended memory address lines Jump to User Patch1 Configure advanced cache registers Initialize Multi Processor APIC Enable external and CPU caches Setup...
TravelMate 3200 Service Guide
Page 82
... Option ROMs Clear parity checkers Display MultiBoot menu Clear screen (optional) Check virus and backup reminders Try to UserPatch2 Build MPTABLE for multi-processor boards Install CD ROM for boot Clear huge ES segment register Fixup Multi Processor table Search for errors POST done- Check for SMART drive (optional) Shadow option ROMs Set up Power Management Initialize security engine (optional) Enable hardware interrupts Determine number of ATA and SCSI drives Set time of ATA drives (optional) Initialize hard-disk controllers Initialize local-bus hard-disk controllers...
... Option ROMs Clear parity checkers Display MultiBoot menu Clear screen (optional) Check virus and backup reminders Try to UserPatch2 Build MPTABLE for multi-processor boards Install CD ROM for boot Clear huge ES segment register Fixup Multi Processor table Search for errors POST done- Check for SMART drive (optional) Shadow option ROMs Set up Power Management Initialize security engine (optional) Enable hardware interrupts Determine number of ATA and SCSI drives Set time of ATA drives (optional) Initialize hard-disk controllers Initialize local-bus hard-disk controllers...
TravelMate 3200 Service Guide
Page 83
... the CPU Initialize the system timer Initialize system I/O Check force recovery boot Checksum BIOS ROM Go to BIOS Set Huge Segment Initialize Multi Processor Initialize OEM special code Initialize PIC and DMA Initialize Memory type Initialize Memory size Shadow Boot Block System memory test Initialize interrupt vectors Initialize Run Time Clock Initialize video Initialize System Management Mode Output one beep before boot Boot to Mini DOS Clear Huge Segment Boot...
... the CPU Initialize the system timer Initialize system I/O Check force recovery boot Checksum BIOS ROM Go to BIOS Set Huge Segment Initialize Multi Processor Initialize OEM special code Initialize PIC and DMA Initialize Memory type Initialize Memory size Shadow Boot Block System memory test Initialize interrupt vectors Initialize Run Time Clock Initialize video Initialize System Management Mode Output one beep before boot Boot to Mini DOS Clear Huge Segment Boot...
TravelMate 3200 Service Guide
Page 84
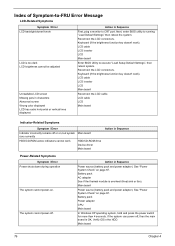
..." on page 67. Keyboard (if the brightness function key doesn't work ). Action in Sequence First, plug a monitor to -FRU Error Message LCD-Related Symptoms Symptom / Error LCD backlight doesn't work HDD/CD-ROM drive Device driver Main board Action in Sequence Power-Related Symptoms Symptom / Error Power shuts down during operation The system cannot power-on , but system Main board runs correctly HDD/CD-ROM active indicators cannot work LCD is too dark LCD brightness cannot be adjusted Unreadable LCD screen Missing pels in...
..." on page 67. Keyboard (if the brightness function key doesn't work ). Action in Sequence First, plug a monitor to -FRU Error Message LCD-Related Symptoms Symptom / Error LCD backlight doesn't work HDD/CD-ROM drive Device driver Main board Action in Sequence Power-Related Symptoms Symptom / Error Power shuts down during operation The system cannot power-on , but system Main board runs correctly HDD/CD-ROM active indicators cannot work LCD is too dark LCD brightness cannot be adjusted Unreadable LCD screen Missing pels in...

TravelMate 3200 Service Guide
Page 85
... ejected Action in Windows XP Hard disk drive Main board Driver of the portable computer. Power-Related Symptoms Symptom / Error Battery can power on page 68. Internal speakers make noise or emit no sound comes from actual size. Battery pack Main board ODD/HDD/FDD/RAM module Main board PCMCIA-Related Symptoms Symptom / Error System cannot detect the PC Card (PCMCIA) PCMCIA slot pin is blank. PC Card cannot be charged or discharged System...
... ejected Action in Windows XP Hard disk drive Main board Driver of the portable computer. Power-Related Symptoms Symptom / Error Battery can power on page 68. Internal speakers make noise or emit no sound comes from actual size. Battery pack Main board ODD/HDD/FDD/RAM module Main board PCMCIA-Related Symptoms Symptom / Error System cannot detect the PC Card (PCMCIA) PCMCIA slot pin is blank. PC Card cannot be charged or discharged System...
TravelMate 3200 Service Guide
Page 86
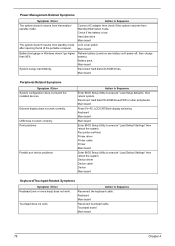
... Press Fn+F5, LCD/CRT/Both display switching Keyboard Main board Main board Enter BIOS Setup Utility to execute "Load Default Settings" then reboot the system. Printer driver Printer cable Printer Main board Enter BIOS Setup Utility to execute "Load Default Settings" then reboot the system. Keyboard Main board Reconnect touchpad cable. Hard disk drive Main board The system doesn't resume from Standby/Hibernation mode. Refresh battery (continue use battery until power off, then charge battery). Main board Peripheral-Related Symptoms Symptom / Error System configuration does not match...
... Press Fn+F5, LCD/CRT/Both display switching Keyboard Main board Main board Enter BIOS Setup Utility to execute "Load Default Settings" then reboot the system. Printer driver Printer cable Printer Main board Enter BIOS Setup Utility to execute "Load Default Settings" then reboot the system. Keyboard Main board Reconnect touchpad cable. Hard disk drive Main board The system doesn't resume from Standby/Hibernation mode. Refresh battery (continue use battery until power off, then charge battery). Main board Peripheral-Related Symptoms Symptom / Error System configuration does not match...
TravelMate 3200 User's Guide
Page 3
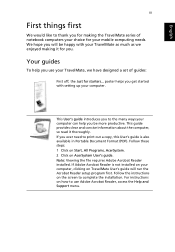
... you use Adobe Acrobat Reader, access the Help and Support menu. This guide provides clear and concise information about the computer, so read it for starters... If Adobe Acrobat Reader is also available in Portable Document Format (PDF). For instructions on TravelMate User's guide will be more productive. English iii First things first We would like to complete the installation. Follow these steps: 1 Click on Start...
... you use Adobe Acrobat Reader, access the Help and Support menu. This guide provides clear and concise information about the computer, so read it for starters... If Adobe Acrobat Reader is also available in Portable Document Format (PDF). For instructions on TravelMate User's guide will be more productive. English iii First things first We would like to complete the installation. Follow these steps: 1 Click on Start...
TravelMate 3200 User's Guide
Page 29
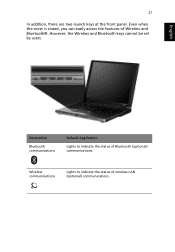
Wireless communications Lights to indicate the status of Bluetooth (optional) communications. However, the Wireless and Bluetooth keys cannot be set by users. English 21 In addition, there are two launch keys at the front panel. Even when the cover is closed, you can easily access the features of wireless LAN (optional) communications. Description Bluetooth communications Default Application Lights to indicate the status of Wireless and Bluetooth®.
Wireless communications Lights to indicate the status of Bluetooth (optional) communications. However, the Wireless and Bluetooth keys cannot be set by users. English 21 In addition, there are two launch keys at the front panel. Even when the cover is closed, you can easily access the features of wireless LAN (optional) communications. Description Bluetooth communications Default Application Lights to indicate the status of Wireless and Bluetooth®.
TravelMate 3200 User's Guide
Page 62
... is turned on. • Depending on your connection (USB or parallel), make sure that the printer cable is connected securely to set up your location. If the problem cannot be resolved, contact your computer and the corresponding port on the printer. • During POST, press F2 to access the BIOS Utility and verify that delivers onscreen error message reports to Windows Help and Support. English 54 3 Troubleshooting...
... is turned on. • Depending on your connection (USB or parallel), make sure that the printer cable is connected securely to set up your location. If the problem cannot be resolved, contact your computer and the corresponding port on the printer. • During POST, press F2 to access the BIOS Utility and verify that delivers onscreen error message reports to Windows Help and Support. English 54 3 Troubleshooting...


