User Manual
Page 2
... the label affixed to the contents hereof and specifically disclaims the implied warranties of purchase Acer and the Acer logo are used herein for a particular purpose. Acer LCD Monitor User Guide Model number Serial number Date of purchase Place of merchantability or fitness for ... any means, electronically, mechanically, by photocopy, recording or otherwise, without the prior written permission of Acer Incorporated. Acer LCD Monitor User Guide Original Issue: 03/2013 Changes may be made periodically to their respective companies. All correspondence concerning your computer...
... the label affixed to the contents hereof and specifically disclaims the implied warranties of purchase Acer and the Acer logo are used herein for a particular purpose. Acer LCD Monitor User Guide Model number Serial number Date of purchase Place of merchantability or fitness for ... any means, electronically, mechanically, by photocopy, recording or otherwise, without the prior written permission of Acer Incorporated. Acer LCD Monitor User Guide Original Issue: 03/2013 Changes may be made periodically to their respective companies. All correspondence concerning your computer...

User Manual
Page 3
... screen has 99.99% or more effective pixels. Cleaning your safety and comfort Safety instructions Read these guidelines when cleaning the monitor: • Always unplug the monitor before cleaning. • Use a soft cloth to make sure the flicker disappears. • You may remain after switching ...on again to wipe the screen and cabinet front and sides. In this document for future reference. English Information for your monitor Please carefully follow these instructions carefully. It may include blemishes of the previous screen may find slightly uneven brightness on the screen...
... screen has 99.99% or more effective pixels. Cleaning your safety and comfort Safety instructions Read these guidelines when cleaning the monitor: • Always unplug the monitor before cleaning. • Use a soft cloth to make sure the flicker disappears. • You may remain after switching ...on again to wipe the screen and cabinet front and sides. In this document for future reference. English Information for your monitor Please carefully follow these instructions carefully. It may include blemishes of the previous screen may find slightly uneven brightness on the screen...
User Manual
Page 4
... power cord into this product through cabinet slots as they may touch dangerous voltage points or short-out parts that could be used for this monitor, do not increase it after your dealer or local power company. • Do not allow anything to block out noisy surroundings. • Turn the volume...
... power cord into this product through cabinet slots as they may touch dangerous voltage points or short-out parts that could be used for this monitor, do not increase it after your dealer or local power company. • Do not allow anything to block out noisy surroundings. • Turn the volume...
User Manual
Page 7
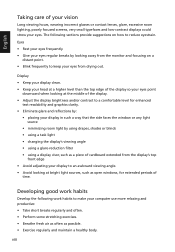
... tips for power management: • Activate display's Sleep mode within 15 minutes of user inactivity. • Activate computer's Sleep mode within 30 minutes of the monitor, using a footrest, or raising your company's health and safety department. English LCD pixel statement The LCD unit is produced with high-precision manufacturing techniques. Finding...
... tips for power management: • Activate display's Sleep mode within 15 minutes of user inactivity. • Activate computer's Sleep mode within 30 minutes of the monitor, using a footrest, or raising your company's health and safety department. English LCD pixel statement The LCD unit is produced with high-precision manufacturing techniques. Finding...
User Manual
Page 8
... of cardboard extended from the display's top front edge • Avoid adjusting your display to an awkward viewing angle. • Avoid looking away from the monitor and focusing on how to a comfortable level for enhanced text readability and graphics clarity. • Eliminate glare and reflections by: • placing your display in...
... of cardboard extended from the display's top front edge • Avoid adjusting your display to an awkward viewing angle. • Avoid looking away from the monitor and focusing on how to a comfortable level for enhanced text readability and graphics clarity. • Eliminate glare and reflections by: • placing your display in...
User Manual
Page 9
..., 40, 20020 Lainate (MI) Italy Tel: +39-02-939-921 ,Fax: +39-02 9399-2913 www.acer.it Declare under our own responsibility that the product: Product: LCD Monitor Trade Name: Acer Model Number: S276HL SKU Number: S276HL xxxxxx; ("x" = 0~9, a ~ z, A ~ Z, or blank) To which this declaration refers conforms to the...and RoHS Directive 2011/65/EU and Directive 2009/125/EC with regard to begin affixing CE marking 2013. RU Jan / Sr. Manager Regulation, Acer Inc. EN55024:2010 • EN 61000-3-2:2006+A1:2009+A2:2009, Class D • EN61000-3-3:2008 • EN60950-1:2006/A11:2009/A1:...
..., 40, 20020 Lainate (MI) Italy Tel: +39-02-939-921 ,Fax: +39-02 9399-2913 www.acer.it Declare under our own responsibility that the product: Product: LCD Monitor Trade Name: Acer Model Number: S276HL SKU Number: S276HL xxxxxx; ("x" = 0~9, a ~ z, A ~ Z, or blank) To which this declaration refers conforms to the...and RoHS Directive 2011/65/EU and Directive 2009/125/EC with regard to begin affixing CE marking 2013. RU Jan / Sr. Manager Regulation, Acer Inc. EN55024:2010 • EN 61000-3-2:2006+A1:2009+A2:2009, Class D • EN61000-3-3:2008 • EN60950-1:2006/A11:2009/A1:...
User Manual
Page 10
... interference received, including interference that may not cause harmful interference, and (2) this declaration: Product: LCD Monitor Model Number: S276HL SKU Number: S276HL xxxxxx ("x" = 0~9, a ~ z, A ~ Z or Blank) Name of Responsible Party: Acer America Corporation Address of the FCC Rules. S. English Acer America Corporation 333 West San Carlos St.,Suite 1500 San Jose,CA 95110, U. The following local...
... interference received, including interference that may not cause harmful interference, and (2) this declaration: Product: LCD Monitor Model Number: S276HL SKU Number: S276HL xxxxxx ("x" = 0~9, a ~ z, A ~ Z or Blank) Name of Responsible Party: Acer America Corporation Address of the FCC Rules. S. English Acer America Corporation 333 West San Carlos St.,Suite 1500 San Jose,CA 95110, U. The following local...
User Manual
Page 11
Contents English Information for your safety and comfort iii Safety instructions iii Special notes on LCD monitors iii Cleaning your monitor iii Accessibility iv Safe listening iv Warnings iv Using electrical power iv Product servicing v Potentially explosive ...19-pin color display signal cable 5 Standard timing table 6 Installation 7 MHL (Mobile High-Definition Link) 8 Users controls 9 Panel controls 9 Acer eColor Management 10 Operation instructions 10 Features and benefits 10 Using the OSD Menus 11 Picture Menu 11 OSD Menu 12 Setting Menu 13
Contents English Information for your safety and comfort iii Safety instructions iii Special notes on LCD monitors iii Cleaning your monitor iii Accessibility iv Safe listening iv Warnings iv Using electrical power iv Product servicing v Potentially explosive ...19-pin color display signal cable 5 Standard timing table 6 Installation 7 MHL (Mobile High-Definition Link) 8 Users controls 9 Panel controls 9 Acer eColor Management 10 Operation instructions 10 Features and benefits 10 Using the OSD Menus 11 Picture Menu 11 OSD Menu 12 Setting Menu 13
User Manual
Page 13
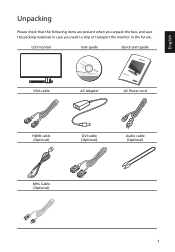
LCD monitor User guide Quick start guide VGA cable AC Adapter AC Power cord HDMI cable (Optional) DVI cable (Optional) Audio cable (Optional) MHL Cable (Optional) 1 English Unpacking Please check that the following items are present when you unpack the box, and save the packing materials in case you need to ship or transport the monitor in the future.
LCD monitor User guide Quick start guide VGA cable AC Adapter AC Power cord HDMI cable (Optional) DVI cable (Optional) Audio cable (Optional) MHL Cable (Optional) 1 English Unpacking Please check that the following items are present when you unpack the box, and save the packing materials in case you need to ship or transport the monitor in the future.
User Manual
Page 14
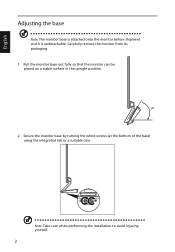
Note: Take care when performing the installation to avoid injuring yourself. 2 English Adjusting the base Note: The monitor base is attached onto the monitor before shipment and it is undetachable. Carefully remove the monitor from its packaging. 1 Pull the monitor base out fully so that the monitor can be placed on a stable surface in the upright position. 45 2 Secure the monitor base by turning the white screws (at the bottom of the base) using the integrated tab or a suitable coin.
Note: Take care when performing the installation to avoid injuring yourself. 2 English Adjusting the base Note: The monitor base is attached onto the monitor before shipment and it is undetachable. Carefully remove the monitor from its packaging. 1 Pull the monitor base out fully so that the monitor can be placed on a stable surface in the upright position. 45 2 Secure the monitor base by turning the white screws (at the bottom of the base) using the integrated tab or a suitable coin.
User Manual
Page 15
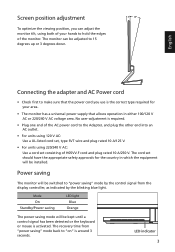
...seconds. The recovery time from the display controller, as indicated by the control signal from "power saving" mode back to hold the edges of the monitor. LED indicator 3 Screen position adjustment To optimize the viewing position, you use is the correct type required for the country in either 100/120 ... V AC: Use a cord set , type SVT wire and plug rated 10 A/125 V. • For units using both of your area. • The monitor has a universal power supply that allows operation in which the equipment will be kept until a control signal has been detected or the keyboard or mouse...
...seconds. The recovery time from the display controller, as indicated by the control signal from "power saving" mode back to hold the edges of the monitor. LED indicator 3 Screen position adjustment To optimize the viewing position, you use is the correct type required for the country in either 100/120 ... V AC: Use a cord set , type SVT wire and plug rated 10 A/125 V. • For units using both of your area. • The monitor has a universal power supply that allows operation in which the equipment will be kept until a control signal has been detected or the keyboard or mouse...
User Manual
Page 16
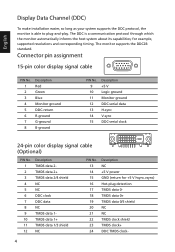
...signal cable 1 5 6 10 11 15 PIN No. 1 2 3 4 5 6 7 8 Description Red Green Blue Monitor ground DDC-return R-ground G-ground B-ground PIN No. 9 10 11 12 13 14 15 Description +5 V Logic ground Monitor ground DDC-serial data H-sync V-sync DDC-serial clock 24-pin color display signal cable (Optional) PIN...14 15 16 17 18 19 20 21 22 23 24 Description NC +5 V power GND (return for example, supported resolutions and corresponding timing. The monitor supports the DDC2B standard. for +5 V hsync.vsync) Hot-plug detection TMDS data 0TMDS data 0+ TMDS data 0/5 shield NC NC TMDS clock shield ...
...signal cable 1 5 6 10 11 15 PIN No. 1 2 3 4 5 6 7 8 Description Red Green Blue Monitor ground DDC-return R-ground G-ground B-ground PIN No. 9 10 11 12 13 14 15 Description +5 V Logic ground Monitor ground DDC-serial data H-sync V-sync DDC-serial clock 24-pin color display signal cable (Optional) PIN...14 15 16 17 18 19 20 21 22 23 24 Description NC +5 V power GND (return for example, supported resolutions and corresponding timing. The monitor supports the DDC2B standard. for +5 V hsync.vsync) Hot-plug detection TMDS data 0TMDS data 0+ TMDS data 0/5 shield NC NC TMDS clock shield ...

User Manual
Page 19
...Only Audio-Input Model)(Optional) a Connect an audio cable to the audio port of the adapter to the monitor and the other end to a properly grounded, AC outlet. 4 Turn on the monitor and computer Turn on your host system, please follow the steps below: Steps 1 Connect the video cable ...the MHL-certified device. English Installation To install the monitor on the monitor first, then the computer. b Connect one end of the monitor. 3 Connect the adapter a Connect the AC cord to the computer. This sequence is very important. 5 If the monitor does not function properly, please refer to the ...
...Only Audio-Input Model)(Optional) a Connect an audio cable to the audio port of the adapter to the monitor and the other end to a properly grounded, AC outlet. 4 Turn on the monitor and computer Turn on your host system, please follow the steps below: Steps 1 Connect the video cable ...the MHL-certified device. English Installation To install the monitor on the monitor first, then the computer. b Connect one end of the monitor. 3 Connect the adapter a Connect the AC cord to the computer. This sequence is very important. 5 If the monitor does not function properly, please refer to the ...
User Manual
Page 20
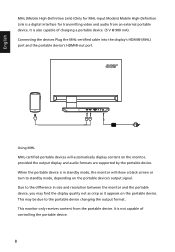
...of controlling the portable device. 8 It is not capable of charging a portable device (5 V @ 900 mA). Due to the difference in standby mode, the monitor will automatically display content on the portable device. MHL (Mobile High-Definition Link) (Only for MHL-input Models) Mobile High-Definition Link is a digital interface... MHL Using MHL MHL-certified portable devices will show a black screen or turn to the portable device changing the output format. This monitor only receives content from an external portable device. When the portable device is in size and resolution between the...
...of controlling the portable device. 8 It is not capable of charging a portable device (5 V @ 900 mA). Due to the difference in standby mode, the monitor will automatically display content on the portable device. MHL (Mobile High-Definition Link) (Only for MHL-input Models) Mobile High-Definition Link is a digital interface... MHL Using MHL MHL-certified portable devices will show a black screen or turn to the portable device changing the output format. This monitor only receives content from an external portable device. When the portable device is in size and resolution between the...

User Manual
Page 21
... OSD menu is inactive, press this button will activate the auto function immediately and the monitor will automatically optimize the display position, focus, and clock of the current function. 3 Menu/Enter button Press to open the Acer eColor Management OSD and access the scenario modes. 9 Users controls English 543 2 1 Panel controls No...
... OSD menu is inactive, press this button will activate the auto function immediately and the monitor will automatically optimize the display position, focus, and clock of the current function. 3 Menu/Enter button Press to open the Acer eColor Management OSD and access the scenario modes. 9 Users controls English 543 2 1 Panel controls No...

User Manual
Page 23
... V. The following content is used for adjusting the picture quality. Press the Menu button to enter the Picture menu. Picture Acer eColor Management Brightness 77 Contrast 56 H.Position 50 V.Position 50 Focus 30 Clock 50 Colour Temp Warm Auto Config Enter 1...Menus Note: The following options are available in the Picture menu: Acer ecolor Management, Brightness, Contrast, H. Picture Menu The Picture menu is for making various adjustments and settings. Actual product specifications may vary. Your LCD monitor is equipped with an on-screen display (OSD) menu for ...
... V. The following content is used for adjusting the picture quality. Press the Menu button to enter the Picture menu. Picture Acer eColor Management Brightness 77 Contrast 56 H.Position 50 V.Position 50 Focus 30 Clock 50 Colour Temp Warm Auto Config Enter 1...Menus Note: The following options are available in the Picture menu: Acer ecolor Management, Brightness, Contrast, H. Picture Menu The Picture menu is for making various adjustments and settings. Actual product specifications may vary. Your LCD monitor is equipped with an on-screen display (OSD) menu for ...

User Manual
Page 26
English Information Menu The Information menu displays the basic information of the LCD monitor, press the < / > button to bring up the OSD menu. 2 To view the basic information of the LCD monitor. Information 1680x1050 H:65Hz V:60Hz VGA Input S/N: ETLXXXX1326350380B3742 Enter 1 Press the Menu button to select Information. 14
English Information Menu The Information menu displays the basic information of the LCD monitor, press the < / > button to bring up the OSD menu. 2 To view the basic information of the LCD monitor. Information 1680x1050 H:65Hz V:60Hz VGA Input S/N: ETLXXXX1326350380B3742 Enter 1 Press the Menu button to select Information. 14
User Manual
Page 27
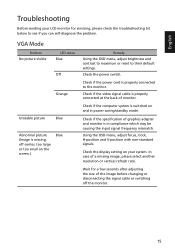
VGA Mode Problem No picture visible LED status Blue Off Orange Unstable picture Blue Abnormal picture (Image is missing, off the monitor. 15 Check the power switch. Check if the computer system is properly connected at the back of a missing image, please select another resolution or vertical ... on and in compliance which may be causing the input signal frequency mismatch. Wait for a few seconds after adjusting the size of graphics adapter and monitor is properly connected to see if you can self-diagnose the problem. English Troubleshooting Before sending your system.
VGA Mode Problem No picture visible LED status Blue Off Orange Unstable picture Blue Abnormal picture (Image is missing, off the monitor. 15 Check the power switch. Check if the computer system is properly connected at the back of a missing image, please select another resolution or vertical ... on and in compliance which may be causing the input signal frequency mismatch. Wait for a few seconds after adjusting the size of graphics adapter and monitor is properly connected to see if you can self-diagnose the problem. English Troubleshooting Before sending your system.
User Manual
Page 28
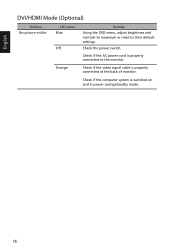
Check the power switch. Orange Check if the video signal cable is switched on and in power saving/standby mode. 16 Check if the computer system is properly connected at the back of monitor. Check if the AC power cord is properly connected to their default settings. English DVI/HDMI Mode (Optional) Problem No picture visible LED status Blue Off Remedy Using the OSD menu, adjust brightness and contrast to maximum or reset to the monitor.
Check the power switch. Orange Check if the video signal cable is switched on and in power saving/standby mode. 16 Check if the computer system is properly connected at the back of monitor. Check if the AC power cord is properly connected to their default settings. English DVI/HDMI Mode (Optional) Problem No picture visible LED status Blue Off Remedy Using the OSD menu, adjust brightness and contrast to maximum or reset to the monitor.


