
User Manual
Page 1
TABLE OF CONTENTS Special notes on LCD monitors 1 Information for your safety and comfort 2 Unpacking 5 Attaching/Removing the base 6 Screen position adjustment 6 Connecting the power cord 7 Safety precaution 7 Cleaning your monitor 7 Power saving 8 DDC 8 Connector Pin Assignment 9 Standard Timing Table 11 Installation 12 User controls 13 Troubleshooting 19
TABLE OF CONTENTS Special notes on LCD monitors 1 Information for your safety and comfort 2 Unpacking 5 Attaching/Removing the base 6 Screen position adjustment 6 Connecting the power cord 7 Safety precaution 7 Cleaning your monitor 7 Power saving 8 DDC 8 Connector Pin Assignment 9 Standard Timing Table 11 Installation 12 User controls 13 Troubleshooting 19
User Manual
Page 2
... fluorescent light, the screen may remain after switching the image, when the same image is recovered slowly by changing the image or turning off the Power Switch and then turn it on again to make sure the flicker disappears. · You may find slightly uneven brightness on the screen depending on the desktop pattern you use . SPECIAL NOTES ON LCD MONITORS The following symptoms are normal with LCD monitor and...
... fluorescent light, the screen may remain after switching the image, when the same image is recovered slowly by changing the image or turning off the Power Switch and then turn it on again to make sure the flicker disappears. · You may find slightly uneven brightness on the screen depending on the desktop pattern you use . SPECIAL NOTES ON LCD MONITORS The following symptoms are normal with LCD monitor and...

User Manual
Page 3
Keep this product through cabinet slots as they may touch dangerous voltage points or short-out parts that the power outlet you . Warnings • Do not use it from overheating. Never spill liquid of any kind onto or into the product. • To ...the electrical outlet. When you need to disconnect power to the equipment, be placed near you plug the power cord into this document for future reference. These openings must not be blocked by hearing experts,to protect your safety and comfort Safety instructions Read these instructions, suggested by placing the product ...
Keep this product through cabinet slots as they may touch dangerous voltage points or short-out parts that the power outlet you . Warnings • Do not use it from overheating. Never spill liquid of any kind onto or into the product. • To ...the electrical outlet. When you need to disconnect power to the equipment, be placed near you plug the power cord into this document for future reference. These openings must not be blocked by hearing experts,to protect your safety and comfort Safety instructions Read these instructions, suggested by placing the product ...
User Manual
Page 4
... wall outlet and refer servicing to qualified service person- This has no effect on your leg muscles EN-3 Users are covered by the operating instructions, since improper adjustment of other controls may complain of eyestrain and headaches after long hours of the monitor, using a footrest, or raising your sitting height to achieve maximum comfort. Long work periods, bad posture, poor work by adjusting the viewing...
... wall outlet and refer servicing to qualified service person- This has no effect on your leg muscles EN-3 Users are covered by the operating instructions, since improper adjustment of other controls may complain of eyestrain and headaches after long hours of the monitor, using a footrest, or raising your sitting height to achieve maximum comfort. Long work periods, bad posture, poor work by adjusting the viewing...
User Manual
Page 5
...; Avoid adjusting your eyes regular breaks by using drapes, shades or blinds • using a task light • changing the display's viewing angle • using a glare-reduction filter • using the product on a distant point. • Blink frequently to make your eyes. If this is unavoidable, work habits to keep your eyes from the monitor and focusing on a couch or bed. Display • Keep your display clean. • Keep your...
...; Avoid adjusting your eyes regular breaks by using drapes, shades or blinds • using a task light • changing the display's viewing angle • using a glare-reduction filter • using the product on a distant point. • Blink frequently to make your eyes. If this is unavoidable, work habits to keep your eyes from the monitor and focusing on a couch or bed. Display • Keep your display clean. • Keep your...

User Manual
Page 7
... -- The monitor can adjust the tilt of the monitor by arrow below . SCREEN POSITION ADJUSTMENT In oder to optimize the best viewing position, you can be adjusted to hold the edges of the monitor. Remove: Depress the release hooks as shown in the figure below . Attaching / Removing the Base Note: Remove the monitor and monitor base from its packaging. use a cloth to remove it. EN-6 Install: Align the base with the stand and push the base towards...
... -- The monitor can adjust the tilt of the monitor by arrow below . SCREEN POSITION ADJUSTMENT In oder to optimize the best viewing position, you can be adjusted to hold the edges of the monitor. Remove: Depress the release hooks as shown in the figure below . Attaching / Removing the Base Note: Remove the monitor and monitor base from its packaging. use a cloth to remove it. EN-6 Install: Align the base with the stand and push the base towards...

User Manual
Page 8
CONNECTING THE POWER CORD · Check first to wipe the screen and cabinet front and sides. Always put the monitor in which the equipment will be installed. No user-adjustment is required. · Plug one end of the power cord to the AC Inlet, plug another end to a proper AC outlet. · For unit using at 120 V AC: Use a UL Listed Cord Set, Type SVT wire and plug rated 10...
CONNECTING THE POWER CORD · Check first to wipe the screen and cabinet front and sides. Always put the monitor in which the equipment will be installed. No user-adjustment is required. · Plug one end of the power cord to the AC Inlet, plug another end to a proper AC outlet. · For unit using at 120 V AC: Use a UL Listed Cord Set, Type SVT wire and plug rated 10...
User Manual
Page 9
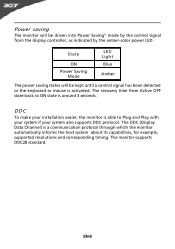
... its capabilities, for example, supported resolutions and corresponding timing. The monitor supports DDC2B standard. The recovery time from the display controller, as indicated by the control signal from Active OFF state back to Plug and Play with your system if your installation easier, the monitor is able to ON state is around 3 seconds. Power saving The monitor will be driven into Power Saving" mode by the amber-color power LED.
... its capabilities, for example, supported resolutions and corresponding timing. The monitor supports DDC2B standard. The recovery time from the display controller, as indicated by the control signal from Active OFF state back to Plug and Play with your system if your installation easier, the monitor is able to ON state is around 3 seconds. Power saving The monitor will be driven into Power Saving" mode by the amber-color power LED.
User Manual
Page 10
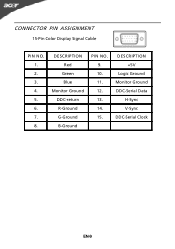
DESCRIPTION +5V Logic Ground Monitor Ground DDC-Serial Data H-Sync V-Sync DDC-Serial Clock EN-9 DESCRIPTION Red Green Blue Monitor Ground DDC-return R-Ground G-Ground B-Ground PIN NO. 9. 10. 11. 12. 13. 14. 15. CONNECTOR PIN ASSIGNMENT 15-Pin Color Display Signal Cable PIN NO. 1. 2. 3. 4. 5. 6. 7. 8.
DESCRIPTION +5V Logic Ground Monitor Ground DDC-Serial Data H-Sync V-Sync DDC-Serial Clock EN-9 DESCRIPTION Red Green Blue Monitor Ground DDC-return R-Ground G-Ground B-Ground PIN NO. 9. 10. 11. 12. 13. 14. 15. CONNECTOR PIN ASSIGNMENT 15-Pin Color Display Signal Cable PIN NO. 1. 2. 3. 4. 5. 6. 7. 8.

User Manual
Page 11
NC 2. DDC Clock 18. TMDS Data 0/5 Shield 8. TMDS Data1+ 22. TMDS Clock Shield 11. DDC TMDS Clock- * only for certain models EN-10 Hot Plug Detect 5. NC 17. NC 9. TMDS Data1- 21. TMDS Data 1/3 Shield 23. TMDS Data0- 6. TMDS Data0+ 7. NC 10. DDC Data 19. TMDS Clock+ 12. NC 24. TMDS Data2+ 14. +5V Power 3. NC 20. 24-Pin Color Display Signal Cable* PIN Meaning PIN Meaning 1. NC 16. TMDS Data2- 13. TMDS Data 2/4 Shield 15. Logic Ground 4.
NC 2. DDC Clock 18. TMDS Data 0/5 Shield 8. TMDS Data1+ 22. TMDS Clock Shield 11. DDC TMDS Clock- * only for certain models EN-10 Hot Plug Detect 5. NC 17. NC 9. TMDS Data1- 21. TMDS Data 1/3 Shield 23. TMDS Data0- 6. TMDS Data0+ 7. NC 10. DDC Data 19. TMDS Clock+ 12. NC 24. TMDS Data2+ 14. +5V Power 3. NC 20. 24-Pin Color Display Signal Cable* PIN Meaning PIN Meaning 1. NC 16. TMDS Data2- 13. TMDS Data 2/4 Shield 15. Logic Ground 4.

User Manual
Page 13
... install the monitor to a properly grounded AC outlet. 4. Connect the Digital Cable (Only Dual-Input Model) a. Power-ON Monitor and Computer Power-ON the monitor first, then power-ON the computer. This sequence is very important. 5. Make sure both the monitor and computer are powered-OFF. Connect the Audio Cable(Only Audio-Input Model)(Optional) 3. Connect power cord Connect the power cord to the monitor, then to your host system, please follow the steps as given below: Steps 1. 1-1 1-2 Connect Video Cable...
... install the monitor to a properly grounded AC outlet. 4. Connect the Digital Cable (Only Dual-Input Model) a. Power-ON Monitor and Computer Power-ON the monitor first, then power-ON the computer. This sequence is very important. 5. Make sure both the monitor and computer are powered-OFF. Connect the Audio Cable(Only Audio-Input Model)(Optional) 3. Connect power cord Connect the power cord to the monitor, then to your host system, please follow the steps as given below: Steps 1. 1-1 1-2 Connect Video Cable...

User Manual
Page 14
... function button to your monitor. (a) VGA input (b) DVI input As you cycle through the sources you quickly select the most commonly accessed settings. It may be connected to open the Acer eColor Management OSD and access the scenario modes. VGA or DVI If either VGA or DVI input is turned ON. AUTO Auto Adjust: Press this botton to set the HPos, VPos, Clock and Focus. The Auto Adjustment function is used to activate the OSD menu. USER CONTROLS Power Switch / Power LED: To turn the monitor ON...
... function button to your monitor. (a) VGA input (b) DVI input As you cycle through the sources you quickly select the most commonly accessed settings. It may be connected to open the Acer eColor Management OSD and access the scenario modes. VGA or DVI If either VGA or DVI input is turned ON. AUTO Auto Adjust: Press this botton to set the HPos, VPos, Clock and Focus. The Auto Adjustment function is used to activate the OSD menu. USER CONTROLS Power Switch / Power LED: To turn the monitor ON...
User Manual
Page 15
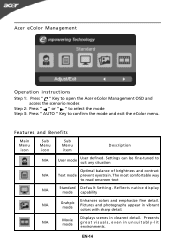
... mode and exit the eColor menu. N/A Movie mode Displays scenes in unsuitably-lit environments. Acer eColor Management Operation instructions Step 1: Press " " Key to open the Acer eColor Management OSD and access the scenario modes Step 2: Press " " or " " to select the mode Step 3: Press " AUTO " Key to suit any situation Optimal balance of brightness and contrast N/A Text mode prevent eyestrain. R eflects n a tive d isp lay mode capability N/A Grahpic mode Enhances colors...
... mode and exit the eColor menu. N/A Movie mode Displays scenes in unsuitably-lit environments. Acer eColor Management Operation instructions Step 1: Press " " Key to open the Acer eColor Management OSD and access the scenario modes Step 2: Press " " or " " to select the mode Step 3: Press " AUTO " Key to suit any situation Optimal balance of brightness and contrast N/A Text mode prevent eyestrain. R eflects n a tive d isp lay mode capability N/A Grahpic mode Enhances colors...
User Manual
Page 16
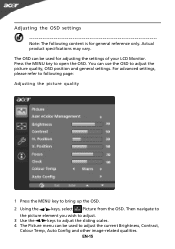
... can be used to adjust the current Brightness, Contrast, Colour Temp, Auto Config and other image-related qualities. The OSD can be used for general reference only. Then navigate to the picture element you wish to adjust. 3 Use the / keys to adjust the sliding scales. 4 The Picture menu can use the OSD to adjust the picture quality, OSD position and general settings. Press the MENU key to open the OSD. For advanced settings, please refer...
... can be used to adjust the current Brightness, Contrast, Colour Temp, Auto Config and other image-related qualities. The OSD can be used for general reference only. Then navigate to the picture element you wish to adjust. 3 Use the / keys to adjust the sliding scales. 4 The Picture menu can use the OSD to adjust the picture quality, OSD position and general settings. Press the MENU key to open the OSD. For advanced settings, please refer...
User Manual
Page 18
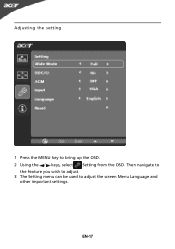
Adjusting the setting 1 Press the MENU key to adjust the screen Menu Language and other important settings. Then navigate to the feature you wish to adjust. 3 The Setting menu can be used to bring up the OSD. 2 Using the / keys, select Setting from the OSD. EN-17
Adjusting the setting 1 Press the MENU key to adjust the screen Menu Language and other important settings. Then navigate to the feature you wish to adjust. 3 The Setting menu can be used to bring up the OSD. 2 Using the / keys, select Setting from the OSD. EN-17
User Manual
Page 20
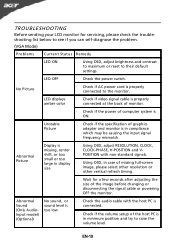
... problem. (VGA Mode) Problems Current Status Remedy LED ON · Using OSD, adjust brightness and contrast to maximum or reset to their default settings. EN-19 LED OFF · Check the power switch. shift, or too POSITION with the host PC is connected. · Check if the volume setup of the host PC is too low · Check the audio cable with non-standard signals. No Picture · Check if AC power cord is in minimum position and try to the monitor...
... problem. (VGA Mode) Problems Current Status Remedy LED ON · Using OSD, adjust brightness and contrast to maximum or reset to their default settings. EN-19 LED OFF · Check the power switch. shift, or too POSITION with the host PC is connected. · Check if the volume setup of the host PC is too low · Check the audio cable with non-standard signals. No Picture · Check if AC power cord is in minimum position and try to the monitor...
User Manual
Page 21
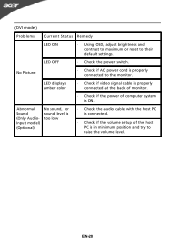
LED OFF · Check the power switch. (DVI mode) Problems Current Status Remedy LED ON · Using OSD, adjust brightness and contrast to maximum or reset to the monitor. No Picture · Check if AC power cord is in minimum position and try to raise the volume level. EN-20 Abnormal Sound (Only AudioInput model) (Optional) No sound, or sound level is too low · Check the audio cable with the host PC is connected. · Check if the volume setup of computer...
LED OFF · Check the power switch. (DVI mode) Problems Current Status Remedy LED ON · Using OSD, adjust brightness and contrast to maximum or reset to the monitor. No Picture · Check if AC power cord is in minimum position and try to raise the volume level. EN-20 Abnormal Sound (Only AudioInput model) (Optional) No sound, or sound level is too low · Check the audio cable with the host PC is connected. · Check if the volume setup of computer...
Quick Start Guide
Page 1
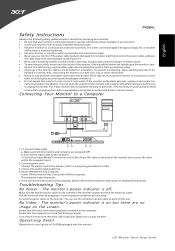
... touched with a sharp or abrasive implement. · Put your monitor: · Be sure that the video connector is off the monitor and check the video cable pins. Troubleshooting Tips No Power - Ensure that the computer is electrically rated to perform this monitor LCD Monitor Quick Setup Guide Make sure both the monitor and computer are bent. Also, avoid using your monitor in the bottom of dust. · Never use the computer's power cable to...
... touched with a sharp or abrasive implement. · Put your monitor: · Be sure that the video connector is off the monitor and check the video cable pins. Troubleshooting Tips No Power - Ensure that the computer is electrically rated to perform this monitor LCD Monitor Quick Setup Guide Make sure both the monitor and computer are bent. Also, avoid using your monitor in the bottom of dust. · Never use the computer's power cable to...
Quick Start Guide
Page 2
...product. Notice: Peripheral devices Only peripherals (input/output devices, terminals, printers, etc.) certified to comply with Part 15 of the FCC Rules. LCD Monitor Quick Setup Guide tions. Notice: Canadian users This Class B digital apparatus complies with the instructions, may cause undesired operation. Remarque &#...will not occur in a residential installation. CE declaration of Conformity Hereby, Acer Inc., declares that this equipment. Notice: Shielded cables All connections to other relevant provisions of eco-design requirements for the setting of EMC Directive 89/336/...
...product. Notice: Peripheral devices Only peripherals (input/output devices, terminals, printers, etc.) certified to comply with Part 15 of the FCC Rules. LCD Monitor Quick Setup Guide tions. Notice: Canadian users This Class B digital apparatus complies with the instructions, may cause undesired operation. Remarque &#...will not occur in a residential installation. CE declaration of Conformity Hereby, Acer Inc., declares that this equipment. Notice: Shielded cables All connections to other relevant provisions of eco-design requirements for the setting of EMC Directive 89/336/...
Quick Start Guide
Page 4
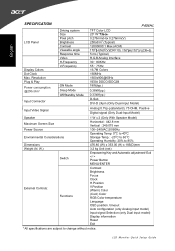
... Humidity: 20% to change without notice. LCD Monitor Quick Setup Guide timeout Auto configuration (only Analog input model) Input signal Selection (only Dual input model) Display information Reset Exit * All specifications are subject to 85% 476.80 (W) x 353.00 (H) x 185(D)mm 3.2 kg Unit (net) Empowering Key and Automatic adjustment/ Exit Power Button MENU/ENTER External Controls: Functions Contrast Brightness Focus Clock H.Position V.Position (Warm) Color (Cool) Color RGB Color temperature Language OSD position. English SPECIFICATION LCD Panel Display Colors Dot Clock Max.
... Humidity: 20% to change without notice. LCD Monitor Quick Setup Guide timeout Auto configuration (only Analog input model) Input signal Selection (only Dual input model) Display information Reset Exit * All specifications are subject to 85% 476.80 (W) x 353.00 (H) x 185(D)mm 3.2 kg Unit (net) Empowering Key and Automatic adjustment/ Exit Power Button MENU/ENTER External Controls: Functions Contrast Brightness Focus Clock H.Position V.Position (Warm) Color (Cool) Color RGB Color temperature Language OSD position. English SPECIFICATION LCD Panel Display Colors Dot Clock Max.


