

User Manual
Page 3
Keep this product from the projector. • If the system has multiple sources of any kind onto or into is provided. • Never push objects of power, disconnect power from overheating. Turning the product off before removing the power supply unit from the wall outlet before cleaning. Warnings! • Do not use liquid cleaners or aerosol cleaners. The openings should never be placed near water...
Keep this product from the projector. • If the system has multiple sources of any kind onto or into is provided. • Never push objects of power, disconnect power from overheating. Turning the product off before removing the power supply unit from the wall outlet before cleaning. Warnings! • Do not use liquid cleaners or aerosol cleaners. The openings should never be placed near water...

User Manual
Page 4
... power outlet is a safety feature. Warning! Unplug this product yourself, as opening or removing covers may expose you to replace the power cord set . If you need to dangerous voltage points or other nearby electrical devices that the new power cord ...cord does not exceed the extension cord ampere rating. If you are used with a three-wire grounded plug. Do not locate this product. • Use the product only with the supplied power supply cord set , make sure that may result in a grounded power outlet. If power strips are not sure of the type of power indicated...
... power outlet is a safety feature. Warning! Unplug this product yourself, as opening or removing covers may expose you to replace the power cord set . If you need to dangerous voltage points or other nearby electrical devices that the new power cord ...cord does not exceed the extension cord ampere rating. If you are used with a three-wire grounded plug. Do not locate this product. • Use the product only with the supplied power supply cord set , make sure that may result in a grounded power outlet. If power strips are not sure of the type of power indicated...

User Manual
Page 5
... power cord or plug is damaged, cut or frayed • liquid was spilled into the projector's lens when the lamp is on the projector first and then signal sources • Do not place the product in following the operating instructions Note: Adjust only those controls that is poorly ventilated or confined. The bright may hurt your dealer for the fan to ensure the projector...
... power cord or plug is damaged, cut or frayed • liquid was spilled into the projector's lens when the lamp is on the projector first and then signal sources • Do not place the product in following the operating instructions Note: Adjust only those controls that is poorly ventilated or confined. The bright may hurt your dealer for the fan to ensure the projector...

User Manual
Page 6
... showing warning message. • When changing the lamp, please allow unit to cool down, and follow all changing instructions. • Reset the "Lamp Hour Reset" function from the Onscreen display "Management" menu after replacing the lamp module. • Do not attempt to break on rare occasions. • Never replace the lamp assembly or any object when the projector is unplugged. • The product will detect the life of displaying inverted images...
... showing warning message. • When changing the lamp, please allow unit to cool down, and follow all changing instructions. • Reset the "Lamp Hour Reset" function from the Onscreen display "Management" menu after replacing the lamp module. • Do not attempt to break on rare occasions. • Never replace the lamp assembly or any object when the projector is unplugged. • The product will detect the life of displaying inverted images...

User Manual
Page 8
... to clean the display housing. • Disconnect the power plug from the Onscreen display "Management" menu after replacing the lamp module. • When switching the projector off the product before disconnecting power. • Turn on the projector first and then the signal sources. • Do not use lens cap when projector is in this user's guide to maximize the life of your unit. Don't: • Block the slots and openings on...
... to clean the display housing. • Disconnect the power plug from the Onscreen display "Management" menu after replacing the lamp module. • When switching the projector off the product before disconnecting power. • Turn on the projector first and then the signal sources. • Do not use lens cap when projector is in this user's guide to maximize the life of your unit. Don't: • Block the slots and openings on...
User Manual
Page 9
... 3 Control Panel 5 Remote Control Layout 6 MHL (Mobile High-Definition Link) Control 8 Getting Started 9 Connecting the Projector 9 Turning the Projector On/Off 11 Turning on the Projector 11 Turning the projector off 12 Adjusting the Projected Image 13 Adjusting the Height of Projected Image 13 How to optimize image size and distance 14 How to get a preferred image size by adjusting distance and zoom 16 How to get a preferred image position by adjusting lens shift 18 User Controls 20 Onscreen Display (OSD) Menus 20 Color 21 Image 23 Setting...
... 3 Control Panel 5 Remote Control Layout 6 MHL (Mobile High-Definition Link) Control 8 Getting Started 9 Connecting the Projector 9 Turning the Projector On/Off 11 Turning on the Projector 11 Turning the projector off 12 Adjusting the Projected Image 13 Adjusting the Height of Projected Image 13 How to optimize image size and distance 14 How to get a preferred image size by adjusting distance and zoom 16 How to get a preferred image position by adjusting lens shift 18 User Controls 20 Onscreen Display (OSD) Menus 20 Color 21 Image 23 Setting...
User Manual
Page 11
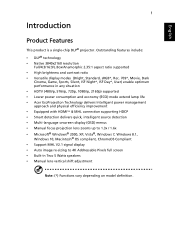
... power management approach and physical efficiency improvement • Equipped with HDMI™ & MHL connection supporting HDCP • Smart detection delivers quick, intelligent source detection • Multi-language onscreen display (OSD) menus • Manual focus projection lens zooms up to 1.3x / 1.6x • Microsoft® Windows® 2000, XP, Vista®, Windows 7, Windows 8.1, Windows 10, Macintosh® OS compliant, ChromeOS Compliant • Support MHL V2.1 signal display • Auto image re-sizing...
... power management approach and physical efficiency improvement • Equipped with HDMI™ & MHL connection supporting HDCP • Smart detection delivers quick, intelligent source detection • Multi-language onscreen display (OSD) menus • Manual focus projection lens zooms up to 1.3x / 1.6x • Microsoft® Windows® 2000, XP, Vista®, Windows 7, Windows 8.1, Windows 10, Macintosh® OS compliant, ChromeOS Compliant • Support MHL V2.1 signal display • Auto image re-sizing...

User Manual
Page 12
Contact your unit is missing. Check to make sure your dealer immediately if any thing is complete. English Projector Power cord HDMI cable User's guide (option) Quick start guide Remote control AAA battery x2 (option) Carrying case (option) MHL HDMI DC 5V IN WirelessCAST (option) WirelessHD-Kit (option) Note: When projecting a 4K2K/60Hz signal, use an HDMI Premium certified 4K2K/60Hz cable supporting 18Gbps bandwidth. 2 Package Overview This projector comes with the label Trust the cable with all the items shown below.
Contact your unit is missing. Check to make sure your dealer immediately if any thing is complete. English Projector Power cord HDMI cable User's guide (option) Quick start guide Remote control AAA battery x2 (option) Carrying case (option) MHL HDMI DC 5V IN WirelessCAST (option) WirelessHD-Kit (option) Note: When projecting a 4K2K/60Hz signal, use an HDMI Premium certified 4K2K/60Hz cable supporting 18Gbps bandwidth. 2 Package Overview This projector comes with the label Trust the cable with all the items shown below.

User Manual
Page 15
... selection. 7 BACK BACK 8 SOURCE SOURCE 9 ENTER ENTER 10 MENU MENU Returns to launch the Onscreen display (OSD) menu or exit the OSD menu. Note: Functions vary depending on model definition. English 5 Control Panel 2 3 1 4 5 8 9 6 7 10 # Icon Function 1 POWER POWER 2 IR Recevier 3 LAMP LAMP 4 TEMP TEMP 5 POWER Description Power Indicator LED Remote control receiver. Lamp Indicator LED Temp Indicator LED See the contents in "Turning the Projector On/Off" section. 6 Four directional select Use to select items or make keys adjustments to your selection...
... selection. 7 BACK BACK 8 SOURCE SOURCE 9 ENTER ENTER 10 MENU MENU Returns to launch the Onscreen display (OSD) menu or exit the OSD menu. Note: Functions vary depending on model definition. English 5 Control Panel 2 3 1 4 5 8 9 6 7 10 # Icon Function 1 POWER POWER 2 IR Recevier 3 LAMP LAMP 4 TEMP TEMP 5 POWER Description Power Indicator LED Remote control receiver. Lamp Indicator LED Temp Indicator LED See the contents in "Turning the Projector On/Off" section. 6 Four directional select Use to select items or make keys adjustments to your selection...

User Manual
Page 17
... white in order to the VGA connector. Display the projector information for Model Name, 13 Information Input Source, Signal Type, Display Mode, Software Version and QR Code on model definition. 10 KEYSTONE Adjusts the image to compensate for distortion caused by tilting the projector. 11 BACK Returns to HDMI/MHL. 20 FREEZE To pause the screen image. 21 HIDE Momentarily turns off the video. Note: Functions vary depending on model definition. Press "VGA" to change source...
... white in order to the VGA connector. Display the projector information for Model Name, 13 Information Input Source, Signal Type, Display Mode, Software Version and QR Code on model definition. 10 KEYSTONE Adjusts the image to compensate for distortion caused by tilting the projector. 11 BACK Returns to HDMI/MHL. 20 FREEZE To pause the screen image. 21 HIDE Momentarily turns off the video. Note: Functions vary depending on model definition. Press "VGA" to change source...

User Manual
Page 21
... the same time, use the "Source" button on either control panel or the remote control or direct source key on the remote control to switch between inputs. The projector will turn blue. 3 Turn on the control panel or remote control, and the Power indicator LED will detect your source (computer, notebook, video player ,etc.). Power button The Power indicator LED will flash red. 2 Turn on the projector by pressing "Power" button on your source automatically. • If the screen displays "Lock" and "Source" icons, it means the projector is locked onto a specific source type and there...
... the same time, use the "Source" button on either control panel or the remote control or direct source key on the remote control to switch between inputs. The projector will turn blue. 3 Turn on the control panel or remote control, and the Power indicator LED will detect your source (computer, notebook, video player ,etc.). Power button The Power indicator LED will flash red. 2 Turn on the projector by pressing "Power" button on your source automatically. • If the screen displays "Lock" and "Source" icons, it means the projector is locked onto a specific source type and there...
User Manual
Page 22
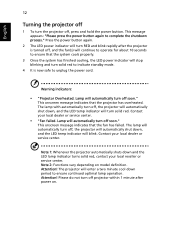
... shutdown process." This message appears: "Please press the power button again to ensure continued optimal lamp operation. Press the power button again. 2 The LED power indicator will turn RED and blink rapidly after power on model definition. English 12 Turning the projector off 1 To turn the projector off , the projector will automatically shut down, and the LED temp indicator will enter a two minute cool down , and the LED temp indicator will stop blinking and turn solid red to indicate standby mode. 4 It is...
... shutdown process." This message appears: "Please press the power button again to ensure continued optimal lamp operation. Press the power button again. 2 The LED power indicator will turn RED and blink rapidly after power on model definition. English 12 Turning the projector off 1 To turn the projector off , the projector will automatically shut down, and the LED temp indicator will enter a two minute cool down , and the LED temp indicator will stop blinking and turn solid red to indicate standby mode. 4 It is...
User Manual
Page 32
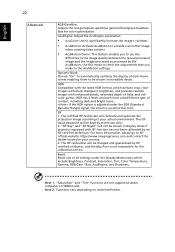
... Acer is not responsible for color optimization. Reset Reset one or all settings under the Display Mode menu which delivers crisp, clear images with the latest HDR format, which include Brightness, Contrast, Saturation, Tint, Color Temperature, Gamma, RGB Gain / Bias, AcuEngine, and Sharpness. Note 1: "Saturation" and "Tint" functions are not supported under the SDR (Standard Dynamic Range) signal, the screen is adjusted under computer or HDMI mode...
... Acer is not responsible for color optimization. Reset Reset one or all settings under the Display Mode menu which delivers crisp, clear images with the latest HDR format, which include Brightness, Contrast, Saturation, Tint, Color Temperature, Gamma, RGB Gain / Bias, AcuEngine, and Sharpness. Note 1: "Saturation" and "Tint" functions are not supported under the SDR (Standard Dynamic Range) signal, the screen is adjusted under computer or HDMI mode...
User Manual
Page 33
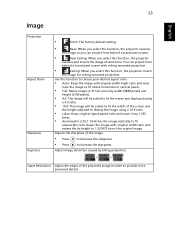
... factory default setting. • Rear: When you select this function, the projector reverses the image so you can project from behind a translucent screen with ceiling mounted projection. • Ceiling: When you select this function, the projector reverses and inverts the image at same time. Use this function, the projector inverts the image for ceiling-mounted projection. Super Resolution Adjust the edges of the screen and the height adjusted to display the image using a 16:9 ratio. • L.Box: Keep original signal aspect...
... factory default setting. • Rear: When you select this function, the projector reverses the image so you can project from behind a translucent screen with ceiling mounted projection. • Ceiling: When you select this function, the projector reverses and inverts the image at same time. Use this function, the projector inverts the image for ceiling-mounted projection. Super Resolution Adjust the edges of the screen and the height adjusted to display the image using a 16:9 ratio. • L.Box: Keep original signal aspect...

User Manual
Page 34
... settings on model definition. V. Position", "Frequency" and "Tracking" functions are only supported under HDMI or Video mode. If you can see a discrete or overlapping image while wearing DLP 3D glasses, you may need to execute "Invert" to get the correct image (for correct 3D display. HDMI Scan Info Adjust the overscan ratio of the projector with corresponding SW player. • Off: Turn off 3D mode. 3D L/R Invert...
... settings on model definition. V. Position", "Frequency" and "Tracking" functions are only supported under HDMI or Video mode. If you can see a discrete or overlapping image while wearing DLP 3D glasses, you may need to execute "Invert" to get the correct image (for correct 3D display. HDMI Scan Info Adjust the overscan ratio of the projector with corresponding SW player. • Off: Turn off 3D mode. 3D L/R Invert...
User Manual
Page 36
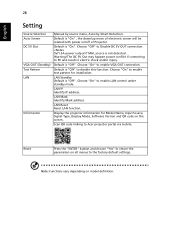
... for Model Name, Input Source, Signal Type, Display Mode, Software Version and QR code on all menus to Disable DC 5V OUT connection. 5V/1.5A power output if MHL source is not detected. LAN IP Identify IP address. English 26 Setting Source Selection Auto Screen DC 5V Out VGA OUT (Standby) Test Pattern LAN Information Manual by source menu, Auto by Smart Detection. Default is "On". Choose "Off" to the factory default settings. LAN Standby Default is "Off". LAN Mask Identify Mask address. Reset...
... for Model Name, Input Source, Signal Type, Display Mode, Software Version and QR code on all menus to Disable DC 5V OUT connection. 5V/1.5A power output if MHL source is not detected. LAN IP Identify IP address. English 26 Setting Source Selection Auto Screen DC 5V Out VGA OUT (Standby) Test Pattern LAN Information Manual by source menu, Auto by Smart Detection. Default is "On". Choose "Off" to the factory default settings. LAN Standby Default is "Off". LAN Mask Identify Mask address. Reset...
User Manual
Page 37
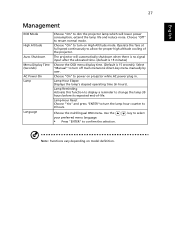
... lamp's elapsed operating time (in . Use the your preferred menu language. • Press "ENTER" to return normal mode. English 27 Management ECO Mode High Altitude Auto Shutdown Menu Display Time (Seconds) AC Power On Lamp Language Choose "On" to dim the projector lamp which will automatically shutdown when there is no signal input after the allocated time. (default is 15 minutes) Choose the OSD menu display time. (Default is 15 seconds). Select "Manual" to turn the lamp hour counter...
... lamp's elapsed operating time (in . Use the your preferred menu language. • Press "ENTER" to return normal mode. English 27 Management ECO Mode High Altitude Auto Shutdown Menu Display Time (Seconds) AC Power On Lamp Language Choose "On" to dim the projector lamp which will automatically shutdown when there is no signal input after the allocated time. (default is 15 minutes) Choose the OSD menu display time. (Default is 15 seconds). Select "Manual" to turn the lamp hour counter...
User Manual
Page 43
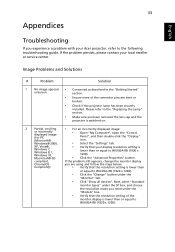
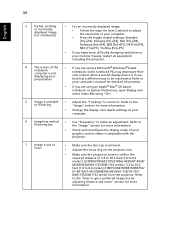
...). • Click the "Change" button under the "Models" box. • Verify that the resolution setting of the connector pins are using and follow the steps below: • Verify that your display resolution setting is switched on. 2 Partial, scrolling • For an incorrectly displayed image: or incorrectly displayed image (for PC (Microsoft® • Open "My Computer", open the "Control Panel", and then double-click the "Display" icon. Next, select...
...). • Click the "Change" button under the "Models" box. • Verify that the resolution setting of the connector pins are using and follow the steps below: • Verify that your display resolution setting is switched on. 2 Partial, scrolling • For an incorrectly displayed image: or incorrectly displayed image (for PC (Microsoft® • Open "My Computer", open the "Control Panel", and then double-click the "Display" icon. Next, select...
User Manual
Page 44
... incorrectly displayed image: • Follow the steps for item 2 (above) to adjust the resolution of your computer. 6 Image has vertical • Use "Frequency" to make it . Refer to get a preferred image size by adjusting distance and zoom" section for more information. • Change the display color depth settings on the projector lens. • Make sure the projection screen is within the required distance of 3.3 to 30.3 feet (1.0 to 9.2 meters) (H7850/V7850...
... incorrectly displayed image: • Follow the steps for item 2 (above) to adjust the resolution of your computer. 6 Image has vertical • Use "Frequency" to make it . Refer to get a preferred image size by adjusting distance and zoom" section for more information. • Change the display color depth settings on the projector lens. • Make sure the projection screen is within the required distance of 3.3 to 30.3 feet (1.0 to 9.2 meters) (H7850/V7850...

User Manual
Page 46
... be used. Problems with the Projector # Condition Solution 1 The projector stops responding If possible, turn on until the lamp module has been replaced. the system fan is about to all controls unplug the power cord and wait at least 30 seconds before it will not turn off the projector, then to reach its useful life, it may make a loud popping sound. Please check the following message. • Replace the lamp...
... be used. Problems with the Projector # Condition Solution 1 The projector stops responding If possible, turn on until the lamp module has been replaced. the system fan is about to all controls unplug the power cord and wait at least 30 seconds before it will not turn off the projector, then to reach its useful life, it may make a loud popping sound. Please check the following message. • Replace the lamp...


