

User Manual
Page 3
... openings should never be blocked by unplugging all warnings and instructions marked on the product. Caution for future reference. Keep this product from the wall outlet before removing the power supply unit from overheating. If the product falls, it from the projector. • If the system has multiple sources of any kind into the product. Turning the product off before cleaning Unplug...
... openings should never be blocked by unplugging all warnings and instructions marked on the product. Caution for future reference. Keep this product from the wall outlet before removing the power supply unit from overheating. If the product falls, it from the projector. • If the system has multiple sources of any kind into the product. Turning the product off before cleaning Unplug...
User Manual
Page 5
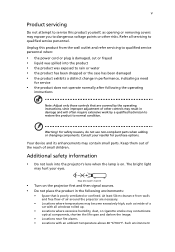
... points or other controls may become excessively high, such as opening or removing covers may contain small parts. Consult your eyes. Such environment Unplug this product yourself, as inside of small children. v Product servicing Do not attempt to service this product from walls and free flow of air around the projector are covered by the operating instructions, since improper adjustment of other risks. Warning! Additional safety...
... points or other controls may become excessively high, such as opening or removing covers may contain small parts. Consult your eyes. Such environment Unplug this product yourself, as inside of small children. v Product servicing Do not attempt to service this product from walls and free flow of air around the projector are covered by the operating instructions, since improper adjustment of other risks. Warning! Additional safety...

User Manual
Page 6
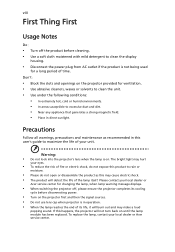
...; Clean the air filter frequently. It may hurt your eyes. • Always open the lens shutter or remove the lens cap when the projector is something wrong with your local dealer or Acer service center when you . • Do not stand the projector on the remote control. • Do not operate lamps beyond the rated lamp life. vi may cause the fan(s) to fire. • When switching the projector off...
...; Clean the air filter frequently. It may hurt your eyes. • Always open the lens shutter or remove the lens cap when the projector is something wrong with your local dealer or Acer service center when you . • Do not stand the projector on the remote control. • Do not operate lamps beyond the rated lamp life. vi may cause the fan(s) to fire. • When switching the projector off...
User Manual
Page 8
... or Acer service center. Warning: • Do not look into the projector's lens when the lamp is in operation. • When the lamp reaches the end of time. If this product to clean the display housing. • Disconnect the power plug from AC outlet if the product is not being used for changing the lamp, when lamp warning message displays. • When switching the projector off the product before disconnecting power. • Turn...
... or Acer service center. Warning: • Do not look into the projector's lens when the lamp is in operation. • When the lamp reaches the end of time. If this product to clean the display housing. • Disconnect the power plug from AC outlet if the product is not being used for changing the lamp, when lamp warning message displays. • When switching the projector off the product before disconnecting power. • Turn...

User Manual
Page 9
... 3 Projector Outlook 3 Control Panel 4 Remote Control Layout 5 Getting Started 7 Connecting the Projector 7 Turning the Projector On/Off 9 Turning On the Projector 9 Turning Off the Projector 9 Adjusting the Projected Image 10 Adjusting the Height of the Projected Image 10 How to Get a Preferred Image Size by Adjusting Distance and Zoom 11 User Controls 12 Onscreen Display (OSD) Menus 12 COLOR 13 IMAGE 16 INSTALLATION 17 SYSTEM SETUP: BASIC 18 SYSTEM SETUP: ADVANCED 19 Appendices 21 Troubleshooting 21 LED & Alarm Definition Listing 24 Ceiling Mount...
... 3 Projector Outlook 3 Control Panel 4 Remote Control Layout 5 Getting Started 7 Connecting the Projector 7 Turning the Projector On/Off 9 Turning On the Projector 9 Turning Off the Projector 9 Adjusting the Projected Image 10 Adjusting the Height of the Projected Image 10 How to Get a Preferred Image Size by Adjusting Distance and Zoom 11 User Controls 12 Onscreen Display (OSD) Menus 12 COLOR 13 IMAGE 16 INSTALLATION 17 SYSTEM SETUP: BASIC 18 SYSTEM SETUP: ADVANCED 19 Appendices 21 Troubleshooting 21 LED & Alarm Definition Listing 24 Ceiling Mount...
User Manual
Page 11
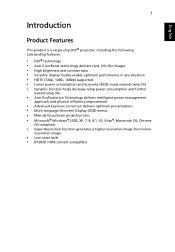
... helps decrease lamp power consumption and further extend lamp life. • Acer EcoProjection Technology delivers Intelligent power management approach and physical efficiency improvement • Advanced keystone correction delivers optimum presentations • Multi-language Onscreen Display (OSD) menus • Manual focus/zoom projection lens • Microsoft® Windows® 2000, XP, 7, 8, 8.1, 10, Vista®, Macintosh OS, Chrome OS compliant • Super Resolution function generates a higher resolution image from lower resolution image...
... helps decrease lamp power consumption and further extend lamp life. • Acer EcoProjection Technology delivers Intelligent power management approach and physical efficiency improvement • Advanced keystone correction delivers optimum presentations • Multi-language Onscreen Display (OSD) menus • Manual focus/zoom projection lens • Microsoft® Windows® 2000, XP, 7, 8, 8.1, 10, Vista®, Macintosh OS, Chrome OS compliant • Super Resolution function generates a higher resolution image from lower resolution image...
User Manual
Page 13
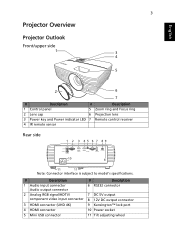
... 1 Control panel 5 Zoom ring and Focus ring 2 Lens cap 6 Projection lens 3 Power key and Power indicator LED 7 Remote control receiver 4 IR remote sensor Rear side 1 2 3 45 6 7 89 10 11 11 Note: Connector interface is subject to model's specifications. # Description 1 Audio input connector Audio output connector 2 Analog RGB signal/HDTV/ component video input connector 3 HDMI connector (UHD 4K) 4 HDMI connector 5 Mini USB connector # Description 6 RS232 connector 7 DC 5V output 8 12V DC output connector 9 Kensington™ lock port 10 Power...
... 1 Control panel 5 Zoom ring and Focus ring 2 Lens cap 6 Projection lens 3 Power key and Power indicator LED 7 Remote control receiver 4 IR remote sensor Rear side 1 2 3 45 6 7 89 10 11 11 Note: Connector interface is subject to model's specifications. # Description 1 Audio input connector Audio output connector 2 Analog RGB signal/HDTV/ component video input connector 3 HDMI connector (UHD 4K) 4 HDMI connector 5 Mini USB connector # Description 6 RS232 connector 7 DC 5V output 8 12V DC output connector 9 Kensington™ lock port 10 Power...

User Manual
Page 14
...Changes the active source. Temperature indicator LED. Selects items or makes adjustments to your selection, or goes back to the "Turning the Projector On/Off" section. Power indicator LED Adjusts image distortion caused by tilting projection. 4 English Control Panel 1 7 2 3 8 4 9 5 6 10 # Function 1 LAMP 2 POWER 3 Keystone 4 Power key 5 ENTER 6 BACK 7 TEMP 8 SOURCE 9 Four directional selection keys 10 MENU 3 Description Lamp indicator LED. Confirms your selection of items. Cancels your selection Launches the Onscreen Display (OSD) menu or exits the OSD menu...
...Changes the active source. Temperature indicator LED. Selects items or makes adjustments to your selection, or goes back to the "Turning the Projector On/Off" section. Power indicator LED Adjusts image distortion caused by tilting projection. 4 English Control Panel 1 7 2 3 8 4 9 5 6 10 # Function 1 LAMP 2 POWER 3 Keystone 4 Power key 5 ENTER 6 BACK 7 TEMP 8 SOURCE 9 Four directional selection keys 10 MENU 3 Description Lamp indicator LED. Confirms your selection of items. Cancels your selection Launches the Onscreen Display (OSD) menu or exits the OSD menu...
User Manual
Page 15
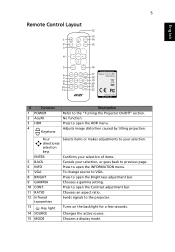
... 5 Remote Control Layout 12 13 1 14 2 15 3 4 5 16 Model No:J-25081 6 17 7 18 8 19 9 20 10 21 11 22 MC.JPC11.001 # Function 1 POWER 2 AcuM. 3 HDR 4 Keystone Description Refer to the projector. 13 Key light Turns on the backlight for a few seconds. 14 SOURCE Changes the active source. 15 MODE Chooses a display mode. No function. Press to open the Brightness adjustment bar. 9 GAMMA Chooses a gamma setting. 10...
... 5 Remote Control Layout 12 13 1 14 2 15 3 4 5 16 Model No:J-25081 6 17 7 18 8 19 9 20 10 21 11 22 MC.JPC11.001 # Function 1 POWER 2 AcuM. 3 HDR 4 Keystone Description Refer to the projector. 13 Key light Turns on the backlight for a few seconds. 14 SOURCE Changes the active source. 15 MODE Chooses a display mode. No function. Press to open the Brightness adjustment bar. 9 GAMMA Chooses a gamma setting. 10...

User Manual
Page 19
... time, use "SOURCE" on the control panel or remote control, or the direct source key on the remote control to switch between inputs. English 9 Turning the Projector On/Off Turning On the Projector 1 Ensure that the power cord and signal cable are securely connected. • If you turn solid red to indicate standby mode. 3 It is "On"). • If the screen displays "No Signal", please make sure the signal cables are securely connected. A confirmation message appears. Press the power button again. 2 The LED Power indicator will turn on the control panel...
... time, use "SOURCE" on the control panel or remote control, or the direct source key on the remote control to switch between inputs. English 9 Turning the Projector On/Off Turning On the Projector 1 Ensure that the power cord and signal cable are securely connected. • If you turn solid red to indicate standby mode. 3 It is "On"). • If the screen displays "No Signal", please make sure the signal cables are securely connected. A confirmation message appears. Press the power button again. 2 The LED Power indicator will turn on the control panel...

User Manual
Page 23
The new name can be disturbed by the noise of the projector. Controls the degree of difference between the lightest and darkest parts of color in the image. COLOR Picture Mode User Mode Settings Brightness Contrast Saturation 13 There are not suitable for your need of watching movies that requires an ultraquiet environment so that you can use one of the picture modes as a starting point and...
The new name can be disturbed by the noise of the projector. Controls the degree of difference between the lightest and darkest parts of color in the image. COLOR Picture Mode User Mode Settings Brightness Contrast Saturation 13 There are not suitable for your need of watching movies that requires an ultraquiet environment so that you can use one of the picture modes as a starting point and...

User Manual
Page 26
... screen and displayed using a 4:3 ratio. • 16:9: The image will be automatically changed to Silent and grayed out. Conceals the poor picture quality in the four edges. Setting 0 means the picture is not supported under video or HDMI mode. Automatically determines the best picture timings for the displayed image. to reduce image distortion. The greater the value, the more portion of the image. Adjusts the horizontal width of the picture...
... screen and displayed using a 4:3 ratio. • 16:9: The image will be automatically changed to Silent and grayed out. Conceals the poor picture quality in the four edges. Setting 0 means the picture is not supported under video or HDMI mode. Automatically determines the best picture timings for the displayed image. to reduce image distortion. The greater the value, the more portion of the image. Adjusts the horizontal width of the picture...

User Manual
Page 27
... turn on . When this function to choose your desired light source mode. • Reset Light Timer: Resets the light source timer. • Light Source Information: Shows the number of hours the lamp has been used. Choose "On" to cool down for you can project from distortion. • Light Source Mode: Use this function is turned on the High Altitude mode. 17 INSTALLATION English Projection Test Pattern Light Source Settings 12V Trigger High Altitude Mode • Front: The factory default setting. • Front Ceiling: Turns the image upside down the projector's temperature...
... turn on . When this function to choose your desired light source mode. • Reset Light Timer: Resets the light source timer. • Light Source Information: Shows the number of hours the lamp has been used. Choose "On" to cool down for you can project from distortion. • Light Source Mode: Use this function is turned on the High Altitude mode. 17 INSTALLATION English Projection Test Pattern Light Source Settings 12V Trigger High Altitude Mode • Front: The factory default setting. • Front Ceiling: Turns the image upside down the projector's temperature...
User Manual
Page 28
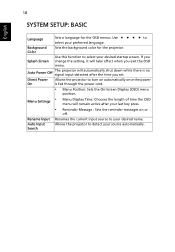
... power cord. • Menu Position: Sets the On-Screen Display (OSD) menu position. Direct Power On Allows the projector to your desired name. Rename Input Renames the current input source to turn on or off. 18 SYSTEM SETUP: BASIC English Language Sets a language for the projector. Background Color Sets the background color for the OSD menus. Use to select your preferred language. Splash Screen Use this function to select your desired startup screen. Auto Power...
... power cord. • Menu Position: Sets the On-Screen Display (OSD) menu position. Direct Power On Allows the projector to your desired name. Rename Input Renames the current input source to turn on or off. 18 SYSTEM SETUP: BASIC English Language Sets a language for the projector. Background Color Sets the background color for the OSD menus. Use to select your preferred language. Splash Screen Use this function to select your desired startup screen. Auto Power...
User Manual
Page 29
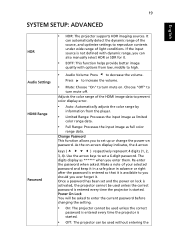
... be used unless the correct password is entered every time the projector is started . • Off: The projector can automatically detect the dynamic range of the source, and optimize settings to reproduce contents under wide range of the HDMI image data to prevent color display error. • Auto: Automatically adjusts the color range by information from low, middle to high. • Audio Volume: Press to set up or change the power-on password...
... be used unless the correct password is entered every time the projector is started . • Off: The projector can automatically detect the dynamic range of the source, and optimize settings to reproduce contents under wide range of the HDMI image data to prevent color display error. • Auto: Automatically adjusts the color range by information from low, middle to high. • Audio Volume: Press to set up or change the power-on password...
User Manual
Page 30
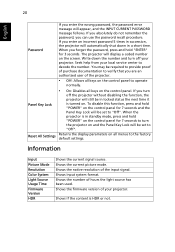
... Input Picture Mode Resolution Color System Light Source Usage Time Firmware Version HDR Shows the current signal source. Shows the number of the projector. • Off: Allows all keys on the control panel to operate normally. • On: Disables all menus to "Off". When you forget the password, press and hold "ENTER" for 7 seconds and the Panel Key Lock will still be in succession, the projector will be set to the factory default settings...
... Input Picture Mode Resolution Color System Light Source Usage Time Firmware Version HDR Shows the current signal source. Shows the number of the projector. • Off: Allows all keys on the control panel to operate normally. • On: Disables all menus to "Off". When you forget the password, press and hold "ENTER" for 7 seconds and the Panel Key Lock will still be in succession, the projector will be set to the factory default settings...
User Manual
Page 31
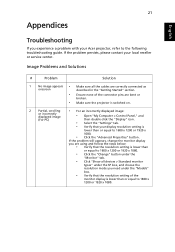
If the problem still appears, change the monitor display you are bent or broken. • Make sure the projector is switched on. 2 Partial, scrolling • For an incorrectly displayed image: or incorrectly displayed image (For PC) • Open "My Computer > Control Panel," and then double-click the "Display" icon. • Select the "Settings" tab. • Verify that the resolution setting of the connector pins are using and follow...
If the problem still appears, change the monitor display you are bent or broken. • Make sure the projector is switched on. 2 Partial, scrolling • For an incorrectly displayed image: or incorrectly displayed image (For PC) • Open "My Computer > Control Panel," and then double-click the "Display" icon. • Select the "Settings" tab. • Verify that the resolution setting of the connector pins are using and follow...

User Manual
Page 32
... are using a Microsoft® Windows® based notebook: Some notebook PCs may need to adjust the aspect ratio. Go to or further from the screen. • Press "MENU" on the projector lens. • Make sure the projection screen is within the required distance. (Refer to "Projection distance with the projector OSD. • If the image is out of focus • Adjust the focus ring on the control panel or remote control...
... are using a Microsoft® Windows® based notebook: Some notebook PCs may need to adjust the aspect ratio. Go to or further from the screen. • Press "MENU" on the projector lens. • Make sure the projection screen is within the required distance. (Refer to "Projection distance with the projector OSD. • If the image is out of focus • Adjust the focus ring on the control panel or remote control...
User Manual
Page 33
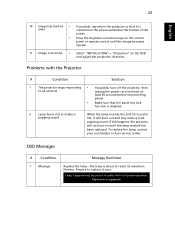
... makes a popping sound When the lamp reaches the end of its useful life, it soon. Prepare to reach its useful life in full power operation. To replace the lamp, contact your local dealer or Acer service center. Lamp is approaching the end of the screen. • Press the Keystone correction keys on the control panel or remote control until the image becomes square. 11 Image is reversed • Select "INSTALLATION" > "Projection" on until...
... makes a popping sound When the lamp reaches the end of its useful life, it soon. Prepare to reach its useful life in full power operation. To replace the lamp, contact your local dealer or Acer service center. Lamp is approaching the end of the screen. • Press the Keystone correction keys on the control panel or remote control until the image becomes square. 11 Image is reversed • Select "INSTALLATION" > "Projection" on until...
User Manual
Page 38
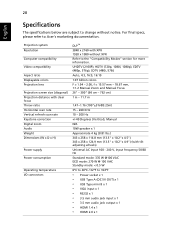
...Resolution Computer compatibility Video compatibility Aspect ratio Displayable colors Projection lens Projection screen size (diagonal) Projection distance with clear focus Throw ratio Horizontal scan rate Vertical refresh scan rate Keystone correction Digital zoom Audio Weight Dimensions (W x D x H) Power supply Power consumption Operating temperature I/O connectors DLP™ 3840 x 2160 with tilt adjusting wheels) Universal AC input 100 - 240 V, input frequency 50/60 Hz Standard mode: 335 W @100 VAC ECO mode: 270 W @ 100 VAC Standby mode: < 0.5 W 0ºC to 40ºC / 32ºF to Acer...
...Resolution Computer compatibility Video compatibility Aspect ratio Displayable colors Projection lens Projection screen size (diagonal) Projection distance with clear focus Throw ratio Horizontal scan rate Vertical refresh scan rate Keystone correction Digital zoom Audio Weight Dimensions (W x D x H) Power supply Power consumption Operating temperature I/O connectors DLP™ 3840 x 2160 with tilt adjusting wheels) Universal AC input 100 - 240 V, input frequency 50/60 Hz Standard mode: 335 W @100 VAC ECO mode: 270 W @ 100 VAC Standby mode: < 0.5 W 0ºC to 40ºC / 32ºF to Acer...


