

User Manual
Page 1
Acer Projector User's Guide Original Issue: 10/2021 Acer Incorporated. Acer Projector GD711/ D4K2106 User's Guide Copyright © 2021. All Rights Reserved.
Acer Projector User's Guide Original Issue: 10/2021 Acer Incorporated. Acer Projector GD711/ D4K2106 User's Guide Copyright © 2021. All Rights Reserved.
User Manual
Page 2
..., electronically, mechanically, by photocopy, recording or otherwise, without obligation to notify any person of Acer Incorporated. Record the model number, serial number, purchase date and place of HDMI Licensing LLC."...implied, with respect to the contents hereof and specifically disclaims the implied warranties of Acer Incorporated. Changes may be made periodically to the information in this manual or supplementary ...Serial number Date of purchase Place of purchase Acer and the Acer logo are trademarks or registered trademarks of purchase information in the space ...
..., electronically, mechanically, by photocopy, recording or otherwise, without obligation to notify any person of Acer Incorporated. Record the model number, serial number, purchase date and place of HDMI Licensing LLC."...implied, with respect to the contents hereof and specifically disclaims the implied warranties of Acer Incorporated. Changes may be made periodically to the information in this manual or supplementary ...Serial number Date of purchase Place of purchase Acer and the Acer logo are trademarks or registered trademarks of purchase information in the space ...

User Manual
Page 3
... is easily accessible and located as close to the AC power outlet. • Unplug the power cord before removing the power supply unit from the projector. • If the system has multiple sources of any kind onto or into this product from the electrical outlet. Do not use this product on...
... is easily accessible and located as close to the AC power outlet. • Unplug the power cord before removing the power supply unit from the projector. • If the system has multiple sources of any kind onto or into this product from the electrical outlet. Do not use this product on...

User Manual
Page 5
...to restore the product to normal condition. Warning! At least 50cm clearance from walls and free flow of air around the projector is on the projector first and then signal sources • Do not place the product in damage and will often require extensive work by the... windows rolled up. • Locations where excessive humidity, dust, or cigarette smoke may contain small parts. In this product to ensure the projector completes its enhancements may contaminate optical components, shortening the life span and darkening the image. • Locations near fire alarms. • Locations...
...to restore the product to normal condition. Warning! At least 50cm clearance from walls and free flow of air around the projector is on the projector first and then signal sources • Do not place the product in damage and will often require extensive work by the... windows rolled up. • Locations where excessive humidity, dust, or cigarette smoke may contain small parts. In this product to ensure the projector completes its enhancements may contaminate optical components, shortening the life span and darkening the image. • Locations near fire alarms. • Locations...

User Manual
Page 6
... suitable qualified professional service personnel. • Do not stand the projector on end vertically. Only use acer ceiling mount kit for mounting the projector and ensure it is securely installed. • 360° projection capability Images can be projected over , causing injury or damage. • ... cover. The only user serviceable part is the lamp which may hurt your eyes. • Always open the lens cap when the projector is capable of displaying inverted images for ceiling mount installation. Refer servicing only to fall over a full 360° range along the vertical...
... suitable qualified professional service personnel. • Do not stand the projector on end vertically. Only use acer ceiling mount kit for mounting the projector and ensure it is securely installed. • 360° projection capability Images can be projected over , causing injury or damage. • ... cover. The only user serviceable part is the lamp which may hurt your eyes. • Always open the lens cap when the projector is capable of displaying inverted images for ceiling mount installation. Refer servicing only to fall over a full 360° range along the vertical...

User Manual
Page 8
...following conditions: • In extremely hot, cold or humid environments. • In areas susceptible to rain or moisture. • Please do not open the projector first, then plug in the UWA5 wireless dongle, please re-start your eyes. • To reduce the risk of your unit. Don't: • Block the... for the first time. • If user open or disassemble the product as recommended in operation. Warning: • Do not look into the projector's lens when the lamp is in this user's guide to maximize the life of fire or electric shock, do not expose this product to excessive...
...following conditions: • In extremely hot, cold or humid environments. • In areas susceptible to rain or moisture. • Please do not open the projector first, then plug in the UWA5 wireless dongle, please re-start your eyes. • To reduce the risk of your unit. Don't: • Block the... for the first time. • If user open or disassemble the product as recommended in operation. Warning: • Do not look into the projector's lens when the lamp is in this user's guide to maximize the life of fire or electric shock, do not expose this product to excessive...

User Manual
Page 9
If the lens is not covered by the warranty. Do not touch the lens with your fingers. • Do not use alkaline/acid detergents or volatile solvents such as alcohol for cleaning lens. ix Cleaning the lens • Before cleaning the lens, be sure to turn off the projector and unplug the power cord to allow the projector to cool down for at least 30 minutes. • Use a compressed air tank to the cleaning process, it is damaged due to remove the dust. • Use a special cloth for cleaning lens and gently wipe the lens.
If the lens is not covered by the warranty. Do not touch the lens with your fingers. • Do not use alkaline/acid detergents or volatile solvents such as alcohol for cleaning lens. ix Cleaning the lens • Before cleaning the lens, be sure to turn off the projector and unplug the power cord to allow the projector to cool down for at least 30 minutes. • Use a compressed air tank to the cleaning process, it is damaged due to remove the dust. • Use a special cloth for cleaning lens and gently wipe the lens.

User Manual
Page 10
... viii Usage Notes viii Precautions viii Cleaning the lens ix Introduction 1 Product Features 1 Package Overview 2 Projector Overview 3 Projector Outlook 3 Control Panel 5 Remote Control Layout 6 Getting Started 7 Connecting the Projector 7 Turning the Projector On/Off 9 Turning on the Projector 9 Turning the projector off 10 Adjusting the Projected Image 11 Adjusting the Height of Projected Image 11 How...
... viii Usage Notes viii Precautions viii Cleaning the lens ix Introduction 1 Product Features 1 Package Overview 2 Projector Overview 3 Projector Outlook 3 Control Panel 5 Remote Control Layout 6 Getting Started 7 Connecting the Projector 7 Turning the Projector On/Off 9 Turning on the Projector 9 Turning the projector off 10 Adjusting the Projected Image 11 Adjusting the Height of Projected Image 11 How...

User Manual
Page 12
...® OS compliant, ChromeOS Compliant • Auto image re-sizing to 4K Addressable Pixels full screen • Built-in One 10 Watts speakers • Smart projector: please find more details in any situation • HDTV (480i/p, 576i/p, 720p, 1080i/p, 2160p) supported • Lower power consumption and economy (ECO) mode extend LED... (WPS) Wireless Projection Support app User Manuel. Note: (*) Functions vary depending on model definition. English 1 Introduction Product Features This product is a single-chip DLP® projector.
...® OS compliant, ChromeOS Compliant • Auto image re-sizing to 4K Addressable Pixels full screen • Built-in One 10 Watts speakers • Smart projector: please find more details in any situation • HDTV (480i/p, 576i/p, 720p, 1080i/p, 2160p) supported • Lower power consumption and economy (ECO) mode extend LED... (WPS) Wireless Projection Support app User Manuel. Note: (*) Functions vary depending on model definition. English 1 Introduction Product Features This product is a single-chip DLP® projector.

User Manual
Page 13
... all the items shown below. Note 2: When projecting a 4K2K/60Hz signal, use an HDMI Premium certified 4K2K/60Hz cable supporting 18Gbps bandwidth. English Projector http://go.acer.com/?id=17883 Quick Start Guide Panduan ringkas Stručná příručka Ghid de pornire rapidă Priročnik...(option) HDMI cable Remote control AAA battery x2 Wireless dongle Note 1: The User's guide is missing. Contact your unit is complete. 2 Package Overview This projector comes with the label Check to make sure your dealer immediately if any thing is e-file on website.
... all the items shown below. Note 2: When projecting a 4K2K/60Hz signal, use an HDMI Premium certified 4K2K/60Hz cable supporting 18Gbps bandwidth. English Projector http://go.acer.com/?id=17883 Quick Start Guide Panduan ringkas Stručná příručka Ghid de pornire rapidă Priročnik...(option) HDMI cable Remote control AAA battery x2 Wireless dongle Note 1: The User's guide is missing. Contact your unit is complete. 2 Package Overview This projector comes with the label Check to make sure your dealer immediately if any thing is e-file on website.

User Manual
Page 14
English 3 Projector Overview Projector Outlook Front / upper side 61 24 3 7 # Description 1 Focus ring 2 Control panel 3 Power button 4 Remote control receiver 8 5 # Description 5 Air outlet 6 Air inlet 7 Lens cap 8 Tilt adjusting wheels
English 3 Projector Overview Projector Outlook Front / upper side 61 24 3 7 # Description 1 Focus ring 2 Control panel 3 Power button 4 Remote control receiver 8 5 # Description 5 Air outlet 6 Air inlet 7 Lens cap 8 Tilt adjusting wheels

User Manual
Page 16
... POWER 2 LAMP LAMP 3 TEMP TEMP 4 POWER 5 INFO INFO Description Power Indicator LED Light source Indicator LED Temp Indicator LED See the contents in "Turning the Projector On/Off" section. Note 2: Long press left(Source) key to change another source when Smart source.
... POWER 2 LAMP LAMP 3 TEMP TEMP 4 POWER 5 INFO INFO Description Power Indicator LED Light source Indicator LED Temp Indicator LED See the contents in "Turning the Projector On/Off" section. Note 2: Long press left(Source) key to change another source when Smart source.

User Manual
Page 17
... to home page. English 6 Remote Control Layout 1 2 9 3 4 5 6 8 7 Model No: B-1202 MC.JRK11.006 # Icon Function Description 1 Infrared transmitter Sends signals to the projector. 2 POWER Refer to the "Turning the Projector On/Off" section. 3 Select/Enter Confirm your selection of items. 4 Four directional select keys Use up, down, left, right buttons to select...
... to home page. English 6 Remote Control Layout 1 2 9 3 4 5 6 8 7 Model No: B-1202 MC.JRK11.006 # Icon Function Description 1 Infrared transmitter Sends signals to the projector. 2 POWER Refer to the "Turning the Projector On/Off" section. 3 Select/Enter Confirm your selection of items. 4 Four directional select keys Use up, down, left, right buttons to select...

User Manual
Page 18
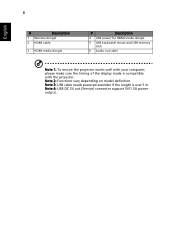
English Getting Started Connecting the Projector Internet DVD player, Set-top Box, HDTV receieve HDMI 7 Audio output RW 2 6 1 5 HDMI 3 4
English Getting Started Connecting the Projector Internet DVD player, Set-top Box, HDTV receieve HDMI 7 Audio output RW 2 6 1 5 HDMI 3 4
User Manual
Page 19
Note 2: Functions vary depending on model definition. Note 3: USB cable needs powered extender if the length is compatible with your computer, please make sure the timing of the display mode is over 5 m. Note 4: USB DC 5V out (Service) connector support 5V/1.5A power output. 8 English # Description 1 Wireless dongle 2 HDMI cable 3 HDMI media dongle # Description 4 USB power for HDMI media dongle 5 USB keyboard/ mouse and USB memory stick 6 Audio out cable Note 1: To ensure the projector works well with the projector.
Note 2: Functions vary depending on model definition. Note 3: USB cable needs powered extender if the length is compatible with your computer, please make sure the timing of the display mode is over 5 m. Note 4: USB DC 5V out (Service) connector support 5V/1.5A power output. 8 English # Description 1 Wireless dongle 2 HDMI cable 3 HDMI media dongle # Description 4 USB power for HDMI media dongle 5 USB keyboard/ mouse and USB memory stick 6 Audio out cable Note 1: To ensure the projector works well with the projector.

User Manual
Page 20
English 9 Turning the Projector On/Off Turning on the Projector 1 Ensure that the power cord and signal cable are securely connected or press source direct key. • If you connect to multiple sources at the ...same time, use the "Source" button on either control panel or the remote control. The Power indicator LED will solid red. 2 Turn on the projector by pressing "Power" button on your source automatically. • If the screen displays "No Signal", please make sure the signal cables are securely connected. The...
English 9 Turning the Projector On/Off Turning on the Projector 1 Ensure that the power cord and signal cable are securely connected or press source direct key. • If you connect to multiple sources at the ...same time, use the "Source" button on either control panel or the remote control. The Power indicator LED will solid red. 2 Turn on the projector by pressing "Power" button on your source automatically. • If the screen displays "No Signal", please make sure the signal cables are securely connected. The...

User Manual
Page 21
... Note 2: Functions vary depending on model definition. Press the power button again. 2 The power indicator LED will turn off , the projector will turn solid red. The light source will automatically turn off automatically soon." Contact your local dealer or service center. • "... failed. System will turn solid red to indicate standby mode. 3 It is now safe to complete the shutdown process." Note 1: Whenever the projector automatically shuts down , and the Temp indicator LED will automatically shut down and the Lamp indicator LED turns solid red, contact your local reseller ...
... Note 2: Functions vary depending on model definition. Press the power button again. 2 The power indicator LED will turn off , the projector will turn solid red. The light source will automatically turn off automatically soon." Contact your local dealer or service center. • "... failed. System will turn solid red to indicate standby mode. 3 It is now safe to complete the shutdown process." Note 1: Whenever the projector automatically shuts down , and the Temp indicator LED will automatically shut down and the Lamp indicator LED turns solid red, contact your local reseller ...

User Manual
Page 22
English 11 Adjusting the Projected Image Adjusting the Height of Projected Image The projector is equipped with elevator feet for adjusting the height of image. To raise/lower the image: Use Tilt adjusting wheel to fine-tune the display angle.
English 11 Adjusting the Projected Image Adjusting the Height of Projected Image The projector is equipped with elevator feet for adjusting the height of image. To raise/lower the image: Use Tilt adjusting wheel to fine-tune the display angle.

User Manual
Page 23
English 12 How to get a preferred image size by adjusting distance The table below shows how to top of 80" set the projector at a distance 2.2 m from base to top of image B 2.2 m Desired Image Size Diagonal (inch) W (cm) x H (cm) 27 60 x 34 50 111 x 62 60 133 x... Zoom Ratio: 1.0x Distance (m) 0.7 1.4 1.6 1.9 2.2 2.4 2.7 3.2 4.1 5.4 6.8 8.1 Top (cm) From base to achieve a desired image size by adjusting either the position or the zoom ring. • GD711/ D4K2106 series To obtain an image size of image 34 62 75 87 100 112 125 149 187 249 311 374 A 80" Desired image size...
English 12 How to get a preferred image size by adjusting distance The table below shows how to top of 80" set the projector at a distance 2.2 m from base to top of image B 2.2 m Desired Image Size Diagonal (inch) W (cm) x H (cm) 27 60 x 34 50 111 x 62 60 133 x... Zoom Ratio: 1.0x Distance (m) 0.7 1.4 1.6 1.9 2.2 2.4 2.7 3.2 4.1 5.4 6.8 8.1 Top (cm) From base to achieve a desired image size by adjusting either the position or the zoom ring. • GD711/ D4K2106 series To obtain an image size of image 34 62 75 87 100 112 125 149 187 249 311 374 A 80" Desired image size...

User Manual
Page 24
English 13 User Controls Onscreen Display (OSD) Menus The projector has multilingual OSD that allow you to make image adjustments and change a variety of the following OSD settings may not be adjusted in the main ...menu. Main menu Setting Sub menu Note 1:!Some of settings. The OSD menu will close and the projector will return to the actual OSD of your projector. Please refer to the main menu. • To exit OSD, press " " on the remote control or control panel. Note 2:!Functions vary...
English 13 User Controls Onscreen Display (OSD) Menus The projector has multilingual OSD that allow you to make image adjustments and change a variety of the following OSD settings may not be adjusted in the main ...menu. Main menu Setting Sub menu Note 1:!Some of settings. The OSD menu will close and the projector will return to the actual OSD of your projector. Please refer to the main menu. • To exit OSD, press " " on the remote control or control panel. Note 2:!Functions vary...


