

User Manual
Page 3
... product should never be blocked or covered. Use a damp cloth for your safety and comfort Read these instructions carefully. Keep this document for ventilation to ensure reliable operation of internal components and to the AC power outlet. • Unplug the power cord before removing the power supply unit from the projector. • If the system has multiple sources of any kind onto or...
... product should never be blocked or covered. Use a damp cloth for your safety and comfort Read these instructions carefully. Keep this document for ventilation to ensure reliable operation of internal components and to the AC power outlet. • Unplug the power cord before removing the power supply unit from the projector. • If the system has multiple sources of any kind onto or...

User Manual
Page 4
.... Make sure the power outlet is a safety feature. Warning! Using a power outlet that the total rating of the equipment plugged into a non-grounded power outlet. Unplug this product. • Use the product only with the supplied power supply cord set , make sure that is used , the load should be operated from the type of power indicated on the cord. • If an extension cord is not properly...
.... Make sure the power outlet is a safety feature. Warning! Using a power outlet that the total rating of the equipment plugged into a non-grounded power outlet. Unplug this product. • Use the product only with the supplied power supply cord set , make sure that is used , the load should be operated from the type of power indicated on the cord. • If an extension cord is not properly...

User Manual
Page 5
... use non-compliant parts when adding or changing components. Warning! Keep them out of the reach of other controls may contain small parts. Additional safety information • Do not look into the product • the product was spilled into the projector's lens when the lamp is on the projector first and then signal sources • Do not place the product in following the operating instructions...
... use non-compliant parts when adding or changing components. Warning! Keep them out of the reach of other controls may contain small parts. Additional safety information • Do not look into the product • the product was spilled into the projector's lens when the lamp is on the projector first and then signal sources • Do not place the product in following the operating instructions...

User Manual
Page 8
... not expose this product to maximize the life of time. • Please plug in the UWA5 wireless dongle in the Wireless Kit port before opening the projector for the first time. • If user open the projector first, then plug in operation. The bright light may cause electric shock. • When switching the projector off the product before cleaning. • Use a soft cloth moistened with mild detergent...
... not expose this product to maximize the life of time. • Please plug in the UWA5 wireless dongle in the Wireless Kit port before opening the projector for the first time. • If user open the projector first, then plug in operation. The bright light may cause electric shock. • When switching the projector off the product before cleaning. • Use a soft cloth moistened with mild detergent...

User Manual
Page 9
Do not touch the lens with your fingers. • Do not use alkaline/acid detergents or volatile solvents such as alcohol for cleaning lens and gently wipe the lens. ix Cleaning the lens • Before cleaning the lens, be sure to turn off the projector and unplug the power cord to allow the projector to cool down for at least 30 minutes. • Use a compressed air tank to the cleaning process, it is damaged due to remove the dust. • Use a special cloth for cleaning lens. If the lens is not covered by the warranty.
Do not touch the lens with your fingers. • Do not use alkaline/acid detergents or volatile solvents such as alcohol for cleaning lens and gently wipe the lens. ix Cleaning the lens • Before cleaning the lens, be sure to turn off the projector and unplug the power cord to allow the projector to cool down for at least 30 minutes. • Use a compressed air tank to the cleaning process, it is damaged due to remove the dust. • Use a special cloth for cleaning lens. If the lens is not covered by the warranty.

User Manual
Page 10
... 2 Projector Overview 3 Projector Outlook 3 Control Panel 5 Remote Control Layout 6 Getting Started 7 Connecting the Projector 7 Turning the Projector On/Off 9 Turning on the Projector 9 Turning the projector off 10 Adjusting the Projected Image 11 Adjusting the Height of Projected Image 11 How to get a preferred image size by adjusting distance 12 User Controls 13 Onscreen Display (OSD) Menus 13 Color 14 Image 17 Setting 20 Management 21 Audio 22 Appendices 23 Troubleshooting 23 LED & Alarm Definition Listing 27 Ceiling Mount Installation 28
... 2 Projector Overview 3 Projector Outlook 3 Control Panel 5 Remote Control Layout 6 Getting Started 7 Connecting the Projector 7 Turning the Projector On/Off 9 Turning on the Projector 9 Turning the projector off 10 Adjusting the Projected Image 11 Adjusting the Height of Projected Image 11 How to get a preferred image size by adjusting distance 12 User Controls 13 Onscreen Display (OSD) Menus 13 Color 14 Image 17 Setting 20 Management 21 Audio 22 Appendices 23 Troubleshooting 23 LED & Alarm Definition Listing 27 Ceiling Mount Installation 28

User Manual
Page 12
.... English 1 Introduction Product Features This product is a single-chip DLP® projector. HDMI ports for AMD FreeSync and NVIDIA G-sync compatible • Support High Frame Rate 1080P max. 240Hz • Microsoft® Windows® 2000, XP, Vista®, Windows 7, Windows 8.1, Windows 10, Macintosh® OS compliant, ChromeOS Compliant • Auto image re-sizing to 4K Addressable Pixels full screen • Built-in One 10 Watts speakers •...
.... English 1 Introduction Product Features This product is a single-chip DLP® projector. HDMI ports for AMD FreeSync and NVIDIA G-sync compatible • Support High Frame Rate 1080P max. 240Hz • Microsoft® Windows® 2000, XP, Vista®, Windows 7, Windows 8.1, Windows 10, Macintosh® OS compliant, ChromeOS Compliant • Auto image re-sizing to 4K Addressable Pixels full screen • Built-in One 10 Watts speakers •...

User Manual
Page 16
English 5 Control Panel 26 1 3 4 5 7 8 10 9 11 # Icon Function 1 POWER POWER 2 LAMP LAMP 3 TEMP TEMP 4 POWER 5 INFO INFO Description Power Indicator LED Light source Indicator LED Temp Indicator LED See the contents in "Turning the Projector On/Off" section. Note 2: Long press left(Source) key to the previous operation. Remote control receiver Note 1: Functions vary depending on model definition. When adjust image to compensate for distortion for manual vertical keystone under no OSD menu. : select OSD item under OSD main 6 Four directional select...
English 5 Control Panel 26 1 3 4 5 7 8 10 9 11 # Icon Function 1 POWER POWER 2 LAMP LAMP 3 TEMP TEMP 4 POWER 5 INFO INFO Description Power Indicator LED Light source Indicator LED Temp Indicator LED See the contents in "Turning the Projector On/Off" section. Note 2: Long press left(Source) key to the previous operation. Remote control receiver Note 1: Functions vary depending on model definition. When adjust image to compensate for distortion for manual vertical keystone under no OSD menu. : select OSD item under OSD main 6 Four directional select...

User Manual
Page 21
... turn solid red. This onscreen message indicates that the projector has overheated. Note 1: Whenever the projector automatically shuts down , and the Temp indicator LED will automatically shut down and the Lamp indicator LED turns solid red, contact your local reseller or service center. Warning indicators: • "Projector Overheated. Contact your local dealer or service center. The light source will automatically turn off automatically soon." Contact your local dealer or service center. • "Fan failed. This message appears: "Please press power button...
... turn solid red. This onscreen message indicates that the projector has overheated. Note 1: Whenever the projector automatically shuts down , and the Temp indicator LED will automatically shut down and the Lamp indicator LED turns solid red, contact your local reseller or service center. Warning indicators: • "Projector Overheated. Contact your local dealer or service center. The light source will automatically turn off automatically soon." Contact your local dealer or service center. • "Fan failed. This message appears: "Please press power button...
User Manual
Page 26
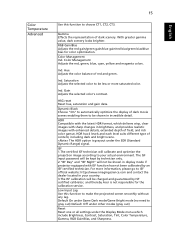
... type of red and green. Low Input Lag Use this function to make the projeccted screen smoothly without any lag. Color Temperature Advanced 15 Use this function to choose CT1, CT2, CT3. With greater gamma value, dark scenery looks brighter. Color Management Adjusts the red, green, blue, cyan, yellow and magenta colors. Saturation Adjusts the selected color to be shown in brightness, and provides realistic images with ISF...
... type of red and green. Low Input Lag Use this function to make the projeccted screen smoothly without any lag. Color Temperature Advanced 15 Use this function to choose CT1, CT2, CT3. With greater gamma value, dark scenery looks brighter. Color Management Adjusts the red, green, blue, cyan, yellow and magenta colors. Saturation Adjusts the selected color to be shown in brightness, and provides realistic images with ISF...

User Manual
Page 28
... English Image Projection Aspect Ratio Sharpness • Front: The factory default setting. • Rear: When you select this function, the projector reverses the image so you can project from behind a translucent screen with ceiling mounted projection. • Ceiling: When you select this function, the projector reverses and inverts the image at same time. Adjusts the sharpness of the screen and the height adjusted to display the image using a 4:3 ratio. • 16:9: The image will...
... English Image Projection Aspect Ratio Sharpness • Front: The factory default setting. • Rear: When you select this function, the projector reverses the image so you can project from behind a translucent screen with ceiling mounted projection. • Ceiling: When you select this function, the projector reverses and inverts the image at same time. Adjusts the sharpness of the screen and the height adjusted to display the image using a 4:3 ratio. • 16:9: The image will...
User Manual
Page 31
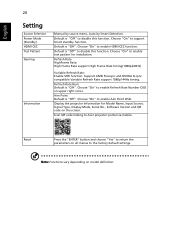
... Refresh Rate support 1080p144Hz timing. Choose "On" to enable Refresh Rate Number OSD on all menus to disable this function. Default is "Off". Default is "Off" to the factory default settings. Choose "On" to enable Aim Point OSD. Reset Press the "ENTER" button and choose "Yes" to Acer projector portal via mobile. English 20 Setting Source Selection Power Mode (Standby) HDMI CEC Test Pattern Gaming Information Manual by source menu, Auto by...
... Refresh Rate support 1080p144Hz timing. Choose "On" to enable Refresh Rate Number OSD on all menus to disable this function. Default is "Off". Default is "Off" to the factory default settings. Choose "On" to enable Aim Point OSD. Reset Press the "ENTER" button and choose "Yes" to Acer projector portal via mobile. English 20 Setting Source Selection Power Mode (Standby) HDMI CEC Test Pattern Gaming Information Manual by source menu, Auto by...

User Manual
Page 32
... preferred menu language. • Press "ENTER" to dim the projector lamp which will automatically shutdown when there is no signal input after the allocated time. (default is 15 minutes) Choose the OSD menu display time. (Default is 15 seconds). English 21 Management ECO Mode High Altitude Auto shutdown (Minutes) Menu Display Time (Seconds) Auto power on Language Choose "On" to confirm the selection. Choose "Off" to power on projector while HDMI cable plug...
... preferred menu language. • Press "ENTER" to dim the projector lamp which will automatically shutdown when there is no signal input after the allocated time. (default is 15 minutes) Choose the OSD menu display time. (Default is 15 seconds). English 21 Management ECO Mode High Altitude Auto shutdown (Minutes) Menu Display Time (Seconds) Auto power on Language Choose "On" to confirm the selection. Choose "Off" to power on projector while HDMI cable plug...

User Manual
Page 36
... displaying video or photo in Smart source Go to or further from the screen. • Press "MENU" on the remote control. or too large • Move the projector closer to "Image - -> Aspect Ratio" and try different settings. 10 Image has slanted • If possible, reposition the projector so that it is sides centered on the screen. • Select "Image --> Keystone" on the OSD and adjust the keystone...
... displaying video or photo in Smart source Go to or further from the screen. • Press "MENU" on the remote control. or too large • Move the projector closer to "Image - -> Aspect Ratio" and try different settings. 10 Image has slanted • If possible, reposition the projector so that it is sides centered on the screen. • Select "Image --> Keystone" on the OSD and adjust the keystone...

User Manual
Page 42
... • AC power cord x1 • HDMI cable x1 • Remote control x1 • AAA battery x2 (for remote control) • Quick start guide x1 • Carrying case x1 (option) I/O connectors Power socket V HDMI1 V HDMI2 V Projection system Resolution Computer compatibility Video compatibility Aspect ratio Displayable colors Throw ratio Projection lens Projection screen size (diagonal) Projection distance Horizontal scan rate Vertical refresh scan rate Audio Weight Dimensions (W x D x H) Power supply Power consumption Operating temperature Standard package contents DLP® 4K UHD...
... • AC power cord x1 • HDMI cable x1 • Remote control x1 • AAA battery x2 (for remote control) • Quick start guide x1 • Carrying case x1 (option) I/O connectors Power socket V HDMI1 V HDMI2 V Projection system Resolution Computer compatibility Video compatibility Aspect ratio Displayable colors Throw ratio Projection lens Projection screen size (diagonal) Projection distance Horizontal scan rate Vertical refresh scan rate Audio Weight Dimensions (W x D x H) Power supply Power consumption Operating temperature Standard package contents DLP® 4K UHD...
User Manual 3D
Page 5
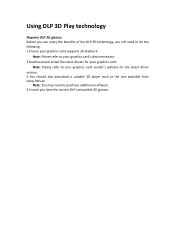
...to your graphics card supports 3D playback. Before you can enjoy the benefits of the DLP 3D technology, you will need to your graphics card's documentation. 2 Download and install the latest drivers for the latest driver version. 3 You should also download a suitable 3D ...player such as the one available from www.3dtv.at. Note: Please refer to purchase additional software. 4 Ensure you have the correct DLP-compatible 3D glasses. Using DLP 3D Play technology Requires DLP...
...to your graphics card supports 3D playback. Before you can enjoy the benefits of the DLP 3D technology, you will need to your graphics card's documentation. 2 Download and install the latest drivers for the latest driver version. 3 You should also download a suitable 3D ...player such as the one available from www.3dtv.at. Note: Please refer to purchase additional software. 4 Ensure you have the correct DLP-compatible 3D glasses. Using DLP 3D Play technology Requires DLP...

User Manual CollaVision APP
Page 2
... connect your Android, iOS, or Windows device's screen or share photos/documents to the Wi-Fi network. Standby Screen of the mobile devices with projector. Note3: The compatibility of the Projector/Display The following information shown on below Smart Control part. Note1: The wireless display service requires Internet connection. App download instructions 2. Login code(Default is not valid for hot key accessing CollaVision(WPS) Wireless Projection Support APP. Quick start the wireless projection...
... connect your Android, iOS, or Windows device's screen or share photos/documents to the Wi-Fi network. Standby Screen of the mobile devices with projector. Note3: The compatibility of the Projector/Display The following information shown on below Smart Control part. Note1: The wireless display service requires Internet connection. App download instructions 2. Login code(Default is not valid for hot key accessing CollaVision(WPS) Wireless Projection Support APP. Quick start the wireless projection...

User Manual CollaVision APP
Page 8
Connectivity a. System Information CollaVision software version 3. Disable/Random/Fixed [The default value is "Disable".] 4. Wi-Fi Hostname: you can do the following settings. 1. Additional functions A. Network Information 2. CollaVision Settings Click menu button ( ) on either sides of the standby screen, and then click ( ) can modify the device name b. Security Login Code: It displayed on "Upgrade" to the projector. Upgrade Click on the standby screen for user to connect to check if new versions are available. 8 IV. Wi-Fi Band: 2.4GHz or 5GHz c.
Connectivity a. System Information CollaVision software version 3. Disable/Random/Fixed [The default value is "Disable".] 4. Wi-Fi Hostname: you can do the following settings. 1. Additional functions A. Network Information 2. CollaVision Settings Click menu button ( ) on either sides of the standby screen, and then click ( ) can modify the device name b. Security Login Code: It displayed on "Upgrade" to the projector. Upgrade Click on the standby screen for user to connect to check if new versions are available. 8 IV. Wi-Fi Band: 2.4GHz or 5GHz c.

User Manual media
Page 7
Smart: Left, to HDMI source. Other: Zooms the projector display out. Note: • • • Functions vary depending on models. Remote controller depend on model definition. Smart: Forbidden function. Others: Switch to select items.* Others: Select the previous page under VGA or HDMI source. Other: Momentarily turns off the video. Other: Zooms the projector display in. SMART FUNCTIONS # Icon Function 10 KEYSTONE 11 BACK 12 VGA 13 FREEZE 14 PgUp 15...
Smart: Left, to HDMI source. Other: Zooms the projector display out. Note: • • • Functions vary depending on models. Remote controller depend on model definition. Smart: Forbidden function. Others: Switch to select items.* Others: Select the previous page under VGA or HDMI source. Other: Momentarily turns off the video. Other: Zooms the projector display in. SMART FUNCTIONS # Icon Function 10 KEYSTONE 11 BACK 12 VGA 13 FREEZE 14 PgUp 15...
User Manual media
Page 16
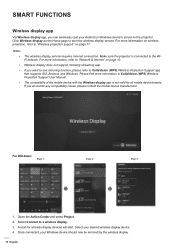
... Project. 2. Click Wireless display on page 10. Please find more information in CollaVision (WPS) Wireless Projection Support User Manual. Select Connect to the WiFi network. SMART FUNCTIONS Wireless display app Via Wireless display app, you want to use mirroring function, please refer to CollaVision (WPS) Wireless Projection Support app that supports iOS, Android, and Windows. Wireless display does not support mirroring streaming app. If you can wirelessly cast your Android or Windows device's screen to the projector...
... Project. 2. Click Wireless display on page 10. Please find more information in CollaVision (WPS) Wireless Projection Support User Manual. Select Connect to the WiFi network. SMART FUNCTIONS Wireless display app Via Wireless display app, you want to use mirroring function, please refer to CollaVision (WPS) Wireless Projection Support app that supports iOS, Android, and Windows. Wireless display does not support mirroring streaming app. If you can wirelessly cast your Android or Windows device's screen to the projector...


