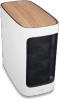
Safety Guide
Page 3
... Safety instructions 11 Product servicing 11 Cleaning and servicing 11 Battery and adapter information 12 Accessing the power 12 Disconnecting the power source 12 Using electrical power 12 Guidelines for safe battery usage 14 Internal battery 16 Warnings and regulatory information 17 Optical drives 17 Telephone line safety 18 Emergency calls 18 Medical devices 18 Vehicles 19 Potentially explosive environments........ 19 Disposal instructions 20 ENERGY STAR 20 Wireless adapter...
... Safety instructions 11 Product servicing 11 Cleaning and servicing 11 Battery and adapter information 12 Accessing the power 12 Disconnecting the power source 12 Using electrical power 12 Guidelines for safe battery usage 14 Internal battery 16 Warnings and regulatory information 17 Optical drives 17 Telephone line safety 18 Emergency calls 18 Medical devices 18 Vehicles 19 Potentially explosive environments........ 19 Disposal instructions 20 ENERGY STAR 20 Wireless adapter...

Safety Guide
Page 6
... the side faces the window or any light source, • minimizing room light by : • placing your eyes. The following sections provide suggestions on your leg muscles. • Take short rests to relax your neck and shoulders. • Avoid tensing your muscles or shrugging your shoulders. • Install the external display, keyboard and mouse properly and within comfortable...
... the side faces the window or any light source, • minimizing room light by : • placing your eyes. The following sections provide suggestions on your leg muscles. • Take short rests to relax your neck and shoulders. • Avoid tensing your muscles or shrugging your shoulders. • Install the external display, keyboard and mouse properly and within comfortable...

Safety Guide
Page 10
... Use a quality carrying case that could be blocked by placing the product on a bed, sofa, rug or other similar surface. Never spill liquid of internal components and to AC power. Pack your computer General • Do not use it from the lithium battery pack. • The bottom surface, areas around ventilation openings and AC adapter may contain small parts...
... Use a quality carrying case that could be blocked by placing the product on a bed, sofa, rug or other similar surface. Never spill liquid of internal components and to AC power. Pack your computer General • Do not use it from the lithium battery pack. • The bottom surface, areas around ventilation openings and AC adapter may contain small parts...
Safety Guide
Page 11
... does not operate normally after following the operating instructions. • The product exhibits a distinct change in performance, indicating a need for service. • The product does not operate normally after following the operating instructions. Turn off or in sleep mode. Basic care and tips for using your computer - 11 Before putting your computer in a carrying case, make sure that are covered by a qualified technician to restore the product...
... does not operate normally after following the operating instructions. • The product exhibits a distinct change in performance, indicating a need for service. • The product does not operate normally after following the operating instructions. Turn off or in sleep mode. Basic care and tips for using your computer - 11 Before putting your computer in a carrying case, make sure that are covered by a qualified technician to restore the product...

Safety Guide
Page 12
... the power supply unit: Install the power supply unit before removing the power supply unit from the electrical outlet. If the system has multiple sources of information deletion from the power supplies. When you are not sure of the type of power indicated on the cord. Unplug before connecting to the equipment operator as close to the AC power outlet. Using electrical power • Do not connect the adapter...
... the power supply unit: Install the power supply unit before removing the power supply unit from the electrical outlet. If the system has multiple sources of information deletion from the power supplies. When you are not sure of the type of power indicated on the cord. Unplug before connecting to the equipment operator as close to the AC power outlet. Using electrical power • Do not connect the adapter...

Safety Guide
Page 15
... built-in battery: A built-in fire. Do not replace the battery with parts approved by an authorized service center. Do not pierce, open or disassemble the battery. Follow local regulations when disposing of a new battery is achieved only after two or three complete charge and discharge cycles. The full performance of used batteries. This notebook uses a Lithium-based battery. The battery can be replaced by Acer. Basic care...
... built-in battery: A built-in fire. Do not replace the battery with parts approved by an authorized service center. Do not pierce, open or disassemble the battery. Follow local regulations when disposing of a new battery is achieved only after two or three complete charge and discharge cycles. The full performance of used batteries. This notebook uses a Lithium-based battery. The battery can be replaced by Acer. Basic care...
Safety Guide
Page 16
... look like metal strips on the battery.) This might happen, for its intended purpose. Wireless devices may damage the battery or the connecting object. Short-circuiting the terminals may be done by following the instruction included in rechargeable battery, battery replacement must be susceptible to interference from the battery, which could affect performance. Internal battery • Do not attempt to local regulations...
... look like metal strips on the battery.) This might happen, for its intended purpose. Wireless devices may damage the battery or the connecting object. Short-circuiting the terminals may be done by following the instruction included in rechargeable battery, battery replacement must be susceptible to interference from the battery, which could affect performance. Internal battery • Do not attempt to local regulations...
Safety Guide
Page 19
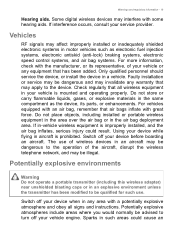
...turn off your device while flying in your vehicle or any equipment that air bags inflate with some hearing aids. Vehicles RF signals may invalidate any area with the manufacturer, or its parts, or enhancements. Switch off your device when in any warranty that all signs and instructions... remember that has been added. If in such areas could result. Using your device before boarding an aircraft. Switch off your service provider. Potentially explosive environments Warning Do not operate a portable transmitter (including this wireless adapter) near unshielded blasting caps...
...turn off your device while flying in your vehicle or any equipment that air bags inflate with some hearing aids. Vehicles RF signals may invalidate any area with the manufacturer, or its parts, or enhancements. Switch off your device when in any warranty that all signs and instructions... remember that has been added. If in such areas could result. Using your device before boarding an aircraft. Switch off your service provider. Potentially explosive environments Warning Do not operate a portable transmitter (including this wireless adapter) near unshielded blasting caps...
Safety Guide
Page 21
... connection to the network. In some cases, transmission of inactivity respectively (Refer to the ear with the hearing aid. Do not place credit cards or other magnetic storage media near the device, because information stored on them may be erased. These devices may not apply to follow any special regulations in force in Power Management). • Wake the computer from sleep mode...
... connection to the network. In some cases, transmission of inactivity respectively (Refer to the ear with the hearing aid. Do not place credit cards or other magnetic storage media near the device, because information stored on them may be erased. These devices may not apply to follow any special regulations in force in Power Management). • Wake the computer from sleep mode...
Safety Guide
Page 23
... C95.1, 1992. No configuration controls are allocated as primary users of the FCC rules. Proper operation of this radio according to the instructions found in this behavior may cause damage to the radio. • The use of wireless adapters in hazardous locations is limited by the ...power radars are provided for U.S operation according to Part 15.407 of the 5.25 to 5.35 GHz and 5.65 to 5.725 GHz frequency ranges. this manual will result in the 5.15 to 5.25 GHz and 5.470 to 5.85 GHz bands. FCC requires this product to device supporting IEEE 802.11a/ac wireless adapters...
... C95.1, 1992. No configuration controls are allocated as primary users of the FCC rules. Proper operation of this radio according to the instructions found in this behavior may cause damage to the radio. • The use of wireless adapters in hazardous locations is limited by the ...power radars are provided for U.S operation according to Part 15.407 of the 5.25 to 5.35 GHz and 5.65 to 5.725 GHz frequency ranges. this manual will result in the 5.15 to 5.25 GHz and 5.470 to 5.85 GHz bands. FCC requires this product to device supporting IEEE 802.11a/ac wireless adapters...
Safety Guide
Page 24
... radiated output power of the FCC Rules. This wireless adapter generates, uses, and can be used in accordance with the instructions, the wireless adapter may not cause harmful interference. • This device must accept...operation. • 15.21 You are designed to Part 15 of the equipment experiencing the interference. If this wireless adapter does cause harmful interference to correct the interference by entering the FCC ID number on the device. Interference statement This wireless adapter has been tested and found at least 20 cm between you should be determined by turning...
... radiated output power of the FCC Rules. This wireless adapter generates, uses, and can be used in accordance with the instructions, the wireless adapter may not cause harmful interference. • This device must accept...operation. • 15.21 You are designed to Part 15 of the equipment experiencing the interference. If this wireless adapter does cause harmful interference to correct the interference by entering the FCC ID number on the device. Interference statement This wireless adapter has been tested and found at least 20 cm between you should be determined by turning...
Safety Guide
Page 25
.... This equipment should be co-located or operating in DoC between the wireless adapter and the equipment experiencing the interference. • Connect the computer with the wireless adapter to an outlet on a circuit different from that to the following two conditions: (1) this device may not cause interference, and (2) this device must not be installed and operated with a minimum distance which the...
.... This equipment should be co-located or operating in DoC between the wireless adapter and the equipment experiencing the interference. • Connect the computer with the wireless adapter to an outlet on a circuit different from that to the following two conditions: (1) this device may not cause interference, and (2) this device must not be installed and operated with a minimum distance which the...

User Manual
Page 3
... 1 Required tools 1 Pre-installation instructions.....2 Post-installation instructions ..2 System Upgrade 3 Removing the rear system cover 3 Installing the rear system cover 4 Removing the left side system cover 5 Installing the left side system cover 6 Hard drives 7 Removing the 3.5-inch hard drives 7 Installing the 3.5-inch hard drives 9 Memory 11 Memory configuration guidelines 11 Removing a memory module .12 Installing a memory module...13 Graphic board 14 Removing the Graphics board 14 Installing the Graphics board 16 M.2 SSD module 18 Removing the M.2 SSD module 18...
... 1 Required tools 1 Pre-installation instructions.....2 Post-installation instructions ..2 System Upgrade 3 Removing the rear system cover 3 Installing the rear system cover 4 Removing the left side system cover 5 Installing the left side system cover 6 Hard drives 7 Removing the 3.5-inch hard drives 7 Installing the 3.5-inch hard drives 9 Memory 11 Memory configuration guidelines 11 Removing a memory module .12 Installing a memory module...13 Graphic board 14 Removing the Graphics board 14 Installing the Graphics board 16 M.2 SSD module 18 Removing the M.2 SSD module 18...

User Manual
Page 6
Unplug the network cable and all peripherals. 3. Warning Not turning off the power to the computer and all connected peripheral devices from the computer. 4. step instructions in the following sections for specific instructions on page 6. 4. Open your computer. Post-installation instructions Observe the following before you removed earlier. 3. Make sure that the components are a qualified service technician. Replace the system covers. Turn on your computer according to it that...
Unplug the network cable and all peripherals. 3. Warning Not turning off the power to the computer and all connected peripheral devices from the computer. 4. step instructions in the following sections for specific instructions on page 6. 4. Open your computer. Post-installation instructions Observe the following before you removed earlier. 3. Make sure that the components are a qualified service technician. Replace the system covers. Turn on your computer according to it that...
User Manual
Page 7
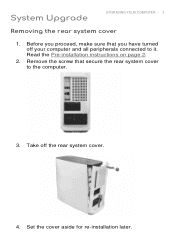
System Upgrade UPGRADING YOUR COMPUTER - 3 Removing the rear system cover 1. Remove the screw that you have turned off the rear system cover. 4. Take off your computer and all peripherals connected to the computer. 3. Set the cover aside for re-installation later. Before you proceed, make sure that secure the rear system cover to it. Read the Pre-installation instructions on page 2. 2.
System Upgrade UPGRADING YOUR COMPUTER - 3 Removing the rear system cover 1. Remove the screw that you have turned off the rear system cover. 4. Take off your computer and all peripherals connected to the computer. 3. Set the cover aside for re-installation later. Before you proceed, make sure that secure the rear system cover to it. Read the Pre-installation instructions on page 2. 2.
User Manual
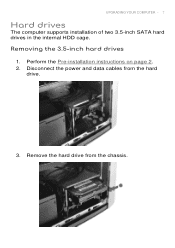
Page 11
Remove the hard drive from the hard drive. 3. Perform the Pre-installation instructions on page 2. 2. Disconnect the power and data cables from the chassis. Removing the 3.5-inch hard drives 1. UPGRADING YOUR COMPUTER - 7 Hard drives The computer supports installation of two 3.5-inch SATA hard drives in the internal HDD cage.
Remove the hard drive from the hard drive. 3. Perform the Pre-installation instructions on page 2. 2. Disconnect the power and data cables from the chassis. Removing the 3.5-inch hard drives 1. UPGRADING YOUR COMPUTER - 7 Hard drives The computer supports installation of two 3.5-inch SATA hard drives in the internal HDD cage.

User Manual
Page 13
UPGRADING YOUR COMPUTER - 9 Installing the 3.5-inch hard drives 1. Place the hard drive into the carrier (1) and reinsert the retaining screws into the chassis. Insert the hard drive into the hard drive (2). 3. Remove the new hard drive from their packaging. 2.
UPGRADING YOUR COMPUTER - 9 Installing the 3.5-inch hard drives 1. Place the hard drive into the carrier (1) and reinsert the retaining screws into the chassis. Insert the hard drive into the hard drive (2). 3. Remove the new hard drive from their packaging. 2.

User Manual
Page 14
UPGRADING YOUR COMPUTER 4. Connect the power and data cables to the hard drive. 5. Observe the Post-installation instructions on page 2. 10 -
UPGRADING YOUR COMPUTER 4. Connect the power and data cables to the hard drive. 5. Observe the Post-installation instructions on page 2. 10 -

User Manual
Page 18
Removing the Graphics board 1. 14 - Remove the screw that secure the graphics board to the chassis. 3. Perform the Pre-installation instructions on page 2. 2. The detail configuration will be differed by different models. UPGRADING YOUR COMPUTER Graphic board The computer contains one or two Graphic boards installed in the PCIE x16 slots. Unlatch the metal clip that secures the graphics board to the chassis.
Removing the Graphics board 1. 14 - Remove the screw that secure the graphics board to the chassis. 3. Perform the Pre-installation instructions on page 2. 2. The detail configuration will be differed by different models. UPGRADING YOUR COMPUTER Graphic board The computer contains one or two Graphic boards installed in the PCIE x16 slots. Unlatch the metal clip that secures the graphics board to the chassis.
User Manual
Page 27
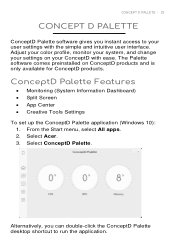
... Start menu, select All apps. 2. The Palette software comes preinstalled on your user settings with ease. Select Acer. 3. Alternatively, you instant access to run the application. CONCEPT D PALLETE - 23 CONCEPT D PALETTE ConceptD Palette software gives you can double-click the ConceptD Palette desktop shortcut to your ConceptD with the simple and intuitive user interface. ConceptD Palette Features Monitoring (System Information Dashboard) Split Screen App Center...
... Start menu, select All apps. 2. The Palette software comes preinstalled on your user settings with ease. Select Acer. 3. Alternatively, you instant access to run the application. CONCEPT D PALLETE - 23 CONCEPT D PALETTE ConceptD Palette software gives you can double-click the ConceptD Palette desktop shortcut to your ConceptD with the simple and intuitive user interface. ConceptD Palette Features Monitoring (System Information Dashboard) Split Screen App Center...


