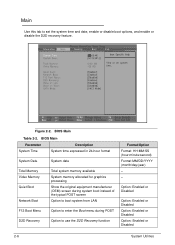
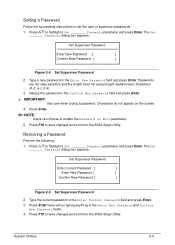
Aspire V5-531 Screen - Acer
Aspire V5-531 Screen

View Results Below
Free Acer Aspire V5-531 manuals!
Problems with Acer Aspire V5-531?
Ask a Question
Free Acer Aspire V5-531 manuals!
Problems with Acer Aspire V5-531?
Ask a Question
Related Manual Pages
Related Videos

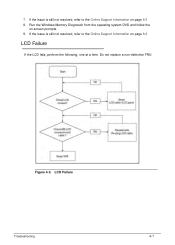
Acer Aspire V5 Laptop Screen Replacement Procedure
Duration: 11:29
Total Views: 37,897
Duration: 11:29
Total Views: 37,897
Laptop Screen Replacement / How to Replace Laptop Screen [Acer Aspire V5-571-6491]
Duration: 4:39
Total Views: 1,140
Duration: 4:39
Total Views: 1,140
Laptop screen replacement / How to replace laptop screen Acer Aspire V5 - 121- 0452
Duration: 13:02
Total Views: 2,355
Duration: 13:02
Total Views: 2,355
Acer Aspire V5-131 Laptop Screen Replacement Procedure
Duration: 11:32
Total Views: 1,501
Duration: 11:32
Total Views: 1,501
Change LED Slim Screen Laptop Ultrabook Display Acer Aspire V5 571G 531
Duration: 14:38
Total Views: 4,307
Duration: 14:38
Total Views: 4,307
Similar Questions

Screen Black :/
When I open my laptop. The screen seems black I can't see anything after typing my password the scre...
When I open my laptop. The screen seems black I can't see anything after typing my password the scre...
(Posted by Arriolajhesamae 10 years ago)

My On Screen Keyboard Won't Stay Off
Help me please My on screen keyborad wont go away
Help me please My on screen keyborad wont go away
(Posted by leemi88 10 years ago)

Switching Screens
I just bought an Aspire V5. When I'm on a site, it randomly switches to another screen. How do I...
I just bought an Aspire V5. When I'm on a site, it randomly switches to another screen. How do I...
(Posted by snphammond 11 years ago)

Acer Aspire 4736z Screen
do all acer aspire 4736Z have same screen.if not how to find the description?
do all acer aspire 4736Z have same screen.if not how to find the description?
(Posted by prabinbuth 11 years ago)
White Screen Problem In Acer 4720
i have an acer 4720 for past one year . now from one month i am facing a problem with my laptop , it...
i have an acer 4720 for past one year . now from one month i am facing a problem with my laptop , it...
(Posted by sam2220 12 years ago)
Related Terms
The following terms were also used when searching for Aspire V5-531 Screen - Acer:- acer acer aspire v5 531 4636
- acer aspire v5
- acer aspire v5 11.6
- acer aspire v5 14
- acer aspire v5 4 series
- acer aspire v5 471
- acer aspire v5 531
- acer aspire v5 531 4636
- acer aspire v5 531 4636 battery
- acer aspire v5 531 4879
- acer aspire v5 531 571
- acer aspire v5 531 battery
- acer aspire v5 531 bios
- acer aspire v5 531 bios key
- acer aspire v5 531 bluetooth
- acer aspire v5 531 bluetooth driver
- acer aspire v5 531 boot key
- acer aspire v5 531 boot menu
- acer aspire v5 531 disassembly
- acer aspire v5 531 driver
- acer aspire v5 531 drivers
- acer aspire v5 531 drivers download
- acer aspire v5 531 drivers win7 acer
- acer aspire v5 531 dual core
- acer aspire v5 531 ethernet controller
- acer aspire v5 531 hard drive removal
- acer aspire v5 531 laptop
- acer aspire v5 531 laptop review
- acer aspire v5 531 laptop specifications
- acer aspire v5 531 manual
- acer aspire v5 531 model ms2361
- acer aspire v5 531 ms2361
- acer aspire v5 531 operating system not found
- acer aspire v5 531 price
- acer aspire v5 531 price in india
- acer aspire v5 531 price in malaysia
- acer aspire v5 531 processor upgrade
- acer aspire v5 531 recovery
- acer aspire v5 531 replace hdd
- acer aspire v5 531 review
- acer aspire v5 531 reviews
- acer aspire v5 531 screen
- acer aspire v5 531 screen replacement
- acer aspire v5 531 series
- acer aspire v5 531 silver
- acer aspire v5 531 specification
- acer aspire v5 531 specs
- acer aspire v5 531 test
- acer aspire v5 531 touch
- acer aspire v5 531 touch screen
- acer aspire v5 531 uk
- acer aspire v5 531 user manual
- acer aspire v5 531 windows 8
- acer aspire v5 531 wireless driver
- acer aspire v5 531-4129 touch screen
- acer aspire v5 531-4636
- acer aspire v5 531/571
- acer aspire v5 531g
- acer aspire v5 531p
- acer aspire v5 531p 4129
- acer aspire v5 531p 4878
- acer aspire v5 531p 571p
- acer aspire v5 531p-4129
- acer aspire v5 531p-4878
- acer aspire v5 531p/571p
- acer aspire v5 571 6605
- acer aspire v5 laptop
- acer aspire v5 laptop review
- acer aspire v5 release
- acer aspire v5 review
- acer aspire v5 series
- acer aspire v5 series notebook computer
- acer aspire v5 specs
- acer aspire v5 touch
- acer aspire v5-531
- acer aspire v5-531 battery
- acer aspire v5-531 battery removal
- acer aspire v5-531 bios
- acer aspire v5-531 bios password reset
- acer aspire v5-531 blue
- acer aspire v5-531 bluetooth
- acer aspire v5-531 case
- acer aspire v5-531 charger
- acer aspire v5-531 disassembly
- acer aspire v5-531 drivers
- acer aspire v5-531 drivers windows 7
- acer aspire v5-531 drivers windows 7 64 bit
- acer aspire v5-531 dual core review
- acer aspire v5-531 factory reset
- acer aspire v5-531 hard drive removal
- acer aspire v5-531 keyboard
- acer aspire v5-531 keyboard replacement
- acer aspire v5-531 laptop
- acer aspire v5-531 manual
- acer aspire v5-531 model ms2361
- acer aspire v5-531 motherboard
- acer aspire v5-531 ms2361
- acer aspire v5-531 netbook
- acer aspire v5-531 notebook
- acer aspire v5-531 notebook service guide
- acer aspire v5-531 price
- acer aspire v5-531 price in india
- acer aspire v5-531 remove hard drive
- acer aspire v5-531 replacement screen
- acer aspire v5-531 review
- acer aspire v5-531 screen
- acer aspire v5-531 screen replacement
- acer aspire v5-531 series
- acer aspire v5-531 specifications
- acer aspire v5-531 specs
- acer aspire v5-531 test
- acer aspire v5-531 user manual
- acer aspire v5-531 windows 7 drivers
- acer aspire v5-531 windows 8
- acer aspire v5-531 wireless driver
- acer aspire v5-531-4636
- acer aspire v5-531/571
- acer aspire v5-531g
- acer aspire v5-531p
- acer aspire v5-531p-4129
- acer aspire v5-531p-4129 screen
- acer aspire v5-531p-4878
- acer aspire v5-531p/571p
- acer aspire v5-571
- aspire v5
- aspire v5 -431
- aspire v5 -471
- aspire v5 11.6
- aspire v5 11.6 review
- aspire v5 122p
- aspire v5 122p 0408
- aspire v5 122p-0408
- aspire v5 171
- aspire v5 431
- aspire v5 471
- aspire v5 471 6473
- aspire v5 471g
- aspire v5 531
- aspire v5 531 4636
- aspire v5 531 4636 battery
- aspire v5 531 4879
- aspire v5 531 571
- aspire v5 531 battery
- aspire v5 531 bios
- aspire v5 531 bios key
- aspire v5 531 bluetooth
- aspire v5 531 bluetooth driver
- aspire v5 531 boot key
- aspire v5 531 boot menu
- aspire v5 531 disassembly
- aspire v5 531 drivers
- aspire v5 531 drivers download
- aspire v5 531 drivers win7
- aspire v5 531 dual core
- aspire v5 531 ethernet controller
- aspire v5 531 hard drive removal
- aspire v5 531 laptop
- aspire v5 531 laptop review
- aspire v5 531 laptop specifications
- aspire v5 531 manual
- aspire v5 531 model ms2361
- aspire v5 531 ms2361
- aspire v5 531 operating system not found
- aspire v5 531 price
- aspire v5 531 price in india
- aspire v5 531 price in malaysia
- aspire v5 531 processor upgrade
- aspire v5 531 recovery
- aspire v5 531 replace hdd
- aspire v5 531 review
- aspire v5 531 reviews
- aspire v5 531 screen
- aspire v5 531 screen replacement
- aspire v5 531 series
- aspire v5 531 specification
- aspire v5 531 specs
- aspire v5 531 test
- aspire v5 531 touch
- aspire v5 531 touch screen
- aspire v5 531 user manual
- aspire v5 531 web cam
- aspire v5 531 webcam
- aspire v5 531 windows 8
- aspire v5 531 wireless driver
- aspire v5 531-4129 touch screen
- aspire v5 531-4636
- aspire v5 531/571
- aspire v5 531g
- aspire v5 531p
- aspire v5 531p 4129
- aspire v5 531p 4878
- aspire v5 531p 571p
- aspire v5 531p-4129
- aspire v5 531p-4878
- aspire v5 531p/571p
- aspire v5 571
- aspire v5 571 6726
- aspire v5 571 6869
- aspire v5 571 review
- aspire v5 571-6869
- aspire v5 571p
- aspire v5 572p 6454
- aspire v5 6869
- aspire v5 acer
- aspire v5 battery
- aspire v5 battery life
- aspire v5 battery removal
- aspire v5 best buy
- aspire v5 bios
- aspire v5 bios key
- aspire v5 black screen
- aspire v5 bluetooth not working
- aspire v5 boot from usb
- aspire v5 boot menu
- aspire v5 case
- aspire v5 charger
- aspire v5 drivers
- aspire v5 factory reset
- aspire v5 i3
- aspire v5 instructions
- aspire v5 keyboard locked
- aspire v5 laptop
- aspire v5 laptop windows 8
- aspire v5 not downloading windows updates
- aspire v5 notebook
- aspire v5 price
- aspire v5 review
- aspire v5 reviews
- aspire v5 series
- aspire v5 series notebook
- aspire v5 series price in india
- aspire v5 slim
- aspire v5 specs
- aspire v5 touch
- aspire v5 touch 15.6
- aspire v5 touch battery removal
- aspire v5 touch best buy
- aspire v5 touch manual
- aspire v5 touch notebook
- aspire v5 touch price
- aspire v5 touch review
- aspire v5 touch reviews
- aspire v5 touch screen
- aspire v5 touch screen 11.6
- aspire v5 touch screen replacement
- aspire v5 touch series
- aspire v5 user manual
- aspire v5 user's manual
- aspire v5 users manual
- aspire v5 webcam driver
- aspire v5- 531 g
- aspire v5-122p
- aspire v5-122p-0408
- aspire v5-122p-0864
- aspire v5-123
- aspire v5-171
- aspire v5-431
- aspire v5-471
- aspire v5-471 p
- aspire v5-471g
- aspire v5-471p
- aspire v5-531
- aspire v5-531 battery
- aspire v5-531 battery removal
- aspire v5-531 bios
- aspire v5-531 bios access
- aspire v5-531 bios password reset
- aspire v5-531 blue
- aspire v5-531 bluetooth
- aspire v5-531 case
- aspire v5-531 charger
- aspire v5-531 disassembly
- aspire v5-531 driver
- aspire v5-531 driver download
- aspire v5-531 drivers
- aspire v5-531 drivers download
- aspire v5-531 drivers windows 7
- aspire v5-531 drivers windows 7 64 bit
- aspire v5-531 factory reset
- aspire v5-531 hard drive removal
- aspire v5-531 keyboard
- aspire v5-531 keyboard replacement
- aspire v5-531 laptop
- aspire v5-531 manual
- aspire v5-531 model ms2361
- aspire v5-531 motherboard
- aspire v5-531 ms2361
- aspire v5-531 notebook
- aspire v5-531 notebook service guide
- aspire v5-531 operating system not found
- aspire v5-531 price
- aspire v5-531 price in india
- aspire v5-531 remove hard drive
- aspire v5-531 replace hard drive
- aspire v5-531 replacement screen
- aspire v5-531 review
- aspire v5-531 reviews
- aspire v5-531 screen
- aspire v5-531 screen replacement
- aspire v5-531 series
- aspire v5-531 service manual
- aspire v5-531 specifications
- aspire v5-531 specs
- aspire v5-531 test
- aspire v5-531 user manual
- aspire v5-531 windows 10
- aspire v5-531 windows 7 drivers
- aspire v5-531 windows 8
- aspire v5-531 wireless driver
- aspire v5-531-4636
- aspire v5-531/571
- aspire v5-531g
- aspire v5-531p
- aspire v5-531p-4129
- aspire v5-531p-4129 screen
- aspire v5-531p-4878
- aspire v5-531p/571p
- aspire v5-552g
- aspire v5-561p
- aspire v5-571
- aspire v5-571 review
- aspire v5-571g
- aspire v5-571p
- aspire v5-571p-6464
- aspire v5-571p-6472
- aspire v5-571p-6648
- aspire v5-572p-6454
- aspire v5-573g
- aspire v5-573p-6486
- aspire v5-6869
- battery removal for acer aspire v5 531
- battery removal for acer aspire v5-531
- battery removal for aspire v5 531
- battery removal for aspire v5-531