
User Manual
Page 3
...to another device 49 computer 16 Turning your computer on and off 16 Power management 50 Taking care of your computer 17 Acer Green Instant On 50 Taking care of your AC adapter 18 Cleaning and servicing 18 Battery pack 51 Battery pack characteristics 51 Your...keys and embedded numeric keypad..... 30 Special considerations 58 Hotkeys 31 Setting up a home office 58 Windows keys 33 Traveling with the computer 59 Recovery 35 Preparing the computer 59 Acer Recovery Management 35 Creating recovery discs 36 Recovering your system 39 Types of recovery 41 What to take...
...to another device 49 computer 16 Turning your computer on and off 16 Power management 50 Taking care of your computer 17 Acer Green Instant On 50 Taking care of your AC adapter 18 Cleaning and servicing 18 Battery pack 51 Battery pack characteristics 51 Your...keys and embedded numeric keypad..... 30 Special considerations 58 Hotkeys 31 Setting up a home office 58 Windows keys 33 Traveling with the computer 59 Recovery 35 Preparing the computer 59 Acer Recovery Management 35 Creating recovery discs 36 Recovering your system 39 Types of recovery 41 What to take...
User Manual
Page 14
... your eyes frequently. Give your eyes regular breaks by looking at the center of your display in such a way that the side faces the window or any light source, minimizing room light by using drapes, shades or blinds, using a task light, changing the display's viewing angle, 14 - Safety and comfort...
... your eyes frequently. Give your eyes regular breaks by looking at the center of your display in such a way that the side faces the window or any light source, minimizing room light by using drapes, shades or blinds, using a task light, changing the display's viewing angle, 14 - Safety and comfort...
User Manual
Page 17
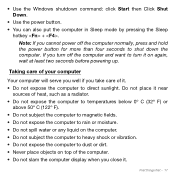
• Use the Windows shutdown command: click Start then Click Shut Down. • Use the power button. • You can also put the computer in Sleep mode by pressing ...
• Use the Windows shutdown command: click Start then Click Shut Down. • Use the power button. • You can also put the computer in Sleep mode by pressing ...
User Manual
Page 30
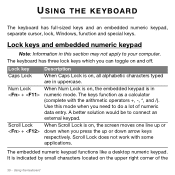
... this section may not apply to your computer. USING THE KEYBOARD The keyboard has full-sized keys and an embedded numeric keypad, separate cursor, lock, Windows, function and special keys. Lock key Caps Lock Num Lock + Scroll Lock + Description When Caps Lock is on the upper right corner of numeric data...
... this section may not apply to your computer. USING THE KEYBOARD The keyboard has full-sized keys and an embedded numeric keypad, separate cursor, lock, Windows, function and special keys. Lock key Caps Lock Num Lock + Scroll Lock + Description When Caps Lock is on the upper right corner of numeric data...
User Manual
Page 33
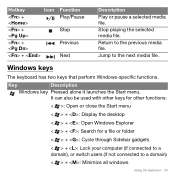
...keyboard - 33 It can also be used with other keys for other functions: < >: Open or close the Start menu < > + : Display the desktop < > + : Open Windows Explorer < > + : Search for a file or folder < > + : Cycle through Sidebar gadgets < > + : Lock your computer (if connected to a domain), or switch ...users (if not connected to the next media file. Stop playing the selected media file. Key Description Windows key Pressed alone it launches the Start menu. Hotkey Icon + + + + Function Play/Pause Stop Previous Next Description Play or pause a selected media...
...keyboard - 33 It can also be used with other keys for other functions: < >: Open or close the Start menu < > + : Display the desktop < > + : Open Windows Explorer < > + : Search for a file or folder < > + : Cycle through Sidebar gadgets < > + : Lock your computer (if connected to a domain), or switch ...users (if not connected to the next media file. Stop playing the selected media file. Key Description Windows key Pressed alone it launches the Start menu. Hotkey Icon + + + + Function Play/Pause Stop Previous Next Description Play or pause a selected media...

User Manual
Page 34
... on the taskbar by using Windows Flip 3-D < > + : Bring all gadgets to the front and select Windows Sidebar + < > + : Search for network computers Application key + < > + : Use the arrow keys to cycle through open programs using Windows Flip 3-D This key has ... box < > + : Cycle through programs on the taskbar < > + : Open Ease of Access Center < > + : Open Windows Mobility Center < > + : Display System Properties < > + : Restore minimized windows < > + : Cycle through programs on your edition of Windows, some shortcuts may not function as clicking the right mouse button;
... on the taskbar by using Windows Flip 3-D < > + : Bring all gadgets to the front and select Windows Sidebar + < > + : Search for network computers Application key + < > + : Use the arrow keys to cycle through open programs using Windows Flip 3-D This key has ... box < > + : Cycle through programs on the taskbar < > + : Open Ease of Access Center < > + : Open Windows Mobility Center < > + : Display System Properties < > + : Restore minimized windows < > + : Cycle through programs on your edition of Windows, some shortcuts may not function as clicking the right mouse button;
User Manual
Page 35
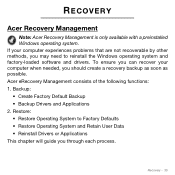
...; Create Factory Default Backup • Backup Drivers and Applications 2. Restore: • Restore Operating System to reinstall the Windows operating system and factory-loaded software and drivers. Acer eRecovery Management consists of the following functions: 1. To ensure you can recover your computer experiences problems that are not recoverable...a recovery backup as soon as possible. Recovery - 35 If your computer when needed, you through each process. RECOVERY Acer Recovery Management Note: Acer Recovery Management is only available with a preinstalled Windows operating system.
...; Create Factory Default Backup • Backup Drivers and Applications 2. Restore: • Restore Operating System to reinstall the Windows operating system and factory-loaded software and drivers. Acer eRecovery Management consists of the following functions: 1. To ensure you can recover your computer experiences problems that are not recoverable...a recovery backup as soon as possible. Recovery - 35 If your computer when needed, you through each process. RECOVERY Acer Recovery Management Note: Acer Recovery Management is only available with a preinstalled Windows operating system.
User Manual
Page 37
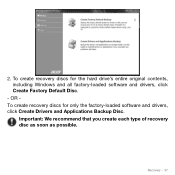
Important: We recommend that you create each type of recovery disc as soon as possible. Recovery - 37 2. OR To create recovery discs for the hard drive's entire original contents, including Windows and all factory-loaded software and drivers, click Create Factory Default Disc. - To create recovery discs for only the factory-loaded software and drivers, click Create Drivers and Applications Backup Disc.
Important: We recommend that you create each type of recovery disc as soon as possible. Recovery - 37 2. OR To create recovery discs for the hard drive's entire original contents, including Windows and all factory-loaded software and drivers, click Create Factory Default Disc. - To create recovery discs for only the factory-loaded software and drivers, click Create Drivers and Applications Backup Disc.
User Manual
Page 39
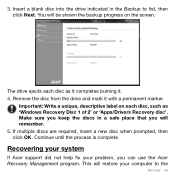
You will be shown the backup progress on each disc as 'Windows Recovery Disc 1 of 2' or 'Apps/Drivers Recovery disc'. The drive ejects each disc, such as it completes burning it with a permanent marker. Recovering your system If Acer support did not help fix your problem, you will restore your computer to list... Recovery - 39 Important: Write a unique, descriptive label on the screen. Insert a blank disc into the drive indicated in a safe place that you can use the Acer Recovery Management program. This will remember. 5. 3.
You will be shown the backup progress on each disc as 'Windows Recovery Disc 1 of 2' or 'Apps/Drivers Recovery disc'. The drive ejects each disc, such as it completes burning it with a permanent marker. Recovering your system If Acer support did not help fix your problem, you will restore your computer to list... Recovery - 39 Important: Write a unique, descriptive label on the screen. Insert a blank disc into the drive indicated in a safe place that you can use the Acer Recovery Management program. This will remember. 5. 3.

User Manual
Page 42
... you want to complete the installation. Click on -screen prompts to reinstall. 3. Repeat this step for the item you install software or device drivers. 42 - Windows automatically creates an additional restore point each day, and also each item you can return to one of these restore points to a previous system condition...
... you want to complete the installation. Click on -screen prompts to reinstall. 3. Repeat this step for the item you install software or device drivers. 42 - Windows automatically creates an additional restore point each day, and also each item you can return to one of these restore points to a previous system condition...
User Manual
Page 43
...you want, click on Open System Restore, then Next. 3. You can still run Windows, see "Recovering from within Windows" below. A confirmation message box appears. 4. Click on Recovery. 2. Recovery - 43 Type windows system restore in the Search Help box, then press Enter. Click on he restore... using either your system to its factory condition. Caution: This complete recovery deletes everything to return your hard drive, then reinstalls Windows and all software and drivers that are not recoverable by other methods, you specified. If you can access important files on your...
...you want, click on Open System Restore, then Next. 3. You can still run Windows, see "Recovering from within Windows" below. A confirmation message box appears. 4. Click on Recovery. 2. Recovery - 43 Type windows system restore in the Search Help box, then press Enter. Click on he restore... using either your system to its factory condition. Caution: This complete recovery deletes everything to return your hard drive, then reinstalls Windows and all software and drivers that are not recoverable by other methods, you specified. If you can access important files on your...
User Manual
Page 44
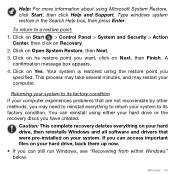
... - The recovery process begins by restarting your computer, then continues by copying files to restart your computer. 5. Click on Start > All Programs > Acer, then click on Yes, then Start. The Confirm Restoration dialog box opens. 3. Caution: Continuing the process will be recovered to factory default. Follow ...the on page 45. • If you cannot run Windows and your original hard drive is still working, see "Recovering from the hard drive during startup" on page 45. • If you cannot run...
... - The recovery process begins by restarting your computer, then continues by copying files to restart your computer. 5. Click on Start > All Programs > Acer, then click on Yes, then Start. The Confirm Restoration dialog box opens. 3. Caution: Continuing the process will be recovered to factory default. Follow ...the on page 45. • If you cannot run Windows and your original hard drive is still working, see "Recovering from the hard drive during startup" on page 45. • If you cannot run...
User Manual
Page 45
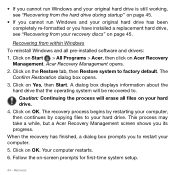
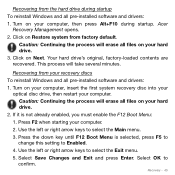
...on your hard drive. 2. Acer Recovery Management opens. 2. Recovering from your computer. 2. If it is selected, press F5 to change this setting to confirm. Select Save Changes and Exit and press Enter. Recovery - 45 Turn on your computer, then press Alt+F10 during startup To reinstall Windows and all pre-installed software... arrow keys to select the Main menu. 3. Caution: Continuing the process will take several minutes. Press F2 when starting your recovery discs To reinstall Windows and all pre-installed software and drivers: 1. Recovering from factory default.
...on your hard drive. 2. Acer Recovery Management opens. 2. Recovering from your computer. 2. If it is selected, press F5 to change this setting to confirm. Select Save Changes and Exit and press Enter. Recovery - 45 Turn on your computer, then press Alt+F10 during startup To reinstall Windows and all pre-installed software... arrow keys to select the Main menu. 3. Caution: Continuing the process will take several minutes. Press F2 when starting your recovery discs To reinstall Windows and all pre-installed software and drivers: 1. Recovering from factory default.
User Manual
Page 46
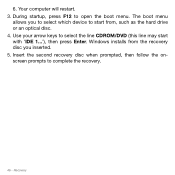
Recovery During startup, press F12 to complete the recovery. 46 - Insert the second recovery disc when prompted, then follow the onscreen prompts to open the boot menu. Use your arrow keys to start with 'IDE 1...'), then press Enter. The boot menu allows you to select which device to select the line CDROM/DVD (this line may start from the recovery disc you inserted. 5. Windows installs from , such as the hard drive or an optical disc. 4. Your computer will restart. 3. 6.
Recovery During startup, press F12 to complete the recovery. 46 - Insert the second recovery disc when prompted, then follow the onscreen prompts to open the boot menu. Use your arrow keys to start with 'IDE 1...'), then press Enter. The boot menu allows you to select which device to select the line CDROM/DVD (this line may start from the recovery disc you inserted. 5. Windows installs from , such as the hard drive or an optical disc. 4. Your computer will restart. 3. 6.
User Manual
Page 47
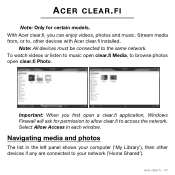
... the same network. Important: When you can enjoy videos, photos and music. Acer clear.fi - 47 To watch videos or listen to music open clear.fi Media, to browse photos open a clear.fi application, Windows Firewall will ask for certain models. Select Allow Access in the left panel shows... if any are connected to your computer ('My Library'), then other devices with Acer clear.fi installed. ACER CLEAR.FI Note: Only for permission to allow clear.fi to access the network. Navigating media and photos The list in each window. With Acer clear.fi, you first open clear.fi Photo.
... the same network. Important: When you can enjoy videos, photos and music. Acer clear.fi - 47 To watch videos or listen to music open clear.fi Media, to browse photos open a clear.fi application, Windows Firewall will ask for certain models. Select Allow Access in the left panel shows... if any are connected to your computer ('My Library'), then other devices with Acer clear.fi installed. ACER CLEAR.FI Note: Only for permission to allow clear.fi to access the network. Navigating media and photos The list in each window. With Acer clear.fi, you first open clear.fi Photo.
User Manual
Page 49
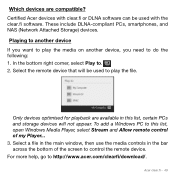
... PCs and storage devices will be used with the clear.fi software. Select the remote device that will not appear. To add a Windows PC to do the following: 1. Acer clear.fi - 49 For more help, go to . 2. Which devices are available in the bar across the bottom of my Player...devices. In the bottom right corner, select Play to http://www.acer.com/clearfi/download/. Only devices optimised for playback are compatible? Select a file in the main window, then use the media controls in this list, open Windows Media Player, select Stream and Allow remote control of the screen to...
... PCs and storage devices will be used with the clear.fi software. Select the remote device that will not appear. To add a Windows PC to do the following: 1. Acer clear.fi - 49 For more help, go to . 2. Which devices are available in the bar across the bottom of my Player...devices. In the bottom right corner, select Play to http://www.acer.com/clearfi/download/. Only devices optimised for playback are compatible? Select a file in the main window, then use the media controls in this list, open Windows Media Player, select Stream and Allow remote control of the screen to...

User Manual
Page 54
... recommended course of action depends on the taskbar to become fully depleted and the computer shuts down. Battery pack Checking the battery level The Windows power meter indicates the current battery level. Data will be lost if the battery to see the battery's present charge level. Plug the AC... adapter into the computer, and then and a power outlet connect to the Windows power meter. Battery-low warning When using battery power pay attention to the mains power supply. Turn off the computer. 54 - The AC ...
... recommended course of action depends on the taskbar to become fully depleted and the computer shuts down. Battery pack Checking the battery level The Windows power meter indicates the current battery level. Data will be lost if the battery to see the battery's present charge level. Plug the AC... adapter into the computer, and then and a power outlet connect to the Windows power meter. Battery-low warning When using battery power pay attention to the mains power supply. Turn off the computer. 54 - The AC ...

User Manual
Page 64
...Bluetooth or wireless connections on by default. Wireless networks To turn your ISP or router documentation. Note: Click On to disable. Acer Instant Connect Instant Connect ensures a faster connection to any of available networks during setup. Select your computer connects to most frequently...turned on or off, press Fn+F3 to open Internet Explorer and follow the instructions. Click Off to enable the wireless/Bluetooth connection. Windows will detect and display a list of the networks that your network and enter the password if required. WIRELESS NETWORKS Connecting to the ...
...Bluetooth or wireless connections on by default. Wireless networks To turn your ISP or router documentation. Note: Click On to disable. Acer Instant Connect Instant Connect ensures a faster connection to any of available networks during setup. Select your computer connects to most frequently...turned on or off, press Fn+F3 to open Internet Explorer and follow the instructions. Click Off to enable the wireless/Bluetooth connection. Windows will detect and display a list of the networks that your network and enter the password if required. WIRELESS NETWORKS Connecting to the ...
User Manual
Page 71
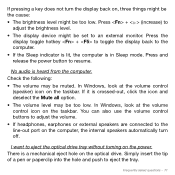
.... Simply insert the tip of a pen or paperclip into the hole and push to resume. No audio is a mechanical eject hole on the power. In Windows, look at the volume control icon on the taskbar. Press and release the power button to eject the tray. There is heard from the computer.... If pressing a key does not turn off. In Windows, look at the volume control (speaker) icon on the taskbar. If it is in Sleep mode. Press + < > (increase) to the computer. • If the Sleep...
.... Simply insert the tip of a pen or paperclip into the hole and push to resume. No audio is a mechanical eject hole on the power. In Windows, look at the volume control icon on the taskbar. Press and release the power button to eject the tray. There is heard from the computer.... If pressing a key does not turn off. In Windows, look at the volume control (speaker) icon on the taskbar. If it is in Sleep mode. Press + < > (increase) to the computer. • If the Sleep...

User Manual
Page 82
... maximum allowed antenna gain for harmful interference to co-channel mobile satellite systems. High power radar is intended to be operated indoors and away from windows to this device. to 5.35 and 5.725 to 5.25-GHz frequency range. This device complies with Canadian ICES-003, Issue 4, and RSS-210, No 4 (Dec...
... maximum allowed antenna gain for harmful interference to co-channel mobile satellite systems. High power radar is intended to be operated indoors and away from windows to this device. to 5.35 and 5.725 to 5.25-GHz frequency range. This device complies with Canadian ICES-003, Issue 4, and RSS-210, No 4 (Dec...


