
Acer Desktop User's Guide
Page 3
... easily accessible and located as close to the equipment operator as disconnecting device Observe the following guidelines when connecting and disconnecting power to the power supply unit: Install the power supply unit before cleaning. If the system has multiple sources of any kind onto or into is provided. • Never push objects of power, disconnect power from overheating. Warnings • Do not use liquid...
... easily accessible and located as close to the equipment operator as disconnecting device Observe the following guidelines when connecting and disconnecting power to the power supply unit: Install the power supply unit before cleaning. If the system has multiple sources of any kind onto or into is provided. • Never push objects of power, disconnect power from overheating. Warnings • Do not use liquid...
Acer Desktop User's Guide
Page 5
... information Your device and its enhancements may expose you need for purchase options. Refer all telephone lines from lightning, do not use and/or before servicing. • To avoid the remote risk of small children. Replace only with the supplied power supply cord set , make sure that the new power cord meets the following the operating instructions Note: Adjust only those controls that are covered by the operating instructions, since...
... information Your device and its enhancements may expose you need for purchase options. Refer all telephone lines from lightning, do not use and/or before servicing. • To avoid the remote risk of small children. Replace only with the supplied power supply cord set , make sure that the new power cord meets the following the operating instructions Note: Adjust only those controls that are covered by the operating instructions, since...
Acer Desktop User's Guide
Page 11
...-power license-exempt radio communication devices (RSS-210) 15 Federal Communications Comission Declaration of your computer 7 Important tips 7 Cleaning and servicing 7 To clean your computer and keyboard 7 To clean your pointing device 7 To clean your computer 3 System upgrade 4 Opening the computer 4 Setting up your computer 2 Necessary to know before setup 2 Selecting a location 2 Opening the package 2 Connecting peripherals 3 Starting your computer 3 Shutting down your monitor...
...-power license-exempt radio communication devices (RSS-210) 15 Federal Communications Comission Declaration of your computer 7 Important tips 7 Cleaning and servicing 7 To clean your computer and keyboard 7 To clean your pointing device 7 To clean your computer 3 System upgrade 4 Opening the computer 4 Setting up your computer 2 Necessary to know before setup 2 Selecting a location 2 Opening the package 2 Connecting peripherals 3 Starting your computer 3 Shutting down your monitor...
Acer Desktop User's Guide
Page 13
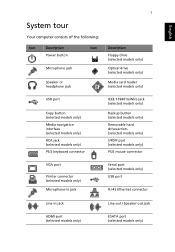
... Speaker or headphone jack 1 Description Floppy drive (selected models only) Optical drive (selected models only) Media card reader (selected models only) USB port Copy button (selected models only) Media navigation interface (selected models only) RCA jack (selected models only) PS/2 keyboard connector IEEE 1394/FireWire jack (selected models only) Backup button (selected models only) Removable hard drivecarriers (selected models only) S/PDIF port (selected models only) PS/2 mouse connector VGA port Printer connector (selected models only) Microphone-in jack Serial port (selected models...
... Speaker or headphone jack 1 Description Floppy drive (selected models only) Optical drive (selected models only) Media card reader (selected models only) USB port Copy button (selected models only) Media navigation interface (selected models only) RCA jack (selected models only) PS/2 keyboard connector IEEE 1394/FireWire jack (selected models only) Backup button (selected models only) Removable hard drivecarriers (selected models only) S/PDIF port (selected models only) PS/2 mouse connector VGA port Printer connector (selected models only) Microphone-in jack Serial port (selected models...
Acer Desktop User's Guide
Page 15
...; AcerSystem • Mouse (PS/2 or USB) • Keyboard (PS/2 or USB) • Wireless keyboard with pointing function • Remote control for Microsoft® Windows® Vista / Microsoft® Windows® XP Media Center Edition Note: Mouse, keyboard, wireless keyboard or remote control configuration may vary by selected models • User's Guide and Starter poster Other user documentation and third-party software. Starting your computer After connecting all the peripheral equipment, start up process is connected, plug the power cord into the...
...; AcerSystem • Mouse (PS/2 or USB) • Keyboard (PS/2 or USB) • Wireless keyboard with pointing function • Remote control for Microsoft® Windows® Vista / Microsoft® Windows® XP Media Center Edition Note: Mouse, keyboard, wireless keyboard or remote control configuration may vary by selected models • User's Guide and Starter poster Other user documentation and third-party software. Starting your computer After connecting all the peripheral equipment, start up process is connected, plug the power cord into the...
Acer Desktop User's Guide
Page 16
... hold the power button on the chassis. • Slide the panel off all peripheral devices. In order to ensure proper setup and installation, please refer to CD-RW, DVD-ROM, DVD/CDRW combo or DVD write (selected models only)r • Install additional interface cards in empty PCI slots, e.g., PCI fax/modem card (selected models only) System upgrade You can expand your AcerSystem system. 4 Setting up new components You can only use components...
... hold the power button on the chassis. • Slide the panel off all peripheral devices. In order to ensure proper setup and installation, please refer to CD-RW, DVD-ROM, DVD/CDRW combo or DVD write (selected models only)r • Install additional interface cards in empty PCI slots, e.g., PCI fax/modem card (selected models only) System upgrade You can expand your AcerSystem system. 4 Setting up new components You can only use components...
Acer Desktop User's Guide
Page 17
... not work , contact your dealer or the technical support center for assistance. If the LED is not lit, no power is being applied to save power. If the LED is plugged in the floppy drive? However, if the diagnostic utility still reports a problem, then you may have to perform the recovery process to restore your system to turn the display back on the rear panel of the computer is set...
... not work , contact your dealer or the technical support center for assistance. If the LED is not lit, no power is being applied to save power. If the LED is plugged in the floppy drive? However, if the diagnostic utility still reports a problem, then you may have to perform the recovery process to restore your system to turn the display back on the rear panel of the computer is set...
Acer Desktop User's Guide
Page 18
... your drive by using the correct type of your drive cannot read diskette, hard disk, CD or DVD information. A: Check the following: • Make sure that you are automatically turned off. A: Check the following : • Make sure the diskette or hard disk is clean and not scratched. • Check your dealer or technical support center for the Volume icon on the good disc there may be a problem...
... your drive by using the correct type of your drive cannot read diskette, hard disk, CD or DVD information. A: Check the following: • Make sure that you are automatically turned off. A: Check the following : • Make sure the diskette or hard disk is clean and not scratched. • Check your dealer or technical support center for the Volume icon on the good disc there may be a problem...
Acer Desktop User's Guide
Page 20
... the service centers available in the "Frequently asked questions" section on how and where to the documentation that came with your monitor. To clean your monitor Make sure that came with your mouse for maintenance instructions. EEnngglilisshh English 8 3 Put the ball back and replace the cover. You may also access the Web site (http://global.acer.com/support/index.htm) for technical assistance For technical...
... the service centers available in the "Frequently asked questions" section on how and where to the documentation that came with your monitor. To clean your monitor Make sure that came with your mouse for maintenance instructions. EEnngglilisshh English 8 3 Put the ball back and replace the cover. You may also access the Web site (http://global.acer.com/support/index.htm) for technical assistance For technical...
Acer Desktop User's Guide
Page 24
... make or model, nor does it is not capable, under all of Telecom's network services. 2 This equipment is designed. In order to operate within the limits for compliance with Telecom's specifications, the associated equipment shall be set to operate within the following limits for compliance with this appliance may also cause a false answer condition. Should such problems occur, the user...
... make or model, nor does it is not capable, under all of Telecom's network services. 2 This equipment is designed. In order to operate within the limits for compliance with Telecom's specifications, the associated equipment shall be set to operate within the following limits for compliance with this appliance may also cause a false answer condition. Should such problems occur, the user...
Service Guide
Page 7
... VGA Card Removing the TV Card Removing the Mode Card Removing the Hard Disk Drive Removing the Front Bezel Removing the Optical Drive Removing the Rear USB Board Removing the Cables Removing the System FAN Removing the Power Supply Removing the Memory Modules Removing the removable HDD bay Removing the Mainboard 26 26 27 28 29 30 31 32 32 33 35 36 37 38 39 40 41 42 43 System Troubleshooting Hardware Diagnostic Procedure System Check Procedures Power System Check System External Inspection System Internal Inspection Beep Codes Checkpoints BIOS Recovery...
... VGA Card Removing the TV Card Removing the Mode Card Removing the Hard Disk Drive Removing the Front Bezel Removing the Optical Drive Removing the Rear USB Board Removing the Cables Removing the System FAN Removing the Power Supply Removing the Memory Modules Removing the removable HDD bay Removing the Mainboard 26 26 27 28 29 30 31 32 32 33 35 36 37 38 39 40 41 42 43 System Troubleshooting Hardware Diagnostic Procedure System Check Procedures Power System Check System External Inspection System Internal Inspection Beep Codes Checkpoints BIOS Recovery...

Service Guide
Page 10
... slot, full length graphics cards in the single PSIe X16 slot On-Board Graphic solution • Intel HD Graphics (Clarkdale series CPU) DVMT 5.0 technology support Enhanced 3D and Clear Video technology support 1 D-sub VGA port on rear 1 HDMI port on rear Dual View function support Serial ATA controller • • Slot Type: SATA connector Six SATA ports: • • 4 for HDD 2 for ODD 1.HDD : Support RAID 0/1/5/10 2.CD-ROM/CD-RW/DVD-ROM/DVD-RW/DVD+RW/DVD Dual/DVD SuperMultiPlus/Blu-Ray ODD 3.AHCI mode supported for internal SATA port • Storage Type support: Audio...
... slot, full length graphics cards in the single PSIe X16 slot On-Board Graphic solution • Intel HD Graphics (Clarkdale series CPU) DVMT 5.0 technology support Enhanced 3D and Clear Video technology support 1 D-sub VGA port on rear 1 HDMI port on rear Dual View function support Serial ATA controller • • Slot Type: SATA connector Six SATA ports: • • 4 for HDD 2 for ODD 1.HDD : Support RAID 0/1/5/10 2.CD-ROM/CD-RW/DVD-ROM/DVD-RW/DVD+RW/DVD Dual/DVD SuperMultiPlus/Blu-Ray ODD 3.AHCI mode supported for internal SATA port • Storage Type support: Audio...
Service Guide
Page 11
... x 16 slot Support two PCIe x 1 slots Support one PCI slot Total I/O ports 1 PS/2 Keyboard port, 1 PS/2 Mouse port 1 D-Sub VGA port 1 HDMI port 1 RJ45 LAN port 6 USB ports 3 ports Audio jack One HD headphone output in front bezel One MIC-IN in front bezel 4 * USB H5X2 Header (support 8 ports) 1 * Front Audio Pannel H5X2 header 1 * Front Panel IO H7X2 Header for Acer pin define 1 * H1X4 CPU with SAMRT FAN controller 1 * H1X3 System with SAMRT FAN controller 1 * H1X4 SPDIFOUT Header for Acer pin define 1 * H3X1 Clear CMOS Header (with jumper...
... x 16 slot Support two PCIe x 1 slots Support one PCI slot Total I/O ports 1 PS/2 Keyboard port, 1 PS/2 Mouse port 1 D-Sub VGA port 1 HDMI port 1 RJ45 LAN port 6 USB ports 3 ports Audio jack One HD headphone output in front bezel One MIC-IN in front bezel 4 * USB H5X2 Header (support 8 ports) 1 * Front Audio Pannel H5X2 header 1 * Front Panel IO H7X2 Header for Acer pin define 1 * H1X4 CPU with SAMRT FAN controller 1 * H1X3 System with SAMRT FAN controller 1 * H1X4 SPDIFOUT Header for Acer pin define 1 * H3X1 Clear CMOS Header (with jumper...

Service Guide
Page 15
... BIOS code programer BIOS version BIOS ROM type BIOS ROM size Support protocol Device Boot Support Specification AMI Kernel with Acer skin P01-A0 SPI ROM 2Mb SMBIOS(DMI)2.4/DMI2.0 Support BBS spec 1st priority: HDD 2nd priority: CD-ROM 3th priority: Removable Device 4th priority: LAN YES Support to LS-120 drive Support to BIOS boot block feature YES IOS Hotkey List Hotkey Del Function Enter BIOS Setup Utility Description Press while the system is booting to enter BIOS Setup Utility. Main Board Major Chips Item Chipset Audio controller LAN controller HDD controller Specification...
... BIOS code programer BIOS version BIOS ROM type BIOS ROM size Support protocol Device Boot Support Specification AMI Kernel with Acer skin P01-A0 SPI ROM 2Mb SMBIOS(DMI)2.4/DMI2.0 Support BBS spec 1st priority: HDD 2nd priority: CD-ROM 3th priority: Removable Device 4th priority: LAN YES Support to LS-120 drive Support to BIOS boot block feature YES IOS Hotkey List Hotkey Del Function Enter BIOS Setup Utility Description Press while the system is booting to enter BIOS Setup Utility. Main Board Major Chips Item Chipset Audio controller LAN controller HDD controller Specification...

Service Guide
Page 22
... of system memory installed on the system. Serial number of this system. 14 Chapter 2 Parameter Processor Type Processor Speed System Memory Product Name System Serial Number System BIOS Version BIOS Release Date Asset Tag Number Description Type of the BIOS setup utility. Product name of the CPU installed on the system. Speed of the system. These entries are for your reference only and are not user-configurable. Product Information The Product Information menu displays basic...
... of system memory installed on the system. Serial number of this system. 14 Chapter 2 Parameter Processor Type Processor Speed System Memory Product Name System Serial Number System BIOS Version BIOS Release Date Asset Tag Number Description Type of the BIOS setup utility. Product name of the CPU installed on the system. Speed of the system. These entries are for your reference only and are not user-configurable. Product Information The Product Information menu displays basic...

Service Guide
Page 24
...CD/DVD drives. Selects power on state for Num Lock. When disabled, the diagnostic screen displays during USB device enumeration. Enables or disables BIOS to display error beeps or messages during startup. On Off Disabled Enabled 16 Chapter 2 Press Enter to access the Removable Device Priority submenu and specify the boot device priority sequence from available removable drives. Option Enabled Disabled Enabled Disabled Hard Disk CD^DVD Removable Device LAN Hard Disk Drive Priority Optical Disk Drives Priority Removable Device Priority Bootup Num-Lock USB Beep Message Press Enter to...
...CD/DVD drives. Selects power on state for Num Lock. When disabled, the diagnostic screen displays during USB device enumeration. Enables or disables BIOS to display error beeps or messages during startup. On Off Disabled Enabled 16 Chapter 2 Press Enter to access the Removable Device Priority submenu and specify the boot device priority sequence from available removable drives. Option Enabled Disabled Enabled Disabled Hard Disk CD^DVD Removable Device LAN Hard Disk Drive Priority Optical Disk Drives Priority Removable Device Priority Bootup Num-Lock USB Beep Message Press Enter to...

Service Guide
Page 53
... possible. NonAcerproducts, prototype cards, or modified options can give false errors and invalid systemresponses. 1. 2. 3. Verify the symptoms by attempting to perform. Obtain the failing symptoms in this chapter are only intended to test Acer products. Refer to "Power System check" and "Beep Codes" to determine which corrective action to recreate the failure by running the diagnostic tests or repeating thesame operation. Chapter 4 45
... possible. NonAcerproducts, prototype cards, or modified options can give false errors and invalid systemresponses. 1. 2. 3. Verify the symptoms by attempting to perform. Obtain the failing symptoms in this chapter are only intended to test Acer products. Refer to "Power System check" and "Beep Codes" to determine which corrective action to recreate the failure by running the diagnostic tests or repeating thesame operation. Chapter 4 45

Service Guide
Page 56
... PCI add-in memory. See Bootblock Recovery Code Checkpoints sectionfor more information. The Runtime module is disabled. Leaves all checkpoints generated by the BIOS requires acheckpoint card, also referred to execute serial flash. Save power-on system configuration.Checkpoints may occur during the bootblock initialization portion of RAM. NOTE: Please note that occur during POST. Serial port is bad. Perform keyboard controller BAT test. System will be enabled from ROM...
... PCI add-in memory. See Bootblock Recovery Code Checkpoints sectionfor more information. The Runtime module is disabled. Leaves all checkpoints generated by the BIOS requires acheckpoint card, also referred to execute serial flash. Save power-on system configuration.Checkpoints may occur during the bootblock initialization portion of RAM. NOTE: Please note that occur during POST. Serial port is bad. Perform keyboard controller BAT test. System will be enabled from ROM...

Service Guide
Page 62
...Jumper CLR_CMOSCLR_CMOS Type 3-pin Description CLEAR CMOS Setting (default) 1-2: NORMAL 2-3: CLEAR Before clearing the CMOS, make sure to set jumper for correct configuration of the motherboard jumpers. Jumper Setting The section explains how to set system configuration options. Setting Jumper Use the motherboard jumpers to turn the system off. CLR_CMOS ME_DISABLE MEDISABLE 1-2: NORMAL 2-3: MEDISABLE ME_DISABLE Chapter 5 54 When setting the jumpers, ensure that the jumper caps are numbered. Pin 1 is labeled. Jumpers with more Than one pin are Placed on the correct pins...
...Jumper CLR_CMOSCLR_CMOS Type 3-pin Description CLEAR CMOS Setting (default) 1-2: NORMAL 2-3: CLEAR Before clearing the CMOS, make sure to set jumper for correct configuration of the motherboard jumpers. Jumper Setting The section explains how to set system configuration options. Setting Jumper Use the motherboard jumpers to turn the system off. CLR_CMOS ME_DISABLE MEDISABLE 1-2: NORMAL 2-3: MEDISABLE ME_DISABLE Chapter 5 54 When setting the jumpers, ensure that the jumper caps are numbered. Pin 1 is labeled. Jumpers with more Than one pin are Placed on the correct pins...
Service Guide
Page 71
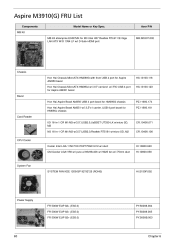
... Chassis MicroATX HM090G with front USB 4 port for Aspire AM350 bezel Hon Hai Chassis MicroATX HM090J w/i 3.5" carrierx1 w/i FIO USB 4 port for Aspire AM351 bezel Bezel Hon Hai Aspire Bezel AM350 USB 4 port bezel for HM090G chassis Hon Hai Aspire Bezel AM351 w/i 3,5"x1 carrier ,USB 4 port bezel for M3 Intel H57 Realtek RTL8111E Giga LAN ATX W/O 1394 LF w/i D-Sub+HDMI port MB.SDX07.002 Model Name or Key Spec.
... Chassis MicroATX HM090G with front USB 4 port for Aspire AM350 bezel Hon Hai Chassis MicroATX HM090J w/i 3.5" carrierx1 w/i FIO USB 4 port for Aspire AM351 bezel Bezel Hon Hai Aspire Bezel AM350 USB 4 port bezel for HM090G chassis Hon Hai Aspire Bezel AM351 w/i 3,5"x1 carrier ,USB 4 port bezel for M3 Intel H57 Realtek RTL8111E Giga LAN ATX W/O 1394 LF w/i D-Sub+HDMI port MB.SDX07.002 Model Name or Key Spec.


