Service Guide
Page 32
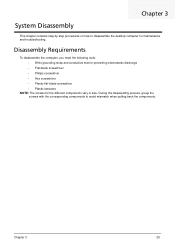
... screwdriver • Plastic tweezers NOTE: The screws for maintenance and troubleshooting. During the disassembly process, group the screws with the corresponding components to disassemble the desktop computer for the different components vary in size. Chapter 3 25 Chapter 3 System Disassembly This chapter contains step-by-step procedures on how to avoid mismatch...
... screwdriver • Plastic tweezers NOTE: The screws for maintenance and troubleshooting. During the disassembly process, group the screws with the corresponding components to disassemble the desktop computer for the different components vary in size. Chapter 3 25 Chapter 3 System Disassembly This chapter contains step-by-step procedures on how to avoid mismatch...

Service Guide
Page 77
... FRU (Field Replaceable Unit) list in the FRU list of the Aspire M3802 desktop computer. You MUST use the local FRU list provided by your regional Acer office on how to return it will be noted on your Acer office may have a different part number code from those given in...date information available on the printed Service Guide. NOTES: • When ordering FRU parts, check the most up-to this printed Service Guide. For Acer authorized service providers, your regional web or channel. chapter 6 71 For whatever reasons a part number is changed, it . • This document will...
... FRU (Field Replaceable Unit) list in the FRU list of the Aspire M3802 desktop computer. You MUST use the local FRU list provided by your regional Acer office on how to return it will be noted on your Acer office may have a different part number code from those given in...date information available on the printed Service Guide. NOTES: • When ordering FRU parts, check the most up-to this printed Service Guide. For Acer authorized service providers, your regional web or channel. chapter 6 71 For whatever reasons a part number is changed, it . • This document will...
Service Guide
Page 95
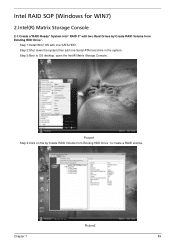
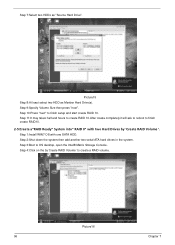
Step 2:Shut down the system,then add one SATA HDD. Step 1:Install Win7 OS with two Hard Drives by 'Create RAID Volume from Existing HDD Drive '. Picture1 Step 4:Click on the by 'Create RAID Volume from Existing HDD Drive ' to OS desktop, open the Intel® Matrix Storage Console. Picture2 Chapter 7 89 Intel RAID SOP (Windows for WIN7) 2.Intel(R) Matrix Storage Console 2-1:Create a"RAID Ready" System into" RAID 0" with one Serial ATA hard drive in the system. Step 3:Boot to create a RAID volume.
Step 2:Shut down the system,then add one SATA HDD. Step 1:Install Win7 OS with two Hard Drives by 'Create RAID Volume from Existing HDD Drive '. Picture1 Step 4:Click on the by 'Create RAID Volume from Existing HDD Drive ' to OS desktop, open the Intel® Matrix Storage Console. Picture2 Chapter 7 89 Intel RAID SOP (Windows for WIN7) 2.Intel(R) Matrix Storage Console 2-1:Create a"RAID Ready" System into" RAID 0" with one Serial ATA hard drive in the system. Step 3:Boot to create a RAID volume.

Service Guide
Page 98
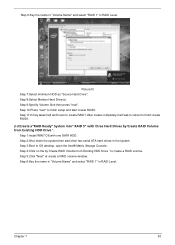
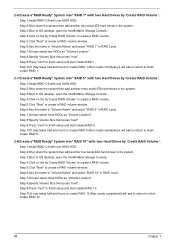
... SATA HDD. Step 1:Install WIN7 OS with two Hard Drives by 'Create RAID Volume from Existing HDD Drive '. Picture8 Step 10:Press "next" to OS desktop, open the Intel® Matrix Storage Console. Step 5:Click "Next" at create a RAID volume window. 92 Chapter 7 Step 4:Click on the by 'Create RAID Volume...
... SATA HDD. Step 1:Install WIN7 OS with two Hard Drives by 'Create RAID Volume from Existing HDD Drive '. Picture8 Step 10:Press "next" to OS desktop, open the Intel® Matrix Storage Console. Step 5:Click "Next" at create a RAID volume window. 92 Chapter 7 Step 4:Click on the by 'Create RAID Volume...
Service Guide
Page 99
.... 2-3:Create a"RAID Ready" System into" RAID 5" with one SATA HDD. Step 9:Specify Volume Size then press "next". Chapter 7 93 Step 10:Press "next" to OS desktop, open the Intel® Matrix Storage Console. Step 6:Key the name in "Volume Name" and select "RAID 1" in the system. Picture10 Step 7:Select minimum HDD...
.... 2-3:Create a"RAID Ready" System into" RAID 5" with one SATA HDD. Step 9:Specify Volume Size then press "next". Chapter 7 93 Step 10:Press "next" to OS desktop, open the Intel® Matrix Storage Console. Step 6:Key the name in "Volume Name" and select "RAID 1" in the system. Picture10 Step 7:Select minimum HDD...

Service Guide
Page 101
... serial ATA hard drives in RAID Level. Step 3:Boot to finish setup and start create RAID5. Picture14 Chapter 7 95 Step 10:Press "next" to OS desktop, open the Intel® Matrix Storage Console. Step 1:Install Win7 OS with three Hard Drives by 'Create RAID Volume from Existing HDD Drive ' to finish...
... serial ATA hard drives in RAID Level. Step 3:Boot to finish setup and start create RAID5. Picture14 Chapter 7 95 Step 10:Press "next" to OS desktop, open the Intel® Matrix Storage Console. Step 1:Install Win7 OS with three Hard Drives by 'Create RAID Volume from Existing HDD Drive ' to finish...
Service Guide
Page 102
.... Picture15 Step 8:At least select two HDD as "Source Hard Drive". Step 7:Select two HDDs as Menber Hard Drive(s). Step 10:Press "next" to OS desktop, open the Intel® Matrix Storage Console. Step 3:Boot to finish setup and start create RAID 10. Step 11:It may takes half and hours...
.... Picture15 Step 8:At least select two HDD as "Source Hard Drive". Step 7:Select two HDDs as Menber Hard Drive(s). Step 10:Press "next" to OS desktop, open the Intel® Matrix Storage Console. Step 3:Boot to finish setup and start create RAID 10. Step 11:It may takes half and hours...
Service Guide
Page 104
...system,then add another four serial ATA hard drives in the system. Step 7:At least select two HDDs as "Volume Location". Step 3:Boot to OS desktop, open the Intel® Matrix Storage Console. Step 5:Click "Next" at create a RAID volume window. Step 9:Press "next" to finish setup ...9:Press "next" to finish setup and start create RAID 5. Step 3:Boot to finish setup and start create RAID 1. Step 9:Press "next" to OS desktop, open the Intel® Matrix Storage Console. Step 8:Specify Volume Size then press "next". Step 2:Shut down the system,then add another three serial ATA...
...system,then add another four serial ATA hard drives in the system. Step 7:At least select two HDDs as "Volume Location". Step 3:Boot to OS desktop, open the Intel® Matrix Storage Console. Step 5:Click "Next" at create a RAID volume window. Step 9:Press "next" to finish setup ...9:Press "next" to finish setup and start create RAID 5. Step 3:Boot to finish setup and start create RAID 1. Step 9:Press "next" to OS desktop, open the Intel® Matrix Storage Console. Step 8:Specify Volume Size then press "next". Step 2:Shut down the system,then add another three serial ATA...


