
Aspire G7700 Series User's Guide
Page 16
...™ Dimensions 490 (L) x 430 (H) x 190 (W) mm BIOS AMI PnP BIOS compatible with SMBIOS 2.4 Power supply 1000 W/750 W System compliance PC 2001 Certification FCC, CE, BSMI, CCC, C-tick, Nemko (CB & Bauart), UL, VCC1 Optional accessories Logitech® G11 gaming keyboard and G5 gaming mouse Acer G series LCD monitor Acer stereo speakers Remote control 1 Support for...
...™ Dimensions 490 (L) x 430 (H) x 190 (W) mm BIOS AMI PnP BIOS compatible with SMBIOS 2.4 Power supply 1000 W/750 W System compliance PC 2001 Certification FCC, CE, BSMI, CCC, C-tick, Nemko (CB & Bauart), UL, VCC1 Optional accessories Logitech® G11 gaming keyboard and G5 gaming mouse Acer G series LCD monitor Acer stereo speakers Remote control 1 Support for...
Aspire G7700 Series User's Guide
Page 76
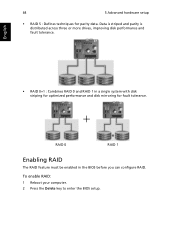
English • RAID 0+1 : Combines RAID 0 and RAID 1 in the BIOS before you can configure RAID. RAID 0 RAID 1 Enabling RAID The RAID feature must be enabled in a single system with disk striping for optimized performance and disk mirroring for parity data. Data is striped and parity is distributed across three or more drives, improving disk performance and fault tolerance. 64 5 Advanced hardware setup • RAID 5 : Defines techniques for fault tolerance. To enable RAID: 1 Reboot your computer. 2 Press the Delete key to enter the BIOS setup.
English • RAID 0+1 : Combines RAID 0 and RAID 1 in the BIOS before you can configure RAID. RAID 0 RAID 1 Enabling RAID The RAID feature must be enabled in a single system with disk striping for optimized performance and disk mirroring for parity data. Data is striped and parity is distributed across three or more drives, improving disk performance and fault tolerance. 64 5 Advanced hardware setup • RAID 5 : Defines techniques for fault tolerance. To enable RAID: 1 Reboot your computer. 2 Press the Delete key to enter the BIOS setup.

Aspire G7700 Series User's Guide
Page 78
... a RAID array and then install the OS over it. To create a non-bootable RAID array using RAID BIOS: 1 Enable RAID in a RAID array. • Bootable array You can use RAID BIOS or the MediaShield utility to create the following types of the system POST and boot process prior to the...appears, listing the arrays in the system. Press N to go to loading of using non bootable disks in the system BIOS. Note: If you have already created a RAID array, the MediaShield BIOS- See page 64. 2 After rebooting the system, wait until you see the RAID software prompting you have not already...
... a RAID array and then install the OS over it. To create a non-bootable RAID array using RAID BIOS: 1 Enable RAID in a RAID array. • Bootable array You can use RAID BIOS or the MediaShield utility to create the following types of the system POST and boot process prior to the...appears, listing the arrays in the system. Press N to go to loading of using non bootable disks in the system BIOS. Note: If you have already created a RAID array, the MediaShield BIOS- See page 64. 2 After rebooting the system, wait until you see the RAID software prompting you have not already...

Aspire G7700 Series User's Guide
Page 82
70 5 Advanced hardware setup For additional information on initializing, partitioning, and formatting the newly created array, refer to the section on Disk Management in the system BIOS. English To create a non-bootable RAID array using MediaShield: 1 Enable RAID in your system's Help and Support Center. a Install the NVIDIA RAID drivers. See page 64. 2 Create the RAID array.
70 5 Advanced hardware setup For additional information on initializing, partitioning, and formatting the newly created array, refer to the section on Disk Management in the system BIOS. English To create a non-bootable RAID array using MediaShield: 1 Enable RAID in your system's Help and Support Center. a Install the NVIDIA RAID drivers. See page 64. 2 Create the RAID array.

Aspire G7700 Series User's Guide
Page 83
...then follow the onscreen instructions to complete disk array creation. To create a bootable RAID array using RAID BIOS: 1 Perform steps 1 through 4 of the "To create a non-bootable RAID array using the RAID BIOS" section. 2 Create a bootable array. c Press Enter to view and verify details for more information... by right-clicking on array creation process. 3 Perform steps 5 and 6 of the "To create a non-bootable RAID array using the RAID BIOS" section. c From the Select a Task pane under the Storage category, select Create array to start the Create Array Wizard and follow the onscreen...
...then follow the onscreen instructions to complete disk array creation. To create a bootable RAID array using RAID BIOS: 1 Perform steps 1 through 4 of the "To create a non-bootable RAID array using the RAID BIOS" section. 2 Create a bootable array. c Press Enter to view and verify details for more information... by right-clicking on array creation process. 3 Perform steps 5 and 6 of the "To create a non-bootable RAID array using the RAID BIOS" section. c From the Select a Task pane under the Storage category, select Create array to start the Create Array Wizard and follow the onscreen...
Aspire G7700 Series User's Guide
Page 84
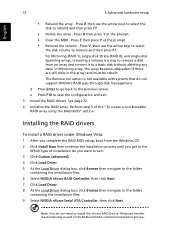
... any data. See page 72. 4 Initialize the RAID array. Installing the RAID drivers To install a RAID driver under Windows Vista: 1 After you complete the RAID BIOS setup, boot from an array and convert it automatically as part of installation do not need to remove and then press F7. Press V, then use... go back to save the configuration and exit. 3 Install the RAID drivers. Perform step 5 of the "To create a non-bootable RAID array using the RAID BIOS" section. Press R then use the arrow keys to select the disk volume to install the nForce RAID Device.
... any data. See page 72. 4 Initialize the RAID array. Installing the RAID drivers To install a RAID driver under Windows Vista: 1 After you complete the RAID BIOS setup, boot from an array and convert it automatically as part of installation do not need to remove and then press F7. Press V, then use... go back to save the configuration and exit. 3 Install the RAID drivers. Perform step 5 of the "To create a non-bootable RAID array using the RAID BIOS" section. Press R then use the arrow keys to select the disk volume to install the nForce RAID Device.

Aspire G7700 Series User's Guide
Page 86
However, make sure your computer. 2 Press Delete to enter the BIOS setup. 3 Use the arrow keys to select Frequency Control, then press Enter. 4 Use the arrow keys to set the System Clock Mode to Manual, then ...
However, make sure your computer. 2 Press Delete to enter the BIOS setup. 3 Use the arrow keys to select Frequency Control, then press Enter. 4 Use the arrow keys to set the System Clock Mode to Manual, then ...

Aspire G7700 Series User's Guide
Page 90
If unavailable, the check box is grayedout. 8 Specify how the system alerts you want to display NVIDIA monitor application in the BIOS - 78 5 Advanced hardware setup English Note: Because of the NVIDIA Monitor window. 6 Choose which temperature scale to track - CPU, System, and chipset temperatures. This may ...
If unavailable, the check box is grayedout. 8 Specify how the system alerts you want to display NVIDIA monitor application in the BIOS - 78 5 Advanced hardware setup English Note: Because of the NVIDIA Monitor window. 6 Choose which temperature scale to track - CPU, System, and chipset temperatures. This may ...

Aspire G7700 Series User's Guide
Page 110
... module, then press the module at both ends to view the new value for total system memory and make a note of memory installed. Run the BIOS setup to seat it fully into the slot, you insert a DIMM but it does not fit easily into the slot (1). English 98 6 Upgrading your computer...
... module, then press the module at both ends to view the new value for total system memory and make a note of memory installed. Run the BIOS setup to seat it fully into the slot, you insert a DIMM but it does not fit easily into the slot (1). English 98 6 Upgrading your computer...

Aspire G7700 Series User's Guide
Page 112
... from its protective packaging, handling it by the edges. 7 Insert the card into the selected slot. 8 Make sure that you turn on the system, the BIOS setup automatically detects and assigns resources to the new device (applicable only to the expansion card as required. 11 Observe the post-installation instructions described...
... from its protective packaging, handling it by the edges. 7 Insert the card into the selected slot. 8 Make sure that you turn on the system, the BIOS setup automatically detects and assigns resources to the new device (applicable only to the expansion card as required. 11 Observe the post-installation instructions described...

Aspire G7700 Series User's Guide
Page 118
... and may make your current OS unstable or unusable. After the POST runs, Press Alt + F10 combine key during BIOS to recovery your system. This utility has same password protection with Acer eRecovery. Follow all onscreen instructions. One is from system's original settings and another is running the Power On Self Test...
... and may make your current OS unstable or unusable. After the POST runs, Press Alt + F10 combine key during BIOS to recovery your system. This utility has same password protection with Acer eRecovery. Follow all onscreen instructions. One is from system's original settings and another is running the Power On Self Test...

Aspire G7700 Service Guide
Page 19
..." message) to be the same those found in CMOS. This memory area is no need to run the CMOS Setup Utility, make changes to as "BIOS", "Setup", or "Setup utility" in a battery-backed nonvolatile memory called the complementary metaloxide semiconductor (CMOS) Setup Utility. Before you close the Setup. These values may...
..." message) to be the same those found in CMOS. This memory area is no need to run the CMOS Setup Utility, make changes to as "BIOS", "Setup", or "Setup utility" in a battery-backed nonvolatile memory called the complementary metaloxide semiconductor (CMOS) Setup Utility. Before you close the Setup. These values may...

Aspire G7700 Service Guide
Page 21
...the six primary CMOS Setup menus, namely: Product Information Standard CMOS Features Advanced BIOS Features Advanced Chipset Features Integrated Peripherals Power Management Setup PC Health Status Frequency/Voltage Control ...; BIOS Security Features Load Optimized Defaults Save & Exit Setup Exit Without Saving In the descriptive table following...
...the six primary CMOS Setup menus, namely: Product Information Standard CMOS Features Advanced BIOS Features Advanced Chipset Features Integrated Peripherals Power Management Setup PC Health Status Frequency/Voltage Control ...; BIOS Security Features Load Optimized Defaults Save & Exit Setup Exit Without Saving In the descriptive table following...

Aspire G7700 Service Guide
Page 24
... Enter to access the Hard Disk Drive Priority submenu and specify the boot device priority sequence from available removable drives. Disabled Enabled Enables or disables BIOS to yes, it lets the OS configure Plug and Play (PnP) devices not required for Num Lock. Disabled When enabled, the... show a warning message on state for boot if the system has a PnP OS. Allows you to manually force BIOS to no, it lets the BIOS configure all the devices in the system. When set to clear the previously saved Extended No System Configuration Data (ESCD) data and reconfigure the settings. ...
... Enter to access the Hard Disk Drive Priority submenu and specify the boot device priority sequence from available removable drives. Disabled Enabled Enables or disables BIOS to yes, it lets the OS configure Plug and Play (PnP) devices not required for Num Lock. Disabled When enabled, the... show a warning message on state for boot if the system has a PnP OS. Allows you to manually force BIOS to no, it lets the BIOS configure all the devices in the system. When set to clear the previously saved Extended No System Configuration Data (ESCD) data and reconfigure the settings. ...

Aspire G7700 Service Guide
Page 28
...; F Disabled 700 C/158 F 75 C/167 F 80 C/176 F Enabled Disabled Enabled Disabled 20 Chapter 2 When processor temperature exceeds the threshold, BIOS will emit warning sound. CPU Fan Smart Fan System Fan1 Smart Fan Enables or disables the processor fan speed control function. Enables or disables the...
...; F Disabled 700 C/158 F 75 C/167 F 80 C/176 F Enabled Disabled Enabled Disabled 20 Chapter 2 When processor temperature exceeds the threshold, BIOS will emit warning sound. CPU Fan Smart Fan System Fan1 Smart Fan Enables or disables the processor fan speed control function. Enables or disables the...

Aspire G7700 Service Guide
Page 31
...F10. 5. Type a password then press Enter. Retype the password to save the new password and close the Setup Utility. BIOS Security Features The BIOS Security menu allows you to safeguard and protect the system from unauthorized use by setting up /down arrow keys to select Change...User password is available only when a Supervisor password is used to control entry access to change the Supervisor password. Press Enter to the BIOS Setup Utility. Select Yes to verify the first entry then press Enter again. 4. Changing the supervisor password 1. Type the original password ...
...F10. 5. Type a password then press Enter. Retype the password to save the new password and close the Setup Utility. BIOS Security Features The BIOS Security menu allows you to safeguard and protect the system from unauthorized use by setting up /down arrow keys to select Change...User password is available only when a Supervisor password is used to control entry access to change the Supervisor password. Press Enter to the BIOS Setup Utility. Select Yes to verify the first entry then press Enter again. 4. Changing the supervisor password 1. Type the original password ...

Aspire G7700 Service Guide
Page 33
If you are quite demanding in terms of low-performance components and you to load these settings, the system might not function properly. Load Optimized Defaults The Load Optimized Defaults menu allows you choose to load the default settings for all BIOS setup parameters. Setup defaults are using low-speed memory chips or other kinds of resources consumption. Chapter 2 25
If you are quite demanding in terms of low-performance components and you to load these settings, the system might not function properly. Load Optimized Defaults The Load Optimized Defaults menu allows you choose to load the default settings for all BIOS setup parameters. Setup defaults are using low-speed memory chips or other kinds of resources consumption. Chapter 2 25

Aspire G7700 Service Guide
Page 76
... System Internal Inspection. If the system will power on the system. 13. Make sure that air flow is making contact that all components are Acer-qualified and supported. 11. Place the system unit on page 6. 2. Verify that all cable connectors inside the system are properly seated. 9..... 3. Unplug the power cord from the power outlets. 4. For instructions on the front panel, which can try viewing the POST messages and BIOS event logs during the system startup. 68 Chapter 4 Verify that components are firmly and correctly attached to "System Disassembly" on , check if ...
... System Internal Inspection. If the system will power on the system. 13. Make sure that air flow is making contact that all components are Acer-qualified and supported. 11. Place the system unit on page 6. 2. Verify that all cable connectors inside the system are properly seated. 9..... 3. Unplug the power cord from the power outlets. 4. For instructions on the front panel, which can try viewing the POST messages and BIOS event logs during the system startup. 68 Chapter 4 Verify that components are firmly and correctly attached to "System Disassembly" on , check if ...

Aspire G7700 Service Guide
Page 77
The error messages in the following table indicate the BIOS signals on the list, please refer to "Undetermined Problems". NOTE: Most of memory installed. Some of them display information about a hardware device, e.g., the amount of ... actions in the sequence shown in FRU/Action column, if the FRU replacement does not solve the problem, put the original part back in the BIOS Setup Utility menus, reset the computer, enter Setup and install Setup defaults or correct the error. Do not replace a non-defective FRU.
The error messages in the following table indicate the BIOS signals on the list, please refer to "Undetermined Problems". NOTE: Most of memory installed. Some of them display information about a hardware device, e.g., the amount of ... actions in the sequence shown in FRU/Action column, if the FRU replacement does not solve the problem, put the original part back in the BIOS Setup Utility menus, reset the computer, enter Setup and install Setup defaults or correct the error. Do not replace a non-defective FRU.

Aspire G7700 Service Guide
Page 79
... POST Routine Description CRB_Init At Early POST_FAR Cp Init At Early POST_FAR Init GPNV Area_FAR Init BIOS Modules_FAR Process SMBIOS Module_far Init GPNV Area_FAR Init Language Modules_FAR Init BIOS Modules_FAR Init Osb CMOS_FAR Init Silent Logo Module_FAR Init Silent Logo Module_FAR Init... BIOS Modules_FAR Save OEM LOGO Size_FAR Init Silent Logo Module_FAR Init BIOS Modules_FAR Global Device Init At Early POST_FAR Add IOITE8718ToMB...
... POST Routine Description CRB_Init At Early POST_FAR Cp Init At Early POST_FAR Init GPNV Area_FAR Init BIOS Modules_FAR Process SMBIOS Module_far Init GPNV Area_FAR Init Language Modules_FAR Init BIOS Modules_FAR Init Osb CMOS_FAR Init Silent Logo Module_FAR Init Silent Logo Module_FAR Init... BIOS Modules_FAR Save OEM LOGO Size_FAR Init Silent Logo Module_FAR Init BIOS Modules_FAR Global Device Init At Early POST_FAR Add IOITE8718ToMB...


