

Aspire G7700 Series User's Guide
Page 9
... use vi 1 First things first 1 Specifications 2 Package contents 5 Accessing the User's Guide 5 2 System tour 7 External and internal structure 8 Closed front panel 8 Front panel 10 Using the memory card reader 12 Rear panel 14 Internal components 16 System board 18 Mainboard 18 Audio card (optional) 21 System board switches and connectors 22 Power button 22 Reset button 22 IDE connector 23 Serial ATA connector: SATA1~6 23 Fan power connectors 24 Front panel connectors 24 Serial port connector 25 System LED indicators 26 Front and rear panel LED...
... use vi 1 First things first 1 Specifications 2 Package contents 5 Accessing the User's Guide 5 2 System tour 7 External and internal structure 8 Closed front panel 8 Front panel 10 Using the memory card reader 12 Rear panel 14 Internal components 16 System board 18 Mainboard 18 Audio card (optional) 21 System board switches and connectors 22 Power button 22 Reset button 22 IDE connector 23 Serial ATA connector: SATA1~6 23 Fan power connectors 24 Front panel connectors 24 Serial port connector 25 System LED indicators 26 Front and rear panel LED...
Aspire G7700 Series User's Guide
Page 10
... desktop 39 Using the keyboard 40 Using the mouse 42 Using the optical drive 43 Taking care of your optical disks 44 Connecting options 45 Printer 45 IEEE 1394 devices 45 eSATA devices 46 Audio devices 46 Audio devices to an optional audio card 50 USB devices 55 Connecting a video game console 56 5 Advanced hardware setup 57 Video card configuration 58 Enabling SLI Antialiasing 58 Setting up an SLI configuration 60 Setting up multiple monitors 61 Setting up the multichannel audio output (optional) 62 Setting up RAID 63 RAID arrays 63 Enabling RAID...
... desktop 39 Using the keyboard 40 Using the mouse 42 Using the optical drive 43 Taking care of your optical disks 44 Connecting options 45 Printer 45 IEEE 1394 devices 45 eSATA devices 46 Audio devices 46 Audio devices to an optional audio card 50 USB devices 55 Connecting a video game console 56 5 Advanced hardware setup 57 Video card configuration 58 Enabling SLI Antialiasing 58 Setting up an SLI configuration 60 Setting up multiple monitors 61 Setting up the multichannel audio output (optional) 62 Setting up RAID 63 RAID arrays 63 Enabling RAID...
Aspire G7700 Series User's Guide
Page 11
... 80 Empowering Technology password 80 Acer eRecovery Management 80 6 Upgrading your computer 83 Installation precautions 84 ESD precautions 84 Preinstallation instructions 84 Post-installation instructions 85 Opening your Aspire G7700 86 Removing and installing the bezel door 86 Removing and installing the side panel 88 Removing and installing a hard drive 90 Removing and installing an optical drive 93 Upgrading the system memory 95 System memory interface 95 System memory configuration guidelines 96 Installing an expansion card 99 PCI bus slots interface 99...
... 80 Empowering Technology password 80 Acer eRecovery Management 80 6 Upgrading your computer 83 Installation precautions 84 ESD precautions 84 Preinstallation instructions 84 Post-installation instructions 85 Opening your Aspire G7700 86 Removing and installing the bezel door 86 Removing and installing the side panel 88 Removing and installing a hard drive 90 Removing and installing an optical drive 93 Upgrading the system memory 95 System memory interface 95 System memory configuration guidelines 96 Installing an expansion card 99 PCI bus slots interface 99...

Aspire G7700 Series User's Guide
Page 16
... (H) x 190 (W) mm BIOS AMI PnP BIOS compatible with SMBIOS 2.4 Power supply 1000 W/750 W System compliance PC 2001 Certification FCC, CE, BSMI, CCC, C-tick, Nemko (CB & Bauart), UL, VCC1 Optional accessories Logitech® G11 gaming keyboard and G5 gaming mouse Acer G series LCD monitor Acer stereo speakers Remote control 1 Support for reference only. Note: The specifications listed above are for RAID 0 and 1 requires two hard drives, RAID 5 requires three, RAID 0+1 requires four or...
... (H) x 190 (W) mm BIOS AMI PnP BIOS compatible with SMBIOS 2.4 Power supply 1000 W/750 W System compliance PC 2001 Certification FCC, CE, BSMI, CCC, C-tick, Nemko (CB & Bauart), UL, VCC1 Optional accessories Logitech® G11 gaming keyboard and G5 gaming mouse Acer G series LCD monitor Acer stereo speakers Remote control 1 Support for reference only. Note: The specifications listed above are for RAID 0 and 1 requires two hard drives, RAID 5 requires three, RAID 0+1 requires four or...

Aspire G7700 Series User's Guide
Page 23
11 English No Icon 1 2 3 4 5 6 7 8 9 10 11 12 13 14 Component USB 2.0 ports Microphone/line-in jack Headphone/line-out jack Power button/power indicator Optical disk drives XD (eXtreme Digital) slot USB 2.0 port IEEE 1394 port (4-pin) CF I/II (CompactFlash Type I/II) slot Drive bay door Easy-swap hard disk drive (1~4) SD/MMC (SecureDigital/MultimediaCard) slot MS/MS Pro (Memory Stick/Memory Stick Pro Duo) slot Optical disk drive eject buttons
11 English No Icon 1 2 3 4 5 6 7 8 9 10 11 12 13 14 Component USB 2.0 ports Microphone/line-in jack Headphone/line-out jack Power button/power indicator Optical disk drives XD (eXtreme Digital) slot USB 2.0 port IEEE 1394 port (4-pin) CF I/II (CompactFlash Type I/II) slot Drive bay door Easy-swap hard disk drive (1~4) SD/MMC (SecureDigital/MultimediaCard) slot MS/MS Pro (Memory Stick/Memory Stick Pro Duo) slot Optical disk drive eject buttons

Aspire G7700 Series User's Guide
Page 32
... other audio devices. Headphone/line-out/front speaker jack This jack connects to a microphone. 20 Back panel I/O 2 System tour English Code Mouse Keyboard 1394 port S/PDIF-out jack eSATA ports Clear CMOS Button LAN Jacks USB ports CS-Out Color Green Purple Orange RS-Out Black SS-Out Gray Line-In Blue Line-Out Mic Green Pink Component PS/2 mouse port PS/2 keyboard port IEEE 1394 port (6-pin) USB ports eSATA ports CMOS reset button Network ports USB ports Center speaker/subwoofer jack (in 5.1/7.1 channel mode) Rear speaker...
... other audio devices. Headphone/line-out/front speaker jack This jack connects to a microphone. 20 Back panel I/O 2 System tour English Code Mouse Keyboard 1394 port S/PDIF-out jack eSATA ports Clear CMOS Button LAN Jacks USB ports CS-Out Color Green Purple Orange RS-Out Black SS-Out Gray Line-In Blue Line-Out Mic Green Pink Component PS/2 mouse port PS/2 keyboard port IEEE 1394 port (6-pin) USB ports eSATA ports CMOS reset button Network ports USB ports Center speaker/subwoofer jack (in 5.1/7.1 channel mode) Rear speaker...

Aspire G7700 Series User's Guide
Page 35
Serial ATA connector: SATA1~6 The six serial ATA connectors (SATA1-6) is a high-speed Serial ATA interface port. Important: Please do not fold the Serial ATA cable into 90-degree angle. Each connector can connect to master / slave mode by the vendors for jumper setting instructions. Refer to IDE device's documentation supplied by setting jumpers. English 23 IDE connector The IDE1 connector supports IDE hard disk drives, optical disk drives, and other IDE devices. Important: If you install two IDE devices on the...
Serial ATA connector: SATA1~6 The six serial ATA connectors (SATA1-6) is a high-speed Serial ATA interface port. Important: Please do not fold the Serial ATA cable into 90-degree angle. Each connector can connect to master / slave mode by the vendors for jumper setting instructions. Refer to IDE device's documentation supplied by setting jumpers. English 23 IDE connector The IDE1 connector supports IDE hard disk drives, optical disk drives, and other IDE devices. Important: If you install two IDE devices on the...

Aspire G7700 Series User's Guide
Page 46
... rear of the computer can combine the two network ports to work as a home gateway and it provides advanced networking features including teaming, load balancing, fail-over, and TCP/IP acceleration. Installing the WLAN antenna (optional) Locate an unused PCI slot and place the card on how to configure your network system administrator or operating system manual for information on top. Note: Consult your network setup. Individual network configuration Connect...
... rear of the computer can combine the two network ports to work as a home gateway and it provides advanced networking features including teaming, load balancing, fail-over, and TCP/IP acceleration. Installing the WLAN antenna (optional) Locate an unused PCI slot and place the card on how to configure your network system administrator or operating system manual for information on top. Note: Consult your network setup. Individual network configuration Connect...

Aspire G7700 Series User's Guide
Page 84
... NVIDIA nForce RAID Controller, then click Next. 7 Click Load Driver. 8 At the Load Driver dialog box, click Browse then navigate to a basic disk without deleting any data. Installing the RAID drivers To install a RAID driver under Windows Vista: 1 After you complete the RAID BIOS setup, boot from an array and convert it automatically as part of the "To create a non-bootable RAID array using the RAID BIOS" section. English 72 5 Advanced hardware setup •...
... NVIDIA nForce RAID Controller, then click Next. 7 Click Load Driver. 8 At the Load Driver dialog box, click Browse then navigate to a basic disk without deleting any data. Installing the RAID drivers To install a RAID driver under Windows Vista: 1 After you complete the RAID BIOS setup, boot from an array and convert it automatically as part of the "To create a non-bootable RAID array using the RAID BIOS" section. English 72 5 Advanced hardware setup •...
Aspire G7700 Series User's Guide
Page 96
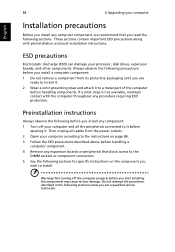
... specific instructions on the component you are a qualified service technician. Then unplug all the peripherals connected to it before opening it to install. Not turning off your computer according to the instructions on page 86. 3 Follow the ESD precautions described above before you are ready to install it. 2 Wear a wrist grounding strap and attach it . English 84 6 Upgrading your processor, disk drives, expansion boards...
... specific instructions on the component you are a qualified service technician. Then unplug all the peripherals connected to it before opening it to install. Not turning off your computer according to the instructions on page 86. 3 Follow the ESD precautions described above before you are ready to install it. 2 Wear a wrist grounding strap and attach it . English 84 6 Upgrading your processor, disk drives, expansion boards...

Aspire G7700 Series User's Guide
Page 109
...-installation instructions described on page 85. If you are replacing an existing DIMM, install the new DIMM in the correct order. To install a memory module: Note: DIMM slots on the mainboard must match the total size of the DIMMs installed in the channel A slots must be installed in pairs and in the same slot where you are adding a new DIMM, note that the system supports dual...
...-installation instructions described on page 85. If you are replacing an existing DIMM, install the new DIMM in the correct order. To install a memory module: Note: DIMM slots on the mainboard must match the total size of the DIMMs installed in the channel A slots must be installed in pairs and in the same slot where you are adding a new DIMM, note that the system supports dual...
Aspire G7700 Series User's Guide
Page 117
... following : • Make sure the printer is connected to a power outlet and that it is turned on . • If headphones, earphones or external speakers are using a good (undamaged) disk. You can not read hard disk or optical disk drive information. If it is crossed-out, click on the good disk there may be a problem with the drive. If your drive can also press the volume control/mute knob...
... following : • Make sure the printer is connected to a power outlet and that it is turned on . • If headphones, earphones or external speakers are using a good (undamaged) disk. You can not read hard disk or optical disk drive information. If it is crossed-out, click on the good disk there may be a problem with the drive. If your drive can also press the volume control/mute knob...

Aspire G7700 Series User's Guide
Page 118
... may make your system's original factory default settings or last system backup. After the POST runs, Press Alt + F10 combine key during BIOS to recovery your system. Follow all onscreen instructions. This utility has same password protection with Acer eRecovery. Warning: Initiating the recovery operation while the operating system is from system backup. One is from system's original settings and another is running the Power On Self Test (POST...
... may make your system's original factory default settings or last system backup. After the POST runs, Press Alt + F10 combine key during BIOS to recovery your system. Follow all onscreen instructions. This utility has same password protection with Acer eRecovery. Warning: Initiating the recovery operation while the operating system is from system backup. One is from system's original settings and another is running the Power On Self Test (POST...

Aspire G7700 Series User's Guide
Page 135
123 English Index A accessing the online User's Guide 5 Acer Empowering Technology password setup 80 Acer eRecovery Management 80 B bezel door install 87 remove 86 C CMOS settings clearing 76 connecting options 1394 device 45 audio devices 46 analog speakers 46 external speakers 46 microphone 46 devices to audio card 50 eSATA devices 46 network 45 printer 45 USB devices 55 creating a RAID array bootable 66 non-bootable 66 D disk drives CD-ROM/DVD-ROM/CD-RW/BD/ HD-DVD drive taking care CDs/DVDs/BDs/ HD-DVDs 44 E event logger...
123 English Index A accessing the online User's Guide 5 Acer Empowering Technology password setup 80 Acer eRecovery Management 80 B bezel door install 87 remove 86 C CMOS settings clearing 76 connecting options 1394 device 45 audio devices 46 analog speakers 46 external speakers 46 microphone 46 devices to audio card 50 eSATA devices 46 network 45 printer 45 USB devices 55 creating a RAID array bootable 66 non-bootable 66 D disk drives CD-ROM/DVD-ROM/CD-RW/BD/ HD-DVD drive taking care CDs/DVDs/BDs/ HD-DVDs 44 E event logger...

Aspire G7700 Series User's Guide
Page 136
... chair 30 connect broadband network 34 external monitor 33 keyboard 32 mouse 32 connecting power cable 35 keyboard 31 monitor 31 mouse 31 side panel install 89 remove 89 system board audio card 21 connectors 22 mainboard 18 switches 22 system memory install 97 system tuning 79 T turning off computer 38 software shutdown 38 suspend mode 38 turning on computer 36 power button 36 power switch 36 U upgrade computer 95 installation precautions post-installation 85 open computer 86 remove computer cover 86 replace components memory 95 AS G7700 V1.0
... chair 30 connect broadband network 34 external monitor 33 keyboard 32 mouse 32 connecting power cable 35 keyboard 31 monitor 31 mouse 31 side panel install 89 remove 89 system board audio card 21 connectors 22 mainboard 18 switches 22 system memory install 97 system tuning 79 T turning off computer 38 software shutdown 38 suspend mode 38 turning on computer 36 power button 36 power switch 36 U upgrade computer 95 installation precautions post-installation 85 open computer 86 remove computer cover 86 replace components memory 95 AS G7700 V1.0

Aspire G7700 Service Guide
Page 13
Front Panel Item 1 2 3 4 5 6 7 8 9 10 11 12 13 14 Icon Component USB 2.0 ports Headphone/line-out jack Microphone/speaker-out/line-in jack Power button/power indicator Optical disk drives XD (eXtreme Digital) slot USB 2.0 port IEEE 1394 port (4-pin) CFI/II (CompactFlash Type I/II) slot Drive bay door Easy-swap hard disk drives (1-4) MS/MS Pro (Memory Stick/Memory Stick Pro Duo) slot SD/MMC (SecureDigital/MultimediaCard) slot Optical disk drive eject buttons Chapter 1 5
Front Panel Item 1 2 3 4 5 6 7 8 9 10 11 12 13 14 Icon Component USB 2.0 ports Headphone/line-out jack Microphone/speaker-out/line-in jack Power button/power indicator Optical disk drives XD (eXtreme Digital) slot USB 2.0 port IEEE 1394 port (4-pin) CFI/II (CompactFlash Type I/II) slot Drive bay door Easy-swap hard disk drives (1-4) MS/MS Pro (Memory Stick/Memory Stick Pro Duo) slot SD/MMC (SecureDigital/MultimediaCard) slot Optical disk drive eject buttons Chapter 1 5
Aspire G7700 Service Guide
Page 23
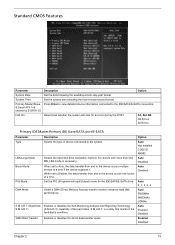
... an error during the POST. Enables or disables the 32-bit data transfer mode. S.M.A.R.T. is necessary. Standard CMOS Features Parameter System Date System Time Primary Master/Slave & Serial-ATA 1~6 channel & E-SATA 1/2 Halt On Description Option Set the date following the hour-minute-second format. Press Enter to view detailed device information connected to enhance hard disk performance. Select a DMA (Direct Memory Access) transfer mode to the IDE/SATA/E-SATA connectors. Option...
... an error during the POST. Enables or disables the 32-bit data transfer mode. S.M.A.R.T. is necessary. Standard CMOS Features Parameter System Date System Time Primary Master/Slave & Serial-ATA 1~6 channel & E-SATA 1/2 Halt On Description Option Set the date following the hour-minute-second format. Press Enter to view detailed device information connected to enhance hard disk performance. Select a DMA (Direct Memory Access) transfer mode to the IDE/SATA/E-SATA connectors. Option...

Aspire G7700 Service Guide
Page 24
... OS configure Plug and Play (PnP) devices not required for Num Lock. Disabled Enabled Enables or disables BIOS to write data into this area. Hard Disk CD^DVD Removable Device LAN Press Enter to access the Hard Disk Drive Priority submenu and specify the boot device priority sequence from the available devices. Selects power on the screen or an alarm beep when someone attempts to display error beeps or messages during USB device enumeration. Disabled Enabled 16 Chapter 2 On Off Enables or disables the boot...
... OS configure Plug and Play (PnP) devices not required for Num Lock. Disabled Enabled Enables or disables BIOS to write data into this area. Hard Disk CD^DVD Removable Device LAN Press Enter to access the Hard Disk Drive Priority submenu and specify the boot device priority sequence from the available devices. Selects power on the screen or an alarm beep when someone attempts to display error beeps or messages during USB device enumeration. Disabled Enabled 16 Chapter 2 On Off Enables or disables the boot...

Aspire G7700 Service Guide
Page 92
Reset Button Press this reset button (RESET1) on the mainboard to master/slave mode by the vendors for jumper setting instructions. 84 Chapter 5 IDE Connector The IDE connector (IDE1) supports IDE hard disk drives, optical disk drives, and other IDE devices. IMPORTANT:If you install two IDE devices on the same cable, you must configure the drives separately to reset the system. Refer to turn the system on or off. System Switches and Jumpers Power Button Press the power button (POWER1) on the mainboard to IDE device's documentation supplied by setting jumpers.
Reset Button Press this reset button (RESET1) on the mainboard to master/slave mode by the vendors for jumper setting instructions. 84 Chapter 5 IDE Connector The IDE connector (IDE1) supports IDE hard disk drives, optical disk drives, and other IDE devices. IMPORTANT:If you install two IDE devices on the same cable, you must configure the drives separately to reset the system. Refer to turn the system on or off. System Switches and Jumpers Power Button Press the power button (POWER1) on the mainboard to IDE device's documentation supplied by setting jumpers.

Aspire G7700 Service Guide
Page 107
Technical Specifications This section provides technical specifications for the system. Processor Appendix A Item Type Model Number Core L2 Cache Size (MB) Clock Speed (GHz) Front Side Bus (MHz) Frequency (MHz) Socket Clock Multiplier Voltage (V) Thermal Design Power (W) Specification Intel Core 2 Extreme QX9650 Quad (45 nm) 12 3 1333 3000 LGA 775 9x 0.85 - 1.3625 130 System Board Major Chips Q9300 Quad (45 nm) 6 2.5 1333...
Technical Specifications This section provides technical specifications for the system. Processor Appendix A Item Type Model Number Core L2 Cache Size (MB) Clock Speed (GHz) Front Side Bus (MHz) Frequency (MHz) Socket Clock Multiplier Voltage (V) Thermal Design Power (W) Specification Intel Core 2 Extreme QX9650 Quad (45 nm) 12 3 1333 3000 LGA 775 9x 0.85 - 1.3625 130 System Board Major Chips Q9300 Quad (45 nm) 6 2.5 1333...


