
Quick Start Guide
Page 10
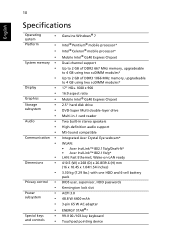
...; Dimensions • • Privacy control • • Power • subsystem • • • Special keys • and controls • Genuine Windows® 7 Intel® Pentium® mobile processor* Intel® Celeron® mobile processor* Mobile Intel® GL40 Express Chipset Dual-channel support Up to 2 GB...-in-1 card reader Two built-in stereo speakers High-definition audio support MS-Sound compatible Integrated Acer Crystal Eye webcam* WLAN: • Acer InviLink™ 802.11b/g/Draft-N* • Acer InviLink™ 802.11b/g* LAN: Fast Ethernet;
...; Dimensions • • Privacy control • • Power • subsystem • • • Special keys • and controls • Genuine Windows® 7 Intel® Pentium® mobile processor* Intel® Celeron® mobile processor* Mobile Intel® GL40 Express Chipset Dual-channel support Up to 2 GB...-in-1 card reader Two built-in stereo speakers High-definition audio support MS-Sound compatible Integrated Acer Crystal Eye webcam* WLAN: • Acer InviLink™ 802.11b/g/Draft-N* • Acer InviLink™ 802.11b/g* LAN: Fast Ethernet;

Service Guide
Page 7
Table of Contents System Specifications 1 Features 1 System Block Diagram 3 Your Acer Notebook tour 4 Front View 4 Closed Front View 5 Rear View 6 Left View 6 Right View 7 Bottom View 7 Indicators 8 TouchPad Basics 9 Using the Keyboard 10 Lock Keys and embedded numeric keypad 10 Windows Keys 11 Hot Keys 12 Hardware Specifications and Configurations 13 System Utilities...
Table of Contents System Specifications 1 Features 1 System Block Diagram 3 Your Acer Notebook tour 4 Front View 4 Closed Front View 5 Rear View 6 Left View 6 Right View 7 Bottom View 7 Indicators 8 TouchPad Basics 9 Using the Keyboard 10 Lock Keys and embedded numeric keypad 10 Windows Keys 11 Hot Keys 12 Hardware Specifications and Configurations 13 System Utilities...
Service Guide
Page 9
... Disk 150 FRU (Field Replaceable Unit) List 151 Aspire 7715Z/7315 Exploded Diagrams 152 Main Assembly 152 Base Assembly 153 Rear Assembly 154 Aspire 7715Z/7315 FRU List 155 Screw List 163 Model Definition and Configuration 164 Aspire 7315 165 Aspire 7715Z 167 Test Compatible Components 181 Microsoft® Windows® 7 Environment Test 182 Online Support Information 185...
... Disk 150 FRU (Field Replaceable Unit) List 151 Aspire 7715Z/7315 Exploded Diagrams 152 Main Assembly 152 Base Assembly 153 Rear Assembly 154 Aspire 7715Z/7315 FRU List 155 Screw List 163 Model Definition and Configuration 164 Aspire 7315 165 Aspire 7715Z 167 Test Compatible Components 181 Microsoft® Windows® 7 Environment Test 182 Online Support Information 185...

Service Guide
Page 11
... modules* • Up to 2 GB of the computer's many features: NOTE: Items denoted with an (*) are only available for selected models. Operating System • Genuine Windows® 7™ Platform • Intel® Pentium® mobile processor* • Intel® Celeron® mobile processor* • Mobile Intel® GL40 Express Chipset System...
... modules* • Up to 2 GB of the computer's many features: NOTE: Items denoted with an (*) are only available for selected models. Operating System • Genuine Windows® 7™ Platform • Intel® Pentium® mobile processor* • Intel® Celeron® mobile processor* • Mobile Intel® GL40 Express Chipset System...
Service Guide
Page 20
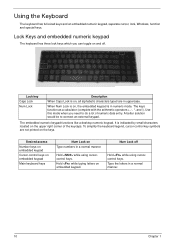
... indicated by small characters located on embedded keypad. Using the Keyboard The keyboard has full-sized keys and an embedded numeric keypad, separate cursor, lock, Windows, function and special keys.
... indicated by small characters located on embedded keypad. Using the Keyboard The keyboard has full-sized keys and an embedded numeric keypad, separate cursor, lock, Windows, function and special keys.
Service Guide
Page 21
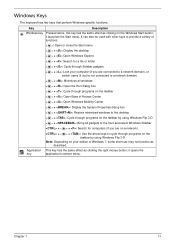
... (if you are on a network) + < > + : Use the arrow keys to cycle through Sidebar gadgets < > + : Lock your edition of Access Center < > + : Open Windows Mobility Center < > + : Display the System Properties dialog box < > + : Restore minimized windows to a network domain) < > + : Minimizes all windows < > + : Open the Run dialog box < > + : Cycle through programs on the taskbar < > + : Open Ease of...
... (if you are on a network) + < > + : Use the arrow keys to cycle through Sidebar gadgets < > + : Lock your edition of Access Center < > + : Open Windows Mobility Center < > + : Display the System Properties dialog box < > + : Restore minimized windows to a network domain) < > + : Minimizes all windows < > + : Open the Run dialog box < > + : Cycle through programs on the taskbar < > + : Open Ease of...
Service Guide
Page 28
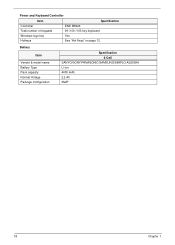
Power and Keyboard Controller Item Controller Total number of keypads Specification ENE KB926 99-/100-/103-key keyboard Windows logo key Hotkeys Yes See "Hot Keys" on page 12. Battery Item Vendor & model name Battery Type Pack capacity Normal Voltage Package configuration Specification 6 Cell SANYO/SONY/PANASONIC/SAMSUNG/SIMPLO AS2009A Li-ion 4400 mAh 2.2 Ah 3S2P 18 Chapter 1
Power and Keyboard Controller Item Controller Total number of keypads Specification ENE KB926 99-/100-/103-key keyboard Windows logo key Hotkeys Yes See "Hot Keys" on page 12. Battery Item Vendor & model name Battery Type Pack capacity Normal Voltage Package configuration Specification 6 Cell SANYO/SONY/PANASONIC/SAMSUNG/SIMPLO AS2009A Li-ion 4400 mAh 2.2 Ah 3S2P 18 Chapter 1
Service Guide
Page 50
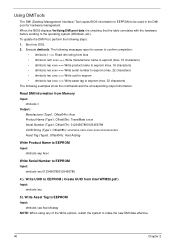
...WFM20.pdf ) Input: dmitools /wu 5). Write UUID to EEPROM ( Create UUID from Memory Input: dmitools /r Output: Manufacturer (Type1, Offset04h): Acer Product Name (Type1, Offset05h): TravelMate xxxxx Serial Number (Type1, Offset07h): 01234567890123456789 UUID String (Type1, Offset08h): xxxxxxxx-xxxx-xxxx-xxxx-xxxxxxxxxxxx Asset ...8226; dmitools /wu xxxx ==> Write uuid to eeprom • dmitools /wa xxxx ==> Write asset tag to the operating system (Windows, etc.). When the BIOS displays Verifying DMI pool data it is checking that the table correlates with the hardware before sending to eeprom...
...WFM20.pdf ) Input: dmitools /wu 5). Write UUID to EEPROM ( Create UUID from Memory Input: dmitools /r Output: Manufacturer (Type1, Offset04h): Acer Product Name (Type1, Offset05h): TravelMate xxxxx Serial Number (Type1, Offset07h): 01234567890123456789 UUID String (Type1, Offset08h): xxxxxxxx-xxxx-xxxx-xxxx-xxxxxxxxxxxx Asset ...8226; dmitools /wu xxxx ==> Write uuid to eeprom • dmitools /wa xxxx ==> Write asset tag to the operating system (Windows, etc.). When the BIOS displays Verifying DMI pool data it is checking that the table correlates with the hardware before sending to eeprom...
Service Guide
Page 136
... cables. 4. Check the display resolution is experiencing HDD or ODD BIOS information loss, disconnect and reconnect the power and data cables between devices. c. Run the Windows Memory Diagnostic from the BIOS, the drive may reduce display brightness. Reboot the computer. 2. See "Disassembly Process" on adjusting settings. Check the Device Manager to.... See "Disassembly Process" on page 44. 5. d. If HDD information is listed under Other Devices. 9. If desktop display resolution is virus free. 3. Minimize or close all Windows.
... cables. 4. Check the display resolution is experiencing HDD or ODD BIOS information loss, disconnect and reconnect the power and data cables between devices. c. Run the Windows Memory Diagnostic from the BIOS, the drive may reduce display brightness. Reboot the computer. 2. See "Disassembly Process" on adjusting settings. Check the Device Manager to.... See "Disassembly Process" on page 44. 5. d. If HDD information is listed under Other Devices. 9. If desktop display resolution is virus free. 3. Minimize or close all Windows.

Service Guide
Page 140
... external devices. 2. The System Recovery Options screen displays. Restart the computer and press F2 to correct the problem. 1. For more information see Windows Help and Support. 9. See "Disassembly Process" on the HDD and ODD are set as the first boot device on the Boot menu. 6.... Disconnect all cables and jumpers on page 44. 130 Chapter 4 When complete, click Finish. c. Run the Windows Disk Defragmenter. Click Next. Remove any key to start to ensure the computer is discovered, follow the onscreen information to locate and resolve issues...
... external devices. 2. The System Recovery Options screen displays. Restart the computer and press F2 to correct the problem. 1. For more information see Windows Help and Support. 9. See "Disassembly Process" on the HDD and ODD are set as the first boot device on the Boot menu. 6.... Disconnect all cables and jumpers on page 44. 130 Chapter 4 When complete, click Finish. c. Run the Windows Disk Defragmenter. Click Next. Remove any key to start to ensure the computer is discovered, follow the onscreen information to locate and resolve issues...

Service Guide
Page 142
... reinstall the driver. Check that the Regional Code is set to another computer. d. Discs Do Not Burn Properly If discs can only be changed even Windows is reinstalled or the drive is not removed from the drop down arrow, right-click on the device and click Enable. b. Click OK. 2. Check that...
... reinstall the driver. Check that the Regional Code is set to another computer. d. Discs Do Not Burn Properly If discs can only be changed even Windows is reinstalled or the drive is not removed from the drop down arrow, right-click on the device and click Enable. b. Click OK. 2. Check that...

Service Guide
Page 143
Drive Not Detected If Windows cannot detect the drive, perform the following actions one at a time to the ODD. Check that the drive is checked and click OK. a. b. Replace the ...
Drive Not Detected If Windows cannot detect the drive, perform the following actions one at a time to the ODD. Check that the drive is checked and click OK. a. b. Replace the ...

Service Guide
Page 145
.... 12. Swap M/B to check the events log for errors. Remove any recently added hardware and associated software. 7. If the issue is still not resolved, see Windows Help and Support. 10. If the mouse uses a wireless connection, insert new batteries and confirm there is properly installed. Try an alternative mouse. 2. If the...
.... 12. Swap M/B to check the events log for errors. Remove any recently added hardware and associated software. 7. If the issue is still not resolved, see Windows Help and Support. 10. If the mouse uses a wireless connection, insert new batteries and confirm there is properly installed. Try an alternative mouse. 2. If the...
Service Guide
Page 160
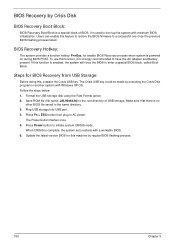
... BIOS initialization. Make sure that there is powered on during BIOS POST. Save ROM file (file name: JAL90x64.fd) to boot up the system with Windows XP OS. To use this , prepare the Crisis USB key. It is used to the root directory of BIOS. The Power button flashes once. 5. Steps...
... BIOS initialization. Make sure that there is powered on during BIOS POST. Save ROM file (file name: JAL90x64.fd) to boot up the system with Windows XP OS. To use this , prepare the Crisis USB key. It is used to the root directory of BIOS. The Power button flashes once. 5. Steps...

Service Guide
Page 191
All of its system functions are tested under Windows® 7 environment. Regarding configuration, combination and test procedures, please refer to the following lists for components, adapter cards, and peripherals which have passed these tests. Appendix B 181 Test Compatible Components Appendix B This computer's compatibility is tested and verified by the Acer Mobile System Testing Department. Refer to the Aspire 7715Z/7315 Compatibility Test Report released by Acer's internal testing department.
All of its system functions are tested under Windows® 7 environment. Regarding configuration, combination and test procedures, please refer to the following lists for components, adapter cards, and peripherals which have passed these tests. Appendix B 181 Test Compatible Components Appendix B This computer's compatibility is tested and verified by the Acer Mobile System Testing Department. Refer to the Aspire 7715Z/7315 Compatibility Test Report released by Acer's internal testing department.

Service Guide
Page 199
Thermal Unit Failure 134 TouchPad Removing 72 TouchPad Bracket Removing 72 Replacing 102 TouchPad Failure 128 Troubleshooting Built-in KB Failure 127 EasyTouch Buttons 134 HDTV Switch 135 Internal Microphone 129 Internal Speakers 128 LCD Failure 127 No Display 125 ODD 131 Other Failures 135 Power On 124 Thermal Unit 134 TouchPad 128 WLAN 134 U Undetermined Problems 136 Upper Cover Removing 63 Replacing 106 utility BIOS 21-33 W Windows 2000 Environment Test 182 Wireless Function Failure 134 WLAN Module Removing 52 Replacing 118 189
Thermal Unit Failure 134 TouchPad Removing 72 TouchPad Bracket Removing 72 Replacing 102 TouchPad Failure 128 Troubleshooting Built-in KB Failure 127 EasyTouch Buttons 134 HDTV Switch 135 Internal Microphone 129 Internal Speakers 128 LCD Failure 127 No Display 125 ODD 131 Other Failures 135 Power On 124 Thermal Unit 134 TouchPad 128 WLAN 134 U Undetermined Problems 136 Upper Cover Removing 63 Replacing 106 utility BIOS 21-33 W Windows 2000 Environment Test 182 Wireless Function Failure 134 WLAN Module Removing 52 Replacing 118 189


