
Quick Start Guide
Page 3
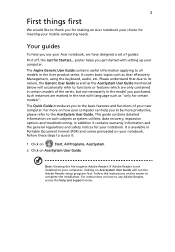
... on AcerSystem User Guide will occasionally refer to functions or features which are marked in the Acer product series. Please understand that due to its nature, the Generic User Guide as well ... contains warranty information and the general regulations and safety notices for your new computer. The Aspire Generic User Guide contains useful information applying to complete the installation. The Quick Guide introduces ...AcerSystem User Guide. This guide contains detailed information on the screen to all models in the text with setting up your mobile computing needs. Follow the...
... on AcerSystem User Guide will occasionally refer to functions or features which are marked in the Acer product series. Please understand that due to its nature, the Generic User Guide as well ... contains warranty information and the general regulations and safety notices for your new computer. The Aspire Generic User Guide contains useful information applying to complete the installation. The Quick Guide introduces ...AcerSystem User Guide. This guide contains detailed information on the screen to all models in the text with setting up your mobile computing needs. Follow the...

Quick Start Guide
Page 5
... 6 Touchpad Touch-sensitive pointing device which functions like a computer mouse. 7 Click buttons (left The left and right buttons function like screen brightness and volume output. Caps Lock Lights up when Num Lock is activated. To activate hotkeys, press and hold the key before pressing... the other key in Sleep mode. Turns the display screen backlight off to return. Hotkeys The computer employs hotkeys or key combinations to access most of wireless LAN communication. 4 Speakers Left...
... 6 Touchpad Touch-sensitive pointing device which functions like a computer mouse. 7 Click buttons (left The left and right buttons function like screen brightness and volume output. Caps Lock Lights up when Num Lock is activated. To activate hotkeys, press and hold the key before pressing... the other key in Sleep mode. Turns the display screen backlight off to return. Hotkeys The computer employs hotkeys or key combinations to access most of wireless LAN communication. 4 Speakers Left...

Quick Start Guide
Page 6
...Stick PRO (MS reader PRO), xD-Picture Card (xD). Brightness up . Charging: The light shows amber when the battery is closed up Increases the screen brightness. Only one card can operate at any given time. 1. The front panel indicators are visible even when the computer cover is charging. 2. English ...6 Hotkey Icon + + < > + < > + < > + < > Function Description Speaker toggle Turns the speakers on and off. Volume up Increases the sound volume. Volume down Decreases the screen brightness. Battery1 Indicates the computer's battery status. 1.
...Stick PRO (MS reader PRO), xD-Picture Card (xD). Brightness up . Charging: The light shows amber when the battery is closed up Increases the screen brightness. Only one card can operate at any given time. 1. The front panel indicators are visible even when the computer cover is charging. 2. English ...6 Hotkey Icon + + < > + < > + < > + < > Function Description Speaker toggle Turns the speakers on and off. Volume up Increases the sound volume. Volume down Decreases the screen brightness. Battery1 Indicates the computer's battery status. 1.

Service Guide
Page 4
NOTE WARNING CAUTION IMPORTANT Gives bits and pieces of procedures. Alerts you to do specific actions relevant to the accomplishment of additional information related to any damage that appear on screen. IV Gives precautionary measures to avoid possible hardware or software problems. Reminds you to the current topic. Conventions The following conventions are used in this manual: SCREEN MESSAGES Denotes actual messages that might result from doing or not doing specific actions.
NOTE WARNING CAUTION IMPORTANT Gives bits and pieces of procedures. Alerts you to do specific actions relevant to the accomplishment of additional information related to any damage that appear on screen. IV Gives precautionary measures to avoid possible hardware or software problems. Reminds you to the current topic. Conventions The following conventions are used in this manual: SCREEN MESSAGES Denotes actual messages that might result from doing or not doing specific actions.

Service Guide
Page 14
For entering data into your computer. Your Acer Notebook tour Front View No. 1 2 3 4 5 6 4 Icon Item Acer Crystal Eye webcam Display screen Touchpad toggle Description Web camera for video communication (for selected models). Power button Turns the computer on and off . Wireless LAN communication button/indicator Speakers ...
For entering data into your computer. Your Acer Notebook tour Front View No. 1 2 3 4 5 6 4 Icon Item Acer Crystal Eye webcam Display screen Touchpad toggle Description Web camera for video communication (for selected models). Power button Turns the computer on and off . Wireless LAN communication button/indicator Speakers ...

Service Guide
Page 22
Switches display output between the display screen, external monitor (if connected) and both. Decreases the screen brightness. 12 Chapter 1 Turns the display screen backlight off . Turns the speakers on and off to return. Increases the screen brightness. Press any key to save power. Increases the sound .... Decreases the sound volume. Hot Keys The computer employs hotkeys or key combinations to access most of the computer's controls like screen brightness, volume output and the BIOS utility. To activate hot keys, press and hold the key before pressing the other key...
Switches display output between the display screen, external monitor (if connected) and both. Decreases the screen brightness. 12 Chapter 1 Turns the display screen backlight off . Turns the speakers on and off to return. Increases the screen brightness. Press any key to save power. Increases the sound .... Decreases the sound volume. Hot Keys The computer employs hotkeys or key combinations to access most of the computer's controls like screen brightness, volume output and the BIOS utility. To activate hot keys, press and hold the key before pressing the other key...

Service Guide
Page 31
... to different models. You can change boot device without entering BIOS SETUP Utility. Chapter 2 21 Your computer is prompted on the bottom of the screen. Press F2 to save any changes made and exit the BIOS Setup Utility. Follow these instructions: • To choose a menu, use the ... to enter multi-boot menu. Read this item. • Press Esc while you are found in the Item Specific Help part of the screen. Please also refer to parameter values. System Utilities Chapter 2 BIOS Setup Utility The BIOS Setup Utility is enclosed in square brackets. Navigating the...
... to different models. You can change boot device without entering BIOS SETUP Utility. Chapter 2 21 Your computer is prompted on the bottom of the screen. Press F2 to save any changes made and exit the BIOS Setup Utility. Follow these instructions: • To choose a menu, use the ... to enter multi-boot menu. Read this item. • Press Esc while you are found in the Item Specific Help part of the screen. Please also refer to parameter values. System Utilities Chapter 2 BIOS Setup Utility The BIOS Setup Utility is enclosed in square brackets. Navigating the...
Service Guide
Page 32
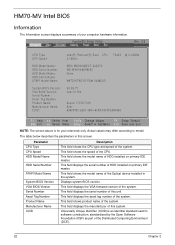
... MATSHITADVD-RAM UJ880AS V0.09-T1 Intel V1704 T3400 @ 2.16GHz Aspire 7715Z/7315 Acer 63623032-6261-3964-6338-00235A495964 F1 Help ESC Exit Select Item F5/F6 Change Values F9 Setup Default Select Menu Enter Select SubMenu F10 Save and Exit NOTE: The screen above is an identifier standard used in the system. This...
... MATSHITADVD-RAM UJ880AS V0.09-T1 Intel V1704 T3400 @ 2.16GHz Aspire 7715Z/7315 Acer 63623032-6261-3964-6338-00235A495964 F1 Help ESC Exit Select Item F5/F6 Change Values F9 Setup Default Select Menu Enter Select SubMenu F10 Save and Exit NOTE: The screen above is an identifier standard used in the system. This...

Service Guide
Page 33
.... Enables, disables the system boot from 0 to boot the system. Enables, disables Boot Menu during POST. Control the mode in this screen. Parameter System Time System Date Total Memory Video Memory Quick Boot Network Boot F12 Boot Menu D2D Recovery SATA Mode Description Sets the system ... in which the SATA controller should operate. The hours are displayed with 24hour format. Enables, disables D2D Recovery function. Main The Main screen allows the user to factory defaults. Valid range is the help for the hour field. Displays the total memory available. Allows startup to...
.... Enables, disables the system boot from 0 to boot the system. Enables, disables Boot Menu during POST. Control the mode in this screen. Parameter System Time System Date Total Memory Video Memory Quick Boot Network Boot F12 Boot Menu D2D Recovery SATA Mode Description Sets the system ... in which the SATA controller should operate. The hours are displayed with 24hour format. Enables, disables D2D Recovery function. Main The Main screen allows the user to factory defaults. Valid range is the help for the hour field. Displays the total memory available. Allows startup to...

Service Guide
Page 34
...system from booting, open BIOS and choose Load Optimal Defaults in the Exit menu to boot up normally. Settings in this screen. IDE Configuration Enter the IDE Configuration menu. Parameter Boot Configuration Peripheral Configuration Description Enter the Boot Configuration menu. InsydeH20 Setup ...XACPI Table/Features Control Express Card [Disabled] XPCI Express Configuration XASF Configuration Item Specific Help Configures Boot Settings. Advanced The Advanced screen allows the user to 4 Master and Slave 24 Chapter 2 If making settings to items on these pages may cause the ...
...system from booting, open BIOS and choose Load Optimal Defaults in the Exit menu to boot up normally. Settings in this screen. IDE Configuration Enter the IDE Configuration menu. Parameter Boot Configuration Peripheral Configuration Description Enter the Boot Configuration menu. InsydeH20 Setup ...XACPI Table/Features Control Express Card [Disabled] XPCI Express Configuration XASF Configuration Item Specific Help Configures Boot Settings. Advanced The Advanced screen allows the user to 4 Master and Slave 24 Chapter 2 If making settings to items on these pages may cause the ...

Service Guide
Page 36
Shows the setting of the user password. Press Enter to set , this screen. When user password is required or not while the events defined in this password protects the BIOS Setup Utility from unauthorized access. Don't forget ... SubMenu F10 Save and Exit The table below describes the parameters in this password protects the BIOS Setup Utility from unauthorized use. Security The Security screen contains parameters that help safeguard and protect your password. InsydeH20 Setup Utility Information Main Advanced Security Power Boot Exit Rev. 3.5 Supervisor Password Is: User ...
Shows the setting of the user password. Press Enter to set , this screen. When user password is required or not while the events defined in this password protects the BIOS Setup Utility from unauthorized access. Don't forget ... SubMenu F10 Save and Exit The table below describes the parameters in this password protects the BIOS Setup Utility from unauthorized use. Security The Security screen contains parameters that help safeguard and protect your password. InsydeH20 Setup Utility Information Main Advanced Security Power Boot Exit Rev. 3.5 Supervisor Password Is: User ...

Service Guide
Page 37
The password length can opt to enable the Password on the screen. 3. Use the ↑ and ↓ keys to highlight the Set Supervisor Password parameter and press the Enter key. Chapter 2 27 Use the ↑ and ↓ ...
The password length can opt to enable the Password on the screen. 3. Use the ↑ and ↓ keys to highlight the Set Supervisor Password parameter and press the Enter key. Chapter 2 27 Use the ↑ and ↓ ...

Service Guide
Page 38
...new password and confirm new password strings do not match. If the current password entered does not match the actual current password, the screen will show you can enable the Password on boot parameter. 6. If desired, you the Setup Warning. Setup Notice Changes have been saved.... [Continue] The password setting is OK, the screen will display the following . Press Enter. Type the current password in the Enter New Password field. The Set Password box appears. After ...
...new password and confirm new password strings do not match. If the current password entered does not match the actual current password, the screen will show you can enable the Password on boot parameter. 6. If desired, you the Setup Warning. Setup Notice Changes have been saved.... [Continue] The password setting is OK, the screen will display the following . Press Enter. Type the current password in the Enter New Password field. The Set Password box appears. After ...

Service Guide
Page 39
... on PME Wake on Modem Ring Quickly S4 Resume Auto wake on these pages may cause the system to boot up normally. Settings in this screen. Unless you have experience adjusting these items, we recommend that you leave these pages causes your system to malfunction or prevents the system from booting... on S5 [Enabled] [Enabled] [Enabled] [Disabled] [Disabled] Item Specific Help These items control various CPU parameters. Enter the Platform Power Management menu. Power The Advanced screen allows the user to configure the various advanced BIOS options.
... on PME Wake on Modem Ring Quickly S4 Resume Auto wake on these pages may cause the system to boot up normally. Settings in this screen. Unless you have experience adjusting these items, we recommend that you leave these pages causes your system to malfunction or prevents the system from booting... on S5 [Enabled] [Enabled] [Enabled] [Disabled] [Disabled] Item Specific Help These items control various CPU parameters. Enter the Platform Power Management menu. Power The Advanced screen allows the user to configure the various advanced BIOS options.
Service Guide
Page 42
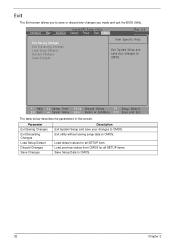
... Item F5/F6 Change Values F9 Setup Default Select Menu Enter Select SubMenu F10 Save and Exit The table below describes the parameters in this screen. Exit utility without saving setup data to CMOS. Load default values for all SETUP item. InsydeH20 Setup Utility Information Main Advanced Security Power Boot Exit... Default Discard Changes Save Changes Description Exit System Setup and save or discard any changes you to save your changes to CMOS. Exit The Exit screen allows you made and quit the BIOS Utility.
... Item F5/F6 Change Values F9 Setup Default Select Menu Enter Select SubMenu F10 Save and Exit The table below describes the parameters in this screen. Exit utility without saving setup data to CMOS. Load default values for all SETUP item. InsydeH20 Setup Utility Information Main Advanced Security Power Boot Exit... Default Discard Changes Save Changes Description Exit System Setup and save or discard any changes you to save your changes to CMOS. Exit The Exit screen allows you made and quit the BIOS Utility.

Service Guide
Page 46
Double-click the WinFlash executable. 2. A progress screen displays. 36 Chapter 2 Click OK to use the WinFlash Utility: 1. WinFlash Utility Perform the following steps to begin the update.
Double-click the WinFlash executable. 2. A progress screen displays. 36 Chapter 2 Click OK to use the WinFlash Utility: 1. WinFlash Utility Perform the following steps to begin the update.

Service Guide
Page 47
... the wrong HDD password three times, an error is generated. Chapter 2 37 An Encode key is displayed, select the Enter Unlock Password option on the screen. 2. Note down this key. 3. Password : 46548274 5. To reset the HDD password, perform the following steps: 1. The command generates a password which can be used for unlocking...
... the wrong HDD password three times, an error is generated. Chapter 2 37 An Encode key is displayed, select the Enter Unlock Password option on the screen. 2. Note down this key. 3. Password : 46548274 5. To reset the HDD password, perform the following steps: 1. The command generates a password which can be used for unlocking...

Service Guide
Page 48
From a DOS prompt, execute clnpwd.exe 2. Removing BIOS Passwords: To clear the User or Supervisor passwords, open the RAM door and use a metal instrument to clean the desired password shown on the screen. The onscreen message determines whether the function is successful or not. 38 Chapter 2 Cleaning BIOS Passwords To clean the User or Supervisor passwords, perform the following steps: 1. Press 1 or 2 to short the J1 jumper.
From a DOS prompt, execute clnpwd.exe 2. Removing BIOS Passwords: To clear the User or Supervisor passwords, open the RAM door and use a metal instrument to clean the desired password shown on the screen. The onscreen message determines whether the function is successful or not. 38 Chapter 2 Cleaning BIOS Passwords To clean the User or Supervisor passwords, perform the following steps: 1. Press 1 or 2 to short the J1 jumper.

Service Guide
Page 49
Select the desired boot sequence by entering the corresponding sequence. Using Boot Sequence Selector The Boot Sequence Selector allows the boot order to HDD | CD ROM | LAN | Floppy. For example, enter BS2 to change the boot sequence to be changed without accessing the BIOS. Enter into DOS. 2. Execute BS.exe to display the usage screen. 3. Chapter 2 39 To use Boot Sequence Selector, perform the following steps: 1.
Select the desired boot sequence by entering the corresponding sequence. Using Boot Sequence Selector The Boot Sequence Selector allows the boot order to HDD | CD ROM | LAN | Floppy. For example, enter BS2 to change the boot sequence to be changed without accessing the BIOS. Enter into DOS. 2. Execute BS.exe to display the usage screen. 3. Chapter 2 39 To use Boot Sequence Selector, perform the following steps: 1.
Service Guide
Page 50
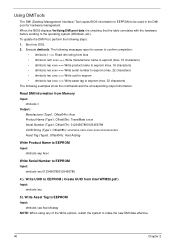
...(Type1, Offset08h): xxxxxxxx-xxxx-xxxx-xxxx-xxxxxxxxxxxx Asset Tag (Type3, Offset04h): Acet Asstag Write Product Name to EEPROM Input: dmitools /wp Acer Write Serial Number to make the new DMI data effective. 40 Chapter 2 Write Asset Tag to EEPROM Input: dmitools /wa Acet Asstag NOTE...(Windows, etc.). To update the DMI Pool, perform the following examples show the commands and the corresponding output information. The following messages report to screen to confirm completion: • dmitools /r ==> Read dmi string from Intel WFM20.pdf ) Input: dmitools /wu 5). Boot into DOS. 2. ...
...(Type1, Offset08h): xxxxxxxx-xxxx-xxxx-xxxx-xxxxxxxxxxxx Asset Tag (Type3, Offset04h): Acet Asstag Write Product Name to EEPROM Input: dmitools /wp Acer Write Serial Number to make the new DMI data effective. 40 Chapter 2 Write Asset Tag to EEPROM Input: dmitools /wa Acet Asstag NOTE...(Windows, etc.). To update the DMI Pool, perform the following examples show the commands and the corresponding output information. The following messages report to screen to confirm completion: • dmitools /r ==> Read dmi string from Intel WFM20.pdf ) Input: dmitools /wu 5). Boot into DOS. 2. ...

