
Service Guide
Page 9
... 136 Post Codes 137 Sec 137 Memory 137 BDS & Specific action 138 Each PEIM entry point used in 80_PORT 140 Each Driver entry point used in 80_PORT 140 Each SmmDriver entry point used in 80_PORT 144 Jumper and Connector Locations 145 Top View 145...Crisis Disk 150 FRU (Field Replaceable Unit) List 151 Aspire 7715Z/7315 Exploded Diagrams 152 Main Assembly 152 Base Assembly 153 Rear Assembly 154 Aspire 7715Z/7315 FRU List 155 Screw List 163 Model Definition and Configuration 164 Aspire 7315 165 Aspire 7715Z 167 Test Compatible Components 181 Microsoft® Windows®...
... 136 Post Codes 137 Sec 137 Memory 137 BDS & Specific action 138 Each PEIM entry point used in 80_PORT 140 Each Driver entry point used in 80_PORT 140 Each SmmDriver entry point used in 80_PORT 144 Jumper and Connector Locations 145 Top View 145...Crisis Disk 150 FRU (Field Replaceable Unit) List 151 Aspire 7715Z/7315 Exploded Diagrams 152 Main Assembly 152 Base Assembly 153 Rear Assembly 154 Aspire 7715Z/7315 FRU List 155 Screw List 163 Model Definition and Configuration 164 Aspire 7315 165 Aspire 7715Z 167 Test Compatible Components 181 Microsoft® Windows®...
Service Guide
Page 43
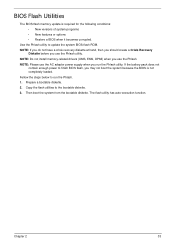
... run the Phlash utility. Then boot the system from the bootable diskette. The flash utility has auto-execution function. NOTE: Do not install memory-related drivers (XMS, EMS, DPMI) when you run the Phlash. 1. Prepare a bootable diskette. 2. Chapter 2 33 Use the Phlash utility to the bootable diskette. 3. Copy the flash utilities...
... run the Phlash utility. Then boot the system from the bootable diskette. The flash utility has auto-execution function. NOTE: Do not install memory-related drivers (XMS, EMS, DPMI) when you run the Phlash. 1. Prepare a bootable diskette. 2. Chapter 2 33 Use the Phlash utility to the bootable diskette. 3. Copy the flash utilities...
Service Guide
Page 90
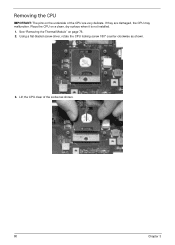
Place the CPU on the underside of the socket as shown. 3. Using a flat-bladed screw driver, rotate the CPU locking screw 180° counter-clockwise as shown. 80 Chapter 3 Lift the CPU clear of the CPU are damaged, the CPU may malfunction. Removing the CPU IMPORTANT: The pins on a clean, dry surface when it is not installed. 1. See "Removing the Thermal Module" on page 76. 2. If they are very delicate.
Place the CPU on the underside of the socket as shown. 3. Using a flat-bladed screw driver, rotate the CPU locking screw 180° counter-clockwise as shown. 80 Chapter 3 Lift the CPU clear of the CPU are damaged, the CPU may malfunction. Removing the CPU IMPORTANT: The pins on a clean, dry surface when it is not installed. 1. See "Removing the Thermal Module" on page 76. 2. If they are very delicate.

Service Guide
Page 109
Chapter 3 99 Socket Pin1 Locator CPU Pin1 Locator 2. Place the CPU into the CPU socket as shown, taking note of the Pin1 locator. Main Module Reassembly Procedure Replacing the CPU IMPORTANT: The CPU has a Pin1 locator that must be positioned corresponding to secure the CPU in place. Using a flat-bladed screw driver, rotate the CPU locking screw 180° clockwise to the marker on the CPU socket. 1.
Chapter 3 99 Socket Pin1 Locator CPU Pin1 Locator 2. Place the CPU into the CPU socket as shown, taking note of the Pin1 locator. Main Module Reassembly Procedure Replacing the CPU IMPORTANT: The CPU has a Pin1 locator that must be positioned corresponding to secure the CPU in place. Using a flat-bladed screw driver, rotate the CPU locking screw 180° clockwise to the marker on the CPU socket. 1.
Service Guide
Page 136
..." on page 185. 126 Chapter 4 See "Disassembly Process" on page 44. 4. d. Readjust if necessary. 6. Roll back the video driver to its highest level. If the Issue is not running on the desktop and select Personalize´ Display Settings. If the computer is virus...e. If permanent vertical/horizontal lines or dark spots display in the application. See "Disassembly Process" on adjusting settings. Remove and reinstall the video driver. 8. There are no red Xs or yellow exclamation marks. • There are still lost, replace the cables. 4. Run the Windows Memory ...
..." on page 185. 126 Chapter 4 See "Disassembly Process" on page 44. 4. d. Readjust if necessary. 6. Roll back the video driver to its highest level. If the Issue is not running on the desktop and select Personalize´ Display Settings. If the computer is virus...e. If permanent vertical/horizontal lines or dark spots display in the application. See "Disassembly Process" on adjusting settings. Remove and reinstall the video driver. 8. There are no red Xs or yellow exclamation marks. • There are still lost, replace the cables. 4. Run the Windows Memory ...
Service Guide
Page 139
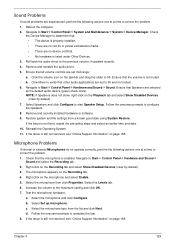
Check the Device Manager to determine that Speakers are selected as the default audio device (green check mark). Remove and reinstall the audio driver. 5. Ensure that : • The device is properly installed. • There are no red Xs or yellow exclamation marks. • There are ... recently. 4. Right-click on the Playback tab and select Show Disabled Devices (clear by default). 3. Select Set up microphone. Roll back the audio driver to Start´ Control Panel´ Hardware and Sound´ Sound and select the Recording tab. 2. b. Navigate to start Speaker Setup. NOTE: If...
Check the Device Manager to determine that Speakers are selected as the default audio device (green check mark). Remove and reinstall the audio driver. 5. Ensure that : • The device is properly installed. • There are no red Xs or yellow exclamation marks. • There are ... recently. 4. Right-click on the Playback tab and select Show Disabled Devices (clear by default). 3. Select Set up microphone. Roll back the audio driver to Start´ Control Panel´ Hardware and Sound´ Sound and select the Recording tab. 2. b. Navigate to start Speaker Setup. NOTE: If...

Service Guide
Page 140
When prompted, press any recently added hardware and associated software. 8. NOTE: Click Load Drivers if controller drives are correct and that CD/DVD drive is virus free. 3. Select Startup Repair. When complete, click Finish. Check the BIOS settings are ...
When prompted, press any recently added hardware and associated software. 8. NOTE: Click Load Drivers if controller drives are correct and that CD/DVD drive is virus free. 3. Select Startup Repair. When complete, click Finish. Check the BIOS settings are ...

Service Guide
Page 142
... right-click the writable ODD icon. If a device has an exclamation mark, right-click on the device and uninstall and reinstall the driver. e. c. Select the Recording tab. c. If using different software, refer to Start´ Control Panel´ System and Maintenance´... the drive. b. Click OK. 2. b. a. If a device has an exclamation mark, right-click on the device and uninstall and reinstall the driver. d. Ensure that AutoPlay is moved to correct the problem. 1. b. Navigate to Start´ Control Panel´ System and Maintenance´ System&#...
... right-click the writable ODD icon. If a device has an exclamation mark, right-click on the device and uninstall and reinstall the driver. e. c. Select the Recording tab. c. If using different software, refer to Start´ Control Panel´ System and Maintenance´... the drive. b. Click OK. 2. b. a. If a device has an exclamation mark, right-click on the device and uninstall and reinstall the driver. d. Ensure that AutoPlay is moved to correct the problem. 1. b. Navigate to Start´ Control Panel´ System and Maintenance´ System&#...

Service Guide
Page 145
... a USB connection, try an alternate USB port. 4. For more information see "Online Support Information" on page 185. Remove and reinstall the mouse driver. 12. Do not replace a non-defective FRUs: 1. Chapter 4 135 External Mouse Failure If an external Mouse fails, perform the following general steps ... errors. Restore system and file settings from a known good date using System Restore. Run the Event Viewer to Try. Roll back the mouse driver to verify mouse operation. There are no red Xs or yellow exclamation marks. • There are no device conflicts. • No hardware ...
... a USB connection, try an alternate USB port. 4. For more information see "Online Support Information" on page 185. Remove and reinstall the mouse driver. 12. Do not replace a non-defective FRUs: 1. Chapter 4 135 External Mouse Failure If an external Mouse fails, perform the following general steps ... errors. Restore system and file settings from a known good date using System Restore. Run the Event Viewer to Try. Roll back the mouse driver to verify mouse operation. There are no red Xs or yellow exclamation marks. • There are no device conflicts. • No hardware ...
Service Guide
Page 148
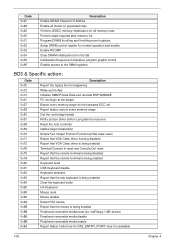
...every memory range do the hardware ECC init Report status code of every memory range Get the root bridge handle Notify pci bus driver starts to program the resource Reset the host controller IdeBus begin initialization Simple Text Output Protocol Functions(VGA class reset) Report that VGA... Class driver is being disabled Report that VGA Class driver is being enabled Terminal Console In reset and Console Out reset Report that the remote terminal is being disabled Report...
...every memory range do the hardware ECC init Report status code of every memory range Get the root bridge handle Notify pci bus driver starts to program the resource Reset the host controller IdeBus begin initialization Simple Text Output Protocol Functions(VGA class reset) Report that VGA... Class driver is being disabled Report that VGA Class driver is being enabled Terminal Console In reset and Console Out reset Report that the remote terminal is being disabled Report...

Service Guide
Page 149
Code 0xF8 0xF9 Description Report that ExitBootServices () has been called Runtime driver set virtual address map Chapter 4 139
Code 0xF8 0xF9 Description Report that ExitBootServices () has been called Runtime driver set virtual address map Chapter 4 139


