
Acer Aspire 7250 Service Guide
Page 16
...be used with other keys to items on the Quick Launch toolbar and the system tray) < > + : Cycle through programs on the Windows Start button; Functions supported by Windows XP: < > + : Show the System Properties dialog box < > + : Open Ease of Access Center ... effect as clicking on the taskbar < > + : Display the System Properties dialog box Functions supported by Windows XP, Windows Vista, and Windows 7: < >: Open or close the Start menu < > + : Open the Run dialog box < > + : Minimizes all windows + < > + M: Undo minimize all windows < > + : Show the help window < > + : Open Windows...
...be used with other keys to items on the Quick Launch toolbar and the system tray) < > + : Cycle through programs on the Windows Start button; Functions supported by Windows XP: < > + : Show the System Properties dialog box < > + : Open Ease of Access Center ... effect as clicking on the taskbar < > + : Display the System Properties dialog box Functions supported by Windows XP, Windows Vista, and Windows 7: < >: Open or close the Start menu < > + : Open the Run dialog box < > + : Minimizes all windows + < > + M: Undo minimize all windows < > + : Show the help window < > + : Open Windows...

Acer Aspire 7250 Service Guide
Page 128
... FFC Swap MB Figure 4-1. Remove all power (AC adapter and Battery), then re-insert to Online Support Information. 4-4 Troubleshooting Do not replace a non-defective FRU: Start Check AC/Battery Power on . Power On Issue Please wait for 3 min.
... FFC Swap MB Figure 4-1. Remove all power (AC adapter and Battery), then re-insert to Online Support Information. 4-4 Troubleshooting Do not replace a non-defective FRU: Start Check AC/Battery Power on . Power On Issue Please wait for 3 min.
Acer Aspire 7250 Service Guide
Page 129
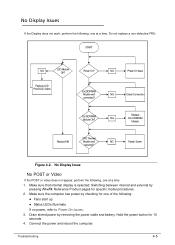
... and reboot the computer. Ext.DDRRAM Module well connected? Drain stored power by pressing Fn+F5. Do not replace a non-defective FRU: START NG LCD Moduel OK? DDRRAM Module CPU Thermal Replace MB Module well NG Fasten Screw screwed? Switching between internal and external by removing the power...checking for one of the following , one at a time. No Display Issues 0 If the Display does not work, perform the following : Fans start up Status LEDs illuminate If no power, refer to Power On Issues. 3. Replace LCD Panel/LCD Cable Power On? NG Power On Issue NG...
... and reboot the computer. Ext.DDRRAM Module well connected? Drain stored power by pressing Fn+F5. Do not replace a non-defective FRU: START NG LCD Moduel OK? DDRRAM Module CPU Thermal Replace MB Module well NG Fasten Screw screwed? Switching between internal and external by removing the power...checking for one of the following , one at a time. No Display Issues 0 If the Display does not work, perform the following : Fans start up Status LEDs illuminate If no power, refer to Power On Issues. 3. Replace LCD Panel/LCD Cable Power On? NG Power On Issue NG...

Acer Aspire 7250 Service Guide
Page 130
... or close all external devices including port replicators or docking stations. Disconnect power and all Windows. If extensive pixel damage is listed under Other Devices 7. 5. Start the computer. Click Apply and check the display. If permanent vertical/horizontal lines or dark spots appear in the application. There are no red Xs...
... or close all external devices including port replicators or docking stations. Disconnect power and all Windows. If extensive pixel damage is listed under Other Devices 7. 5. Start the computer. Click Apply and check the display. If permanent vertical/horizontal lines or dark spots appear in the application. There are no red Xs...

Acer Aspire 7250 Service Guide
Page 131
LCD Failure 0 If the LCD fails, perform the following, one at a time. Do not replace a non-defective FRU: START Check LCD Module Check LCD Connector/ Cable Swap LCD NG Module/LCD Panel NG Reassemble/Replug LCD Cable Swap MB Figure 4-3. LCD Failure Troubleshooting 4-7
LCD Failure 0 If the LCD fails, perform the following, one at a time. Do not replace a non-defective FRU: START Check LCD Module Check LCD Connector/ Cable Swap LCD NG Module/LCD Panel NG Reassemble/Replug LCD Cable Swap MB Figure 4-3. LCD Failure Troubleshooting 4-7

Acer Aspire 7250 Service Guide
Page 132
Keyboard Failure 0 If the Keyboard fails, perform the following, one at a time. Keyboard Failure 4-8 Troubleshooting NG Connect it Well Keyboard Ok? NG Replace Keyboard Replace M/B Figure 4-4. Do not replace a non-defective FRU: START Keyboard FFC Well Connected?
Keyboard Failure 0 If the Keyboard fails, perform the following, one at a time. Keyboard Failure 4-8 Troubleshooting NG Connect it Well Keyboard Ok? NG Replace Keyboard Replace M/B Figure 4-4. Do not replace a non-defective FRU: START Keyboard FFC Well Connected?

Acer Aspire 7250 Service Guide
Page 133
Touchpad Failure Troubleshooting 4-9 Touchpad Failure 0 If the Touchpad fails, perform the following, one at a time. Do not replace a non-defective FRU: START Check MB T/P FFC NG Reassemble the T/P FFC to MB Check Touchpad Swap/Reassemble NG the T/P Pad or T/P FFC Swap MB Figure 4-5.
Touchpad Failure Troubleshooting 4-9 Touchpad Failure 0 If the Touchpad fails, perform the following, one at a time. Do not replace a non-defective FRU: START Check MB T/P FFC NG Reassemble the T/P FFC to MB Check Touchpad Swap/Reassemble NG the T/P Pad or T/P FFC Swap MB Figure 4-5.

Acer Aspire 7250 Service Guide
Page 134
... There are no red Xs or yellow exclamation marks There are no device conflicts No hardware is not muted. Do not replace a non-defective FRU: START START Check MB SPK cable NG Reassemble the SPK cable to the previous version. 4. Click Mixer to verify that all volume controls are set mid range...
... There are no red Xs or yellow exclamation marks There are no device conflicts No hardware is not muted. Do not replace a non-defective FRU: START START Check MB SPK cable NG Reassemble the SPK cable to the previous version. 4. Click Mixer to verify that all volume controls are set mid range...

Acer Aspire 7250 Service Guide
Page 135
... the issue is still not resolved, refer to configure the speakers. 8. If these function correctly, the internal speaker or I/O board may be defective. Navigate to start Speaker Setup. Troubleshooting 4-11
... the issue is still not resolved, refer to configure the speakers. 8. If these function correctly, the internal speaker or I/O board may be defective. Navigate to start Speaker Setup. Troubleshooting 4-11

Acer Aspire 7250 Service Guide
Page 136
No Re-assemble Mic cable to Start-> Control Panel->Hardware and Sound-> Sound and select the Recording tab. 2. No Swap Mic module and cable Replace M/B Figure 4-7. Check that the microphone is still ... Recording tab and select Show Disabled Devices (clear by default). The microphone appears on the microphone and select Enable. 4. Right click on the Recording tab. 3. Start Check Mic to complete the test. 7. Right click on -screen prompts to MB cable well connected? Test the microphone hardware: Select the microphone and click...
No Re-assemble Mic cable to Start-> Control Panel->Hardware and Sound-> Sound and select the Recording tab. 2. No Swap Mic module and cable Replace M/B Figure 4-7. Check that the microphone is still ... Recording tab and select Show Disabled Devices (clear by default). The microphone appears on the microphone and select Enable. 4. Right click on the Recording tab. 3. Start Check Mic to complete the test. 7. Right click on -screen prompts to MB cable well connected? Test the microphone hardware: Select the microphone and click...

Acer Aspire 7250 Service Guide
Page 140
Thermal Unit Failure 0 If the Thermal Unit fails, perform the following, one at a time. No Check Connect Fan OK? No Seat it well Replace M/B Figure 4-11. No Replace thermal module Heatsink well seated? Thermal Unit Failure 4-16 Troubleshooting Do not replace a non-defective FRU: Start Fan power wire well connected?
Thermal Unit Failure 0 If the Thermal Unit fails, perform the following, one at a time. No Check Connect Fan OK? No Seat it well Replace M/B Figure 4-11. No Replace thermal module Heatsink well seated? Thermal Unit Failure 4-16 Troubleshooting Do not replace a non-defective FRU: Start Fan power wire well connected?
Acer Aspire 7250 Service Guide
Page 141
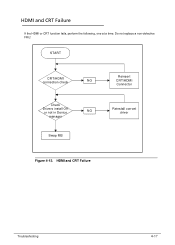
HDMI and CRT Failure Troubleshooting 4-17 HDMI and CRT Failure 0 If the HDMI or CRT function fails, perform the following, one at a time. Do not replace a non-defective FRU: START CRT/HDMI connection check NG Check Drivers install OK or not in Device NG manager Swap MB Reinsert CRT/HDMI Connector Reinstall corrcet driver Figure 4-12.
HDMI and CRT Failure Troubleshooting 4-17 HDMI and CRT Failure 0 If the HDMI or CRT function fails, perform the following, one at a time. Do not replace a non-defective FRU: START CRT/HDMI connection check NG Check Drivers install OK or not in Device NG manager Swap MB Reinsert CRT/HDMI Connector Reinstall corrcet driver Figure 4-12.

Acer Aspire 7250 Service Guide
Page 142
CD-ROM/DVD Failure Reassemble ODD/B to M/B Swap ODD/B 4-18 Troubleshooting Do not replace a non-defective FRU: START ODD Device with ODD/B connection check NG Reassemble ODD Device ODD/B with M/B connection check NG ODD/B function check NG Swap MB Figure 4-13. CD-ROM/DVD Failure 0 If the CD-ROM/DVD function fail, perform the following, one at a time.
CD-ROM/DVD Failure Reassemble ODD/B to M/B Swap ODD/B 4-18 Troubleshooting Do not replace a non-defective FRU: START ODD Device with ODD/B connection check NG Reassemble ODD Device ODD/B with M/B connection check NG ODD/B function check NG Swap MB Figure 4-13. CD-ROM/DVD Failure 0 If the CD-ROM/DVD function fail, perform the following, one at a time.

Acer Aspire 7250 Service Guide
Page 145
... dependence. PEI_MEMORY_INIT_FOR_CRISIS PEI 7F Memory Initial for Crisis Recovery PEI_MEMORY_INSTALL PEI 80 Simple Memory test PEI_TXTPEI* PEI 81 TXT function early Initialization PEI_SWITCH_STACK PEI 82 Start to maximum level SEC_GO_TO_SECSTARTUP SEC 9 Setup BIOS ROM cache SEC_GO_TO_PEICORE SEC 0A Enter Boot Firmware Volume * 3rd party relate functions - Table 4-4. Table 4-3. PEI Phase POST...
... dependence. PEI_MEMORY_INIT_FOR_CRISIS PEI 7F Memory Initial for Crisis Recovery PEI_MEMORY_INSTALL PEI 80 Simple Memory test PEI_TXTPEI* PEI 81 TXT function early Initialization PEI_SWITCH_STACK PEI 82 Start to maximum level SEC_GO_TO_SECSTARTUP SEC 9 Setup BIOS ROM cache SEC_GO_TO_PEICORE SEC 0A Enter Boot Firmware Volume * 3rd party relate functions - Table 4-4. Table 4-3. PEI Phase POST...
Acer Aspire 7250 Service Guide
Page 146
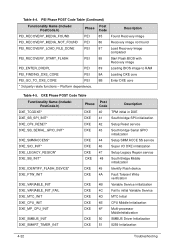
... Code Description PEI_RECOVERY_MEDIA_FOUND PEI 85 Found Recovery image PEI_RECOVERY_MEDIA_NOT_FOUND PEI 86 Recovery image not found PEI_RECOVERY_LOAD_FILE_DONE PEI 87 Load Recovery Image completed PEI_RECOVERY_START_FLASH PEI 88 Start Flash BIOS with Recovery image PEI_ENTER_DXEIPL PEI 89 Loading BIOS image to initial Variable Service DXE_MTC_INIT DXE 4D MTC Initial DXE_CPU_INIT DXE 4E CPU Middle...
... Code Description PEI_RECOVERY_MEDIA_FOUND PEI 85 Found Recovery image PEI_RECOVERY_MEDIA_NOT_FOUND PEI 86 Recovery image not found PEI_RECOVERY_LOAD_FILE_DONE PEI 87 Load Recovery Image completed PEI_RECOVERY_START_FLASH PEI 88 Start Flash BIOS with Recovery image PEI_ENTER_DXEIPL PEI 89 Loading BIOS image to initial Variable Service DXE_MTC_INIT DXE 4D MTC Initial DXE_CPU_INIT DXE 4E CPU Middle...

Acer Aspire 7250 Service Guide
Page 149
...S3 resume required data in RAM BDS_READY_TO_BOOT_EVENT BDS 2E Last Chipset initial before boot to OS BDS_GO_LEGACY_BOOT BDS 2F Start to boot Legacy OS BDS_GO_UEFI_BOOT BDS 30 Start to boot UEFI OS BDS_LEGACY16_PREPARE_TO_BOOT BDS 31 Prepare to Boot to Legacy OS BDS_EXIT_BOOT_SERVICES* BDS 32 Send END...C0 Memory initial for S3 resume S3_INSTALL_S3_MEMORY PEI C1 Get S3 resume required data from memory S3_SWITCH_STACK PEI C2 Start to use memory during S3 resume S3_MEMORY_CALLBACK PEI C3 Set cache for physical memory during S3 resume S3_ENTER_S3_RESUME_PEIM PEI C4...
...S3 resume required data in RAM BDS_READY_TO_BOOT_EVENT BDS 2E Last Chipset initial before boot to OS BDS_GO_LEGACY_BOOT BDS 2F Start to boot Legacy OS BDS_GO_UEFI_BOOT BDS 30 Start to boot UEFI OS BDS_LEGACY16_PREPARE_TO_BOOT BDS 31 Prepare to Boot to Legacy OS BDS_EXIT_BOOT_SERVICES* BDS 32 Send END...C0 Memory initial for S3 resume S3_INSTALL_S3_MEMORY PEI C1 Get S3 resume required data from memory S3_SWITCH_STACK PEI C2 Start to use memory during S3 resume S3_MEMORY_CALLBACK PEI C3 Set cache for physical memory during S3 resume S3_ENTER_S3_RESUME_PEIM PEI C4...

Acer Aspire 7250 Service Guide
Page 150
...)S3 Functions POST Code Table Functionality Name (Include\ PostCode.h) Phase Post Code Description S3_BEFORE_MP_INIT PEI C8 Multi-processor initial during S3 resume S3_BEFORE_RESTORE_ACPI_CALLBACK PEI C9 Start to restore system configuration in SMM S3_AFTER_RESTORE_ACPI_CALLBACK PEI CA Restore system configuration in SMM SMM_SMM_PLATFORM_INIT SMM 0xA2 SMM service initial SMM_ACPI_ENABLE_START SMM 0xA6 OS call...
...)S3 Functions POST Code Table Functionality Name (Include\ PostCode.h) Phase Post Code Description S3_BEFORE_MP_INIT PEI C8 Multi-processor initial during S3 resume S3_BEFORE_RESTORE_ACPI_CALLBACK PEI C9 Start to restore system configuration in SMM S3_AFTER_RESTORE_ACPI_CALLBACK PEI CA Restore system configuration in SMM SMM_SMM_PLATFORM_INIT SMM 0xA2 SMM service initial SMM_ACPI_ENABLE_START SMM 0xA6 OS call...


