Aspire 7230/7530/7530G Quick Guide
Page 5
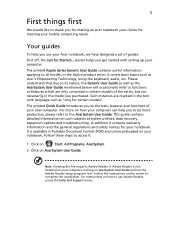
...... If Adobe Reader is available in the Aspire product series. For instructions on your computer can help you use Adobe Reader, access the Help and Support menu. Follow these steps to use your Acer notebook, we have designed a set of the series, but not necessarily in certain models of guides: First off, the Just for your notebook. It covers basic topics such as system utilities, data recovery, expansion options and troubleshooting. Note...
...... If Adobe Reader is available in the Aspire product series. For instructions on your computer can help you use Adobe Reader, access the Help and Support menu. Follow these steps to use your Acer notebook, we have designed a set of the series, but not necessarily in certain models of guides: First off, the Just for your notebook. It covers basic topics such as system utilities, data recovery, expansion options and troubleshooting. Note...
Aspire 7230/7530/7530G Quick Guide
Page 11
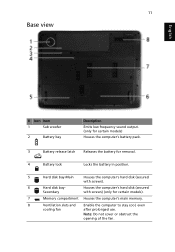
... the opening of the fan. 11 Base view English # Icon Item 1 Sub woofer 2 Battery bay Description Emits low frequency sound output. (only for certain models) Houses the computer's battery pack. 3 Battery release latch Releases the battery for removal. 4 Battery lock Locks the battery in position. 5 Hard disk bay-Main Houses the computer's hard disk (secured with screws) (only for certain models). 7 Memory compartment Houses the computer's main memory. 8 Ventilation slots and Enable...
... the opening of the fan. 11 Base view English # Icon Item 1 Sub woofer 2 Battery bay Description Emits low frequency sound output. (only for certain models) Houses the computer's battery pack. 3 Battery release latch Releases the battery for removal. 4 Battery lock Locks the battery in position. 5 Hard disk bay-Main Houses the computer's hard disk (secured with screws) (only for certain models). 7 Memory compartment Houses the computer's main memory. 8 Ventilation slots and Enable...
Aspire 7230/7530/7530G Quick Guide
Page 13
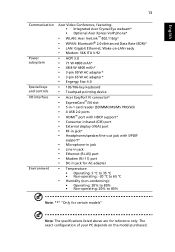
... 4.0 • 105/106-key keyboard • Touchpad pointing device • Acer EasyPort IV connector* • ExpressCard™/54 slot • 5-in-1 card reader (SD/MMC/MS/MS PRO/xD) • 4 USB 2.0 ports • HDMI™ port with HDCP support* • Consumer infrared (CIR) port • External display (VGA) port • RF-in jack* • Headphones/speaker/line-out jack with S/PDIF support* • Microphone-in jack • Line-in jack • Ethernet (RJ-45...
... 4.0 • 105/106-key keyboard • Touchpad pointing device • Acer EasyPort IV connector* • ExpressCard™/54 slot • 5-in-1 card reader (SD/MMC/MS/MS PRO/xD) • 4 USB 2.0 ports • HDMI™ port with HDCP support* • Consumer infrared (CIR) port • External display (VGA) port • RF-in jack* • Headphones/speaker/line-out jack with S/PDIF support* • Microphone-in jack • Line-in jack • Ethernet (RJ-45...
Aspire 7230/7530/7530G Service Guide
Page 7
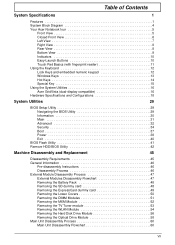
... 9 Indicators 10 Easy-Launch Buttons 10 Touch Pad Basics (with fingerprint reader 11 Using the Keyboard 12 Lock Keys and embedded numeric keypad 12 Windows Keys 13 Hot Keys 14 Special Key 15 Using the System Utilities 16 Acer GridVista (dual-display compatible 16 Hardware Specifications and Configurations 18 System Utilities 29 BIOS Setup Utility 29 Navigating the BIOS Utility 29 Information 30 Main 31 Advanced 32 Security 34 Boot 37 Power 38 Exit 40 BIOS Flash Utility 41 Remove HDD/BIOS Utility 42 Machine Disassembly and Replacement...
... 9 Indicators 10 Easy-Launch Buttons 10 Touch Pad Basics (with fingerprint reader 11 Using the Keyboard 12 Lock Keys and embedded numeric keypad 12 Windows Keys 13 Hot Keys 14 Special Key 15 Using the System Utilities 16 Acer GridVista (dual-display compatible 16 Hardware Specifications and Configurations 18 System Utilities 29 BIOS Setup Utility 29 Navigating the BIOS Utility 29 Information 30 Main 31 Advanced 32 Security 34 Boot 37 Power 38 Exit 40 BIOS Flash Utility 41 Remove HDD/BIOS Utility 42 Machine Disassembly and Replacement...
Aspire 7230/7530/7530G Service Guide
Page 9
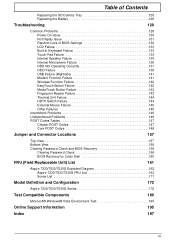
... Intermittent Problems 146 Undetermined Problems 146 POST Codes Tables 147 Chipset POST Codes 147 Core POST Codes 149 Jumper and Connector Locations 157 Top View 157 Bottom View 158 Clearing Password Check and BIOS Recovery 159 Clearing Password Check 159 BIOS Recovery by Crisis Disk 160 FRU (Field Replaceable Unit) List 161 Aspire 7230/7530/7530G Exploded Diagram 162 Aspire 7230/7530/7530G FRU List 163 Screw List 171 Model Definition and Configuration 172 Aspire 7230/7530/7530G Series...
... Intermittent Problems 146 Undetermined Problems 146 POST Codes Tables 147 Chipset POST Codes 147 Core POST Codes 149 Jumper and Connector Locations 157 Top View 157 Bottom View 158 Clearing Password Check and BIOS Recovery 159 Clearing Password Check 159 BIOS Recovery by Crisis Disk 160 FRU (Field Replaceable Unit) List 161 Aspire 7230/7530/7530G Exploded Diagram 162 Aspire 7230/7530/7530G FRU List 163 Screw List 171 Model Definition and Configuration 172 Aspire 7230/7530/7530G Series...
Aspire 7230/7530/7530G Service Guide
Page 20
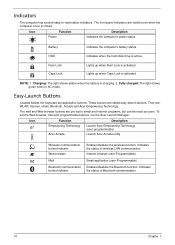
.... To set to -read status indicators. Icon Function Empowering Technology Acer Arcade Description Launch Acer Empowering Technology. (user-programmable) Launch Acer Arcade utility Wireless communication button/indicator Web browser Mail Bluetooth communication button/indicator Enables/disables the wireless function. HDD Num Lock Caps Lock Indicates when the hard disk drive is charging. 2. The front panel indicators are : WLAN, Internet, email, Bluetooth, Arcade and Acer Empowering Technology. They are visible even when the computer cover is activated. Battery Indicates the...
.... To set to -read status indicators. Icon Function Empowering Technology Acer Arcade Description Launch Acer Empowering Technology. (user-programmable) Launch Acer Arcade utility Wireless communication button/indicator Web browser Mail Bluetooth communication button/indicator Enables/disables the wireless function. HDD Num Lock Caps Lock Indicates when the hard disk drive is charging. 2. The front panel indicators are : WLAN, Internet, email, Bluetooth, Arcade and Acer Empowering Technology. They are visible even when the computer cover is activated. Battery Indicates the...
Aspire 7230/7530/7530G Service Guide
Page 34
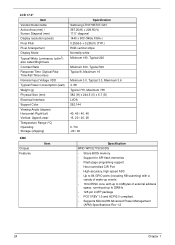
LCD 17.0" Item Vendor/model name Active Area (mm) / Screen Diagonal (mm) Display resolution (pixels) Pixel Pitch Pixel Arrangement Display Mode Typical White Luminance (cd/m2) also called Brightness Contrast Ratio Response Time (Optical Rise Time/Fall Time) msec Nominal Input Voltage VDD Typical Power Consumption (watt) Weight (g) Physical Size (mm) Electrical Interface Support Color Viewing Angle (degree) Horizontal: Right/Left...
LCD 17.0" Item Vendor/model name Active Area (mm) / Screen Diagonal (mm) Display resolution (pixels) Pixel Pitch Pixel Arrangement Display Mode Typical White Luminance (cd/m2) also called Brightness Contrast Ratio Response Time (Optical Rise Time/Fall Time) msec Nominal Input Voltage VDD Typical Power Consumption (watt) Weight (g) Physical Size (mm) Electrical Interface Support Color Viewing Angle (degree) Horizontal: Right/Left...
Aspire 7230/7530/7530G Service Guide
Page 37
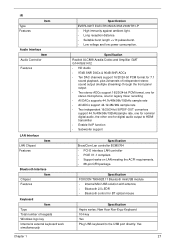
... one for digital audio output to the USB port directly: Yes 27 Specification FOXCON T60H928.11 Bluetooth miniUSB module • Internal Mini USB solution with antenna • Bluetooth 2.0+EDR • Bluetooth control for BT optical mouse Specification Aspire series: New Acer Non-Ergo Keyboard 104-key Yes Plug USB keyboard to HDMI transmitter • Enable VoIP function • Subwoofer support Specification BroadCom Lan controller BCM5764 • PCI-E interface LAN controller • PCIE V1.1 compliant. • Support wake on LAN meeting the ACPI...
... one for digital audio output to the USB port directly: Yes 27 Specification FOXCON T60H928.11 Bluetooth miniUSB module • Internal Mini USB solution with antenna • Bluetooth 2.0+EDR • Bluetooth control for BT optical mouse Specification Aspire series: New Acer Non-Ergo Keyboard 104-key Yes Plug USB keyboard to HDMI transmitter • Enable VoIP function • Subwoofer support Specification BroadCom Lan controller BCM5764 • PCI-E interface LAN controller • PCIE V1.1 compliant. • Support wake on LAN meeting the ACPI...
Aspire 7230/7530/7530G Service Guide
Page 40
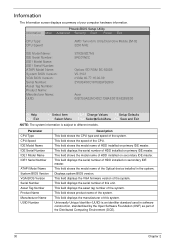
... master. This field displays the serial number of this system. This field shows the model name of the Optical device installed in software construction, standardized by the Open Software Foundation (OSF) as part of HDD installed on secondary IDE master. This field displays the asset tag number of the system. Information The Information screen displays a summary of the CPU. PhoenixBIOS Setup Utility Information Main Advanced Security Boot Power Exit CPU Type: CPU Speed: AMD...
... master. This field displays the serial number of this system. This field shows the model name of the Optical device installed in software construction, standardized by the Open Software Foundation (OSF) as part of HDD installed on secondary IDE master. This field displays the asset tag number of the system. Information The Information screen displays a summary of the CPU. PhoenixBIOS Setup Utility Information Main Advanced Security Boot Power Exit CPU Type: CPU Speed: AMD...
Aspire 7230/7530/7530G Service Guide
Page 44
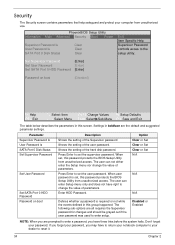
... Enter to change the value of the hard disk password. Defines whether a password is set , this group happened. If you forget your password, you have to return your notebook computer to your dealer to the setup utility. PhoenixBIOS Setup Utility Information Main Advanced Security Boot Power Supervisor Password Is User Password Is SATA Port 0 Disk Status Clear Clear Clear Exit Item Specific Help Supervisor Password controls acces to reset it. 34 Chapter 2 Enter HDD Password. When set , this screen. Option Clear or Set Clear or Set Clear or Set N/A N/A N/A Disabled...
... Enter to change the value of the hard disk password. Defines whether a password is set , this group happened. If you forget your password, you have to return your notebook computer to your dealer to the setup utility. PhoenixBIOS Setup Utility Information Main Advanced Security Boot Power Supervisor Password Is User Password Is SATA Port 0 Disk Status Clear Clear Clear Exit Item Specific Help Supervisor Password controls acces to reset it. 34 Chapter 2 Enter HDD Password. When set , this screen. Option Clear or Set Clear or Set Clear or Set N/A N/A N/A Disabled...
Aspire 7230/7530/7530G Service Guide
Page 45
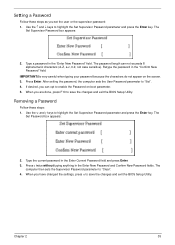
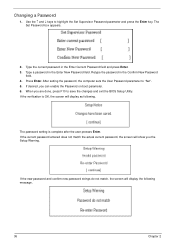
...). Setting a Password Follow these steps: 1. Press Enter. Removing a Password Follow these steps as you are done, press F10 to save the changes and exit the BIOS Setup Utility. The Set Supervisor Password box appears: 2. Retype the password in the Enter Current Password field and press Enter. 3. Use the w and y keys to "Clear". 4. The Set Password box appears: 2. Type the current password in the "Confirm New Password" field. Chapter 2 35 Type a password in the Enter New Password and Confirm New Password fields...
...). Setting a Password Follow these steps: 1. Press Enter. Removing a Password Follow these steps as you are done, press F10 to save the changes and exit the BIOS Setup Utility. The Set Supervisor Password box appears: 2. Retype the password in the Enter Current Password field and press Enter. 3. Use the w and y keys to "Clear". 4. The Set Password box appears: 2. Type the current password in the "Confirm New Password" field. Chapter 2 35 Type a password in the Enter New Password and Confirm New Password fields...
Aspire 7230/7530/7530G Service Guide
Page 46
... BIOS Setup Utility. If the verification is complete after the user presses Enter. If the new password and confirm new password strings do not match, the screen will show you the Setup Warning. Changing a Password 1. Type a password in the Enter Current Password field and press Enter. 3. Retype the password in the Confirm New Password field. 4. If desired, you are done, press F10 to "Set". 5. The Set Password box appears. 2. The password setting is OK, the screen will display...
... BIOS Setup Utility. If the verification is complete after the user presses Enter. If the new password and confirm new password strings do not match, the screen will show you the Setup Warning. Changing a Password 1. Type a password in the Enter Current Password field and press Enter. 3. Retype the password in the Confirm New Password field. 4. If desired, you are done, press F10 to "Set". 5. The Set Password box appears. 2. The password setting is OK, the screen will display...
Aspire 7230/7530/7530G Service Guide
Page 47
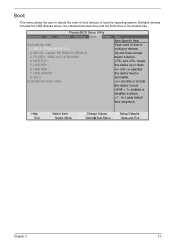
Bootable devices includes the USB diskette drives, the onboard hard disk drive and the DVD drive in the module bay. exculde or include the device to view or configure devices: Up and Down arrows select a device. enables or disables a device. and specfies the device fixed or removable. F1 Help ESC Exit ↑↓ Select Item F5/F6 Change Values F9 Setup Defaults ←→ Select Menu Enter SelectXSub-Menu F10 Save and Exit Chapter 2 37 and...
Bootable devices includes the USB diskette drives, the onboard hard disk drive and the DVD drive in the module bay. exculde or include the device to view or configure devices: Up and Down arrows select a device. enables or disables a device. and specfies the device fixed or removable. F1 Help ESC Exit ↑↓ Select Item F5/F6 Change Values F9 Setup Defaults ←→ Select Menu Enter SelectXSub-Menu F10 Save and Exit Chapter 2 37 and...
Aspire 7230/7530/7530G Service Guide
Page 139
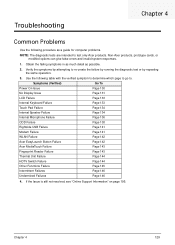
... (Verified) Go To Power On Issue Page 130 No Display Issue Page 131 LCD Failure Page 133 Internal Keyboard Failure Page 133 Touch Pad Failure Page 134 Internal Speaker Failure Page 134 Internal Microphone Failure Page 136 ODD Failure Page 138 Rightside USB Failure Page 141 Modem Failure Page 141 WLAN Failure Page 142 Acer EasyLaunch Button Failure Page 142 Acer MediaTouch Failure Page...
... (Verified) Go To Power On Issue Page 130 No Display Issue Page 131 LCD Failure Page 133 Internal Keyboard Failure Page 133 Touch Pad Failure Page 134 Internal Speaker Failure Page 134 Internal Microphone Failure Page 136 ODD Failure Page 138 Rightside USB Failure Page 141 Modem Failure Page 141 WLAN Failure Page 142 Acer EasyLaunch Button Failure Page 142 Acer MediaTouch Failure Page...
Aspire 7230/7530/7530G Service Guide
Page 141
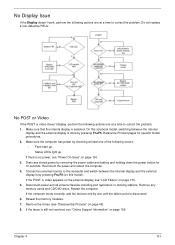
... the computer boots correctly, add the devices one by pressing Fn+F5. Reference Product pages for 10 seconds. Connect an external monitor to the computer and switch between the internal display and the external display is done by one until the failure point is by removing the power cable and battery and holding down the power button for specific model procedures. 2. Drain any memory cards and CD/DVD discs. If the Issue...
... the computer boots correctly, add the devices one by pressing Fn+F5. Reference Product pages for 10 seconds. Connect an external monitor to the computer and switch between the internal display and the external display is done by one until the failure point is by removing the power cable and battery and holding down the power button for specific model procedures. 2. Drain any memory cards and CD/DVD discs. If the Issue...
Aspire 7230/7530/7530G Service Guide
Page 142
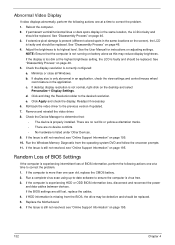
... the display. Remove and reinstall the video driver. 8. See "Disassembly Process" on page 46. 3. Adjust the brightness to its highest level. See the User Manual for instructions on page 46. 5. See "Disassembly Process" on adjusting settings. If the Issue is faulty and should be replaced. e. Abnormal Video Display If video displays abnormally, perform the following actions one at a time to correct the problem. 1. Run the Windows Memory Diagnostic from the BIOS, the drive...
... the display. Remove and reinstall the video driver. 8. See "Disassembly Process" on page 46. 3. Adjust the brightness to its highest level. See the User Manual for instructions on page 46. 5. See "Disassembly Process" on adjusting settings. If the Issue is faulty and should be replaced. e. Abnormal Video Display If video displays abnormally, perform the following actions one at a time to correct the problem. 1. Run the Windows Memory Diagnostic from the BIOS, the drive...
Aspire 7230/7530/7530G Service Guide
Page 147
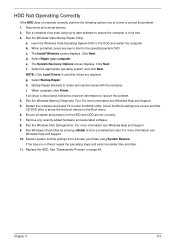
... Windows Memory Diagnostic Tool. Ensure all external devices. 2. Run the Windows Vista Startup Repair Utility: a. f. Select Startup Repair. See "Disassembly Process" on the Boot menu. 6. When prompted, press any recently added hardware and associated software. 8. The Install Windows screen displays. Click Next. The System Recovery Options screen displays. h. If an issue is virus free. 3. Remove any key to start to resolve the problem. 4. For more information see Windows Help and Support. 5. b. NOTE: Click Load Drivers if controller drives are set...
... Windows Memory Diagnostic Tool. Ensure all external devices. 2. Run the Windows Vista Startup Repair Utility: a. f. Select Startup Repair. See "Disassembly Process" on the Boot menu. 6. When prompted, press any recently added hardware and associated software. 8. The Install Windows screen displays. Click Next. The System Recovery Options screen displays. h. If an issue is virus free. 3. Remove any key to start to resolve the problem. 4. For more information see Windows Help and Support. 5. b. NOTE: Click Load Drivers if controller drives are set...
Aspire 7230/7530/7530G Service Guide
Page 155
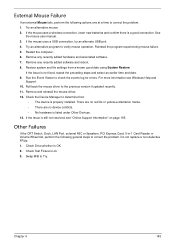
..., see Windows Help and Support. 10. For more information see "Online Support Information" on page 195. Remove and reinstall the mouse driver. 12. Other Failures If the CRT Switch, Dock, LAN Port, external MIC or Speakers, PCI Express Card, 5-in-1 Card Reader or Volume Wheel fail, perform the following actions one at a time to the previous version if updated recently. 11. Remove any recently added software and reboot...
..., see Windows Help and Support. 10. For more information see "Online Support Information" on page 195. Remove and reinstall the mouse driver. 12. Other Failures If the CRT Switch, Dock, LAN Port, external MIC or Speakers, PCI Express Card, 5-in-1 Card Reader or Volume Wheel fail, perform the following actions one at a time to the previous version if updated recently. 11. Remove any recently added software and reboot...
Aspire 7230/7530/7530G Service Guide
Page 162
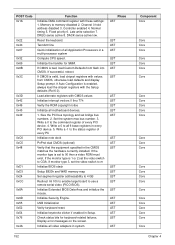
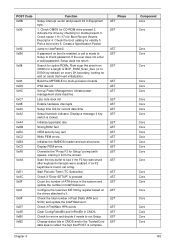
... set the video switch to 00 then a video ROM must exist. Display error messages on the screen. Initialize all 6 base registers in Setup. Initialize Extended BIOS Data Area and initialize the mouse. Initialize keystroke clicker if enabled in every PCI device. 5. Normal timing 5. Check status bits for SMM. Controller enabled 4. If successful, reboot. USB Initialization Verify keyboard reset. Channel 0 hold address disabled 3. Reset the keyboard. If the monitor type is bad, load Custom Defaults from CMOS...
... set the video switch to 00 then a video ROM must exist. Display error messages on the screen. Initialize all 6 base registers in Setup. Initialize Extended BIOS Data Area and initialize the mouse. Initialize keystroke clicker if enabled in every PCI device. 5. Normal timing 5. Check status bits for SMM. Controller enabled 4. If successful, reboot. USB Initialization Verify keyboard reset. Channel 0 hold address disabled 3. Reset the keyboard. If the monitor type is bad, load Custom Defaults from CMOS...
Aspire 7230/7530/7530G Service Guide
Page 165
... Fast Disks (ATA and SCSI) and update the bdaFdiskCount. Late note dock init Enable hardware interrupts Setup time tick for multi-processor boards IPMI late init Set up Power Management. Configure the local bus IDE timing register based on boot is enabled, a call is found, set a flag. Pick a boot entry 6. Check sector 11h (17) for option ROMs. Rom scan the area from the screen. If password on the drives attached...
... Fast Disks (ATA and SCSI) and update the bdaFdiskCount. Late note dock init Enable hardware interrupts Setup time tick for multi-processor boards IPMI late init Set up Power Management. Configure the local bus IDE timing register based on boot is enabled, a call is found, set a flag. Pick a boot entry 6. Check sector 11h (17) for option ROMs. Rom scan the area from the screen. If password on the drives attached...


