Aspire 6935 Series Quick Guide
Page 5
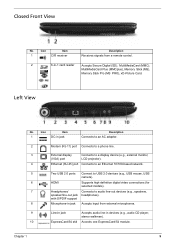
...* and right) The left and right buttons function like a computer mouse. Empowering key Launch Acer Empowering Technology console sensitive entertainment interface. Also called Liquid-Crystal Display (LCD), displays computer output. Status indicators Light-Emitting Diodes (LEDs) that light up to show the...device which functions like the left and right mouse buttons. *The center button serves as Acer Bio-Protection fingerprint reader supporting Acer FingerNav 4-way control function (only for launching frequently used program. Two internal stereo microphones for sound recording....
...* and right) The left and right buttons function like a computer mouse. Empowering key Launch Acer Empowering Technology console sensitive entertainment interface. Also called Liquid-Crystal Display (LCD), displays computer output. Status indicators Light-Emitting Diodes (LEDs) that light up to show the...device which functions like the left and right mouse buttons. *The center button serves as Acer Bio-Protection fingerprint reader supporting Acer FingerNav 4-way control function (only for launching frequently used program. Two internal stereo microphones for sound recording....
Aspire 6935 Series Quick Guide
Page 7
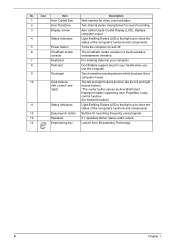
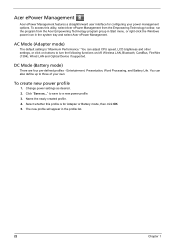
.../100/1000- HDMI port Supports high definition digital video connections (only for certain models). Ethernet (RJ-45) Connects to a display device (VGA) port (e.g., external monitor, LCD projector). Microphone-in jack Description Connects to an AC adapter. 2 3 4 5 6 HDMI 7 8 9 10 Modem (RJ-11) port Connects to a phone line. Line-in jack Accepts audio...
.../100/1000- HDMI port Supports high definition digital video connections (only for certain models). Ethernet (RJ-45) Connects to a display device (VGA) port (e.g., external monitor, LCD projector). Microphone-in jack Description Connects to an AC adapter. 2 3 4 5 6 HDMI 7 8 9 10 Modem (RJ-11) port Connects to a phone line. Line-in jack Accepts audio...
Service Guide
Page 16
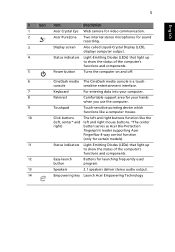
... like the left and right (left, center* and mouse buttons. No. Icon Item Description 1 Acer Crystal Eye Web camera for video communication. 2 Acer PureZone Two internal stereo microphones for sound recording. 3 Display screen Also called Liquid-Crystal Display (LCD), displays computer output. 4 Status indicators Light-Emitting Diodes (LEDs) that light up to show...
... like the left and right (left, center* and mouse buttons. No. Icon Item Description 1 Acer Crystal Eye Web camera for video communication. 2 Acer PureZone Two internal stereo microphones for sound recording. 3 Display screen Also called Liquid-Crystal Display (LCD), displays computer output. 4 Status indicators Light-Emitting Diodes (LEDs) that light up to show...
Service Guide
Page 17
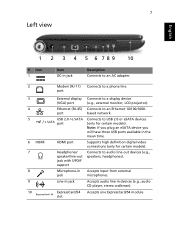
... jack Description Connects to an AC adapter. 2 Modem (RJ-11) port Connects to a phone line. 3 External display Connects to a display device (e.g., external monitor, (VGA) port LCD projector). 4 Ethernet (RJ-45) port Connects to an Ethernet 10/100-based network. 5 Two USB 2.0 ports Connect to USB 2.0 devices (e.g., USB mouse, USB camera). 6 HDMI...
... jack Description Connects to an AC adapter. 2 Modem (RJ-11) port Connects to a phone line. 3 External display Connects to a display device (e.g., external monitor, (VGA) port LCD projector). 4 Ethernet (RJ-45) port Connects to an Ethernet 10/100-based network. 5 Two USB 2.0 ports Connect to USB 2.0 devices (e.g., USB mouse, USB camera). 6 HDMI...
Service Guide
Page 30
To create new power profile 1. You can adjust CPU speed, LCD brightness and other settings, or click on buttons to turn the following functions on/off: Wireless LAN, Bluetooth, CardBus, FireWire (1394), Wired LAN and ... power profile. 3. DC Mode (Battery mode) There are four pre-defined profiles - The new profile will appear in the system tray and select Acer ePower Management. Acer ePower Management Acer ePower Management features a straightforward user interface for Adapter or Battery mode, then click OK. 5. Entertainment, Presentation, Word Processing, and Battery Life. Click "...
To create new power profile 1. You can adjust CPU speed, LCD brightness and other settings, or click on buttons to turn the following functions on/off: Wireless LAN, Bluetooth, CardBus, FireWire (1394), Wired LAN and ... power profile. 3. DC Mode (Battery mode) There are four pre-defined profiles - The new profile will appear in the system tray and select Acer ePower Management. Acer ePower Management Acer ePower Management features a straightforward user interface for Adapter or Battery mode, then click OK. 5. Entertainment, Presentation, Word Processing, and Battery Life. Click "...
Service Guide
Page 46
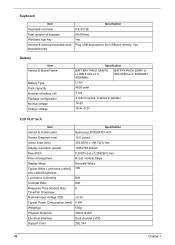
... LI-ION 8 CELL2.4, 4800MAH BATTRY PACK SONY LIION 8CELL2.4, 4800MAH Li-ion 4800 mAH 8 cell 4 cells in series, 2 series in parallel 14.8V 16.8+-0.2V LCD 16.0" inch Item Specification Vendor & model name Samsung LTN160AT01-A01 Screen Diagonal (mm) 16.0 inches Active Area (mm) 353.45(H) x 198.72(V) mm Display resolution...
... LI-ION 8 CELL2.4, 4800MAH BATTRY PACK SONY LIION 8CELL2.4, 4800MAH Li-ion 4800 mAH 8 cell 4 cells in series, 2 series in parallel 14.8V 16.8+-0.2V LCD 16.0" inch Item Specification Vendor & model name Samsung LTN160AT01-A01 Screen Diagonal (mm) 16.0 inches Active Area (mm) 353.45(H) x 198.72(V) mm Display resolution...
Service Guide
Page 47
... Viewing Angle (degree) Horizontal: Right/Left Vertial: Upper/Lower Temperature Range(°C) Operating Storage (shipping) 65/65 50/50 0 to +50 -20 to +60 Specification LCD Inverter Item Vendor & model name Brightness conditions Input voltage (V) Input current (mA) Output voltage (V, rms) Output current (mA, rms) Output voltage frequency (k Hz) Specification TDK...
... Viewing Angle (degree) Horizontal: Right/Left Vertial: Upper/Lower Temperature Range(°C) Operating Storage (shipping) 65/65 50/50 0 to +50 -20 to +60 Specification LCD Inverter Item Vendor & model name Brightness conditions Input voltage (V) Input current (mA) Output voltage (V, rms) Output current (mA, rms) Output voltage frequency (k Hz) Specification TDK...
Service Guide
Page 53
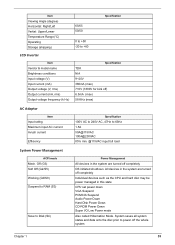
... is disabled or enabled. shows Summary Screen is not allowed to disable or auto. The table below describes the parameters in the system. Settings in LCD only mode. Parameter System Time System Date System Memory Extended Memory VGA Memory Quiet Boot Power on hard disc drive to store operation system and.... Shows the VGA memory size. Otherwise it will be shown if the device control is fixed to factory defaults. Both: Simultaneously enable both the integrated LCD screen and the system's external video port (for an external CRT or projector).
... is disabled or enabled. shows Summary Screen is not allowed to disable or auto. The table below describes the parameters in the system. Settings in LCD only mode. Parameter System Time System Date System Memory Extended Memory VGA Memory Quiet Boot Power on hard disc drive to store operation system and.... Shows the VGA memory size. Otherwise it will be shown if the device control is fixed to factory defaults. Both: Simultaneously enable both the integrated LCD screen and the system's external video port (for an external CRT or projector).

Service Guide
Page 74
Disassembly LCM module 1. Loose 11 LCM bezel screws. 3. Loose four LCD scrws from BTCB. 21. 20. Disconnect Modem card cable. 23. Disconnect CCD cable. 6. Remove the USB board from the hinge. 64 Chapter 3 Disconnect Inverter cable and Back LED board cable. 5. Remove six LCM bezel mylar. 2. Remove Modem card from the M/B. Loose two Modem card screws. 22. Remove LCM bezel. 4.
Disassembly LCM module 1. Loose 11 LCM bezel screws. 3. Loose four LCD scrws from BTCB. 21. 20. Disconnect Modem card cable. 23. Disconnect CCD cable. 6. Remove the USB board from the hinge. 64 Chapter 3 Disconnect Inverter cable and Back LED board cable. 5. Remove six LCM bezel mylar. 2. Remove Modem card from the M/B. Loose two Modem card screws. 22. Remove LCM bezel. 4.

Service Guide
Page 75
Chapter 3 65 Loose four LCD hinge screws, then remove two hinges from LCD panel. 7. Remove the LCD panel. 8. Remove the Inverter board. 9.
Chapter 3 65 Loose four LCD hinge screws, then remove two hinges from LCD panel. 7. Remove the LCD panel. 8. Remove the Inverter board. 9.

Service Guide
Page 77
... page 85 "Undetermined Problems" on page 86 Chapter 4 69 Symptoms cannot be re-created (intermittent problems). Non-Acer products, prototype cards, or modified options can give false errors and invalid system responses. 1. LCD display problems or others). No beep or error codes are intended to test only... Acer products. Go To "Power System Check" on page 71 "Power-On Self-Test (POST) Error Message" on ...
... page 85 "Undetermined Problems" on page 86 Chapter 4 69 Symptoms cannot be re-created (intermittent problems). Non-Acer products, prototype cards, or modified options can give false errors and invalid system responses. 1. LCD display problems or others). No beep or error codes are intended to test only... Acer products. Go To "Power System Check" on page 71 "Power-On Self-Test (POST) Error Message" on ...
Service Guide
Page 83
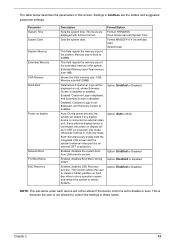
... connector is blank. Diskette drive Hard disk drive System board Error Message List No beep Error Messages No beep, power-on indicator turns off and LCD is connected tightly and correctly. Reconnect the DIMM LED board System board Chapter 4 75 Error Messages Real time clock error Previous boot incomplete - run SETUP...
... connector is blank. Diskette drive Hard disk drive System board Error Message List No beep Error Messages No beep, power-on indicator turns off and LCD is connected tightly and correctly. Reconnect the DIMM LED board System board Chapter 4 75 Error Messages Real time clock error Previous boot incomplete - run SETUP...
Service Guide
Page 84
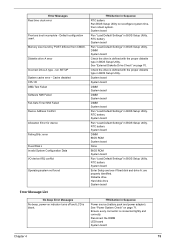
... Sequence Power source (battery pack and power adapter). Reconnect the LCD connector Hard disk drive LCD inverter ID LCD cable LCD Inverter LCD System board Reconnect the LCD connectors LCD inverter ID LCD cable LCD inverter LCD System board Ensure every connector is blank. See "Power System Check" on LCD during POST but system runs correctly. System board Speaker System board...
... Sequence Power source (battery pack and power adapter). Reconnect the LCD connector Hard disk drive LCD inverter ID LCD cable LCD Inverter LCD System board Reconnect the LCD connectors LCD inverter ID LCD cable LCD inverter LCD System board Ensure every connector is blank. See "Power System Check" on LCD during POST but system runs correctly. System board Speaker System board...
Service Guide
Page 89
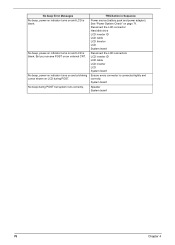
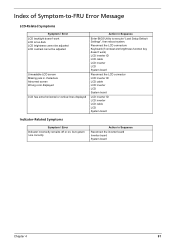
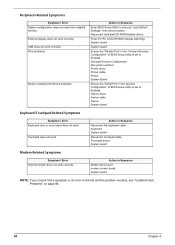
... lines displayed Action in Sequence Enter BIOS Utility to -FRU Error Message LCD-Related Symptoms Symptom / Error LCD backlight doesn't work ) LCD inverter ID LCD cable LCD inverter LCD System board Reconnect the LCD connector LCD inverter ID LCD cable LCD inverter LCD System board LCD inverter ID LCD inverter LCD cable LCD System board Indicator-Related Symptoms Symptom / Error Indicator incorrectly remains off or...
... lines displayed Action in Sequence Enter BIOS Utility to -FRU Error Message LCD-Related Symptoms Symptom / Error LCD backlight doesn't work ) LCD inverter ID LCD cable LCD inverter LCD System board Reconnect the LCD connector LCD inverter ID LCD cable LCD inverter LCD System board LCD inverter ID LCD inverter LCD cable LCD System board Indicator-Related Symptoms Symptom / Error Indicator incorrectly remains off or...
Service Guide
Page 91
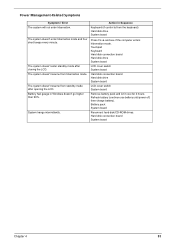
... not enter hibernation. The system doesn't resume from standby mode after closing the LCD. Touchpad Keyboard Hard disk connection board Hard disk drive System board LCD cover switch System board Hard disk connection board Hard disk drive System board LCD cover switch System board Remove battery pack and let it cool for 2 hours... doesn't resume from hibernation mode. Refresh battery (continue use battery until power off, then charge battery). The system doesn't enter standby mode after opening the LCD. Action in Windows doesn't go higher than 90%.
... not enter hibernation. The system doesn't resume from standby mode after closing the LCD. Touchpad Keyboard Hard disk connection board Hard disk drive System board LCD cover switch System board Hard disk connection board Hard disk drive System board LCD cover switch System board Remove battery pack and let it cool for 2 hours... doesn't resume from hibernation mode. Refresh battery (continue use battery until power off, then charge battery). The system doesn't enter standby mode after opening the LCD. Action in Windows doesn't go higher than 90%.
Service Guide
Page 92
... self-test. Peripheral-Related Symptoms Symptom / Error System configuration does not match the installed devices. Reconnect hard disk/CD-ROM/diskette drives. Press Fn+F5, LCD/CRT/Both display switching. External display does not work correctly.
... self-test. Peripheral-Related Symptoms Symptom / Error System configuration does not match the installed devices. Reconnect hard disk/CD-ROM/diskette drives. Press Fn+F5, LCD/CRT/Both display switching. External display does not work correctly.
Service Guide
Page 94
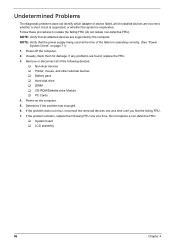
...find the failing FRU. 7. Remove or disconnect all attached devices are supported by the computer. If the problem remains, replace the following devices: ‰ Non-Acer devices ‰ Printer, mouse, and other external devices ‰ Battery pack ‰ Hard disk drive ‰ DIMM ‰ CD-ROM/Diskette drive ...failing FRU (do not isolate non-defective FRU). Power-on page 71): 1. Do not replace a non-defective FRU: ‰ System board ‰ LCD assembly 86 Chapter 4 NOTE: Verify that the power supply being used at the time of the following FRU one at a time. NOTE: Verify that...
...find the failing FRU. 7. Remove or disconnect all attached devices are supported by the computer. If the problem remains, replace the following devices: ‰ Non-Acer devices ‰ Printer, mouse, and other external devices ‰ Battery pack ‰ Hard disk drive ‰ DIMM ‰ CD-ROM/Diskette drive ...failing FRU (do not isolate non-defective FRU). Power-on page 71): 1. Do not replace a non-defective FRU: ‰ System board ‰ LCD assembly 86 Chapter 4 NOTE: Verify that the power supply being used at the time of the following FRU one at a time. NOTE: Verify that...

Service Guide
Page 121
CASE/COVER/BRACKET ASSEMBLY Category Part Name and Description MINI DUMMY CARD Acer Part No. 42.APQ0N.008 SD DUMMY CARD 42.APQ0N.009 BD COMBO BEZEL SUPER-MULTI BEZEL LCD COVER 16" 42.APQ0N.005 42.APQ0N.004 60.ATP0N.003 LCD BEZEL 16" 60.APQ0N.004 LCD BRACKET RIGHT 33.APQ0N.004 LCD BRACKET LEFT 33.APQ0N.005 UPPER CASE WITH FINGERPRINT HOLE 60.ATP0N.002 TOUCHPAD BRACKET 33.ASY0N.001 LOWER CASE WITH TV PORT LOWER CASE W/O TV PORT MIDDLE COVER 60.ATQ0N.001 60.ATP0N.001 42.APQ0N.001 Chapter 6 113
CASE/COVER/BRACKET ASSEMBLY Category Part Name and Description MINI DUMMY CARD Acer Part No. 42.APQ0N.008 SD DUMMY CARD 42.APQ0N.009 BD COMBO BEZEL SUPER-MULTI BEZEL LCD COVER 16" 42.APQ0N.005 42.APQ0N.004 60.ATP0N.003 LCD BEZEL 16" 60.APQ0N.004 LCD BRACKET RIGHT 33.APQ0N.004 LCD BRACKET LEFT 33.APQ0N.005 UPPER CASE WITH FINGERPRINT HOLE 60.ATP0N.002 TOUCHPAD BRACKET 33.ASY0N.001 LOWER CASE WITH TV PORT LOWER CASE W/O TV PORT MIDDLE COVER 60.ATQ0N.001 60.ATP0N.001 42.APQ0N.001 Chapter 6 113
Service Guide
Page 124
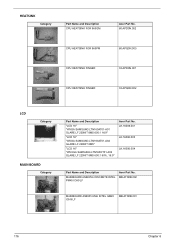
...and Description CPU HEATSINK FOR 965GM CPU HEATSINK FOR 965PM CPU HEATSINK FINGER CPU HEATSINK FINGER Acer Part No. 60.APD0N.002 60.APQ0N.003 33.APD0N.001 33.APQ0N.002 LCD Category MAIN BOARD Category Part Name and Description "LCD 16" "WXGA SAMSUNG LTN160AT01-A01 GLARE LF 220NIT 8MS 600:1 16...:9" "LCD 16" "WXGA SAMSUNG LTN160AT01-A02 GLARE LF 220NIT 8MS" "LCD 16" "WUXGA SAMSUNG LTN160HT01-A02 GLARE LF 220NIT 8MS 600:1 60%, 16:9" Acer Part No. LK.16006.001 LK.16006.003 LK.16006.004 Part Name and Description MAINBOARD AS6935G ...
...and Description CPU HEATSINK FOR 965GM CPU HEATSINK FOR 965PM CPU HEATSINK FINGER CPU HEATSINK FINGER Acer Part No. 60.APD0N.002 60.APQ0N.003 33.APD0N.001 33.APQ0N.002 LCD Category MAIN BOARD Category Part Name and Description "LCD 16" "WXGA SAMSUNG LTN160AT01-A01 GLARE LF 220NIT 8MS 600:1 16...:9" "LCD 16" "WXGA SAMSUNG LTN160AT01-A02 GLARE LF 220NIT 8MS" "LCD 16" "WUXGA SAMSUNG LTN160HT01-A02 GLARE LF 220NIT 8MS 600:1 60%, 16:9" Acer Part No. LK.16006.001 LK.16006.003 LK.16006.004 Part Name and Description MAINBOARD AS6935G ...


