Aspire 5810TZ Service Guide
Page 7
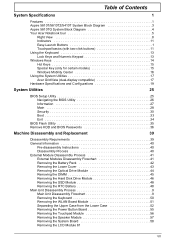
... Specifications 1 Features 1 Aspire 5810T/5810TZ/5410T System Block Diagram 3 Aspire 5810TG System Block Diagram 4 Your Acer Notebook tour 5 Right View 8 Indicators 11 Easy-Launch Buttons 1 Touchpad basics (with two-click buttons 11 Using the Keyboard 13 Lock Keys and ...Removing the Battery Pack 42 Removing the Lower Cover 43 Removing the Optical Drive Module 44 Removing the DIMM 45 Removing the Hard Disk Drive Module 46 Removing the SSD Module 48 Removing the RTC Battery 48 Main Unit Disassembly Process 9 Main Unit Disassembly Flowchart 9 Removing the Keyboard 50 Removing...
... Specifications 1 Features 1 Aspire 5810T/5810TZ/5410T System Block Diagram 3 Aspire 5810TG System Block Diagram 4 Your Acer Notebook tour 5 Right View 8 Indicators 11 Easy-Launch Buttons 1 Touchpad basics (with two-click buttons 11 Using the Keyboard 13 Lock Keys and ...Removing the Battery Pack 42 Removing the Lower Cover 43 Removing the Optical Drive Module 44 Removing the DIMM 45 Removing the Hard Disk Drive Module 46 Removing the SSD Module 48 Removing the RTC Battery 48 Main Unit Disassembly Process 9 Main Unit Disassembly Flowchart 9 Removing the Keyboard 50 Removing...
Aspire 5810TZ Service Guide
Page 8
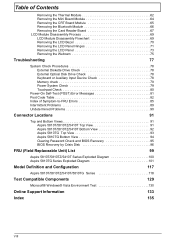
... Keyboard or Auxiliary Input Device Check 78 Memory check 79 Power System Check 79 Touchpad Check 80 Power-On Self-Test (POST) Error Messages 81 Post Code Table 82 Index of Symptom-to-FRU Errors 85 Intermittent Problems 89 Undetermined Problems 90 Connector Locations 91 Top and Bottom Views 91 Aspire 5810T/5810TZ...
... Keyboard or Auxiliary Input Device Check 78 Memory check 79 Power System Check 79 Touchpad Check 80 Power-On Self-Test (POST) Error Messages 81 Post Code Table 82 Index of Symptom-to-FRU Errors 85 Intermittent Problems 89 Undetermined Problems 90 Connector Locations 91 Top and Bottom Views 91 Aspire 5810T/5810TZ...

Aspire 5810TZ Service Guide
Page 48
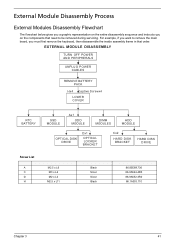
... disassembly sections illustrate the entire disassembly sequence. Unplug the AC adapter and all peripherals. 2. For example, if you want to remove the main board, you do the following stages: • External module disassembly • Main unit disassembly • LCD module... disassembly The flowcharts provided in that you must first remove the keyboard, then disassemble the inside the card slot. Main Screw List Item A B C D E F G H Screw M2.5 x L6 M2 x L4 M3 x ...
... disassembly sections illustrate the entire disassembly sequence. Unplug the AC adapter and all peripherals. 2. For example, if you want to remove the main board, you do the following stages: • External module disassembly • Main unit disassembly • LCD module... disassembly The flowcharts provided in that you must first remove the keyboard, then disassemble the inside the card slot. Main Screw List Item A B C D E F G H Screw M2.5 x L6 M2 x L4 M3 x ...
Aspire 5810TZ Service Guide
Page 49
...flowchart below gives you a graphic representation on the entire disassembly sequence and instructs you must first remove the keyboard, then disassemble the inside assembly frame in that need to remove the main board, you on the components that order. EXTERNAL MODULE DISASSEMBLY TURN OFF POWER ...AND PERIPHERALS UNPLUG POWER CABLES REMOVE BATTERY PACK Hx4 Captive Screwx4 LOWER COVER RTC BATTERY Screw List A C D H SSD...
...flowchart below gives you a graphic representation on the entire disassembly sequence and instructs you must first remove the keyboard, then disassemble the inside assembly frame in that need to remove the main board, you on the components that order. EXTERNAL MODULE DISASSEMBLY TURN OFF POWER ...AND PERIPHERALS UNPLUG POWER CABLES REMOVE BATTERY PACK Hx4 Captive Screwx4 LOWER COVER RTC BATTERY Screw List A C D H SSD...
Aspire 5810TZ Service Guide
Page 58
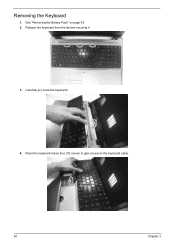
See "Removing the Battery Pack" on page 42. 2. Removing the Keyboard 1. Release the keyboard from the latches securing it. 3. Carefully pry loose the keyboard. 4. Place the keyboard below the LCD screen to gain access to the keyboard cable. 50 Chapter 3
See "Removing the Battery Pack" on page 42. 2. Removing the Keyboard 1. Release the keyboard from the latches securing it. 3. Carefully pry loose the keyboard. 4. Place the keyboard below the LCD screen to gain access to the keyboard cable. 50 Chapter 3

Aspire 5810TZ Service Guide
Page 59
Disconnect the keyboard cable from the WLAN board. See "Removing the Keyboard" on page 42. 2. The Black antenna cable is connected to connector 1and the White antenna cable is connected to remove the keyboard. Removing the WLAN Board Module 1. NOTE: There are 2 antenna cables connected to the WLAN board. Chapter 3 51 See "Removing the Battery Pack" on page 50. 3. Disconnect the antenna cables from the main board to connector 2. 5.
Disconnect the keyboard cable from the WLAN board. See "Removing the Keyboard" on page 42. 2. The Black antenna cable is connected to connector 1and the White antenna cable is connected to remove the keyboard. Removing the WLAN Board Module 1. NOTE: There are 2 antenna cables connected to the WLAN board. Chapter 3 51 See "Removing the Battery Pack" on page 50. 3. Disconnect the antenna cables from the main board to connector 2. 5.

Aspire 5810TZ Service Guide
Page 60
... Torque 1.6 kgf-cm NOTE: When attaching the antenna back to release the WLAN board. See "Removing the Lower Cover" on page 46. 7. See "Removing the Lower Cover" on page 50. 10. See "Removing the Keyboard" on page 43. 4. See "Removing the WLAN Board Module" on page 42. 2. Separating the Upper Case from the WLAN socket...
... Torque 1.6 kgf-cm NOTE: When attaching the antenna back to release the WLAN board. See "Removing the Lower Cover" on page 46. 7. See "Removing the Lower Cover" on page 50. 10. See "Removing the Keyboard" on page 43. 4. See "Removing the WLAN Board Module" on page 42. 2. Separating the Upper Case from the WLAN socket...

Aspire 5810TZ Service Guide
Page 63
... "Separating the Upper Case from the lower case. Removing the Power Button Board 1. See "Removing the Optical Drive Module" on page 48. 9. See "Removing the RTC Battery" on page 44. 5. See "Removing the Keyboard" on page 43. 3. Chapter 3 55 See "Removing the Lower Cover" on page 50. 10. See "Removing the DIMM" on the system board. 18...
... "Separating the Upper Case from the lower case. Removing the Power Button Board 1. See "Removing the Optical Drive Module" on page 48. 9. See "Removing the RTC Battery" on page 44. 5. See "Removing the Keyboard" on page 43. 3. Chapter 3 55 See "Removing the Lower Cover" on page 50. 10. See "Removing the DIMM" on the system board. 18...

Aspire 5810TZ Service Guide
Page 64
... touchpad cable from the Lower Case" on page 52. 12. See "Removing the Lower Cover" on page 44. 5. See "Removing the Keyboard" on page 51. 11. See "Removing the WLAN Board Module" on page 50. 10. See "Removing the Lower Cover" on page 48. 9. See "Removing the RTC Battery" on page 43. 3. See "Separating the Upper...
... touchpad cable from the Lower Case" on page 52. 12. See "Removing the Lower Cover" on page 44. 5. See "Removing the Keyboard" on page 51. 11. See "Removing the WLAN Board Module" on page 50. 10. See "Removing the Lower Cover" on page 48. 9. See "Removing the RTC Battery" on page 43. 3. See "Separating the Upper...

Aspire 5810TZ Service Guide
Page 65
... WLAN Board Module" on page 48. 8. See "Removing the Keyboard" on page 48. 9. Carefully pry loose and remove the touch pad board. See "Removing the RTC Battery" on page 50. 10. See "Removing the Lower Cover" on page 42. 2. See "Removing the Battery Pack" on page 43. 4. See "Removing the DIMM" on page 52. See "Separating the...
... WLAN Board Module" on page 48. 8. See "Removing the Keyboard" on page 48. 9. Carefully pry loose and remove the touch pad board. See "Removing the RTC Battery" on page 50. 10. See "Removing the Lower Cover" on page 42. 2. See "Removing the Battery Pack" on page 43. 4. See "Removing the DIMM" on page 52. See "Separating the...

Aspire 5810TZ Service Guide
Page 66
... Pack" on page 43. 3. See "Removing the Lower Cover" on page 42. 2. See "Removing the SSD Module" on page 43. 4. See "Removing the Lower Cover" on page 48. 8. See "Removing the Keyboard" on page 45. 6. See "Removing the DIMM" on page 50. 10. See "Removing the RTC Battery" on page 44. 5. See "Removing the Optical Drive Module" on...
... Pack" on page 43. 3. See "Removing the Lower Cover" on page 42. 2. See "Removing the SSD Module" on page 43. 4. See "Removing the Lower Cover" on page 48. 8. See "Removing the Keyboard" on page 45. 6. See "Removing the DIMM" on page 50. 10. See "Removing the RTC Battery" on page 44. 5. See "Removing the Optical Drive Module" on...
Aspire 5810TZ Service Guide
Page 69
...Chapter 3 61 See "Removing the Lower Cover" on page 48. 8. See "Separating the Upper Case from the Lower Case" on page 45. 6. See "Removing the DIMM" on page 52. 12. Remove the two screws (A) from the latches. 14. See "Removing the Keyboard" on page 43. 3. See "Removing the Lower Cover" ...on page 50. 10. See "Removing the Hard Disk Drive Module" on page 51. 11. ...
...Chapter 3 61 See "Removing the Lower Cover" on page 48. 8. See "Separating the Upper Case from the Lower Case" on page 45. 6. See "Removing the DIMM" on page 52. 12. Remove the two screws (A) from the latches. 14. See "Removing the Keyboard" on page 43. 3. See "Removing the Lower Cover" ...on page 50. 10. See "Removing the Hard Disk Drive Module" on page 51. 11. ...
Aspire 5810TZ Service Guide
Page 70
... unit, please note that the cable should be routed well. The discrete version (for Aspire 5810T/5810TZ/5410T). See "Removing the Lower Cover" on page 45. 6. See "Removing the DIMM" on page 43. 3. See "Removing the RTC Battery" on page 50. 10. See "Removing the Keyboard" on page 48. 9. See "Removing the System Board" on page 52. 12.
... unit, please note that the cable should be routed well. The discrete version (for Aspire 5810T/5810TZ/5410T). See "Removing the Lower Cover" on page 45. 6. See "Removing the DIMM" on page 43. 3. See "Removing the RTC Battery" on page 50. 10. See "Removing the Keyboard" on page 48. 9. See "Removing the System Board" on page 52. 12.

Aspire 5810TZ Service Guide
Page 72
... 1.6 kgf-cm 64 Chapter 3 See "Removing the DIMM" on page 52. 12. See "Removing the Keyboard" on page 48. 8. See "Removing the SSD Module" on page 50. 10. See "Removing the System Board" on page 43. 4. Removing the Mini Board Module 1. 15. See "Removing the Lower Cover" on page 58. 13. Remove the one screw (B) securing the mini...
... 1.6 kgf-cm 64 Chapter 3 See "Removing the DIMM" on page 52. 12. See "Removing the Keyboard" on page 48. 8. See "Removing the SSD Module" on page 50. 10. See "Removing the System Board" on page 43. 4. Removing the Mini Board Module 1. 15. See "Removing the Lower Cover" on page 58. 13. Remove the one screw (B) securing the mini...

Aspire 5810TZ Service Guide
Page 73
..." on page 48. 8. See "Removing the SSD Module" on page 43. 4. Removing the CRT Board Module 1. See "Removing the Optical Drive Module" on page 48. 9. See "Removing the RTC Battery" on page 44. 5. See "Removing the DIMM" on page 51. 11. See "Removing the WLAN Board Module" on page 45. 6. See "Removing the Keyboard" on page 52. 12...
..." on page 48. 8. See "Removing the SSD Module" on page 43. 4. Removing the CRT Board Module 1. See "Removing the Optical Drive Module" on page 48. 9. See "Removing the RTC Battery" on page 44. 5. See "Removing the DIMM" on page 51. 11. See "Removing the WLAN Board Module" on page 45. 6. See "Removing the Keyboard" on page 52. 12...

Aspire 5810TZ Service Guide
Page 74
... Case from the card reader board. 66 Chapter 3 See "Removing the RTC Battery" on page 48. 8. 14. Removing the Bluetooth Module 1. See "Removing the Lower Cover" on page 46. 7. See "Removing the Hard Disk Drive Module" on page 43. 3. See "Removing the Keyboard" on page 44. 5. See "Removing the Optical Drive Module" on page 50. 10. Disconnect...
... Case from the card reader board. 66 Chapter 3 See "Removing the RTC Battery" on page 48. 8. 14. Removing the Bluetooth Module 1. See "Removing the Lower Cover" on page 46. 7. See "Removing the Hard Disk Drive Module" on page 43. 3. See "Removing the Keyboard" on page 44. 5. See "Removing the Optical Drive Module" on page 50. 10. Disconnect...

Aspire 5810TZ Service Guide
Page 75
... Battery Pack" on page 43. 3. See "Removing the Lower Cover" on page 42. 2. See "Removing the DIMM" on page 50. 10. See "Removing the Keyboard" on page 45. 6. See "Removing the WLAN Board Module" on page 44. 5. See "Removing the Optical Drive Module" on page 51. 11. See "Removing the RTC Battery" on page 66. See "Separating...
... Battery Pack" on page 43. 3. See "Removing the Lower Cover" on page 42. 2. See "Removing the DIMM" on page 50. 10. See "Removing the Keyboard" on page 45. 6. See "Removing the WLAN Board Module" on page 44. 5. See "Removing the Optical Drive Module" on page 51. 11. See "Removing the RTC Battery" on page 66. See "Separating...

Aspire 5810TZ Service Guide
Page 78
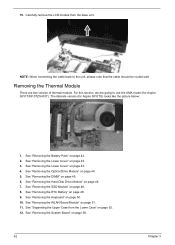
... Drive Module" on page 50. 10. See "Removing the Keyboard" on page 46. 7. Remove the four screws (G) on page 51. 11. See "Removing the WLAN Board Module" on the LCD module as shown. See "Removing the Battery Pack" on page 45. 6. See "Removing the DIMM" on page 42. 2. See "Removing the RTC Battery" on page 61. 14...
... Drive Module" on page 50. 10. See "Removing the Keyboard" on page 46. 7. Remove the four screws (G) on page 51. 11. See "Removing the WLAN Board Module" on the LCD module as shown. See "Removing the Battery Pack" on page 45. 6. See "Removing the DIMM" on page 42. 2. See "Removing the RTC Battery" on page 61. 14...
Aspire 5810TZ Service Guide
Page 79
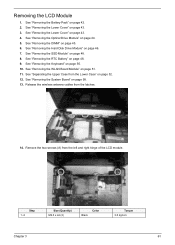
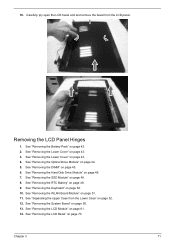
..." on page 48. 8. See "Removing the WLAN Board Module" on page 45. 6. See "Removing the DIMM" on page 51. 11. See "Removing the System Board" on page 43. 4. Removing the LCD Panel Hinges 1. See "Removing the Lower Cover" on page 58. 13. Chapter 3 71 See "Removing the Keyboard" on page 70. See "Removing the LCD Bezel" on page...
..." on page 48. 8. See "Removing the WLAN Board Module" on page 45. 6. See "Removing the DIMM" on page 51. 11. See "Removing the System Board" on page 43. 4. Removing the LCD Panel Hinges 1. See "Removing the Lower Cover" on page 58. 13. Chapter 3 71 See "Removing the Keyboard" on page 70. See "Removing the LCD Bezel" on page...
Aspire 5810TZ Service Guide
Page 81
... Lower Cover" on page 48. 9. See "Removing the RTC Battery" on page 43. 3. See "Removing the Battery Pack" on page 50. 10. See "Removing the Keyboard" on page 42. 2. See "Removing the LCD Bezel" on page 43. 4. See "Removing the Lower Cover" on page 70. 15. See "Separating the Upper Case from the Lower Case" on...
... Lower Cover" on page 48. 9. See "Removing the RTC Battery" on page 43. 3. See "Removing the Battery Pack" on page 50. 10. See "Removing the Keyboard" on page 42. 2. See "Removing the LCD Bezel" on page 43. 4. See "Removing the Lower Cover" on page 70. 15. See "Separating the Upper Case from the Lower Case" on...


