
Acer Aspire 5810T / 5810TG Series Service Guide
Page 4
Conventions The following conventions are used in this manual: SCREEN MESSAGES Denotes actual messages that might result from doing or not doing specific actions. IV Gives precautionary measures to avoid possible hardware or software problems. Reminds you to any damage that appear on screen. Alerts you to do specific actions relevant to the current topic. NOTE WARNING CAUTION IMPORTANT Gives bits and pieces of additional information related to the accomplishment of procedures.
Conventions The following conventions are used in this manual: SCREEN MESSAGES Denotes actual messages that might result from doing or not doing specific actions. IV Gives precautionary measures to avoid possible hardware or software problems. Reminds you to any damage that appear on screen. Alerts you to do specific actions relevant to the current topic. NOTE WARNING CAUTION IMPORTANT Gives bits and pieces of additional information related to the accomplishment of procedures.

Acer Aspire 5810T / 5810TG Series Service Guide
Page 33
... entering BIOS Setup Utility, please set to enter setup. Press during POST (when "Press to Chapter 4 Troubleshooting when problem arises. However, if you encounter configuration problems, you do not need to run Setup. Chapter 2 25 Chapter 2 System Utilities BIOS Setup Utility The BIOS Setup ... BIOS SETUP Utility. Your computer is set the parameter to enter multi-boot menu. Press F2 to "disabled". The default parameter of screen). To activate the BIOS Utility, press F2 during POST to "enabled". In this utility. Please also refer to enter Setup" message ...
... entering BIOS Setup Utility, please set to enter setup. Press during POST (when "Press to Chapter 4 Troubleshooting when problem arises. However, if you encounter configuration problems, you do not need to run Setup. Chapter 2 25 Chapter 2 System Utilities BIOS Setup Utility The BIOS Setup ... BIOS SETUP Utility. Your computer is set the parameter to enter multi-boot menu. Press F2 to "disabled". The default parameter of screen). To activate the BIOS Utility, press F2 during POST to "enabled". In this utility. Please also refer to enter Setup" message ...
Acer Aspire 5810T / 5810TG Series Service Guide
Page 44
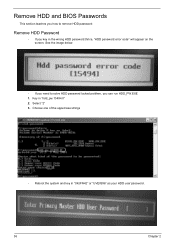
Select "2" 3. Choose one of the uppercase strings • Reboot the system and key in "hdd_pw 15494 0" 2. Key in "0KJFN42" or "UVEIQ96" as your HDD user password. 36 Chapter 2 Remove HDD and BIOS Passwords This section teaches you how to solve HDD password locked problem, you key in the wrong HDD password thrice, "HDD password error code" will appear on the screen. See the image below. • If you need to remove HDD password: Remove HDD Password • If you can run HDD_PW.EXE 1.
Select "2" 3. Choose one of the uppercase strings • Reboot the system and key in "hdd_pw 15494 0" 2. Key in "0KJFN42" or "UVEIQ96" as your HDD user password. 36 Chapter 2 Remove HDD and BIOS Passwords This section teaches you how to solve HDD password locked problem, you key in the wrong HDD password thrice, "HDD password error code" will appear on the screen. See the image below. • If you need to remove HDD password: Remove HDD Password • If you can run HDD_PW.EXE 1.

Acer Aspire 5810T / 5810TG Series Service Guide
Page 45
Key in wrong Supervisor Password for three time, "System Disabled" would display on the screen. Remove BIOS Password • If you can run BIOS_PW.EXE 1. See the image below. • If you need to solve BIOS password locked problem, you key in "bios_pw 14452 0" 2. Chapter 2 37 Choose one upper-case string • Reboot the system and key in "qjjg9vy" or "07yqmjd" as your BIOS user password.
Key in wrong Supervisor Password for three time, "System Disabled" would display on the screen. Remove BIOS Password • If you can run BIOS_PW.EXE 1. See the image below. • If you need to solve BIOS password locked problem, you key in "bios_pw 14452 0" 2. Chapter 2 37 Choose one upper-case string • Reboot the system and key in "qjjg9vy" or "07yqmjd" as your BIOS user password.
Acer Aspire 5810T / 5810TG Series Service Guide
Page 85
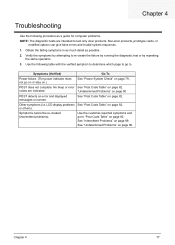
...cannot be re-created (intermittent problems). See "Post Code Table" on screen. See "Intermittent Problems" on page 90. See "Undetermined Problems" on page 89. Use the following procedure as possible. 2. "Undetermined Problems" on page 90 See "Post Code Table" on page 79.. Non-Acer products, prototype cards, or...Table" on page 82. No beep or error codes are intended to test only Acer products. Other symptoms (i.e. Go To See "Power System Check" on page 82. LCD display problems or others). Chapter 4 Troubleshooting Use the following table with the verified symptom to ...
...cannot be re-created (intermittent problems). See "Post Code Table" on screen. See "Intermittent Problems" on page 90. See "Undetermined Problems" on page 89. Use the following procedure as possible. 2. "Undetermined Problems" on page 90 See "Post Code Table" on page 79.. Non-Acer products, prototype cards, or...Table" on page 82. No beep or error codes are intended to test only Acer products. Other symptoms (i.e. Go To See "Power System Check" on page 82. LCD display problems or others). Chapter 4 Troubleshooting Use the following table with the verified symptom to ...

Acer Aspire 5810T / 5810TG Series Service Guide
Page 87
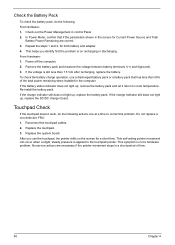
... the power adapter and check that power is not correct, go to main board. 2. q If the problem is supplied. 3. If you suspect a power problem, see "Check the Battery Pack" on the screen, or hang the system. 1. Press F2 in the message window. A loose connection can cause an error.... then check that power is not corrected, see "Undetermined Problems" on page 80 Check the Power Adapter...
... the power adapter and check that power is not correct, go to main board. 2. q If the problem is supplied. 3. If you suspect a power problem, see "Check the Battery Pack" on the screen, or hang the system. 1. Press F2 in the message window. A loose connection can cause an error.... then check that power is not corrected, see "Undetermined Problems" on page 80 Check the Power Adapter...
Acer Aspire 5810T / 5810TG Series Service Guide
Page 88
... replace the battery. Remove the battery pack and measure the voltage between battery terminals 1(+) and 6(ground). 3. If the voltage is not a hardware problem. Replace the touchpad. 3. Replace the system board. No service actions are correct. 3. This helps you use a discharged battery pack or a battery...less than 50% of time. 80 Chapter 4 This self-acting pointer movement can occur when a slight, steady pressure is on the screen for both battery and adapter. 4. To check the battery charge operation, use the touchpad, the pointer drifts on recharging or discharging. ...
... replace the battery. Remove the battery pack and measure the voltage between battery terminals 1(+) and 6(ground). 3. If the voltage is not a hardware problem. Replace the touchpad. 3. Replace the system board. No service actions are correct. 3. This helps you use a discharged battery pack or a battery...less than 50% of time. 80 Chapter 4 This self-acting pointer movement can occur when a slight, steady pressure is on the screen for both battery and adapter. 4. To check the battery charge operation, use the touchpad, the pointer drifts on recharging or discharging. ...

Acer Aspire 5810T / 5810TG Series Service Guide
Page 89
The most likely cause is not listed, see "Undetermined Problems" on the screen and the error symptoms classified by function. Others may indicate a problem with a device, such as the way it has been configured. If the symptom is listed first. NOTE: Most of memory installed. Chapter 4 81 NOTE: ...page 90. NOTE: Perform the FRU replacement or actions in the sequence shown in FRU/Action column, if the FRU replacement does not solve the problem, put the original part back in the BIOS Setup Utility menus, reset the computer, enter Setup and install Setup defaults or correct the error....
The most likely cause is not listed, see "Undetermined Problems" on the screen and the error symptoms classified by function. Others may indicate a problem with a device, such as the way it has been configured. If the symptom is listed first. NOTE: Most of memory installed. Chapter 4 81 NOTE: ...page 90. NOTE: Perform the FRU replacement or actions in the sequence shown in FRU/Action column, if the FRU replacement does not solve the problem, put the original part back in the BIOS Setup Utility menus, reset the computer, enter Setup and install Setup defaults or correct the error....

Acer Aspire 5810T / 5810TG Series Service Guide
Page 149
... Recovery by Crisis Disk 96 steps 96 BIOS Recovery Hotkey 96 BIOS Utility 25-35 Flash 35 Navigating 26 Button eject 5 button / indicator 5 button/indicator Acer PowerSmart 5 Backup 5 C Clearing BIOS Password steps 96 compartment memory 10 Connector Locations 91 cooling fan 10 Core logic 19 CPU core voltage 19 CPU Fan...) List 99 H Hard disk 21 hard disk drive module removing 46 HDD 21 Hot key Bluetooth 15 brightness down 15 brightness up 15 Display 15 Screen blank 15 Sleep 15 Speaker 15 System property 15 volume down 15 volume up 15 Hot Keys 13, 15 I Indicator battery 11 HDD 5, 11 WLANG...
... Recovery by Crisis Disk 96 steps 96 BIOS Recovery Hotkey 96 BIOS Utility 25-35 Flash 35 Navigating 26 Button eject 5 button / indicator 5 button/indicator Acer PowerSmart 5 Backup 5 C Clearing BIOS Password steps 96 compartment memory 10 Connector Locations 91 cooling fan 10 Core logic 19 CPU core voltage 19 CPU Fan...) List 99 H Hard disk 21 hard disk drive module removing 46 HDD 21 Hot key Bluetooth 15 brightness down 15 brightness up 15 Display 15 Screen blank 15 Sleep 15 Speaker 15 System property 15 volume down 15 volume up 15 Hot Keys 13, 15 I Indicator battery 11 HDD 5, 11 WLANG...


