Quick Start Guide
Page 5
...useful information applying to functions or features which are marked in the Aspire product series. The Quick Guide introduces you to the basic features...run the Adobe Reader setup program first. This guide contains detailed information on how to use your Acer notebook, we have designed a set of the series, but not necessarily in Portable Document Format (... Note: Viewing the file requires Adobe Reader. It covers basic topics such as system utilities, data recovery, expansion options and troubleshooting. For instructions on such subjects as using the keyboard and audio, etc....
...useful information applying to functions or features which are marked in the Aspire product series. The Quick Guide introduces you to the basic features...run the Adobe Reader setup program first. This guide contains detailed information on how to use your Acer notebook, we have designed a set of the series, but not necessarily in Portable Document Format (... Note: Viewing the file requires Adobe Reader. It covers basic topics such as system utilities, data recovery, expansion options and troubleshooting. For instructions on such subjects as using the keyboard and audio, etc....
Service Guide
Page 9
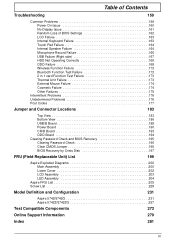
... 195 Clear CMOS Jumper 195 BIOS Recovery by Crisis Disk 197 FRU (Field Replaceable Unit) List 199 Aspire Exploded Diagrams 200 Main Assembly 200 Lower Cover 202 LCD Assembly 203 LED Assembly 204 Aspire FRU List 205 Screw List 229 Model Definition and Configuration 231 Aspire 5742/5742G 231 Aspire 5742Z/5742ZG 257 Test Compatible Components...
... 195 Clear CMOS Jumper 195 BIOS Recovery by Crisis Disk 197 FRU (Field Replaceable Unit) List 199 Aspire Exploded Diagrams 200 Main Assembly 200 Lower Cover 202 LCD Assembly 203 LED Assembly 204 Aspire FRU List 205 Screw List 229 Model Definition and Configuration 231 Aspire 5742/5742G 231 Aspire 5742Z/5742ZG 257 Test Compatible Components...
Service Guide
Page 43
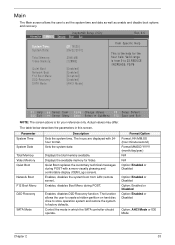
...store operation system and restore the system to set the system time and date as well as enable and disable boot options and recovery. The table below describes the parameters in which the SATA controller should operate. Displays the available memory for your reference only. Enables,... field. Information Main InsydeH20 Setup Utility Security Boot Exit System Time: System Date: Total Memory: Video Memory: Quiet Boot Network Boot F12 Boot Menu D2D Recovery SATA Mode [21:18:25] [06/22/2010] 2048 MB [128MB] [Enabled] [Enabled] [Disabled] [Enabled] [AHCI Mode] Rev. 3.5 Item Specific ...
...store operation system and restore the system to set the system time and date as well as enable and disable boot options and recovery. The table below describes the parameters in which the SATA controller should operate. Displays the available memory for your reference only. Enables,... field. Information Main InsydeH20 Setup Utility Security Boot Exit System Time: System Date: Total Memory: Video Memory: Quiet Boot Network Boot F12 Boot Menu D2D Recovery SATA Mode [21:18:25] [06/22/2010] 2048 MB [128MB] [Enabled] [Enabled] [Disabled] [Enabled] [AHCI Mode] Rev. 3.5 Item Specific ...

Service Guide
Page 49
.... Prepare a bootable diskette. 2. Copy the Flash utilities to update the system BIOS Flash ROM. NOTE: If you do not have a crisis recovery diskette at hand, then you should create a Crisis Recovery Diskette before you run the Flash. 1. Fellow the steps below to finish BIOS Flash, you may not boot the system because...
.... Prepare a bootable diskette. 2. Copy the Flash utilities to update the system BIOS Flash ROM. NOTE: If you do not have a crisis recovery diskette at hand, then you should create a Crisis Recovery Diskette before you run the Flash. 1. Fellow the steps below to finish BIOS Flash, you may not boot the system because...
Service Guide
Page 178
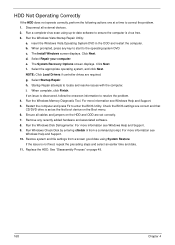
... all external devices. 2. For more information see Windows Help and Support. 5. Run the Windows Vista Startup Repair Utility: a. The Install Windows screen displays. The System Recovery Options screen displays. Select the appropriate operating system, and click Next. Run the Windows Memory Diagnostic Tool. Restart the computer and press F2 to correct...
... all external devices. 2. For more information see Windows Help and Support. 5. Run the Windows Vista Startup Repair Utility: a. The Install Windows screen displays. The System Recovery Options screen displays. Select the appropriate operating system, and click Next. Run the Windows Memory Diagnostic Tool. Restart the computer and press F2 to correct...
Service Guide
Page 188
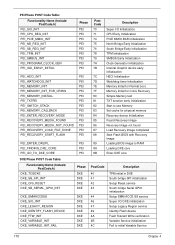
Memory Initial for Crisis Recovery Simple Memory test TXT function early Initialization Start to initial Variable Service 178 Chapter 4 PEI Phase POST Code Table: Functionality Name (Include\ PostCode.h) ...Clock Generator Initialization Internal Graphic device early Initialization HECI Initialization Watchdog timer Initialization Memory Initial for physical memory Recovery device Initialization Found Recovery image Recovery image not found Load Recovery Image completed Start Flash BIOS with Recovery image Loading BIOS image to RAM Loading DXE core Enter DXE core DXE Phase POST Code Table:...
Memory Initial for Crisis Recovery Simple Memory test TXT function early Initialization Start to initial Variable Service 178 Chapter 4 PEI Phase POST Code Table: Functionality Name (Include\ PostCode.h) ...Clock Generator Initialization Internal Graphic device early Initialization HECI Initialization Watchdog timer Initialization Memory Initial for physical memory Recovery device Initialization Found Recovery image Recovery image not found Load Recovery Image completed Start Flash BIOS with Recovery image Loading BIOS image to RAM Loading DXE core Enter DXE core DXE Phase POST Code Table:...
Service Guide
Page 190
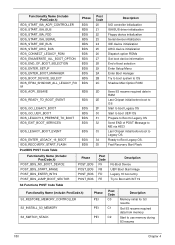
...Post Code C0 C1 C2 Description Memory initial for S3 resume Get S3 resume required data from memory Start to Boot Legacy OS. Fast Recovery Start Flash. Functionality Name (Include\ PostCode.h) BDS_START_ISA_ACPI_CONTROLLER BDS_START_ISA_BUS BDS_START_ISA_FDD BDS_START_ISA_SEIRAL BDS_START_IDE_BUS BDS_START_AHCI_BUS BDS_CONNECT_LEGACY_ROM BDS_ENUMERATE_ALL_BOOT_OPTION BDS_END_OF_BOOT_SELECTION BDS_ENTER_SETUP BDS_ENTER_BOOT_MANAGER BDS_BOOT_DEVICE_SELECT BDS_EFI64_SHADOW_ALL_LEGACY_RO M BDS_ACPI_S3SAVE BDS_READY_TO_BOOT_EVENT BDS_GO_LEGACY_BOOT BDS_GO_UEFI_BOOT BDS_LEGACY16_PREPARE_TO_BOOT...
...Post Code C0 C1 C2 Description Memory initial for S3 resume Get S3 resume required data from memory Start to Boot Legacy OS. Fast Recovery Start Flash. Functionality Name (Include\ PostCode.h) BDS_START_ISA_ACPI_CONTROLLER BDS_START_ISA_BUS BDS_START_ISA_FDD BDS_START_ISA_SEIRAL BDS_START_IDE_BUS BDS_START_AHCI_BUS BDS_CONNECT_LEGACY_ROM BDS_ENUMERATE_ALL_BOOT_OPTION BDS_END_OF_BOOT_SELECTION BDS_ENTER_SETUP BDS_ENTER_BOOT_MANAGER BDS_BOOT_DEVICE_SELECT BDS_EFI64_SHADOW_ALL_LEGACY_RO M BDS_ACPI_S3SAVE BDS_READY_TO_BOOT_EVENT BDS_GO_LEGACY_BOOT BDS_GO_UEFI_BOOT BDS_LEGACY16_PREPARE_TO_BOOT...
Service Guide
Page 205
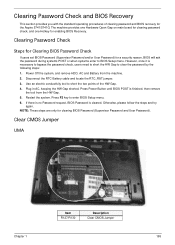
... conductivity tool to clear the password by the following steps: 1. Press F2 key to BIOS Setup menu. Clearing Password Check and BIOS Recovery This section provides you with the standard operating procedures of the HW Gap. 4. Clear CMOS Jumper UMA Item R127/R130 Description Clear CMOS...system. Clearing Password Check Steps for Clearing BIOS Password Check If users set BIOS Password (Supervisor Password and/or User Password) for the Aspire 5741/5741G. Disconnect the RTC Battery cable and locate the RTC_RST jumper. 3. Otherwise, please follow the steps and try again. Press...
... conductivity tool to clear the password by the following steps: 1. Press F2 key to BIOS Setup menu. Clearing Password Check and BIOS Recovery This section provides you with the standard operating procedures of the HW Gap. 4. Clear CMOS Jumper UMA Item R127/R130 Description Clear CMOS...system. Clearing Password Check Steps for Clearing BIOS Password Check If users set BIOS Password (Supervisor Password and/or User Password) for the Aspire 5741/5741G. Disconnect the RTC Battery cable and locate the RTC_RST jumper. 3. Otherwise, please follow the steps and try again. Press...
Service Guide
Page 207
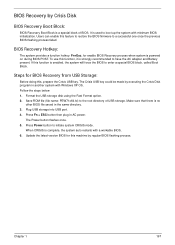
...previous BIOS flashing process failed. To use this feature to restore the BIOS firmware to have the AC adapter and Battery present. Steps for BIOS Recovery from USB Storage: Before doing this function is used to enter a special BIOS block, called Boot Block. Press Fn + ESC button then ... Crisis USB key could be made by executing the Crisis Disk program in another system with minimum BIOS initialization. BIOS Recovery by Crisis Disk BIOS Recovery Boot Block: BIOS Recovery Boot Block is powered on during BIOS POST. It is enabled, the system will force the BIOS to boot up...
...previous BIOS flashing process failed. To use this feature to restore the BIOS firmware to have the AC adapter and Battery present. Steps for BIOS Recovery from USB Storage: Before doing this function is used to enter a special BIOS block, called Boot Block. Press Fn + ESC button then ... Crisis USB key could be made by executing the Crisis Disk program in another system with minimum BIOS initialization. BIOS Recovery by Crisis Disk BIOS Recovery Boot Block: BIOS Recovery Boot Block is powered on during BIOS POST. It is enabled, the system will force the BIOS to boot up...


