Aspire 5735Z Keyboard Removal - Acer
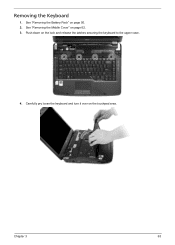
Aspire 5735Z Keyboard Removal

Related Manual Pages


Similar Questions

Is Laptop Ruined?
Spilled some coffee on the keyboard. The laptop stopped working . Is it ruined.
Spilled some coffee on the keyboard. The laptop stopped working . Is it ruined.
(Posted by lflrealty 9 years ago)

How To Remove Keyboard And Replace It?
how to remove keyboard and replace it? help please
how to remove keyboard and replace it? help please
(Posted by sergiut11 9 years ago)


How To Video On Replacing Keyboard On Aspire 4743-4861
Need necessary steps on keyboard removal and install.
Need necessary steps on keyboard removal and install.
(Posted by justinpoky 10 years ago)
