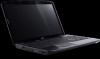
Acer Aspire 5735Z Support Question
Acer Aspire 5735Z Support Question
Find answers below for this question about Acer Aspire 5735Z.Need a Acer Aspire 5735Z manual? We have 2 online manuals for this item!
Question posted by Dferai on June 5th, 2014
Acer Aspire 5735z How Remove Cmos Battery
The person who posted this question about this Acer product did not include a detailed explanation. Please use the "Request More Information" button to the right if more details would help you to answer this question.
Current Answers
Related Acer Aspire 5735Z Manual Pages
Aspire 5335 / 5735 / 5735Z User's Guide EN - Page 9
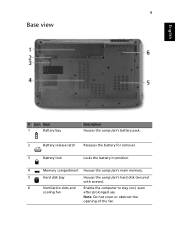
Note: Do not cover or obstruct the
opening of the fan.
9
Base view
English
# Icon Item
1
Battery bay
Description Houses the computer's battery pack.
2
Battery release latch Releases the battery for removal.
3
Battery lock
Locks the battery in position.
4
Memory compartment Houses the computer's main memory.
5
Hard disk bay
Houses the computer's hard disk (secured with screws).
...
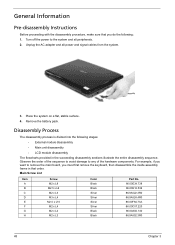
Aspire 5335 / 5735 / 5735Z Service Guide - Page 7
... External Module Disassembly Process 49 External Modules Disassembly Flowchart 49 Removing the Battery Pack 50 Removing the SD dummy card 51 Removing the ExpressCard dummy card 51 Removing the Lower Cover 52 Removing the DIMM 53 Removing the WLAN Board Modules 54 Removing the Hard Disk Drive Module 56 Removing the Optical Drive Module 58 Main Unit Disassembly Process...
Aspire 5335 / 5735 / 5735Z Service Guide - Page 11
...Intel® GL40/GM45 Express Chipset (GM45 for Aspire 5735/5735Z/5335)*
Storage subsystem
• 2.5" hard disk ...Aspire 5735; GL45 for Aspire 5735/
5735Z/5335) • Intel® Wireless WiFi Link 5100/5300* • Acer InviLink™ Nplify™ 802.11b/g/Draft-N* • Acer InviLink™ 802.11b/g* NOTE: Intel® Core™2 Duo T5800/T5900/T9400/P7350/P8400 for Aspire 5735Z...
Aspire 5335 / 5735 / 5735Z Service Guide - Page 58
...off the power to the system and all power and signal cables from the system.
3. Remove the battery pack. Unplug the AC adapter and all peripherals. 2. Observe the order of the hardware ... Instructions
Before proceeding with the disassembly procedure, make sure that you must first remove the keyboard, then disassemble the inside assembly frame in the succeeding disassembly sections illustrate...
Aspire 5335 / 5735 / 5735Z Service Guide - Page 60
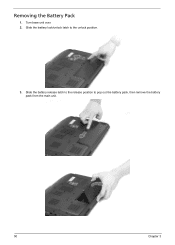
Removing the Battery Pack
1. Slide the battery release latch to the release position to the unlock position.
3. Turn base unit over. 2. Slide the battery lock/unlock latch to pop out the battery pack, then remove the battery pack from the main unit.
50
Chapter 3
Aspire 5335 / 5735 / 5735Z Service Guide - Page 62
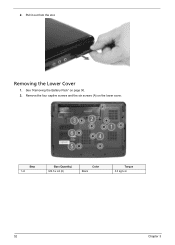
Step 1~6
Size (Quantity) M2.5 x L8 (6)
Color Black
Torque 3.0 kgf-cm
52
Chapter 3 Removing the Lower Cover
1. 2. Pull it out from the slot.
See "Removing the Battery Pack" on the lower cover. Remove the four captive screws and the six screws (A) on page 50. 2.
Aspire 5335 / 5735 / 5735Z Service Guide - Page 63
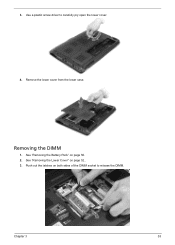
Use a plastic screw driver to release the DIMM. Remove the lower cover from the lower case. Push out the latches on page 50. 2. See "Removing the Battery Pack" on both sides of the DIMM socket to carefully pry open the lower cover.
4. See "Removing the Lower Cover" on page 52.. 3.
Removing the DIMM
1. Chapter 3
53 3.
Aspire 5335 / 5735 / 5735Z Service Guide - Page 64

Removing the WLAN Board Modules
1. See "Removing the Battery Pack" on page 52. 3. See "Removing the Lower Cover" on page 50. 2.
Remove the DIMM module. Remove the white antenna cable that is taped to the WLAN board module.
54
Chapter 3 4.
Aspire 5335 / 5735 / 5735Z Service Guide - Page 66
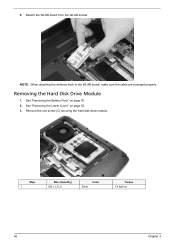
... attaching the antenna back to the WLAN board, make sure the cable are arranged properly. Removing the Hard Disk Drive Module
1. See "Removing the Battery Pack" on page 52. 3. Remove the one screw (C) securing the hard disk drive module.
See "Removing the Lower Cover" on page 50. 2.
Step 1
Size (Quantity) M2 x L3 (1)
Color Silver
Torque...
Aspire 5335 / 5735 / 5735Z Service Guide - Page 68
See "Removing the Lower Cover" on page 50. 2.
Step 1~2
Size (Quantity) M3 x L4 (2)
Color Silver
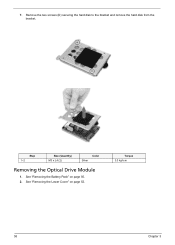
Removing the Optical Drive Module
1. 7. See "Removing the Battery Pack" on page 52.
Torque 3.0 kgf-cm
58
Chapter 3 Remove the two screws (D) securing the hard disk to the bracket and remove the hard disk from the bracket.
Aspire 5335 / 5735 / 5735Z Service Guide - Page 72
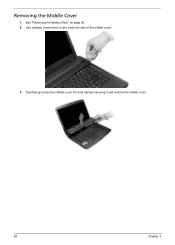
See "Removing the Battery Pack" on page 50. 2. Carefully pry loose the middle cover from the latches securing it and remove the middle cover.
62
Chapter 3 Removing the Middle Cover
1. Use a plastic screw driver to pry loose the side of the middle cover.
3.
Aspire 5335 / 5735 / 5735Z Service Guide - Page 73
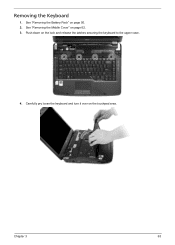
See "Removing the Middle Cover" on the touchpad area. Carefully pry loose the keyboard and turn it over on page 62. 3. Push down on page 50. 2.
Removing the Keyboard
1. Chapter 3
63 See "Removing the Battery Pack" on the lock and release the latches securing the keyboard to the upper case.
4.
Aspire 5335 / 5735 / 5735Z Service Guide - Page 74
5. See "Removing the Lower Cover" on page 50. 2. Disconnect the keyboard cable from the main board.
64
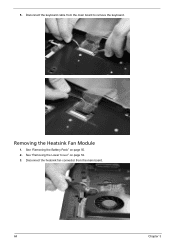
Chapter 3 Disconnect the heatsink fan connector from the main board to remove the keyboard. Removing the Heatsink Fan Module
1.
See "Removing the Battery Pack" on page 52. 3.
Aspire 5335 / 5735 / 5735Z Service Guide - Page 75

Torque 1.6 kgf-cm
Removing the CPU Heatsink Module
1. See "Removing the Heatsink Fan Module" on page 52. 3. Carefully lift up the heatsink fan module. See "Removing the Lower Cover" on page 64. Step 1
Size (Quantity) M2 x L3 (1)
Color Silver
5. Remove the one screw (C) securing the heatsink fan module in place. See "Removing the Battery Pack" on page...
Aspire 5335 / 5735 / 5735Z Service Guide - Page 76
... release the CPU.
66
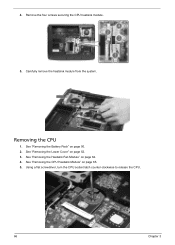
Chapter 3 4. Removing the CPU
1. See "Removing the Heatsink Fan Module" on page 50. 2. Carefully remove the heatsink module from the system. See "Removing the Battery Pack" on page 64. 4. Remove the four screws securing the CPU heatsink module.
5. See "Removing the Lower Cover" on page 65. 5. See "Removing the CPU Heatsink Module" on page...
Aspire 5335 / 5735 / 5735Z Service Guide - Page 77
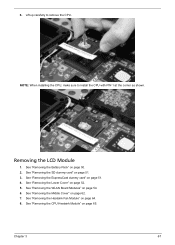
... 1 at the corner as shown. Removing the LCD Module
1. See "Removing the ExpressCard dummy card" on page 54. 6. See "Removing the WLAN Board Modules" on page 51. 4.
See "Removing the Middle Cover" on page 50. 2. See "Removing the Battery Pack" on page 62. 7. See "Removing the Lower Cover" on page 64. 8. See "Removing the Heatsink Fan Module" on...
Aspire 5335 / 5735 / 5735Z Service Guide - Page 80

... Middle Cover" on page 51. 4.
See "Removing the ExpressCard dummy card" on page 62. 10. See "Removing the Lower Cover" on page 64. 12. See "Removing the Heatsink Fan Module" on page 52. 5. See "Removing the Battery Pack" on page 63. 11. See "Removing the Keyboard" on page 50. 2. See "Removing the CPU" on page 56. 8. Separating...
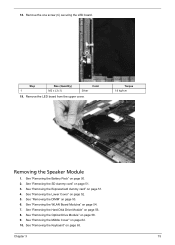
Aspire 5335 / 5735 / 5735Z Service Guide - Page 83
... Middle Cover" on page 63. Torque 3.0 kgf-cm
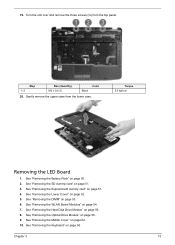
Removing the LED Board
1. See "Removing the Keyboard" on page 62. 10. 19. Gently remove the upper case from the top panel. See "Removing the WLAN Board Modules" on page 50. 2.
See "Removing the Battery Pack" on page 54. 7. See "Removing the Optical Drive Module" on page 53. 6. Turn...
Aspire 5335 / 5735 / 5735Z Service Guide - Page 85
... Optical Drive Module" on page 53. 6. See "Removing the Battery Pack" on page 63. See "Removing the Keyboard" on page 50. 2.
See "Removing the SD dummy card" on page 52. 5. See "Removing the Lower Cover" on page 51. 3. See "Removing the WLAN Board Modules" on page 56. 8. See "Removing the Hard Disk Drive Module" on page 54...
Aspire 5335 / 5735 / 5735Z Service Guide - Page 87
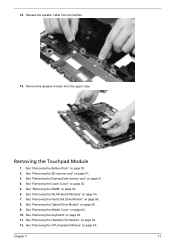
... Module" on page 65. See "Removing the CPU Heatsink Module" on page 58. 9. See "Removing the Battery Pack" on page 63. 11. See "Removing the Keyboard" on page 50. 2. See "Removing the Heatsink Fan Module" on page 51. 3. Chapter 3
77 See "Removing the SD dummy card" on page 64. 12. See "Removing the WLAN Board Modules" on...
Similar Questions


Removing Cmos Battery
How do i remove cmos battery from acer aspire 4930?
How do i remove cmos battery from acer aspire 4930?
(Posted by najeebuv 12 years ago)

Acer Extensa 4420-5237 Cmos Battery Location
need to replace CMOS Battery
need to replace CMOS Battery
(Posted by vladnik48 12 years ago)