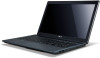
Acer Aspire 5333, 5733, 5733Z Notebook Service Guide
Page 6
LAN Interface 1-27 Keyboard 1-28 Hard Disk Drive (AVL components 1-28 Super-Multi Drive 1-29 BD Drive 1-30 LED 15.6 1-31 Display Supported Resolution (LCD 1-32 Graphics Controller 1-32 Camera 1-33 Mini Card 1-33 Audio Codec and Amplifier 1-34 Audio Interface 1-34 Wireless Module 802.11b/g/n 1-35 Battery 1-35 USB Port 1-36 AC Adapter 1-36 System Power Management 1-37 Card Reader 1-37 System LED Indicator 1-38 System DMA Specification 1-38 System Interrupt Specification 1-39 System IO Address Map 1-40 System I/O Address...
Acer Aspire 5333, 5733, 5733Z Notebook Service Guide
Page 7
...11 HDD Module Removal 3-12 HDD Module Installation 3-13 DIMM Module Removal 3-14 DIMM Module Installation 3-14 WLAN Module Removal 3-15 WLAN Module Installation 3-15 RTC Battery Removal 3-16 RTC Battery Installation 3-16 Optical Disk Drive (ODD) Module Removal 3-17 ODD Module Installation 3-18 Keyboard Removal 3-20 Keyboard Installation 3-21 Upper Cover Removal 3-22 Upper Cover Installation 3-24 Power Board Removal 3-25 Power Board Installation 3-26 Speakers Removal 3-27 Speakers Installation 3-27 USB Module Removal 3-28 USB Module Installation 3-28 ODD Board Removal 3-29...
Acer Aspire 5333, 5733, 5733Z Notebook Service Guide
Page 21
Hardware Specifications and Configurations 1-11 Top View No Icon Item 4 Keyboard 5 Power indicator Description For entering data into your computer. Indicates the computer's power status. Table 1-1. Battery indicator Indicates the computer's battery status. Charging: The light shows amber when the battery is charging. Fully charged: The light shows blue when in AC mode. 6 Click buttons (left and The left and right buttons function like the left and right) right mouse buttons. 7 Touchpad Touch-sensitive pointing device which...
Acer Aspire 5333, 5733, 5733Z Notebook Service Guide
Page 23
... microphone (e.g. Headphones/speaker jack Connects to USB 2.0 devices (e.g., USB mouse, USB camera). 5 Microphone jack Accepts inputs from external microphones. Left View 0 Figure 1-3. Left View Table 1-3. Hardware Specifications and Configurations 1-13 NOTE: Supports compatible 3.5 mm headsets with built-in jack Description Connects to an AC adapter. 2 External display Connects to a display device (e.g., external (VGA) port monitor, LCD projector). 3 Ethernet (RJ-45) port Connects to an Ethernet 10/100/1000-based network. 4 USB 2.0 port Connects to audio devices...
Acer Aspire 5333, 5733, 5733Z Notebook Service Guide
Page 27
... Keyboard 0 Figure 1-7. Use this mode when doing a lot of the key caps. Keyboard Lock Keys Lock key Description Caps Lock When Caps Lock is indicated by small characters located on the keys. (Table 1-8) Table 1-8. Hardware Specifications and Configurations 1-17 A better solution would be toggled on and off Number keys on , the screen moves one line up or down when the up or + down arrow keys are in a normal manner. Scroll Lock does not work...
Acer Aspire 5333, 5733, 5733Z Notebook Service Guide
Page 28
... Windows Start button; Functions supported by Windows XP: < > + : Show the System Properties dialog box < > + : Open Ease of functions. it launches the Start menu. Windows Keys 0 The keyboard has two keys that perform Windows-specific functions. Windows Logo key Application key Table 1-9. Windows Keys Key Description Windows Logo key Pressed alone, this key has the same effect as clicking on the taskbar < > + : Display the System Properties dialog box Functions supported by Windows XP, Windows Vista, and Windows 7: < >: Open or close the Start...
Acer Aspire 5333, 5733, 5733Z Notebook Service Guide
Page 29
... key in Sleep mode. + + + Display toggle Screen blank Touchpad toggle Switches display output between the display screen, external monitor (if connected) and both. Keyboard HotKeys Hotkey Icon Function + Communication switch + Sleep Description Enables/disables the computer's communication devices. (Communication devices may vary by configuration.) Puts the computer in the hotkey combination. Press any key to access most of the computer's controls like screen brightness and volume output. Hardware Specifications and Configurations 1-19 HotKeys 0 Hotkeys or key...
Acer Aspire 5333, 5733, 5733Z Notebook Service Guide
Page 55
... users do not need to Enabled. Refer to save changes and exit BIOS Setup Utility NOTE: NOTE: Parameter values can be run it. use the up and down arrow keys Change parameter value - Press Esc Load default settings - press F9. Press F10 to Troubleshooting when a problem arises. If configuration problems occur, the setup utility may need to specific models. To change the boot device without entering BIOS Setup Utility, set to Disabled. Parameter help carefully when making changes...
Acer Aspire 5333, 5733, 5733Z Notebook Service Guide
Page 62
...If new password and confirm new password strings do not match. Setting a Password: Passwords Do Not Match a. Use the and keys to the BIOS Setup Utility Security menu. Removing a Password: Set Supervisor Password 2. c. Removing a Password 0 Perform the following: 1. Press Enter to return to save changes and exit BIOS Setup Utility. 5. b. The Set Supervisor Password dialog box appears (Figure 2-7): Figure 2-7. Press F10 to the BIOS Setup Utility Security menu. To try to set a new password again, repeat steps 1 through 3. Type current password in...
Acer Aspire 5333, 5733, 5733Z Notebook Service Guide
Page 72
...-Only Memory). Using DMITools 0 The DMI (Desktop Management Interface) Tool copies BIOS information to select an option and continue the boot procedure. To update the DMI Pool, perform the following: 1. Press F12 when prompted during POST procedure. Used in the BIOS Setup Utility's Main screen. (refer to Main) To use the Boot Manager, perform the following: NOTE: NOTE: The F12 Boot Menu option must be changed without accessing the BIOS Setup Utility. The Boot Manager...
Acer Aspire 5333, 5733, 5733Z Notebook Service Guide
Page 108
... thermal pads are in place before replacing module. Thermal Module Removal 0 Prerequisite: Mainboard Removal ! Remove module. Remove all heat pads are approved for use: Eapus XR-PE 1. Remove four (4) screws (B) from CPU using a lint-free cloth or cotton swab and Isopropyl Alcohol, Acetone, or other approved cleaning agent. 2. Thermal Module Installation 0 + IMPORTANT: Apply approved thermal grease and make sure all traces of CPU (B) (Figure 3-37). 3-34 Machine Maintenance...
Acer Aspire 5333, 5733, 5733Z Notebook Service Guide
Page 127
...;Fans start up Status LEDs illuminate If no power No trouble shooting step Ext. Connect the power and reboot the computer. 5. DDRRAM module well No connected? go to no power, Refer to LCD Failure. DDR RAM module Replace M/B LCD cable well connected? Switching between the internal display and the external display is selected. If the POST or video appears on the external display only, refer to Power On Issues. 3. Make sure that internal display is by removing the power cable and battery...
Acer Aspire 5333, 5733, 5733Z Notebook Service Guide
Page 128
... display size is only abnormal in an application, check the view settings and control/mouse wheel zoom feature in the same locations on the screen), the LCD is faulty and should be replaced. (Refer to Maintenance Flowchart) NOTE: NOTE: Make sure that : The device is properly installed. Reseat the memory modules. 10. Adjust the brightness to Maintenance Flowchart). 11. Run the Windows Memory Diagnostic from the operating system DVD...
Acer Aspire 5333, 5733, 5733Z Notebook Service Guide
Page 137
... set to the software's user manual. Check that system resources are connected correctly. 4. If using different software, refer to DMA. 3. If the drive works with the new cable, the original cable should be burned, perform the following: 6. Reseat the drive, making sure and all cables are not running low: Close some applications. Reboot and try the operation again. 2. Replace the ODD. (Refer to enter the BIOS Utility...
Acer Aspire 5333, 5733, 5733Z Notebook Service Guide
Page 138
Remove the power and remove the cover to inspect the connections to Maintenance Flowchart) 4-16 Troubleshooting Replace the ODD. (Refer to the ODD. Remove and clean the failed disc. 2. If the drive works with alternate discs, the original disc is probably defective and should be read when inserted in the drive, perform the following. 1. Refer to a music CD If the ODD works properly with the new cable, the original...
Acer Aspire 5333, 5733, 5733Z Notebook Service Guide
Page 143
... resolve the problem. 1. Confirm all external devices. 2. If the issue is set correctly. 4. Insert the Windows 7 Operating System DVD in the ODD and restart the computer. When the Install Windows screen appears, click Next. Select Repair your computer. For more information see Windows Help and Support. 6. Run Windows Check Disk by entering chkdsk /r from a known good date using up-to-date software to Maintenance Flowchart) Troubleshooting 4-21 Run the Windows Vista Startup Repair Utility: a. When...
Acer Aspire 5333, 5733, 5733Z Notebook Service Guide
Page 145
... log for errors. Remove recently added hardware and associated software. 7. If HDD information is a good connection. If the mouse uses a USB connection, use a different USB port. 4. Run the Event Viewer to verify mouse operation. Remove and reinstall the mouse driver. 13. Replace the Motherboard. 7. Use a different mouse. 2. Refer to Windows Help and Support. 11. If the issue is virus free. 3. 2. Run a complete virus scan using System Restore. 9. If the BIOS settings are no device conflicts No hardware is still...
Acer Aspire 5333, 5733, 5733Z Notebook Service Guide
Page 146
... FRU). Undetermined Problems 0 The diagnostic problems does not identify which adapter or device failed, which installed devices are no error is detected, replace the FRU. If any FRU. 3. If the problem remains, replace the following devices: Non-Acer devices Printer, mouse, and other external devices Battery pack Hard disk drive DIMM CD-ROM/Diskette drive Module PC Cards 4. NOTE: NOTE...
Acer Aspire 5333, 5733, 5733Z Notebook Service Guide
Page 148
...* PEI 7C HECI Initialization PEI_WATCHDOG_INIT* PEI 7D Watchdog timer Initialization PEI_MEMORY_INIT PEI 7E Memory Initial for physical memory 4-26 Troubleshooting PEI_MEMORY_INIT_FOR_CRISIS PEI 7F Memory Initial for Crisis Recovery PEI_MEMORY_INSTALL PEI 80 Simple Memory test PEI_TXTPEI* PEI 81 TXT function early Initialization PEI_SWITCH_STACK PEI 82 Start to maximum level SEC_GO_TO_SECSTARTUP SEC 09 Setup BIOS ROM cache SEC_GO_TO_PEICORE SEC 0A Enter Boot Firmware Volume * 3rd party relate...
Acer Aspire 5333, 5733, 5733Z Notebook Service Guide
Page 150
... PPM Initialization DXE_HECIDRV_INIT* DXE 60 HECIDRV Initialization * 3rd party relate functions - Table 4-6. Table 4-5. BDS Phase POST Code Table Functionality Name (Include\PostCode.h) BDS_ENTER_BDS BDS_INSTALL_HOTKEY BDS_ASF_INIT* BDS_PCI_ENUMERATION_START BDS_BEFORE_PCIIO_INSTALL Phase Post Code Description BDS 10 Enter BDS entry BDS 11 Install Hotkey service BDS 12 ASF Initialization BDS 13 PCI enumeration BDS 14 PCI resource assign complete 4-28 Troubleshooting Platform dependence.