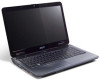
Aspire 5732Z Driver - Acer
Aspire 5732Z Driver
Related Manual Pages


Similar Questions


How Do I Repair Display Driver Is Not Responding But Has Recovered
display driver not responding but has recovered how do i fix this problem
display driver not responding but has recovered how do i fix this problem
(Posted by jedowdall 10 years ago)

Download Driver
how to download windows xp driver for acer aspire 4755g
how to download windows xp driver for acer aspire 4755g
(Posted by glennnoelalag 11 years ago)

I Need To Find My Drivers
im trying to get my webcam n my autio driver back into my acer aspire 5733z 4851 can u p-lease help ...
im trying to get my webcam n my autio driver back into my acer aspire 5733z 4851 can u p-lease help ...
(Posted by babylove18x 11 years ago)

Related Terms
The following terms were also used when searching for Aspire 5732Z Driver - Acer:- acer aspire 5732z
- aspire 5732z
- aspire 5732zg
- aspire5732z
- acer aspire 5732z laptop
- aspire 5732z laptop
- acer aspire5732z
- acer aspire 5732z bluetooth
- aspire 5732z driver
- acer aspire 5732z drivers
- aspire 5732z bluetooth
- aspire 5732z touchpad
- aspire 5732z acer
- aspire 5732z drivers
- acer aspire 5732z microphone
- acer aspire 5732z bluetooth driver
- aspire 5732z 5332
- aspire 5732z microphone
- acer aspire 5732z touchpad
- aspire 5732z /5332
- acer aspire 5732z review
- aspire 5732z keyboard
- acer aspire 5732z xp drivers
- aspire 5732z xp drivers
- aspire 5732z review
- acer aspire 5732z 5332
- aspire5732z driver
- acer aspire 5732z battery
- aspire 5732z 4280
- aspire 5732z battery
- acer aspire 5732z 4280
- aspire 5732z graphics card
- aspire 5732z motherboard
- aspire 5732z-4280
- acer aspire 5732z motherboard
- acer aspire 5732z-4280
- acer laptop aspire5732z
- aspire 5732z manual
- aspire 5732z touchpad not working
- aspire 5732z 432g25mn
- aspire 5732z specs
- aspire 5732z-434g25mn
- aspire5732z drivers xp
- aspire5732z specifications
- acer aspire 5732z batteries
- acer aspire 5732z battery life
- acer aspire 5732z battery not charging
- acer aspire 5732z battery replacement
- acer aspire 5732z battery won't charge
- acer aspire 5732z bios
- acer aspire 5732z black screen of death
- acer aspire 5732z bluetooth driver download
- acer aspire 5732z boot disk
- acer aspire 5732z ccfl lcd
- acer aspire 5732z cd drive
- acer aspire 5732z charger
- acer aspire 5732z dc jack
- acer aspire 5732z disassembly
- acer aspire 5732z driver
- acer aspire 5732z driver 64 bit
- acer aspire 5732z drivers download
- acer aspire 5732z drivers for windows 7
- acer aspire 5732z drivers for xp
- acer aspire 5732z dvd drive
- acer aspire 5732z factory restore
- acer aspire 5732z fan
- acer aspire 5732z for sale
- acer aspire 5732z goes to black screen
- acer aspire 5732z graphics card upgrade
- acer aspire 5732z hard drive
- acer aspire 5732z hard drive ebay
- acer aspire 5732z hard drive replacement
- acer aspire 5732z has no network connections
- acer aspire 5732z hinge cover
- acer aspire 5732z keyboard
- acer aspire 5732z keyboard driver download
- acer aspire 5732z keyboard drivers
- acer aspire 5732z laptop battery
- acer aspire 5732z laptop best price
- acer aspire 5732z laptop charger
- acer aspire 5732z laptop price
- acer aspire 5732z laptop review
- acer aspire 5732z lcd screen
- acer aspire 5732z manual
- acer aspire 5732z memory
- acer aspire 5732z memory upgrade
- acer aspire 5732z microphone not working
- acer aspire 5732z monitor replacement
- acer aspire 5732z never fully charges
- acer aspire 5732z parts
- acer aspire 5732z power adapter
- acer aspire 5732z power button on and off
- acer aspire 5732z power cord
- acer aspire 5732z power jack
- acer aspire 5732z price
- acer aspire 5732z ram
- acer aspire 5732z recovery
- acer aspire 5732z recovery disk
- acer aspire 5732z recovery partition
- acer aspire 5732z release date
- acer aspire 5732z replacement battery
- acer aspire 5732z replacement screen
- acer aspire 5732z restore factory settings
- acer aspire 5732z reviews
- acer aspire 5732z screen
- acer aspire 5732z screen goes black
- acer aspire 5732z screen replacement
- acer aspire 5732z screen very dim
- acer aspire 5732z service manual
- acer aspire 5732z specification
- acer aspire 5732z specifications
- acer aspire 5732z specs
- acer aspire 5732z support
- acer aspire 5732z touchpad driver
- acer aspire 5732z touchpad not working
- acer aspire 5732z usb port replacement
- acer aspire 5732z usb ports not working
- acer aspire 5732z user manual
- acer aspire 5732z webcam
- acer aspire 5732z webcam driver
- acer aspire 5732z webcam software download
- acer aspire 5732z weight
- acer aspire 5732z wifi card
- acer aspire 5732z wireless driver
- acer aspire 5732z wireless switch
- acer aspire 5732z xp driver download
- acer aspire 5732z xp drivers free download
- acer aspire 5732z-434g25mn
- acer aspire 5732z-4836 battery charger
- acer aspire 5732z/5332
- acer aspire 5732z/5532 notebook
- acer aspire 5732zg
- acer aspire 5732zg drivers
- acer aspire5732z 4280
- acer aspire5732z drivers
- aspire 5732z batteries
- aspire 5732z battery life
- aspire 5732z battery not charging
- aspire 5732z battery replacement
- aspire 5732z battery won't charge
- aspire 5732z bios
- aspire 5732z bios password cracker
- aspire 5732z bios password recovery
- aspire 5732z black screen of death
- aspire 5732z bluetooth driver download
- aspire 5732z bluetooth drivers
- aspire 5732z boot disk
- aspire 5732z camera driver
- aspire 5732z card reader
- aspire 5732z ccfl lcd
- aspire 5732z cd drive
- aspire 5732z charger
- aspire 5732z cpu upgrade
- aspire 5732z dc jack
- aspire 5732z disassembly
- aspire 5732z docking station
- aspire 5732z downloads
- aspire 5732z driver 64 bit
- aspire 5732z drivers download
- aspire 5732z drivers for win xp
- aspire 5732z drivers for windows 7
- aspire 5732z drivers for winxp
- aspire 5732z drivers for xp
- aspire 5732z drivers windows 7
- aspire 5732z drivers xp
- aspire 5732z dvd drive
- aspire 5732z factory restore
- aspire 5732z fan
- aspire 5732z for sale
- aspire 5732z goes to black screen
- aspire 5732z graphics card upgrade
- aspire 5732z hard drive
- aspire 5732z hard drive ebay
- aspire 5732z hard drive model
- aspire 5732z hard drive replacement
- aspire 5732z has no network connections
- aspire 5732z hinge cover
- aspire 5732z keyboard driver download
- aspire 5732z keyboard drivers
- aspire 5732z keyboard keyboard
- aspire 5732z keyboard replacement
- aspire 5732z laptop battery
- aspire 5732z laptop best price
- aspire 5732z laptop charger
- aspire 5732z laptop price
- aspire 5732z laptop review
- aspire 5732z lcd
- aspire 5732z lcd screen
- aspire 5732z mainboard
- aspire 5732z memory
- aspire 5732z memory upgrade
- aspire 5732z microphone not working
- aspire 5732z monitor replacement
- aspire 5732z mouse not working
- aspire 5732z never fully charges
- aspire 5732z operating system
- aspire 5732z parts
- aspire 5732z power adapter
- aspire 5732z power button on and off
- aspire 5732z power cord
- aspire 5732z power jack
- aspire 5732z price
- aspire 5732z processor chip
- aspire 5732z ram
- aspire 5732z ram upgrade
- aspire 5732z recovery
- aspire 5732z recovery disk
- aspire 5732z recovery partition
- aspire 5732z release date
- aspire 5732z replacement battery
- aspire 5732z replacement screen
- aspire 5732z restore factory settings
- aspire 5732z reviews
- aspire 5732z screen
- aspire 5732z screen goes black
- aspire 5732z screen replacement
- aspire 5732z screen very dim
- aspire 5732z series sound card
- aspire 5732z service manual
- aspire 5732z specification
- aspire 5732z specifications
- aspire 5732z ssd
- aspire 5732z support
- aspire 5732z touchpad driver
- aspire 5732z turns off
- aspire 5732z u+p mouse usb driver
- aspire 5732z usb port replacement
- aspire 5732z usb ports
- aspire 5732z usb ports not working
- aspire 5732z user manual
- aspire 5732z vga download for xp
- aspire 5732z webcam
- aspire 5732z webcam driver
- aspire 5732z webcam software download
- aspire 5732z weight
- aspire 5732z wifi card
- aspire 5732z wifi driver
- aspire 5732z windows 10
- aspire 5732z wireless driver
- aspire 5732z wireless switch
- aspire 5732z xp
- aspire 5732z xp driver download
- aspire 5732z xp drivers free download
- aspire 5732z-4836 battery charger
- aspire 5732z/5332
- aspire 5732z/5532 notebook
- aspire 5732zg drivers
- battery for aspire 5732z