Aspire 3690 - 5630 - 5680 User's Guide EN
Page 8
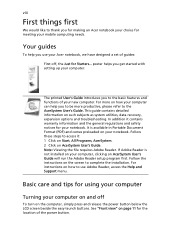
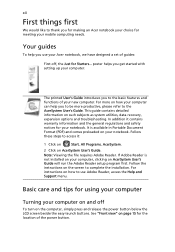
poster helps you for making an Acer notebook your choice for meeting your mobile computing needs. For instructions on how to the basic features and functions of your new computer. The printed User's Guide introduces you to use your Acer notebook, we have designed a set of the power button. Follow the instructions on the screen to the AcerSystem User's Guide. Your guides To help you use Adobe Reader, access the Help and Support menu. For more...
poster helps you for making an Acer notebook your choice for meeting your mobile computing needs. For instructions on how to the basic features and functions of your new computer. The printed User's Guide introduces you to use your Acer notebook, we have designed a set of the power button. Follow the instructions on the screen to the AcerSystem User's Guide. Your guides To help you use Adobe Reader, access the Help and Support menu. For more...

Aspire 3690 - 5630 - 5680 User's Guide EN
Page 13
... 1394 port 70 PC Card slot 71 ExpressCard 72 Installing memory 73 Connecting your TV and AV-in cables 74 Acer Arcade TV set-up wizard (Windows XP Home and Professional) 76 BIOS utility 77 Boot sequence 77 Enable disk-to-disk recovery 77 Password 77 Using software 78 Playing DVD movies 78 Power management 79 Acer eRecovery Management 79 Create backup 80 Restore from backup 80 Create factory default image CD 81 Re-install bundled software without CD 81 Change password 82 Troubleshooting 83 Troubleshooting tips 83 Error...
... 1394 port 70 PC Card slot 71 ExpressCard 72 Installing memory 73 Connecting your TV and AV-in cables 74 Acer Arcade TV set-up wizard (Windows XP Home and Professional) 76 BIOS utility 77 Boot sequence 77 Enable disk-to-disk recovery 77 Password 77 Using software 78 Playing DVD movies 78 Power management 79 Acer eRecovery Management 79 Create backup 80 Restore from backup 80 Create factory default image CD 81 Re-install bundled software without CD 81 Change password 82 Troubleshooting 83 Troubleshooting tips 83 Error...
Aspire 3690 - 5630 - 5680 User's Guide EN
Page 22
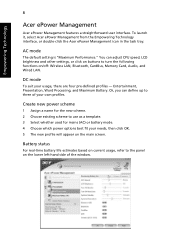
...) or battery mode. 4 Choose which power options best fit your usage, there are four pre-defined profiles - Or, you can adjust CPU speed, LCD brightness and other settings, or click on buttons to use as a template. 3 Select whether used for the new scheme. 2 Choose existing scheme to turn the following functions on the main screen. Empowering Technology 8 Acer ePower Management Acer ePower Management features a straightforward user interface. AC mode The default setting is "Maximum...
...) or battery mode. 4 Choose which power options best fit your usage, there are four pre-defined profiles - Or, you can adjust CPU speed, LCD brightness and other settings, or click on buttons to use as a template. 3 Select whether used for the new scheme. 2 Choose existing scheme to turn the following functions on the main screen. Empowering Technology 8 Acer ePower Management Acer ePower Management features a straightforward user interface. AC mode The default setting is "Maximum...
Aspire 3690 - 5630 - 5680 User's Guide EN
Page 58
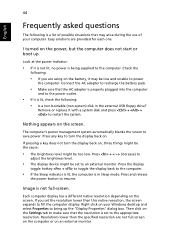
...; If the Sleep indicator is lit, the computer is in the external USB floppy drive? Nothing appears on the screen. Press and release the power button to the computer. Resolutions lower than this native resoution, the screen expands to the appropriate resolution. Remove or replace it is not full-screen. Press + (increase) to adjust the brightness level. • The display device might be set to restart the...
...; If the Sleep indicator is lit, the computer is in the external USB floppy drive? Nothing appears on the screen. Press and release the power button to the computer. Resolutions lower than this native resoution, the screen expands to the appropriate resolution. Remove or replace it is not full-screen. Press + (increase) to adjust the brightness level. • The display device might be set to restart the...
Aspire 5680/5650/5630/5610/5610Z/3690 User's Guide
Page 12
... Format (PDF) and comes preloaded on how your computer can help you get started with setting up your new computer. See "Front view" on the computer, simply press and release the power button below the LCD screen beside the easy-launch buttons. It is not installed on your computer on and off , the Just for your notebook. Follow these steps to use your Acer notebook...
... Format (PDF) and comes preloaded on how your computer can help you get started with setting up your new computer. See "Front view" on the computer, simply press and release the power button below the LCD screen beside the easy-launch buttons. It is not installed on your computer on and off , the Just for your notebook. Follow these steps to use your Acer notebook...

Aspire 5680/5650/5630/5610/5610Z/3690 User's Guide
Page 61
... a list of your Windows desktop and select Properties to bring up . If pressing a key does not turn the display back on the screen. Look at the power indicator: • If it is lit, check the following: • Is a non-bootable (non-system) disk in Sleep mode. Remove or replace it may arise during the use of possible situations that may be set to an external monitor. Press...
... a list of your Windows desktop and select Properties to bring up . If pressing a key does not turn the display back on the screen. Look at the power indicator: • If it is lit, check the following: • Is a non-bootable (non-system) disk in Sleep mode. Remove or replace it may arise during the use of possible situations that may be set to an external monitor. Press...
Aspire 5680/5650/5630/5610/5610Z/3690 User's Guide
Page 107
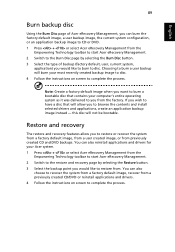
... a factory default image, recover from the Empowering Technology toolbar to start Acer eRecovery Management. 2 Switch to the restore and recovery page by selecting the Burn Disc button. 3 Select the type of Acer eRecovery Management, you can burn the factory default image, a user backup image, the current system configuration, or an application backup image to CD or DVD. 1 Press + or select Acer eRecovery Management from a previously created CD/DVD or reinstall applications and drivers. 4 Follow the instructions on screen...
... a factory default image, recover from the Empowering Technology toolbar to start Acer eRecovery Management. 2 Switch to the restore and recovery page by selecting the Burn Disc button. 3 Select the type of Acer eRecovery Management, you can burn the factory default image, a user backup image, the current system configuration, or an application backup image to CD or DVD. 1 Press + or select Acer eRecovery Management from a previously created CD/DVD or reinstall applications and drivers. 4 Follow the instructions on screen...

Service Guide
Page 29
Acer eSetting Launches the Acer eSettings in Sleep mode. Fn-y Volume down Decreases the speaker volume. Fn-F5 Fn-F6 Fn-F7 Display toggle Screen blank Touchpad toggle Switches display output between the display screen, external monitor (if connected) and both. TravelMate Series: Hot Key Fn-F1 Fn-F2 Icon Function Hot key help Description Displays help on and off . Fn-w Volume up Increases the speaker volume. Sleep Puts the computer in Acer eManager. Turns the internal touchpad on and off...
Acer eSetting Launches the Acer eSettings in Sleep mode. Fn-y Volume down Decreases the speaker volume. Fn-F5 Fn-F6 Fn-F7 Display toggle Screen blank Touchpad toggle Switches display output between the display screen, external monitor (if connected) and both. TravelMate Series: Hot Key Fn-F1 Fn-F2 Icon Function Hot key help Description Displays help on and off . Fn-w Volume up Increases the speaker volume. Sleep Puts the computer in Acer eManager. Turns the internal touchpad on and off...

Service Guide
Page 38
... new scheme. 2. The new profile will appear on /off: Wireless LAN, Bluetooth, CardBus, Memory Card, Audio, and Wired LAN. You can define up to three of your own profiles. Acer eNet Management can save network settings for a location to a profile, and automatically apply the appropriate profile when you can adjust CPU speed, LCD brightness and other settings, or click on buttons to use as default printer settings. Entertainment, Presentation, Word Processing, and Maximum Battery...
... new scheme. 2. The new profile will appear on /off: Wireless LAN, Bluetooth, CardBus, Memory Card, Audio, and Wired LAN. You can define up to three of your own profiles. Acer eNet Management can save network settings for a location to a profile, and automatically apply the appropriate profile when you can adjust CPU speed, LCD brightness and other settings, or click on buttons to use as default printer settings. Entertainment, Presentation, Word Processing, and Maximum Battery...

Service Guide
Page 41
.../2.0/3.0, PCI2.2, System/HDD Password Security Control, INT 13h Extensions, PnP 1.0a, SMBIOS 2.4, BIOS Boot Specification (Compaq, Phoenix, INtel), Simple Boot Flag 1.0, Boot Block, PCI Bus Power Management Interface Specification,USB 1.1/2.0, PC Card 95, IrDA 1.0, Intel AC97 CNR Specification, WfM 2.0, PXE 2.1, Boot Integrity Service Application Program Interface (BIS) 1.0, PC99a and Mobile PC2001 Compliant, Intel (R) SpeedStep Technology, Legacy 1394 Device support, DMI 2.0, PS/2 keyboard and mouse Set by setup manual Specification Built-in CPU 4MB for Intel...
.../2.0/3.0, PCI2.2, System/HDD Password Security Control, INT 13h Extensions, PnP 1.0a, SMBIOS 2.4, BIOS Boot Specification (Compaq, Phoenix, INtel), Simple Boot Flag 1.0, Boot Block, PCI Bus Power Management Interface Specification,USB 1.1/2.0, PC Card 95, IrDA 1.0, Intel AC97 CNR Specification, WfM 2.0, PXE 2.1, Boot Integrity Service Application Program Interface (BIS) 1.0, PC99a and Mobile PC2001 Compliant, Intel (R) SpeedStep Technology, Legacy 1394 Device support, DMI 2.0, PS/2 keyboard and mouse Set by setup manual Specification Built-in CPU 4MB for Intel...
Service Guide
Page 42
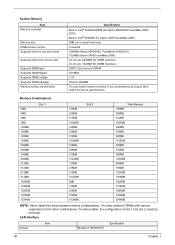
... 1152MB 1280MB 1536MB 2048MB NOTE: Above table lists some system memory configurations. LAN Interface Item Chipset BroadCom BCM4401E Specification 36 Chapter 1 System Memory Item Memory controller Memory size DIMM socket number Supports memory size per socket Supports maximum memory size Supports DIMM type Supports DIMM Speed Supports DIMM voltage Supports DIMM package Memory module combinations Specification Built-in Intel® 945GM/945PM (for Aspire 3690/TravelMate 2490) 0MB (no on-board memory) 2 sockets 2048MB (Aspire 5680/5630;
... 1152MB 1280MB 1536MB 2048MB NOTE: Above table lists some system memory configurations. LAN Interface Item Chipset BroadCom BCM4401E Specification 36 Chapter 1 System Memory Item Memory controller Memory size DIMM socket number Supports memory size per socket Supports maximum memory size Supports DIMM type Supports DIMM Speed Supports DIMM voltage Supports DIMM package Memory module combinations Specification Built-in Intel® 945GM/945PM (for Aspire 3690/TravelMate 2490) 0MB (no on-board memory) 2 sockets 2048MB (Aspire 5680/5630;
Service Guide
Page 59
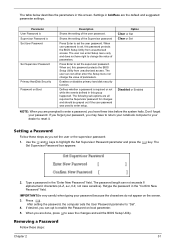
... if the user password was used to save the changes and exit the BIOS Setup Utility. When user password is set the user password. Press e. Settings in boldface are done, press u to enter setup. Shows the setting of parameters. The user can not exceeds 8 alphanumeric characters (A-Z, a-z, 0-9, not case sensitive). Defines whether a password is Set User Password Set Supervisor Password Primary HardDisk Security Password on boot parameter. 5. Option Clear or Set Clear or Set Disabled or Enabled NOTE: When you set , this screen. Don't forget...
... if the user password was used to save the changes and exit the BIOS Setup Utility. When user password is set the user password. Press e. Settings in boldface are done, press u to enter setup. Shows the setting of parameters. The user can not exceeds 8 alphanumeric characters (A-Z, a-z, 0-9, not case sensitive). Defines whether a password is Set User Password Set Supervisor Password Primary HardDisk Security Password on boot parameter. 5. Option Clear or Set Clear or Set Disabled or Enabled NOTE: When you set , this screen. Don't forget...

Service Guide
Page 60
... User Password parameter to "Clear". 4. When you have changed the settings, press u to save the changes and exit the BIOS Setup Utility. The password setting is OK, the screen will show you can enable the Password on boot parameter. 6. Press e twice without typing anything in the Enter Current Password field and press e. 3. Use the w and y keys to highlight the Set Supervisor Password parameter and press the e key. Type the current password in the Enter New Password and Confirm New Password...
... User Password parameter to "Clear". 4. When you have changed the settings, press u to save the changes and exit the BIOS Setup Utility. The password setting is OK, the screen will show you can enable the Password on boot parameter. 6. Press e twice without typing anything in the Enter Current Password field and press e. 3. Use the w and y keys to highlight the Set Supervisor Password parameter and press the e key. Type the current password in the Enter New Password and Confirm New Password...
Service Guide
Page 63
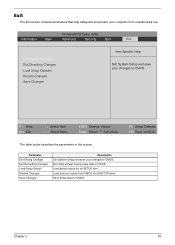
... Changes Exit Discarding Changes Load Setup Default Discard Changes Save Changes Description Exit System Setup and save your changes to CMOS. PhoenixBIOS Setup Utility Information Main Advanced Security Boot Exit Exit Saving Changes Exit Disarding Changes Load Setup Defaults Discard Changes Save Changes Item Specific Help Exit System Setup and save your changes to CMOS. F1 Help Esc Exit ↑ ↓ Select Item ← → Select Menu F5/F6 Change Values Enter Select 4 Sub-Menu F9 Setup Defaults...
... Changes Exit Discarding Changes Load Setup Default Discard Changes Save Changes Description Exit System Setup and save your changes to CMOS. PhoenixBIOS Setup Utility Information Main Advanced Security Boot Exit Exit Saving Changes Exit Disarding Changes Load Setup Defaults Discard Changes Save Changes Item Specific Help Exit System Setup and save your changes to CMOS. F1 Help Esc Exit ↑ ↓ Select Item ← → Select Menu F5/F6 Change Values Enter Select 4 Sub-Menu F9 Setup Defaults...
Service Guide
Page 87
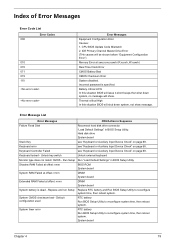
.../Action in BIOS Setup Utility. Keyboard error see "Keyboard or Auxiliary Input Device Check" on page 68. Unlock key switch Unlock external keyboard Monitor type does not match CMOS - System CMOS checksum bad - CPU BIOS Update Code Mismatch 2. IDE Primary Channel Master Drive Error (THe causes will be shown before "Equipment Configuration Error") Memory Error at offset: nnnn DIMM System board System battery is specified. Run Setup Run "Load Default Settings" in Sequence Failure Fixed Disk Reconnect hard disk drive connector. System board Chapter 4 79 Keyboard locked...
.../Action in BIOS Setup Utility. Keyboard error see "Keyboard or Auxiliary Input Device Check" on page 68. Unlock key switch Unlock external keyboard Monitor type does not match CMOS - System CMOS checksum bad - CPU BIOS Update Code Mismatch 2. IDE Primary Channel Master Drive Error (THe causes will be shown before "Equipment Configuration Error") Memory Error at offset: nnnn DIMM System board System battery is specified. Run Setup Run "Load Default Settings" in Sequence Failure Fixed Disk Reconnect hard disk drive connector. System board Chapter 4 79 Keyboard locked...

Service Guide
Page 88
... Default Settings" in Sequence RTC battery Run BIOS Setup Utility to reconfigure system time, then reboot system. DIMM System board Check the drive is defined with the proper diskette type in BIOS Setup Utility See "External Diskette Drive Check" on page 68. Cache disabled CPU ID: DMA Test Failed Software NMI Failed Fail-Safe Timer NMI Failed Device Address Conflict Allocation Error for device Failing Bits: nnnn Fixed Disk n Invalid System Configuration Data I/O device IRQ conflict Operating...
... Default Settings" in Sequence RTC battery Run BIOS Setup Utility to reconfigure system time, then reboot system. DIMM System board Check the drive is defined with the proper diskette type in BIOS Setup Utility See "External Diskette Drive Check" on page 68. Cache disabled CPU ID: DMA Test Failed Software NMI Failed Fail-Safe Timer NMI Failed Device Address Conflict Allocation Error for device Failing Bits: nnnn Fixed Disk n Invalid System Configuration Data I/O device IRQ conflict Operating...

Service Guide
Page 91
... devices Initialize all video adapters in system QuietBoot start (optional) Shadow video BIOS ROM Display BIOS copyright notice Display CPU type and speed Initialize EISA board Test keyboard Set key click if enabled Test for unexpected interrupts Initialize POST display service Display prompt "Press F2 to enter SETUP" Disable CPU cache Test RAM between 512 and 640 KB Test extended memory Test extended memory address lines Jump to User Patch1 Configure advanced cache registers Initialize Multi Processor APIC Enable external and CPU caches Setup...
... devices Initialize all video adapters in system QuietBoot start (optional) Shadow video BIOS ROM Display BIOS copyright notice Display CPU type and speed Initialize EISA board Test keyboard Set key click if enabled Test for unexpected interrupts Initialize POST display service Display prompt "Press F2 to enter SETUP" Disable CPU cache Test RAM between 512 and 640 KB Test extended memory Test extended memory address lines Jump to User Patch1 Configure advanced cache registers Initialize Multi Processor APIC Enable external and CPU caches Setup...
Service Guide
Page 93
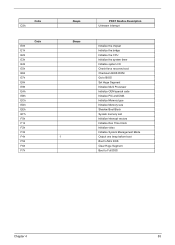
... the CPU Initialize the system timer Initialize system I/O Check force recovery boot Checksum BIOS ROM Go to BIOS Set Huge Segment Initialize Multi Processor Initialize OEM special code Initialize PIC and DMA Initialize Memory type Initialize Memory size Shadow Boot Block System memory test Initialize interrupt vectors Initialize Run Time Clock Initialize video Initialize System Management Mode Output one beep before boot Boot to Mini DOS Clear Huge Segment Boot...
... the CPU Initialize the system timer Initialize system I/O Check force recovery boot Checksum BIOS ROM Go to BIOS Set Huge Segment Initialize Multi Processor Initialize OEM special code Initialize PIC and DMA Initialize Memory type Initialize Memory size Shadow Boot Block System memory test Initialize interrupt vectors Initialize Run Time Clock Initialize video Initialize System Management Mode Output one beep before boot Boot to Mini DOS Clear Huge Segment Boot...
Service Guide
Page 95
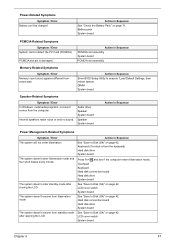
... / Error In Windows, multimedia programs, no sound. Audio driver Speaker System board Speaker System board Action in Sequence PCMCIA slot assembly System board PCMCIA slot assembly Memory-Related Symptoms Symptom / Error Memory count (size) appears different from the keyboard) Hard disk drive System board Press Fn+oand see if the computer enters hibernation mode. Action in Sequence See "Save to execute "Load Default Settings, then reboot system. Power-Related Symptoms Symptom / Error Battery can't be charged Action...
... / Error In Windows, multimedia programs, no sound. Audio driver Speaker System board Speaker System board Action in Sequence PCMCIA slot assembly System board PCMCIA slot assembly Memory-Related Symptoms Symptom / Error Memory count (size) appears different from the keyboard) Hard disk drive System board Press Fn+oand see if the computer enters hibernation mode. Action in Sequence See "Save to execute "Load Default Settings, then reboot system. Power-Related Symptoms Symptom / Error Battery can't be charged Action...

Service Guide
Page 97
... with a hardware defect, such as: cosmic radiation, electrostatic discharge, or software errors. FRU replacement should be caused by a variety of reasons that have nothing to verify that there are no error is detected, replace the FRU. Run the advanced diagnostic test for the system board in loop mode at least 10 times. 2. Intermittent Problems Intermittent system hang problems can be...
... with a hardware defect, such as: cosmic radiation, electrostatic discharge, or software errors. FRU replacement should be caused by a variety of reasons that have nothing to verify that there are no error is detected, replace the FRU. Run the advanced diagnostic test for the system board in loop mode at least 10 times. 2. Intermittent Problems Intermittent system hang problems can be...


