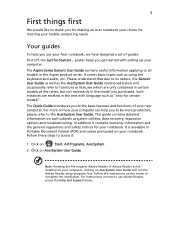
Acer Aspire 5538 Notebook Series Start Guide
Page 3
...Acer notebook your choice for certain models". For instructions on such subjects as "only for meeting your mobile computing needs. The Aspire Series Generic User Guide contains useful information applying to all models in Portable Document Format (PDF) and comes preloaded on how your computer can help you get started...the Just for your notebook. Follow the instructions on AcerSystem User Guide. If Adobe Reader is available in the Aspire product series. Follow these steps to access it contains warranty information and the general regulations and safety notices for ...
Acer Aspire 5538 Notebook Series Start Guide
Page 5
... right buttons function like screen brightness and volume output. Hotkey Icon + + + Function System property Bluetooth Sleep Description Starts System Property for certain models) Puts the computer in the hotkey combination. key Backup key Launches Acer Backup Management for your hands when you use the computer. 9 Touchpad toggle Turns the internal touchpad on...
Acer Aspire 5538 Series Service Guide
Page 22
Key Description Windows key Pressed alone, this key has the same effect as clicking the right mouse button; it launches the Start menu. Application This key has the same effect as clicking on your computer (if you are connected to a network domain), or switch users (if you...opens the key application's context menu. 12 Chapter 1 It can also be used with other keys to provide a variety of functions: < >: Open or close the Start menu < > + : Display the desktop < > + : Open Windows Explore < > + : Search for computers (if you are on a network) Note: Depending on the Windows...
Acer Aspire 5538 Series Service Guide
Page 75
Starting at a top corner, pry apart the Upper and Lower Covers as shown. 7. 5. Working from the back corners toward the back center, pry apart the covers ...
Acer Aspire 5538 Series Service Guide
Page 102
See "Removing the LCD Module" on page 85. 2. Chapter 3 92 Starting from the inside top edge, pry the bezel away from the LCD Module. Continue moving along the top, prying the bezel away from the panel. If necessary, use a plastic pry to the LCD cover. Step LCD Bezel Size M2.5*4 Quantity 4 Screw Type p 3. Remove the four screw covers and four screws securing the front bezel to release the corners of the bezel. Removing the LCD Bezel 1.
Acer Aspire 5538 Series Service Guide
Page 144
Place the Upper Cover on the assembly bottom edge first. 2. Starting at the bottom edge, press the edges of the upper cover and lower cover together. An audible click signifies that the securing clips are engaged. Replacing the Upper Cover 1. Chapter 3 134
Acer Aspire 5538 Series Service Guide
Page 164
... model procedures. 2. Do not replace a non-defective FRUs: No POST or Video If the POST or video doesn't display, perform the following occurs: • Fans start up • Status LEDs light up If there is done by one at a time to correct the problem. Reconnect the power and reboot the computer...
Acer Aspire 5538 Series Service Guide
Page 168
... the Issue is listed under Other Devices. 3. Navigate to the previous version, if updated recently. 4. Roll back the audio driver to Start´ Control Panel´ System and Maintenance´ System´ Device Manager. Check the Device Manager to verify that the volume is ... time to configure the speakers. 8. Ensure that other audio applications are set mid range: a. Click Mixer to determine that Speakers are set to Start´ Control Panel´ Hardware and Sound´ Sound. Reboot the computer. 2. Navigate to 50 and not muted. 6. Chapter 4 158 ...
Acer Aspire 5538 Series Service Guide
Page 169
... the internal Microphone fails, perform the following actions one at a time to correct the problem. 1. Select the microphone then click Properties. Increase the volume to Start´ Control Panel´ Hardware and Sound´ Sound and select the Recording tab. 2. b. Select Set up microphone. Select the microphone type from the list...
Acer Aspire 5538 Series Service Guide
Page 170
... onscreen information to the operating system DVD. Replace the HDD. See "Disassembly Process" on the Boot menu. 6. e. f. Ensure all external devices. 2. Remove any key to start to resolve the problem. 4. When prompted, press any recently added hardware and associated software. 8. g. h. Chapter 4 160 insert the Windows Vista Operating System DVD in the...
Acer Aspire 5538 Series Service Guide
Page 171
...up • The tray does not eject • Access failure screen displays • The ODD is noisy Perform the following actions one at a time to Start´ Computer. Reboot the computer and retry the operation. 2. Navigate to correct the problem. Try an alternate disc. 3. Check that the ODD device is... displayed in My Computer or the BIOS setup • LED does not flash when the computer starts up or jumps • Optical drive not found or not active: • Not shown in the Devices with Removable Storage panel. 161 Chapter 4
Acer Aspire 5538 Series Service Guide
Page 172
... cannot be changed even Windows is reinstalled or the drive is visible. 2. c. Click Properties. c. If using different software, refer to Start´ Computer and right-click the writable ODD icon. Playback is Choppy If playback is enabled: a. Check that there are no yellow exclamation...the region suitable for all media and devices. Check that AutoPlay is choppy or jumps, perform the following actions one at a time to Start´ Control Panel´ Hardware and Sound´ AutoPlay. b. Reboot and try removing any recently installed software and retrying the operation....
Acer Aspire 5538 Series Service Guide
Page 173
... field on the drive, motherboard, and cables. See "Disassembly Process" on page 52. c. Repeat for the other discs. Restart the computer and press F2 to Start´ Control Panel´ System and Maintenance´ System´ Device Manager. b. Remove and clean the failed disc. 2. b. Ensure that the entry is detected in...
Acer Aspire 5538 Series Service Guide
Page 175
Wireless Function Failure If the WLAN/WiMAX fails, perform the following actions one at a time to the card Check Antenna NG Swap the Antenna OK Check WLAN/Wi MAX Card NG Swap WLAN/ WiMAX Card OK Check Function Board NG Swap Function Board Swap Mainboard 165 Chapter 4 Do not replace a non-defective FRUs: Start Check Antenna to WLAN/WiMAX C ard OK NG OK Reconnect the Antenna to correct the problem.
Acer Aspire 5538 Series Service Guide
Page 176
...Failure If the Bluetooth fails, perform the following actions one at a time to correct the problem. Do not replace a nondefective FRUs: Start Check BT cable connected OK NG OK Reconnect the cable to the module Check BT cable NG Swap the cable OK Check BT Module NG... Easy Button Failure If the Media Board fails, perform the following actions one at a time to correct the problem. Do not replace a non-defective FRUs: Start OK Check function /B to M/B FFC OK Check function /B and FFC Re -assemble NG the function /B FFC to M/B OK Swap The NG function /B Swap M/B ...
Acer Aspire 5538 Series Service Guide
Page 177
NG Seat it well OK Check CPU NG Swap CPU Swap Mainboard 167 Chapter 4 Thermal Unit Failure If the Thermal Unit fails, perform the following actions one at a time to the Mainboard Check Fan NG Swap the Thermal Module OK CPU Heatink well seated? Do not replace a non-defective FRUs: Start OK Check Fan power cable NG OK Reconnect the cable to correct the problem.
Acer Aspire 5538 Series Service Guide
Page 182
... every memory range do the hard ware ECC init Report status code of every memory range Get the root bridge handle Notify pci bus driver starts to program the resource Reset the host controller IdeBus begin initialization Report that the remote terminal is being disabled Report that the remote terminal is...
Acer Aspire 5538 Series Service Guide
Page 189
...and enter BIOS Setup Utility. 2. Check the Security screen shows Supervisor and User Passwords are clear. After the Save, the notebook auto re-starts. 3. Remove the battery pack and AC adapter. 7. Replace the memory modules and close memory door. 9. Replace the battery pack and power...and exit. Clearing Password Check Hardware Open Gap Description Item Description R397 Clear CMOS Jumper Location Memory Bay Steps for enabling BIOS Recovery. Aspire 5538 provides one Hotkey for Clearing BIOS Password Check If users set in step 1 and allow the device to startup. 4. Clearing Password...