
Aspire 4735ZG/4935/4935G Quick Guide
Page 3
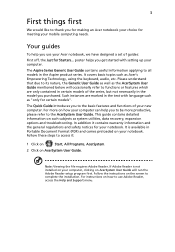
...and safety notices for your computer, clicking on AcerSystem User Guide will occasionally refer to functions or features which are marked in the Aspire product series. Follow the instructions on how to use your computer. It covers basic topics such as system utilities, data recovery,... expansion options and troubleshooting. For instructions on the screen to all models in the text with setting up your Acer notebook, we have designed a set of guides: First off, the Just for certain models". This guide ...
...and safety notices for your computer, clicking on AcerSystem User Guide will occasionally refer to functions or features which are marked in the Aspire product series. Follow the instructions on how to use your computer. It covers basic topics such as system utilities, data recovery,... expansion options and troubleshooting. For instructions on the screen to all models in the text with setting up your Acer notebook, we have designed a set of guides: First off, the Just for certain models". This guide ...

Aspire 4735ZG/4935/4935G Quick Guide
Page 5
... the status of the computer's functions and components. 5 English # Icon Item 2 Microphone Description Internal microphone for sound recording. 3 Display screen Also called Liquid-Crystal Display (LCD), displays computer output (Configuration may vary by models). 4 Power button Turns the computer on and off.... 6 Keyboard For entering data into your computer. 7 Palmrest Comfortable support area for your hands when you use with Acer Arcade and other keys media playing programs. 12 Easy-launch Buttons for launching frequently used buttons programs. Please refer to ...
... the status of the computer's functions and components. 5 English # Icon Item 2 Microphone Description Internal microphone for sound recording. 3 Display screen Also called Liquid-Crystal Display (LCD), displays computer output (Configuration may vary by models). 4 Power button Turns the computer on and off.... 6 Keyboard For entering data into your computer. 7 Palmrest Comfortable support area for your hands when you use with Acer Arcade and other keys media playing programs. 12 Easy-launch Buttons for launching frequently used buttons programs. Please refer to ...

Service Guide
Page 4
IV Alerts you to do specific actions relevant to any damage that appear on screen. Gives precautionary measures to avoid possible hardware or software problems. Reminds you to the accomplishment of additional information related to the current topic. NOTE WARNING CAUTION IMPORTANT Gives bits and pieces of procedures. Conventions The following conventions are used in this manual: SCREEN MESSAGES Denotes actual messages that might result from doing or not doing specific actions.
IV Alerts you to do specific actions relevant to any damage that appear on screen. Gives precautionary measures to avoid possible hardware or software problems. Reminds you to the accomplishment of additional information related to the current topic. NOTE WARNING CAUTION IMPORTANT Gives bits and pieces of procedures. Conventions The following conventions are used in this manual: SCREEN MESSAGES Denotes actual messages that might result from doing or not doing specific actions.

Service Guide
Page 15
...computer on and off. For entering data into your hands when you around your new computer. Chapter 1 5 Your Acer Notebook tour After knowing your computer features, let us show the status of the computer's functions and components. Status ... Internal microphone for certain models). Front View No. 1 2 3 4 5 6 7 Icon Item Acer Crystal Eye webcam Microphone Description Web camera for video communication (only for sound recording. Display screen Power button Also called Liquid-Crystal Display (LCD), displays computer output (Configuration may vary by models). Comfortable...
...computer on and off. For entering data into your hands when you around your new computer. Chapter 1 5 Your Acer Notebook tour After knowing your computer features, let us show the status of the computer's functions and components. Status ... Internal microphone for certain models). Front View No. 1 2 3 4 5 6 7 Icon Item Acer Crystal Eye webcam Microphone Description Web camera for video communication (only for sound recording. Display screen Power button Also called Liquid-Crystal Display (LCD), displays computer output (Configuration may vary by models). Comfortable...

Service Guide
Page 22
... which you press the up or down arrow keys respectively. Lock key Caps Lock Num Lock + Scroll Lock + Description When Caps Lock is on, the screen moves one line up or down when you can toggle on the keys. To simplify the keyboard legend, cursor-control key symbols are in a normal...
... which you press the up or down arrow keys respectively. Lock key Caps Lock Num Lock + Scroll Lock + Description When Caps Lock is on, the screen moves one line up or down when you can toggle on the keys. To simplify the keyboard legend, cursor-control key symbols are in a normal...

Service Guide
Page 24
... key in Sleep mode. Hotkey + + + + + + + + + < > + < > Icon Function Hotkey help Acer eSettings Management Acer ePower Management Sleep Display toggle Screen blank Touchpad toggle Speaker toggle Brightness up Brightness down Description Displays help on and off. Launches Acer ePower Management in Acer Empowering Technology. Launches Acer eSettings Management in Acer Empowering Technology. Turns the speakers on hotkeys. Decreases the...
... key in Sleep mode. Hotkey + + + + + + + + + < > + < > Icon Function Hotkey help Acer eSettings Management Acer ePower Management Sleep Display toggle Screen blank Touchpad toggle Speaker toggle Brightness up Brightness down Description Displays help on and off. Launches Acer ePower Management in Acer Empowering Technology. Launches Acer eSettings Management in Acer Empowering Technology. Turns the speakers on hotkeys. Decreases the...

Service Guide
Page 26
... Solution has incorporated protection against unauthorized access to Start´ All Programs and click on the same screen. With Acer Bio-Protection Fingerprint Solution, you can now enjoy an extra layer of protection for certain models) Acer Bio-Protection Fingerprint Solution is connected, then select Start, Control Panel, Display and click on certain...
... Solution has incorporated protection against unauthorized access to Start´ All Programs and click on the same screen. With Acer Bio-Protection Fingerprint Solution, you can now enjoy an extra layer of protection for certain models) Acer Bio-Protection Fingerprint Solution is connected, then select Start, Control Panel, Display and click on certain...

Service Guide
Page 27
... to be partitioned independently. Enjoy the convenience of the second monitor is dual-display compatible, allowing two displays to be partitioned independently. Run Acer GridVista and select your preferred screen configuration for each window into the appropriate grid. 3. NOTE: Please ensure that the resolution setting of a well-organized desktop. Double (vertical), Triple...
... to be partitioned independently. Enjoy the convenience of the second monitor is dual-display compatible, allowing two displays to be partitioned independently. Run Acer GridVista and select your preferred screen configuration for each window into the appropriate grid. 3. NOTE: Please ensure that the resolution setting of a well-organized desktop. Double (vertical), Triple...

Service Guide
Page 36
... Vertical 40 45 CR => 10 10 15 25 30 Temperature Range (°C) Operating Storage (shipping) 0 to 50°C -20 to 60°C 26 Chapter 1 L02 Screen Diagonal (mm) 355.6 (14.0") Display Area (mm) 309.399(H) X 173.952(V) Display resolution (pixels) 1366 x 768 Pixel Pitch 0.2265(H) x 0.2265(V) Display Mode Normally white Typical...
... Vertical 40 45 CR => 10 10 15 25 30 Temperature Range (°C) Operating Storage (shipping) 0 to 50°C -20 to 60°C 26 Chapter 1 L02 Screen Diagonal (mm) 355.6 (14.0") Display Area (mm) 309.399(H) X 173.952(V) Display resolution (pixels) 1366 x 768 Pixel Pitch 0.2265(H) x 0.2265(V) Display Mode Normally white Typical...

Service Guide
Page 39
...Setup" message is already properly configured and optimized, and you do not need to "enabled". Your computer is prompted on the bottom of the screen. Please also refer to run Setup. Please note that system information is set the parameter to run this item. • Press Esc while you... System). Press during POST (when "Press to the Exit menu. • In any menu, you are found in the Item Specific Help part of the screen. However, if you encounter configuration problems, you want to change the value of a parameter, press F5 or F6. • A plus sign (+) indicates ...
...Setup" message is already properly configured and optimized, and you do not need to "enabled". Your computer is prompted on the bottom of the screen. Please also refer to run Setup. Please note that system information is set the parameter to run this item. • Press Esc while you... System). Press during POST (when "Press to the Exit menu. • In any menu, you are found in the Item Specific Help part of the screen. However, if you encounter configuration problems, you want to change the value of a parameter, press F5 or F6. • A plus sign (+) indicates ...
Service Guide
Page 40
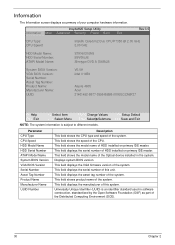
...A DS8A2S System BIOS Version: VGA BIOS Version: Serial Number: Asset Tag Number: Product Name: Manufacturer Name: UUID: V0.09 Intel V1659 Aspire 4935 Acer 21401492-B677-3996-B6BB-001EECCA8F37 F1 Help ESC Exit ↑↓ Select Item ←→ Select Menu F5/F6 Change Values F9 Setup... shows the model name of the system. This field shows product name of HDD installed on primary IDE master. Information The Information screen displays a summary of the system. Displays system BIOS version. This field displays the VGA firmware version of your computer hardware information....
...A DS8A2S System BIOS Version: VGA BIOS Version: Serial Number: Asset Tag Number: Product Name: Manufacturer Name: UUID: V0.09 Intel V1659 Aspire 4935 Acer 21401492-B677-3996-B6BB-001EECCA8F37 F1 Help ESC Exit ↑↓ Select Item ←→ Select Menu F5/F6 Change Values F9 Setup... shows the model name of the system. This field shows product name of HDD installed on primary IDE master. Information The Information screen displays a summary of the system. Displays system BIOS version. This field displays the VGA firmware version of your computer hardware information....

Service Guide
Page 41
...;↓ Select Item ←→ Select Menu F5/F6 Change Values F9 Setup Default Enter SelectXSubmenu F10 Save and Exit NOTE: The screen above is the help for your reference only. Enables or disables the Press to factory defaults. Actual values may differ. Parameter System Time...in boldface are displayed with 24hour format. This field reports the total memory size. Enables, disables D2D Recovery function. Settings in this screen. This field reports the video Memory size. Enables the boot sequence to skip some processes to set the system time and date as...
...;↓ Select Item ←→ Select Menu F5/F6 Change Values F9 Setup Default Enter SelectXSubmenu F10 Save and Exit NOTE: The screen above is the help for your reference only. Enables or disables the Press to factory defaults. Actual values may differ. Parameter System Time...in boldface are displayed with 24hour format. This field reports the total memory size. Enables, disables D2D Recovery function. Settings in this screen. This field reports the video Memory size. Enables the boot sequence to skip some processes to set the system time and date as...

Service Guide
Page 42
...up normally. Unless you have experience adjusting these items, we recommend that you leave these settings at the default values. Settings in this screen. Parameter Boot Configuration Peripheral Configuration Description Enter the Boot Configuration menu. F1 Help ESC Exit ↑↓ Select Item ←→ Select... Support • SATA Port 0, 1, 4, and 5 Hotplug XChannel 1 to 4 Master XChannel 1 to configure the various advanced BIOS options. Advanced The Advanced screen allows the user to 4 Slave 32 Chapter 2 IDE Configuration Enter the IDE Configuration menu.
...up normally. Unless you have experience adjusting these items, we recommend that you leave these settings at the default values. Settings in this screen. Parameter Boot Configuration Peripheral Configuration Description Enter the Boot Configuration menu. F1 Help ESC Exit ↑↓ Select Item ←→ Select... Support • SATA Port 0, 1, 4, and 5 Hotplug XChannel 1 to 4 Master XChannel 1 to configure the various advanced BIOS options. Advanced The Advanced screen allows the user to 4 Slave 32 Chapter 2 IDE Configuration Enter the IDE Configuration menu.

Service Guide
Page 45
... of the user password. Settings in this password protects the BIOS Setup Utility from unauthorized access. When Hdd password is set , this screen. When set , this password protects the BIOS Setup Utility from unauthorized use. Press Enter to set , this password protects the Hdd from...or Set Clear, Set, or Frozen N/A N/A N/A Disabled or Enabled NOTE: When you are prompted to reset it. Security The Security screen contains parameters that help safeguard and protect your computer from unauthorized access. The user can not either enter the Setup menu nor change parameters....
... of the user password. Settings in this password protects the BIOS Setup Utility from unauthorized access. When Hdd password is set , this screen. When set , this password protects the BIOS Setup Utility from unauthorized use. Press Enter to set , this password protects the Hdd from...or Set Clear, Set, or Frozen N/A N/A N/A Disabled or Enabled NOTE: When you are prompted to reset it. Security The Security screen contains parameters that help safeguard and protect your computer from unauthorized access. The user can not either enter the Setup menu nor change parameters....

Service Guide
Page 46
... the changes and exit the BIOS Setup Utility. After setting the password, the computer sets the User Password parameter to enable the Password on the screen. 3. If desired, you are done, press F10 to save the changes and exit the BIOS Setup Utility. 36 Chapter 2 When you can not exceeds 8 alphanumeric...
... the changes and exit the BIOS Setup Utility. After setting the password, the computer sets the User Password parameter to enable the Password on the screen. 3. If desired, you are done, press F10 to save the changes and exit the BIOS Setup Utility. 36 Chapter 2 When you can not exceeds 8 alphanumeric...

Service Guide
Page 47
... field. When you are done, press F10 to "Set". 5. If the new password and confirm new password strings do not match, the screen will display the following . If desired, you the Setup Warning. If the verification is complete after the user presses Enter. After setting the password...to save the changes and exit the BIOS Setup Utility. Type a password in the Confirm New Password field. 4. The password setting is OK, the screen will show you can enable the Password on boot parameter. 6. The Set Password box appears. 2. Press Enter. Chapter 2 37 Type the current ...
... field. When you are done, press F10 to "Set". 5. If the new password and confirm new password strings do not match, the screen will display the following . If desired, you the Setup Warning. If the verification is complete after the user presses Enter. After setting the password...to save the changes and exit the BIOS Setup Utility. Type a password in the Confirm New Password field. 4. The password setting is OK, the screen will show you can enable the Password on boot parameter. 6. The Set Password box appears. 2. Press Enter. Chapter 2 37 Type the current ...

Service Guide
Page 48
...• DTS Calibration • Thermal Trip Points Setting (Fan On Temp., Throttle On Temp.) 38 Chapter 2 Power The Power screen allows the user to configure CPU and power management options. Parameter Advanced CPU Control Description Enter the Advanced CPU Control menu. Settings in this... screen. InsydeH20 Setup Utility Information Main Advanced Security Power Boot XAdvanced CPU Control XPlatform Power Management XBreak Event Rev 3.5 Exit...
...• DTS Calibration • Thermal Trip Points Setting (Fan On Temp., Throttle On Temp.) 38 Chapter 2 Power The Power screen allows the user to configure CPU and power management options. Parameter Advanced CPU Control Description Enter the Advanced CPU Control menu. Settings in this... screen. InsydeH20 Setup Utility Information Main Advanced Security Power Boot XAdvanced CPU Control XPlatform Power Management XBreak Event Rev 3.5 Exit...

Service Guide
Page 51
...←→ Select Menu F5/F6 Change Values F9 Setup Default Enter SelectXSubMenu F10 Save and Exit The table below describes the parameters in this screen. Load previous values from CMOS for all SETUP items. Save Setup Data to save your changes to CMOS. Chapter 2 41 Exit The Exit... screen allows you made and quit the BIOS Utility. Parameter Exit Saving Changes Exit Discarding Changes Load Setup Default Discard Changes Save Changes Description Exit ...
...←→ Select Menu F5/F6 Change Values F9 Setup Default Enter SelectXSubMenu F10 Save and Exit The table below describes the parameters in this screen. Load previous values from CMOS for all SETUP items. Save Setup Data to save your changes to CMOS. Chapter 2 41 Exit The Exit... screen allows you made and quit the BIOS Utility. Parameter Exit Saving Changes Exit Discarding Changes Load Setup Default Discard Changes Save Changes Description Exit ...
Service Guide
Page 54
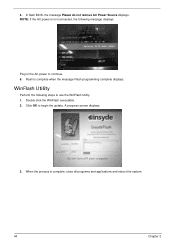
Double click the WinFlash executable. 2. When the process is complete when the message Flash programming complete displays. Plug in the AC power to begin the update. Click OK to continue. 5. WinFlash Utility Perform the following message displays. Flash is complete, close all programs and applications and reboot the system. 44 Chapter 2 NOTE: If the AC power is not connected, the following steps to use the WinFlash Utility: 1. A progress screen displays. 3. In flash BIOS, the message Please do not remove AC Power Source displays. 4.
Double click the WinFlash executable. 2. When the process is complete when the message Flash programming complete displays. Plug in the AC power to begin the update. Click OK to continue. 5. WinFlash Utility Perform the following message displays. Flash is complete, close all programs and applications and reboot the system. 44 Chapter 2 NOTE: If the AC power is not connected, the following steps to use the WinFlash Utility: 1. A progress screen displays. 3. In flash BIOS, the message Please do not remove AC Power Source displays. 4.

Service Guide
Page 55
... generated by pressing F2 when prompted. 7. Make a note of the key, 76943488 in the example. 4. Save and exit the BIOS to display the Select Item screen. 2. Remove HDD/BIOS Password Utilities This section provide you with removing HDD/BIOS method: Remove HDD Password: When the user keys in the wrong password...
... generated by pressing F2 when prompted. 7. Make a note of the key, 76943488 in the example. 4. Save and exit the BIOS to display the Select Item screen. 2. Remove HDD/BIOS Password Utilities This section provide you with removing HDD/BIOS method: Remove HDD Password: When the user keys in the wrong password...

