Acer Aspire 4752G Bios Recovery

Related Manual Pages


Similar Questions

Acer Aspire 4752 G Series Bios Unlock Key
i don't know unlock key for acer aspire 4752G series laptop.unlock key hint number is F1C6DB44
i don't know unlock key for acer aspire 4752G series laptop.unlock key hint number is F1C6DB44
(Posted by roll1suraj1990 9 years ago)

Acer Aspire V3 How Boot From Bios Recovery Windows 8
(Posted by Frevian 9 years ago)

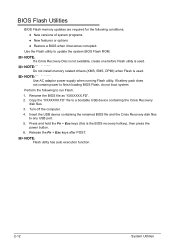
Steps For Bios Recovery From Usb Storage Before Performing This Procedure,
prepare a Crisis USB key. The Crisis USB key can be made by executing the Crisis Disk program in a f...
prepare a Crisis USB key. The Crisis USB key can be made by executing the Crisis Disk program in a f...
(Posted by drhirve 9 years ago)

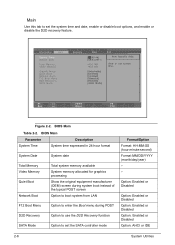
Bios Recovery
When i was updating the bios of my Acer aspire 4720z the power fails.After that my lap didnt start, ...
When i was updating the bios of my Acer aspire 4720z the power fails.After that my lap didnt start, ...
(Posted by snipperprasad 11 years ago)
Related Terms
The following terms were also used when searching for Acer Aspire 4752G Bios Recovery:- acer aspire 4752
- acer aspire 4752 battery
- acer aspire 4752 driver download
- acer aspire 4752 drivers
- acer aspire 4752 graphics driver download
- acer aspire 4752 laptop
- acer aspire 4752 price
- acer aspire 4752 screen replacement
- acer aspire 4752 series
- acer aspire 4752g
- acer aspire 4752g battery
- acer aspire 4752g battery price
- acer aspire 4752g bios
- acer aspire 4752g bios recovery
- acer aspire 4752g bios update
- acer aspire 4752g blue
- acer aspire 4752g bluetooth
- acer aspire 4752g bluetooth driver
- acer aspire 4752g charger
- acer aspire 4752g core i3
- acer aspire 4752g core i5
- acer aspire 4752g core i5 specs
- acer aspire 4752g disassembly
- acer aspire 4752g driver
- acer aspire 4752g driver 64 bit
- acer aspire 4752g driver download
- acer aspire 4752g driver for windows xp
- acer aspire 4752g driver free download
- acer aspire 4752g drivers
- acer aspire 4752g drivers download
- acer aspire 4752g drivers for windows 7
- acer aspire 4752g i3
- acer aspire 4752g i5
- acer aspire 4752g i5 2.40 ghz
- acer aspire 4752g i5 price
- acer aspire 4752g intel core i3
- acer aspire 4752g keyboard
- acer aspire 4752g keyboard not working
- acer aspire 4752g laptop
- acer aspire 4752g laptop specifications
- acer aspire 4752g malaysia
- acer aspire 4752g manual
- acer aspire 4752g motherboard
- acer aspire 4752g price
- acer aspire 4752g price in india
- acer aspire 4752g price in malaysia
- acer aspire 4752g ram
- acer aspire 4752g ram support
- acer aspire 4752g ram upgrade
- acer aspire 4752g review
- acer aspire 4752g reviews
- acer aspire 4752g spec
- acer aspire 4752g specification
- acer aspire 4752g specifications
- acer aspire 4752g specs
- acer aspire 4752g weight
- acer aspire 4752g wifi driver
- acer aspire 4752g windows 7 driver
- acer aspire 4752g windows xp driver
- acer aspire 4752g wireless driver
- acer aspire 4752g xp
- acer aspire 4752z
- acer aspire 4752z battery
- acer aspire 4752z drivers
- acer aspire 4752z specs
- acer aspire 4752zg
- aspire 4752
- aspire 4752 battery
- aspire 4752 driver
- aspire 4752 driver download
- aspire 4752 drivers
- aspire 4752 graphics driver download
- aspire 4752 laptop
- aspire 4752 price
- aspire 4752 price in india
- aspire 4752 screen replacement
- aspire 4752 series
- aspire 4752 specification
- aspire 4752g
- aspire 4752g acer
- aspire 4752g battery
- aspire 4752g battery price
- aspire 4752g bios
- aspire 4752g bios recovery
- aspire 4752g bios update
- aspire 4752g blue
- aspire 4752g bluetooth
- aspire 4752g bluetooth driver
- aspire 4752g camera driver
- aspire 4752g charger
- aspire 4752g core i3
- aspire 4752g core i5
- aspire 4752g core i5 specs
- aspire 4752g disassembly
- aspire 4752g driver
- aspire 4752g driver 64 bit
- aspire 4752g driver download
- aspire 4752g driver for windows 8
- aspire 4752g driver for windows xp
- aspire 4752g driver for xp
- aspire 4752g driver free download
- aspire 4752g driver windows 10
- aspire 4752g driver windows 7
- aspire 4752g drivers
- aspire 4752g drivers download
- aspire 4752g drivers for windows 7
- aspire 4752g factory reset
- aspire 4752g i3
- aspire 4752g i5
- aspire 4752g i5 2.40 ghz
- aspire 4752g i5 price
- aspire 4752g intel core i3
- aspire 4752g keyboard
- aspire 4752g keyboard not working
- aspire 4752g laptop
- aspire 4752g laptop specifications
- aspire 4752g malaysia
- aspire 4752g manual
- aspire 4752g motherboard
- aspire 4752g ms2347
- aspire 4752g network controller driver
- aspire 4752g price
- aspire 4752g price in india
- aspire 4752g price in malaysia
- aspire 4752g ram
- aspire 4752g ram support
- aspire 4752g ram upgrade
- aspire 4752g review
- aspire 4752g reviews
- aspire 4752g softwares
- aspire 4752g spec
- aspire 4752g specification
- aspire 4752g specifications
- aspire 4752g specs
- aspire 4752g support
- aspire 4752g weight
- aspire 4752g wifi driver
- aspire 4752g windows 10
- aspire 4752g windows 7 driver
- aspire 4752g windows xp driver
- aspire 4752g wireless driver
- aspire 4752g xp
- aspire 4752g xp driver
- aspire 4752z
- aspire 4752z battery
- aspire 4752z drivers
- aspire 4752z laptop used
- aspire 4752z specs
- aspire 4752zg
- driver aspire 4752g
- driver aspire4752g
- review acer aspire 4752g
- review aspire 4752g