Acer Aspire 4336 Notebook Series Service Guide
Page 7
... 9 Indicators 10 Easy-Launch Buttons 10 Touchpad Basics (with fingerprint reader 11 Using the Keyboard 12 Lock Keys and embedded numeric keypad 12 Windows Keys 13 Hot Keys 14 Special Key 15 Using the System Utilities 16 Acer GridVista (dual-display compatible 16 Hardware Specifications and Configurations 18 System Utilities 29 BIOS Setup Utility 29 Navigating the BIOS Utility 29 Information 30 Main 31 Security 32 Power 35 Boot 37 Exit 38 BIOS Flash Utility 39 DOS Flash Utility 40 WinFlash Utility 42 Remove HDD/BIOS Password Utilities 43 Removing BIOS Passwords...
... 9 Indicators 10 Easy-Launch Buttons 10 Touchpad Basics (with fingerprint reader 11 Using the Keyboard 12 Lock Keys and embedded numeric keypad 12 Windows Keys 13 Hot Keys 14 Special Key 15 Using the System Utilities 16 Acer GridVista (dual-display compatible 16 Hardware Specifications and Configurations 18 System Utilities 29 BIOS Setup Utility 29 Navigating the BIOS Utility 29 Information 30 Main 31 Security 32 Power 35 Boot 37 Exit 38 BIOS Flash Utility 39 DOS Flash Utility 40 WinFlash Utility 42 Remove HDD/BIOS Password Utilities 43 Removing BIOS Passwords...
Acer Aspire 4336 Notebook Series Service Guide
Page 8
... Board 117 Replacing the Modem Module 117 Replacing the USB Board 118 Replacing the Media Board 119 Replacing the TouchPad Bracket 121 Replacing the Finger Print Reader 121 Replacing the Upper Cover 123 Replacing the LCD Module 126 Replacing the Speaker Module 130 Replacing the Keyboard 131 Replacing the Switch Cover 132 Replacing the Hinge Covers 134 Replacing the ODD Module 135 Replacing the Hard Disk Drive Module 136 Replacing the DIMM Modules 136 Replacing the WLAN Module 137 Replacing the Lower Covers 137 Replacing the SD Card Dummy Trays 138 Replacing the Battery...
... Board 117 Replacing the Modem Module 117 Replacing the USB Board 118 Replacing the Media Board 119 Replacing the TouchPad Bracket 121 Replacing the Finger Print Reader 121 Replacing the Upper Cover 123 Replacing the LCD Module 126 Replacing the Speaker Module 130 Replacing the Keyboard 131 Replacing the Switch Cover 132 Replacing the Hinge Covers 134 Replacing the ODD Module 135 Replacing the Hard Disk Drive Module 136 Replacing the DIMM Modules 136 Replacing the WLAN Module 137 Replacing the Lower Covers 137 Replacing the SD Card Dummy Trays 138 Replacing the Battery...
Acer Aspire 4336 Notebook Series Service Guide
Page 9
... Contents Troubleshooting 139 Common Problems 139 Power On Issue 140 No Display Issue 141 Random Loss of BIOS Settings 142 LCD Failure 143 Built-In Keyboard Failure 143 Touchpad Failure 144 Internal Speaker Failure 144 Internal Microphone Failure 146 HDD Not Operating Correctly 147 ODD Failure 148 USB Failure (Rightside 151 Modem Function Failure 151 Wireless Function Failure 152 Bluetooth Function Failure 152 EasyTouch Button Failure 153 Media Board Failure 153 Fingerprint Reader Failure...
... Contents Troubleshooting 139 Common Problems 139 Power On Issue 140 No Display Issue 141 Random Loss of BIOS Settings 142 LCD Failure 143 Built-In Keyboard Failure 143 Touchpad Failure 144 Internal Speaker Failure 144 Internal Microphone Failure 146 HDD Not Operating Correctly 147 ODD Failure 148 USB Failure (Rightside 151 Modem Function Failure 151 Wireless Function Failure 152 Bluetooth Function Failure 152 EasyTouch Button Failure 153 Media Board Failure 153 Fingerprint Reader Failure...
Acer Aspire 4336 Notebook Series Service Guide
Page 16
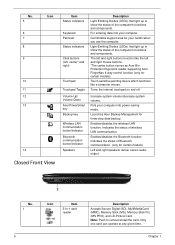
... card reader Description Accepts Secure Digital (SD), MultiMediaCard (MMC), Memory Stick (MS), Memory Stick Pro (MS PRO), and xD-Picture Card. No. 5 6 7 8 9 Icon 10 11 12 13 14 Closed Front View Item Status indicators Keyboard Palmrest Status indicators Click buttons (left, center* and right) Touchpad Touchpad Toggle Volume Up/ Volume Down Acer PowerSmart key Backup key Wireless LAN communication button/indicator Bluetooth communication button/indicator Speakers Description Light-Emitting Diodes (LEDs) that light up to remove/install the card. Enables/disables the wireless LAN...
... card reader Description Accepts Secure Digital (SD), MultiMediaCard (MMC), Memory Stick (MS), Memory Stick Pro (MS PRO), and xD-Picture Card. No. 5 6 7 8 9 Icon 10 11 12 13 14 Closed Front View Item Status indicators Keyboard Palmrest Status indicators Click buttons (left, center* and right) Touchpad Touchpad Toggle Volume Up/ Volume Down Acer PowerSmart key Backup key Wireless LAN communication button/indicator Bluetooth communication button/indicator Speakers Description Light-Emitting Diodes (LEDs) that light up to remove/install the card. Enables/disables the wireless LAN...
Acer Aspire 4336 Notebook Series Service Guide
Page 20
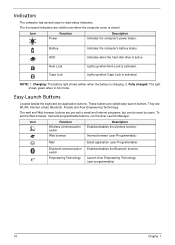
... Enables/disables the Bluetooth function. To set to -read status indicators: The front panel indicators are called easy-launch buttons. They are application buttons. Icon Function Wireless communication switch Web browser Description Enables/disables the wireless function. Indicates when the hard disk drive is charging. 2. Battery HDD Num Lock Caps Lock Indicates the computer's battery status. Fully charged: The light shows green when in AC mode. These buttons are visible even when the computer cover is activated. NOTE: 1. Icon Function Power Description Indicates...
... Enables/disables the Bluetooth function. To set to -read status indicators: The front panel indicators are called easy-launch buttons. They are application buttons. Icon Function Wireless communication switch Web browser Description Enables/disables the wireless function. Indicates when the hard disk drive is charging. 2. Battery HDD Num Lock Caps Lock Indicates the computer's battery status. Fully charged: The light shows green when in AC mode. These buttons are visible even when the computer cover is activated. NOTE: 1. Icon Function Power Description Indicates...
Acer Aspire 4336 Notebook Series Service Guide
Page 39
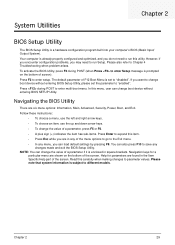
... different models. However, if you encounter configuration problems, you can also press F10 to save any menu, you may need to run Setup. To activate the BIOS Utility, press F2 during POST to parameter values. In this carefully when making changes to enter multi-boot menu. NOTE: You can change boot device without entering BIOS Setup Utility, please set to expand this utility. Follow these instructions: • To choose a menu, use the left and right arrow keys...
... different models. However, if you encounter configuration problems, you can also press F10 to save any menu, you may need to run Setup. To activate the BIOS Utility, press F2 during POST to parameter values. In this carefully when making changes to enter multi-boot menu. NOTE: You can change boot device without entering BIOS Setup Utility, please set to expand this utility. Follow these instructions: • To choose a menu, use the left and right arrow keys...
Acer Aspire 4336 Notebook Series Service Guide
Page 41
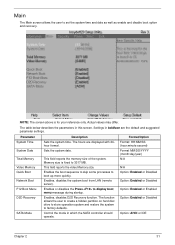
... hard disc drive to store operation system and restore the system to set the system time and date as well as enable and disable boot option and recovery. Format/Option Format: HH:MM:SS (hour:minute:second) Format MM/DD/YYYY (month/day/year) N/A N/A Option: Enabled or Disabled Option: Enabled or Disabled Option: Enabled or Enabled Option: Enabled or Disabled Option: AHCI or IDE Chapter 2 31 Sets the system date. Control the mode in this screen. Main The Main screen allows the user to factory defaults. Enables, disables...
... hard disc drive to store operation system and restore the system to set the system time and date as well as enable and disable boot option and recovery. Format/Option Format: HH:MM:SS (hour:minute:second) Format MM/DD/YYYY (month/day/year) N/A N/A Option: Enabled or Disabled Option: Enabled or Disabled Option: Enabled or Enabled Option: Enabled or Disabled Option: AHCI or IDE Chapter 2 31 Sets the system date. Control the mode in this screen. Main The Main screen allows the user to factory defaults. Enables, disables...
Acer Aspire 4336 Notebook Series Service Guide
Page 43
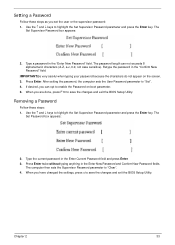
... the changes and exit the BIOS Setup Utility. Use the ↑ and ↓ keys to "Clear". 4. Press Enter twice without typing anything in the "Enter New Password" field. When you are done, press F10 to enable the Password on the screen. 3. If desired, you set the user or the supervisor password: 1. The Set Password box appears: 2. The computer then sets the Supervisor Password parameter to highlight the Set Supervisor Password parameter and press the Enter key. Removing a Password...
... the changes and exit the BIOS Setup Utility. Use the ↑ and ↓ keys to "Clear". 4. Press Enter twice without typing anything in the "Enter New Password" field. When you are done, press F10 to enable the Password on the screen. 3. If desired, you set the user or the supervisor password: 1. The Set Password box appears: 2. The computer then sets the Supervisor Password parameter to highlight the Set Supervisor Password parameter and press the Enter key. Removing a Password...
Acer Aspire 4336 Notebook Series Service Guide
Page 44
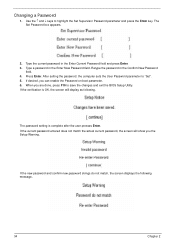
... password in the Enter New Password field. Use the ↑ and ↓ keys to save the changes and exit the BIOS Setup Utility. If the verification is complete after the user presses Enter. After setting the password, the computer sets the User Password parameter to "Set". 5. The password setting is OK, the screen will show you can enable the Password on boot parameter. 6. Changing a Password 1. If the current password entered does not match the actual current password, the screen will display...
... password in the Enter New Password field. Use the ↑ and ↓ keys to save the changes and exit the BIOS Setup Utility. If the verification is complete after the user presses Enter. After setting the password, the computer sets the User Password parameter to "Set". 5. The password setting is OK, the screen will show you can enable the Password on boot parameter. 6. Changing a Password 1. If the current password entered does not match the actual current password, the screen will display...
Acer Aspire 4336 Notebook Series Service Guide
Page 149
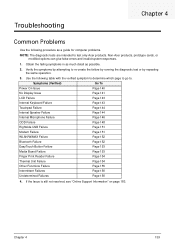
... To Power On Issue Page 140 No Display Issue Page 141 LCD Failure Page 143 Internal Keyboard Failure Page 143 Touchpad Failure Page 144 Internal Speaker Failure Page 144 Internal Microphone Failure Page 146 ODD Failure Page 148 Rightside USB Failure Page 151 Modem Failure Page 151 WLAN/WiMAX Failure Page 152 Bluetooth Failure Page 152 EasyTouch Button Failure Page 153 Media Board Failure...
... To Power On Issue Page 140 No Display Issue Page 141 LCD Failure Page 143 Internal Keyboard Failure Page 143 Touchpad Failure Page 144 Internal Speaker Failure Page 144 Internal Microphone Failure Page 146 ODD Failure Page 148 Rightside USB Failure Page 151 Modem Failure Page 151 WLAN/WiMAX Failure Page 152 Bluetooth Failure Page 152 EasyTouch Button Failure Page 153 Media Board Failure...
Acer Aspire 4336 Notebook Series Service Guide
Page 151
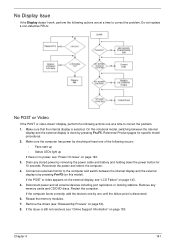
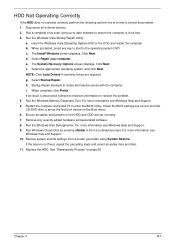
... removing the power cable and battery and holding down the power button for specific model procedures. 2. Reference Product pages for 10 seconds. Connect an external monitor to correct the problem. Remove any stored power by pressing Fn+F5. Make sure the computer has power by checking at a time to the computer and switch between the internal display and the external display is discovered. 6. Reseat the memory modules. 7. Reconnect the power and reboot the computer. 4. Remove the drives...
... removing the power cable and battery and holding down the power button for specific model procedures. 2. Reference Product pages for 10 seconds. Connect an external monitor to correct the problem. Remove any stored power by pressing Fn+F5. Make sure the computer has power by checking at a time to the computer and switch between the internal display and the external display is discovered. 6. Reseat the memory modules. 7. Reconnect the power and reboot the computer. 4. Remove the drives...
Acer Aspire 4336 Notebook Series Service Guide
Page 152
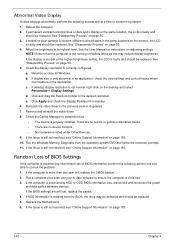
... replaced. If the computer is correctly configured: a. See "Disassembly Process" on adjusting settings. Adjust the brightness to the previous version if updated. 7. Check the display resolution is experiencing HDD or ODD BIOS information loss, disconnect and reconnect the power and data cables between devices. c. If desktop display resolution is still not resolved, see "Online Support Information" on the desktop and select Personalize´ Display Settings. e. Remove and reinstall the video driver...
... replaced. If the computer is correctly configured: a. See "Disassembly Process" on adjusting settings. Adjust the brightness to the previous version if updated. 7. Check the display resolution is experiencing HDD or ODD BIOS information loss, disconnect and reconnect the power and data cables between devices. c. If desktop display resolution is still not resolved, see "Online Support Information" on the desktop and select Personalize´ Display Settings. e. Remove and reinstall the video driver...
Acer Aspire 4336 Notebook Series Service Guide
Page 157
... hardware and associated software. 8. c. Select Repair your computer. e. g. i. If an issue is set correctly. 7. For more information see Windows Help and Support. 9. Remove any key to start to enter the BIOS Utility. For more information see Windows Help and Support. 10. For more information see Windows Help and Support. 5. insert the Windows Vista Operating System DVD in the ODD and restart the computer. The Install Windows screen displays. Click Next. NOTE: Click Load Drivers if controller drives...
... hardware and associated software. 8. c. Select Repair your computer. e. g. i. If an issue is set correctly. 7. For more information see Windows Help and Support. 9. Remove any key to start to enter the BIOS Utility. For more information see Windows Help and Support. 10. For more information see Windows Help and Support. 5. insert the Windows Vista Operating System DVD in the ODD and restart the computer. The Install Windows screen displays. Click Next. NOTE: Click Load Drivers if controller drives...

Acer Aspire 4336 Notebook Series Service Guide
Page 160
... drive works with alternate discs, the original disc is identical to one at a time to enter the BIOS Utility. 2. Double-click IDE ATA/ATAPI controllers, then right-click ATA Device 0. Turn off the power and remove the cover to inspect the connections to correct the problem. 1. Drive Read Failure If discs cannot be replaced. 3. See "Disassembly Process" on page 50. b. Check for bent or broken pins on the drive, motherboard, and cable connections...
... drive works with alternate discs, the original disc is identical to one at a time to enter the BIOS Utility. 2. Double-click IDE ATA/ATAPI controllers, then right-click ATA Device 0. Turn off the power and remove the cover to inspect the connections to correct the problem. 1. Drive Read Failure If discs cannot be replaced. 3. See "Disassembly Process" on page 50. b. Check for bent or broken pins on the drive, motherboard, and cable connections...
Acer Aspire 4336 Notebook Series Service Guide
Page 165
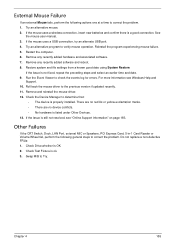
... file settings from a known good date using System Restore. Remove any recently added hardware and associated software. 7. There are no red Xs or yellow exclamation marks. • There are no device conflicts. • No hardware is ok. 3. Try an alternative mouse. 2. If the mouse uses a USB connection, try an alternate USB port. 4. Other Failures If the CRT Switch, Dock, LAN Port, external MIC or Speakers, PCI Express Card, 5-in-1 Card Reader or Volume...
... file settings from a known good date using System Restore. Remove any recently added hardware and associated software. 7. There are no red Xs or yellow exclamation marks. • There are no device conflicts. • No hardware is ok. 3. Try an alternative mouse. 2. If the mouse uses a USB connection, try an alternate USB port. 4. Other Failures If the CRT Switch, Dock, LAN Port, external MIC or Speakers, PCI Express Card, 5-in-1 Card Reader or Volume...
Acer Aspire 4336 Notebook Series Service Guide
Page 166
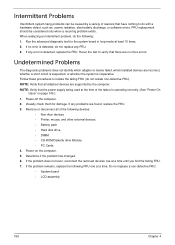
... following devices: • Non-Acer devices • Printer, mouse, and other external devices • Battery pack • Hard disk drive • DIMM • CD-ROM/Diskette drive Module • PC Cards 4. NOTE: Verify that there are found, replace the FRU. 3. When analyzing an intermittent problem, do with a hardware defect, such as: cosmic radiation, electrostatic discharge, or software errors. Undetermined Problems The diagnostic problems does not identify which adapter or device failed, which installed devices are supported...
... following devices: • Non-Acer devices • Printer, mouse, and other external devices • Battery pack • Hard disk drive • DIMM • CD-ROM/Diskette drive Module • PC Cards 4. NOTE: Verify that there are found, replace the FRU. 3. When analyzing an intermittent problem, do with a hardware defect, such as: cosmic radiation, electrostatic discharge, or software errors. Undetermined Problems The diagnostic problems does not identify which adapter or device failed, which installed devices are supported...
Quick Start Guide
Page 3
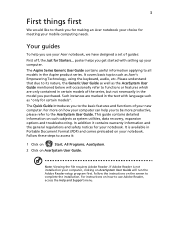
... as Acer's Empowering Technology, using the keyboard, audio, etc. In addition it : 1 Click on Start, All Programs, AcerSystem. 2 Click on how your new computer. 3 First things first We would like to complete the installation. poster helps you use Adobe Reader, access the Help and Support menu. Such instances are only contained in certain models of the series, but not necessarily in the Aspire product series. It covers...
... as Acer's Empowering Technology, using the keyboard, audio, etc. In addition it : 1 Click on Start, All Programs, AcerSystem. 2 Click on how your new computer. 3 First things first We would like to complete the installation. poster helps you use Adobe Reader, access the Help and Support menu. Such instances are only contained in certain models of the series, but not necessarily in the Aspire product series. It covers...
Quick Start Guide
Page 5
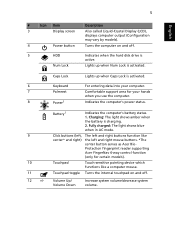
... # Icon Item Description 3 Display screen Also called Liquid-Crystal Display (LCD), displays computer output (Configuration may vary by models). 4 Power button Turns the computer on and off . 5 HDD Indicates when the hard disk drive is charging. 2. Fully charged: The light shows blue when in AC mode. 9 Click buttons (left, The left and right mouse buttons. *The center button serves as Acer Bio- Volume Up/ Volume Down Increase system volume/decrease system volume. Protection fingerprint reader supporting Acer FingerNav 4-way control function (only for your...
... # Icon Item Description 3 Display screen Also called Liquid-Crystal Display (LCD), displays computer output (Configuration may vary by models). 4 Power button Turns the computer on and off . 5 HDD Indicates when the hard disk drive is charging. 2. Fully charged: The light shows blue when in AC mode. 9 Click buttons (left, The left and right mouse buttons. *The center button serves as Acer Bio- Volume Up/ Volume Down Increase system volume/decrease system volume. Protection fingerprint reader supporting Acer FingerNav 4-way control function (only for your...

Quick Start Guide
Page 6
... computer cover is closed up Increases the screen brightness. To activate hotkeys, press and hold the key before pressing the other key in Sleep mode. Press any key to save power. Indicates the status of wireless LAN communication. Hotkeys The computer employs hotkeys or key combinations to access most of the computer's controls like screen brightness, volume output. Display toggle Screen blank Switches display output between the display screen, external monitor (if connected) and both. Wireless LAN communication button/indicator Enables/disables the wireless LAN function. Bluetooth...
... computer cover is closed up Increases the screen brightness. To activate hotkeys, press and hold the key before pressing the other key in Sleep mode. Press any key to save power. Indicates the status of wireless LAN communication. Hotkeys The computer employs hotkeys or key combinations to access most of the computer's controls like screen brightness, volume output. Display toggle Screen blank Switches display output between the display screen, external monitor (if connected) and both. Wireless LAN communication button/indicator Enables/disables the wireless LAN function. Bluetooth...
Quick Start Guide
Page 12
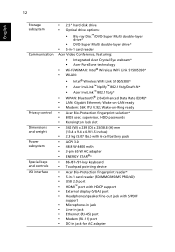
...-/91-key keyboard • Touchpad pointing device • Acer Bio-Protection fingerprint reader* • 5-in-1 card reader (SD/MMC/MS/MS PRO/xD) • USB 2.0 port • HDMI™ port with HDCP support • External display (VGA) port • Headphones/speaker/line-out jack with S/PDIF support • Microphone-in jack • Line-in jack • Ethernet (RJ-45) port • Modem (RJ-11) port • DC-in -1 card reader Acer Video Conference, featuring: • Integrated Acer Crystal Eye webcam* • Acer...
...-/91-key keyboard • Touchpad pointing device • Acer Bio-Protection fingerprint reader* • 5-in-1 card reader (SD/MMC/MS/MS PRO/xD) • USB 2.0 port • HDMI™ port with HDCP support • External display (VGA) port • Headphones/speaker/line-out jack with S/PDIF support • Microphone-in jack • Line-in jack • Ethernet (RJ-45) port • Modem (RJ-11) port • DC-in -1 card reader Acer Video Conference, featuring: • Integrated Acer Crystal Eye webcam* • Acer...


