Acer Aspire 4336 Notebook Series Service Guide
Page 7
... 9 Indicators 10 Easy-Launch Buttons 10 Touchpad Basics (with fingerprint reader 11 Using the Keyboard 12 Lock Keys and embedded numeric keypad 12 Windows Keys 13 Hot Keys 14 Special Key 15 Using the System Utilities 16 Acer GridVista (dual-display compatible 16 Hardware Specifications and Configurations 18 System Utilities 29 BIOS Setup Utility 29 Navigating the BIOS Utility 29 Information 30 Main 31 Security 32 Power 35 Boot 37 Exit 38 BIOS Flash Utility 39 DOS Flash Utility 40 WinFlash Utility 42 Remove HDD/BIOS Password Utilities 43 Removing BIOS Passwords...
... 9 Indicators 10 Easy-Launch Buttons 10 Touchpad Basics (with fingerprint reader 11 Using the Keyboard 12 Lock Keys and embedded numeric keypad 12 Windows Keys 13 Hot Keys 14 Special Key 15 Using the System Utilities 16 Acer GridVista (dual-display compatible 16 Hardware Specifications and Configurations 18 System Utilities 29 BIOS Setup Utility 29 Navigating the BIOS Utility 29 Information 30 Main 31 Security 32 Power 35 Boot 37 Exit 38 BIOS Flash Utility 39 DOS Flash Utility 40 WinFlash Utility 42 Remove HDD/BIOS Password Utilities 43 Removing BIOS Passwords...
Acer Aspire 4336 Notebook Series Service Guide
Page 8
... Board 117 Replacing the Modem Module 117 Replacing the USB Board 118 Replacing the Media Board 119 Replacing the TouchPad Bracket 121 Replacing the Finger Print Reader 121 Replacing the Upper Cover 123 Replacing the LCD Module 126 Replacing the Speaker Module 130 Replacing the Keyboard 131 Replacing the Switch Cover 132 Replacing the Hinge Covers 134 Replacing the ODD Module 135 Replacing the Hard Disk Drive Module 136 Replacing the DIMM Modules 136 Replacing the WLAN Module 137 Replacing the Lower Covers 137 Replacing the SD Card Dummy Trays 138 Replacing the Battery...
... Board 117 Replacing the Modem Module 117 Replacing the USB Board 118 Replacing the Media Board 119 Replacing the TouchPad Bracket 121 Replacing the Finger Print Reader 121 Replacing the Upper Cover 123 Replacing the LCD Module 126 Replacing the Speaker Module 130 Replacing the Keyboard 131 Replacing the Switch Cover 132 Replacing the Hinge Covers 134 Replacing the ODD Module 135 Replacing the Hard Disk Drive Module 136 Replacing the DIMM Modules 136 Replacing the WLAN Module 137 Replacing the Lower Covers 137 Replacing the SD Card Dummy Trays 138 Replacing the Battery...
Acer Aspire 4336 Notebook Series Service Guide
Page 9
... Contents Troubleshooting 139 Common Problems 139 Power On Issue 140 No Display Issue 141 Random Loss of BIOS Settings 142 LCD Failure 143 Built-In Keyboard Failure 143 Touchpad Failure 144 Internal Speaker Failure 144 Internal Microphone Failure 146 HDD Not Operating Correctly 147 ODD Failure 148 USB Failure (Rightside 151 Modem Function Failure 151 Wireless Function Failure 152 Bluetooth Function Failure 152 EasyTouch Button Failure 153 Media Board Failure 153 Fingerprint Reader Failure...
... Contents Troubleshooting 139 Common Problems 139 Power On Issue 140 No Display Issue 141 Random Loss of BIOS Settings 142 LCD Failure 143 Built-In Keyboard Failure 143 Touchpad Failure 144 Internal Speaker Failure 144 Internal Microphone Failure 146 HDD Not Operating Correctly 147 ODD Failure 148 USB Failure (Rightside 151 Modem Function Failure 151 Wireless Function Failure 152 Bluetooth Function Failure 152 EasyTouch Button Failure 153 Media Board Failure 153 Fingerprint Reader Failure...
Acer Aspire 4336 Notebook Series Service Guide
Page 16
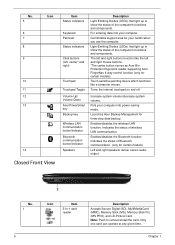
... mouse. No. 5 6 7 8 9 Icon 10 11 12 13 14 Closed Front View Item Status indicators Keyboard Palmrest Status indicators Click buttons (left, center* and right) Touchpad Touchpad Toggle Volume Up/ Volume Down Acer PowerSmart key Backup key Wireless LAN communication button/indicator Bluetooth communication button/indicator Speakers Description Light-Emitting Diodes (LEDs) that light up to show the status of the computer's functions and components. Comfortable support area for certain models). For entering data into power-saving mode. Enables/disables the wireless LAN...
... mouse. No. 5 6 7 8 9 Icon 10 11 12 13 14 Closed Front View Item Status indicators Keyboard Palmrest Status indicators Click buttons (left, center* and right) Touchpad Touchpad Toggle Volume Up/ Volume Down Acer PowerSmart key Backup key Wireless LAN communication button/indicator Bluetooth communication button/indicator Speakers Description Light-Emitting Diodes (LEDs) that light up to show the status of the computer's functions and components. Comfortable support area for certain models). For entering data into power-saving mode. Enables/disables the wireless LAN...
Acer Aspire 4336 Notebook Series Service Guide
Page 20
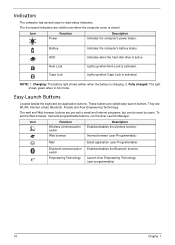
... Num Lock is active. Charging: The battery light shows amber when the battery is activated. To set to -read status indicators: The front panel indicators are visible even when the computer cover is closed. Indicates when the hard disk drive is activated. NOTE: 1. The mail and Web browser buttons are called easy-launch buttons. Easy-Launch Buttons Located beside the keyboard are : WLAN, Internet, email, Bluetooth, Arcade and Acer Empowering Technology. They are application buttons. Internet browser (user...
... Num Lock is active. Charging: The battery light shows amber when the battery is activated. To set to -read status indicators: The front panel indicators are visible even when the computer cover is closed. Indicates when the hard disk drive is activated. NOTE: 1. The mail and Web browser buttons are called easy-launch buttons. Easy-Launch Buttons Located beside the keyboard are : WLAN, Internet, email, Bluetooth, Arcade and Acer Empowering Technology. They are application buttons. Internet browser (user...
Acer Aspire 4336 Notebook Series Service Guide
Page 39
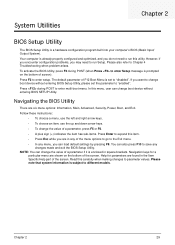
... part of F12 Boot Menu is subject to "enabled". Please note that system information is set the parameter to different models. Chapter 2 29 The default parameter of the screen. Follow these instructions: • To choose a menu, use the left and right arrow keys. • To choose an item, use the up and down arrow keys. • To change boot device without entering BIOS Setup Utility, please set to expand this menu, user can load default settings...
... part of F12 Boot Menu is subject to "enabled". Please note that system information is set the parameter to different models. Chapter 2 29 The default parameter of the screen. Follow these instructions: • To choose a menu, use the left and right arrow keys. • To choose an item, use the up and down arrow keys. • To change boot device without entering BIOS Setup Utility, please set to expand this menu, user can load default settings...
Acer Aspire 4336 Notebook Series Service Guide
Page 41
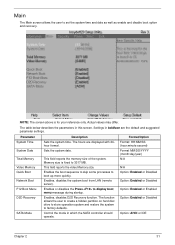
... Chapter 2 31 This field reports the video Memory size. Enables, disables D2D Recovery function. The function allows the user to create a hidden partition on hard disc drive to store operation system and restore the system to set the system time and date as well as enable and disable boot option and recovery. Main The Main screen allows the user to factory defaults. NOTE: The screen above is fixed to boot up more quickly. Enables or disables the Press to display boot menu message during startup.
... Chapter 2 31 This field reports the video Memory size. Enables, disables D2D Recovery function. The function allows the user to create a hidden partition on hard disc drive to store operation system and restore the system to set the system time and date as well as enable and disable boot option and recovery. Main The Main screen allows the user to factory defaults. NOTE: The screen above is fixed to boot up more quickly. Enables or disables the Press to display boot menu message during startup.
Acer Aspire 4336 Notebook Series Service Guide
Page 43
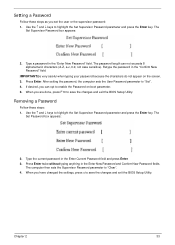
... can opt to enable the Password on the screen. 3. Retype the password in the Enter Current Password field and press Enter. 3. After setting the password, the computer sets the User Password parameter to highlight the Set Supervisor Password parameter and press the Enter key. Use the ↑ and ↓ keys to "Set". 4. Chapter 2 33 If desired, you have changed the settings, press u to save the changes and exit the BIOS Setup Utility. When you can...
... can opt to enable the Password on the screen. 3. Retype the password in the Enter Current Password field and press Enter. 3. After setting the password, the computer sets the User Password parameter to highlight the Set Supervisor Password parameter and press the Enter key. Use the ↑ and ↓ keys to "Set". 4. Chapter 2 33 If desired, you have changed the settings, press u to save the changes and exit the BIOS Setup Utility. When you can...
Acer Aspire 4336 Notebook Series Service Guide
Page 44
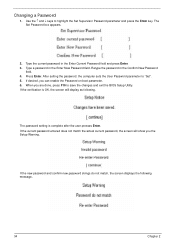
... password in the Enter New Password field. The password setting is OK, the screen will show you can enable the Password on boot parameter. 6. Type a password in the Enter Current Password field and press Enter. 3. Changing a Password 1. After setting the password, the computer sets the User Password parameter to highlight the Set Supervisor Password parameter and press the Enter key. If the current password entered does not match the actual current password, the screen will display as following message. 34 Chapter 2 Use...
... password in the Enter New Password field. The password setting is OK, the screen will show you can enable the Password on boot parameter. 6. Type a password in the Enter Current Password field and press Enter. 3. Changing a Password 1. After setting the password, the computer sets the User Password parameter to highlight the Set Supervisor Password parameter and press the Enter key. If the current password entered does not match the actual current password, the screen will display as following message. 34 Chapter 2 Use...
Acer Aspire 4336 Notebook Series Service Guide
Page 149
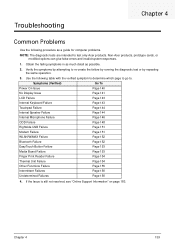
... To Power On Issue Page 140 No Display Issue Page 141 LCD Failure Page 143 Internal Keyboard Failure Page 143 Touchpad Failure Page 144 Internal Speaker Failure Page 144 Internal Microphone Failure Page 146 ODD Failure Page 148 Rightside USB Failure Page 151 Modem Failure Page 151 WLAN/WiMAX Failure Page 152 Bluetooth Failure Page 152 EasyTouch Button Failure Page 153 Media Board Failure...
... To Power On Issue Page 140 No Display Issue Page 141 LCD Failure Page 143 Internal Keyboard Failure Page 143 Touchpad Failure Page 144 Internal Speaker Failure Page 144 Internal Microphone Failure Page 146 ODD Failure Page 148 Rightside USB Failure Page 151 Modem Failure Page 151 WLAN/WiMAX Failure Page 152 Bluetooth Failure Page 152 EasyTouch Button Failure Page 153 Media Board Failure...
Acer Aspire 4336 Notebook Series Service Guide
Page 151
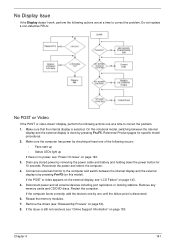
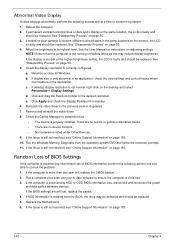
... not resolved, see "Disassembly Process" on this notebook model, switching between the internal display and the external display is selected. Drain any memory cards and CD/DVD discs. Connect an external monitor to correct the problem. 1. Disconnect power and all external devices including port replicators or docking stations. Reseat the memory modules. 7. Remove the drives (see "Online Support Information" on page 183. If the Issue is by removing the power cable and battery and holding down the power button for specific model procedures. 2.
... not resolved, see "Disassembly Process" on this notebook model, switching between the internal display and the external display is selected. Drain any memory cards and CD/DVD discs. Connect an external monitor to correct the problem. 1. Disconnect power and all external devices including port replicators or docking stations. Reseat the memory modules. 7. Remove the drives (see "Online Support Information" on page 183. If the Issue is by removing the power cable and battery and holding down the power button for specific model procedures. 2.
Acer Aspire 4336 Notebook Series Service Guide
Page 152
... resolved, see "Online Support Information" on page 50. 5. Readjust if necessary. 6. Reboot the computer. 2. See "Disassembly Process" on the desktop and select Personalize´ Display Settings. Adjust the brightness to the desired resolution. If desktop display resolution is virus free. 3. See "Disassembly Process" on page 183. Run the Windows Memory Diagnostic from the BIOS, the drive may reduce display brightness. Remove and reinstall the video driver. 8. If the computer...
... resolved, see "Online Support Information" on page 50. 5. Readjust if necessary. 6. Reboot the computer. 2. See "Disassembly Process" on the desktop and select Personalize´ Display Settings. Adjust the brightness to the desired resolution. If desktop display resolution is virus free. 3. See "Disassembly Process" on page 183. Run the Windows Memory Diagnostic from the BIOS, the drive may reduce display brightness. Remove and reinstall the video driver. 8. If the computer...
Acer Aspire 4336 Notebook Series Service Guide
Page 157
... set as the first boot device on the Boot menu. 6. Disconnect all cables and jumpers on page 50. Run the Windows Vista Startup Repair Utility: a. Select the appropriate operating system, and click Next. i. When prompted, press any recently added hardware and associated software. 8. Remove any key to start to enter the BIOS Utility. d. f. Select Startup Repair. When complete, click Finish. For more information see Windows Help and Support. 5. e. Run the Windows Disk Defragmenter. Restore system and file settings...
... set as the first boot device on the Boot menu. 6. Disconnect all cables and jumpers on page 50. Run the Windows Vista Startup Repair Utility: a. Select the appropriate operating system, and click Next. i. When prompted, press any recently added hardware and associated software. 8. Remove any key to start to enter the BIOS Utility. d. f. Select Startup Repair. When complete, click Finish. For more information see Windows Help and Support. 5. e. Run the Windows Disk Defragmenter. Restore system and file settings...

Acer Aspire 4336 Notebook Series Service Guide
Page 160
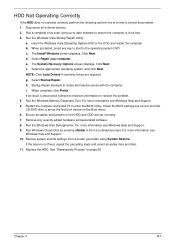
... Settings tab. Turn off the power and remove the cover to inspect the connections to enter the BIOS Utility. 2. Double-click IDE ATA/ATAPI controllers, then right-click ATA Device 0. Replace the ODD. Try an alternate cable, if available. Check that the Enable DMA box is identical to a music CD If the ODD works properly with alternate discs, the original disc is detected in "Hardware Specifications and Configurations" on the drive, motherboard...
... Settings tab. Turn off the power and remove the cover to inspect the connections to enter the BIOS Utility. 2. Double-click IDE ATA/ATAPI controllers, then right-click ATA Device 0. Replace the ODD. Try an alternate cable, if available. Check that the Enable DMA box is identical to a music CD If the ODD works properly with alternate discs, the original disc is detected in "Hardware Specifications and Configurations" on the drive, motherboard...
Acer Aspire 4336 Notebook Series Service Guide
Page 165
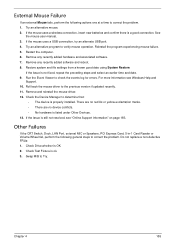
..., LAN Port, external MIC or Speakers, PCI Express Card, 5-in-1 Card Reader or Volume Wheel fail, perform the following actions one at a time to the previous version if updated recently. 11. Check Test Fixture is properly installed. If the mouse uses a USB connection, try an alternate USB port. 4. Try an alternative program to correct the problem. Remove any recently added software and reboot. 8. If the issue is listed under Other Devices...
..., LAN Port, external MIC or Speakers, PCI Express Card, 5-in-1 Card Reader or Volume Wheel fail, perform the following actions one at a time to the previous version if updated recently. 11. Check Test Fixture is properly installed. If the mouse uses a USB connection, try an alternate USB port. 4. Try an alternative program to correct the problem. Remove any recently added software and reboot. 8. If the issue is listed under Other Devices...
Acer Aspire 4336 Notebook Series Service Guide
Page 166
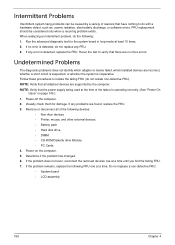
... the following devices: • Non-Acer devices • Printer, mouse, and other external devices • Battery pack • Hard disk drive • DIMM • CD-ROM/Diskette drive Module • PC Cards 4. If any problems are no error is operating correctly. (See "Power On Issue" on the computer. 5. If the problem does not recur, reconnect the removed devices one at a time. If no more errors. Power-off the computer. 2. If the problem remains, replace the...
... the following devices: • Non-Acer devices • Printer, mouse, and other external devices • Battery pack • Hard disk drive • DIMM • CD-ROM/Diskette drive Module • PC Cards 4. If any problems are no error is operating correctly. (See "Power On Issue" on the computer. 5. If the problem does not recur, reconnect the removed devices one at a time. If no more errors. Power-off the computer. 2. If the problem remains, replace the...
Quick Start Guide
Page 3
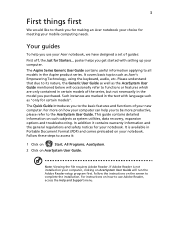
... utilities, data recovery, expansion options and troubleshooting. Please understand that due to use your computer, clicking on your Acer notebook, we have designed a set of the series, but not necessarily in certain models of guides: First off, the Just for certain models". Follow the instructions on AcerSystem User Guide. For instructions on your new computer. Your guides To help you to be more on how your mobile computing needs...
... utilities, data recovery, expansion options and troubleshooting. Please understand that due to use your computer, clicking on your Acer notebook, we have designed a set of the series, but not necessarily in certain models of guides: First off, the Just for certain models". Follow the instructions on AcerSystem User Guide. For instructions on your new computer. Your guides To help you to be more on how your mobile computing needs...
Quick Start Guide
Page 5
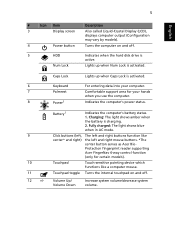
... support area for certain models). 10 Touchpad Touch-sensitive pointing device which functions like center* and right) the left and right mouse buttons. *The center button serves as Acer Bio- Num Lock Lights up when Caps Lock is active. Caps Lock Lights up when Num Lock is charging. 2. 5 English # Icon Item Description 3 Display screen Also called Liquid-Crystal Display (LCD), displays computer output (Configuration may vary by models). 4 Power button Turns the computer on and off . 5 HDD Indicates when the hard disk drive is activated. 6 Keyboard...
... support area for certain models). 10 Touchpad Touch-sensitive pointing device which functions like center* and right) the left and right mouse buttons. *The center button serves as Acer Bio- Num Lock Lights up when Caps Lock is active. Caps Lock Lights up when Num Lock is charging. 2. 5 English # Icon Item Description 3 Display screen Also called Liquid-Crystal Display (LCD), displays computer output (Configuration may vary by models). 4 Power button Turns the computer on and off . 5 HDD Indicates when the hard disk drive is activated. 6 Keyboard...

Quick Start Guide
Page 6
... of the computer's controls like screen brightness, volume output. Turns the display screen backlight off . + < > Brightness up . Press any key to save power. Speaker toggle Turns the speakers on and off to return. Backup key Launches Acer Backup Management for displaying system information. Hotkey + Icon + Function System property Description Starts System Property for three-step data backup. Display toggle Screen blank Switches display output between the display screen, external monitor (if connected) and both. The front panel indicators are visible even when...
... of the computer's controls like screen brightness, volume output. Turns the display screen backlight off . + < > Brightness up . Press any key to save power. Speaker toggle Turns the speakers on and off to return. Backup key Launches Acer Backup Management for displaying system information. Hotkey + Icon + Function System property Description Starts System Property for three-step data backup. Display toggle Screen blank Switches display output between the display screen, external monitor (if connected) and both. The front panel indicators are visible even when...
Quick Start Guide
Page 12
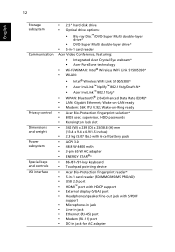
...-/91-key keyboard • Touchpad pointing device • Acer Bio-Protection fingerprint reader* • 5-in-1 card reader (SD/MMC/MS/MS PRO/xD) • USB 2.0 port • HDMI™ port with HDCP support • External display (VGA) port • Headphones/speaker/line-out jack with S/PDIF support • Microphone-in jack • Line-in jack • Ethernet (RJ-45) port • Modem (RJ-11) port • DC-in -1 card reader Acer Video Conference, featuring: • Integrated Acer Crystal Eye webcam* • Acer...
...-/91-key keyboard • Touchpad pointing device • Acer Bio-Protection fingerprint reader* • 5-in-1 card reader (SD/MMC/MS/MS PRO/xD) • USB 2.0 port • HDMI™ port with HDCP support • External display (VGA) port • Headphones/speaker/line-out jack with S/PDIF support • Microphone-in jack • Line-in jack • Ethernet (RJ-45) port • Modem (RJ-11) port • DC-in -1 card reader Acer Video Conference, featuring: • Integrated Acer Crystal Eye webcam* • Acer...


