
Aspire 1420P and 1820PT Service Guide
Page 7
... 32 WinFlash Utility 33 Remove HDD/BIOS Password Utilities 34 Removing BIOS Passwords 35 Miscellaneous Utilities 36 Machine Disassembly and Replacement 39 Disassembly Requirements 39 Related Information 39 General Information 39 Pre-disassembly Instructions 39 Disassembly Process 40 External Module Disassembly ...Process 41 External Modules Disassembly Flowchart 41 Removing the Dummy Card 42 Removing the Battery Pack 42 Removing the SIM Card 43 Removing the Module Cover 44 Removing the Hard Disk Drive Module 45 Removing ...
... 32 WinFlash Utility 33 Remove HDD/BIOS Password Utilities 34 Removing BIOS Passwords 35 Miscellaneous Utilities 36 Machine Disassembly and Replacement 39 Disassembly Requirements 39 Related Information 39 General Information 39 Pre-disassembly Instructions 39 Disassembly Process 40 External Module Disassembly ...Process 41 External Modules Disassembly Flowchart 41 Removing the Dummy Card 42 Removing the Battery Pack 42 Removing the SIM Card 43 Removing the Module Cover 44 Removing the Hard Disk Drive Module 45 Removing ...
Aspire 1420P and 1820PT Service Guide
Page 8
... Reassembly Process 110 Replacing the LCD Module 110 Replacing the RTC Battery 112 Replacing the Thermal Module 112 Replacing the Speakers 113 Replacing the Mainboard 115 Replacing the CRT Board 117 Replacing the LED Board 118 Replacing the Bluetooth Module 121 Replacing the I/O Board 122 Replacing the Button Board 125 Replacing the Upper Cover 128 Replacing the Hinge Covers 131 Replacing the Keyboard 133...
... Reassembly Process 110 Replacing the LCD Module 110 Replacing the RTC Battery 112 Replacing the Thermal Module 112 Replacing the Speakers 113 Replacing the Mainboard 115 Replacing the CRT Board 117 Replacing the LED Board 118 Replacing the Bluetooth Module 121 Replacing the I/O Board 122 Replacing the Button Board 125 Replacing the Upper Cover 128 Replacing the Hinge Covers 131 Replacing the Keyboard 133...
Aspire 1420P and 1820PT Service Guide
Page 61
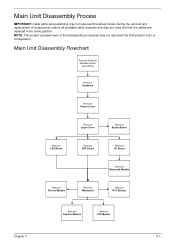
...Remove Upper Cover Remove Button Board Remove LED Board Remove CRT Board Remove I/O Board Remove Bluetooth Module Remove Thermal Module Remove Mainboard Remove RTC Battery Remove Speaker Module Remove LCD Module Chapter 3 51 Main Unit Disassembly Process IMPORTANT: Cable paths and positioning may not represent the final product color... or configuration. NOTE: The product previews seen in the same position. During the removal and replacement of components, ensure all available cable channels and clips are used and that the cables are...
...Remove Upper Cover Remove Button Board Remove LED Board Remove CRT Board Remove I/O Board Remove Bluetooth Module Remove Thermal Module Remove Mainboard Remove RTC Battery Remove Speaker Module Remove LCD Module Chapter 3 51 Main Unit Disassembly Process IMPORTANT: Cable paths and positioning may not represent the final product color... or configuration. NOTE: The product previews seen in the same position. During the removal and replacement of components, ensure all available cable channels and clips are used and that the cables are...

Aspire 1420P and 1820PT Service Guide
Page 122
Push the RTC battery into the holder. Place the thermal module on the main board. 112 Chapter 3 Remove all heat pads are approved for use: • Eapus XR-PE 1. Replacing the Thermal Module IMPORTANT: Ensure all traces of thermal grease or pad adhesive from the CPU and thermal module using a lint-free cloth or cotton swab and Isopropyl Alcohol, Acetone, or other approved cleaning agent. 2. The following thermal pads are in place before replacing the Thermal Module. Replacing the RTC Battery 1.
Push the RTC battery into the holder. Place the thermal module on the main board. 112 Chapter 3 Remove all heat pads are approved for use: • Eapus XR-PE 1. Replacing the Thermal Module IMPORTANT: Ensure all traces of thermal grease or pad adhesive from the CPU and thermal module using a lint-free cloth or cotton swab and Isopropyl Alcohol, Acetone, or other approved cleaning agent. 2. The following thermal pads are in place before replacing the Thermal Module. Replacing the RTC Battery 1.

Aspire 1420P and 1820PT Service Guide
Page 151
Push the battery down into the slot. Chapter 3 141 Insert the SIM card into place. Insert the battery outer edge into the slots. 2. Replacing the SIM Card 1. Replacing the Battery 1.
Push the battery down into the slot. Chapter 3 141 Insert the SIM card into place. Insert the battery outer edge into the slots. 2. Replacing the SIM Card 1. Replacing the Battery 1.

Aspire 1420P and 1820PT Service Guide
Page 152
Insert the dummy card into the slot. 142 Chapter 3 Replacing the Dummy Card 1. Lock the battery. 3.
Insert the dummy card into the slot. 142 Chapter 3 Replacing the Dummy Card 1. Lock the battery. 3.

Aspire 1420P and 1820PT Service Guide
Page 154
... good electrical outlet. 4. Remove any extension cables between the computer and the electrical outlet. Do not replace non-defective FRUs: SSttaarrtt OK Check AC/Battery Power on OK Check Daughter/B & FFC Whether OK Swap AC /Battery NG to try OK Swap Daughter/B NG Re-plug PWR FFC Swap M/B Computer Shuts down Intermittently If...
... good electrical outlet. 4. Remove any extension cables between the computer and the electrical outlet. Do not replace non-defective FRUs: SSttaarrtt OK Check AC/Battery Power on OK Check Daughter/B & FFC Whether OK Swap AC /Battery NG to try OK Swap Daughter/B NG Re-plug PWR FFC Swap M/B Computer Shuts down Intermittently If...
Aspire 1420P and 1820PT Service Guide
Page 155
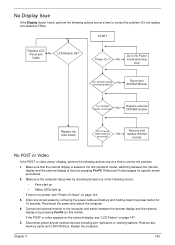
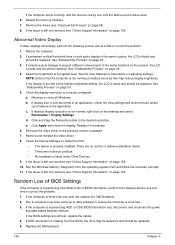
...by pressing Fn+F5 (on this notebook model, switching between the internal display and the external display is by removing the power cable and battery and holding down the power button for specific model procedures. 2. No Display Issue If the Display doesn't work, perform the following actions one... connected properly? Go to correct the problem. Make sure the computer has power by pressing Fn+F5. Chapter 4 145 Do not replace non-defective FRUs: START Replace LCD Panel and No Cable LCD Module OK? Make sure that the internal display is no power, see "LCD Failure" on page...
...by pressing Fn+F5 (on this notebook model, switching between the internal display and the external display is by removing the power cable and battery and holding down the power button for specific model procedures. 2. No Display Issue If the Display doesn't work, perform the following actions one... connected properly? Go to correct the problem. Make sure the computer has power by pressing Fn+F5. Chapter 4 145 Do not replace non-defective FRUs: START Replace LCD Panel and No Cable LCD Module OK? Make sure that the internal display is no power, see "LCD Failure" on page...
Aspire 1420P and 1820PT Service Guide
Page 156
... If the computer is properly installed. Minimize or close all Windows. There are no red Xs or yellow exclamation marks. • There are still lost, replace the cables. 4. Random Loss of BIOS information, perform the following actions one at a time to ensure the computer is listed under Other Devices. 9. If ...information loss, disconnect and reconnect the power and data cables between devices. If the computer boots correctly, add the devices one by one year old, replace the CMOS battery. 2. If permanent vertical/horizontal lines or dark spots display in the same locations on...
... If the computer is properly installed. Minimize or close all Windows. There are no red Xs or yellow exclamation marks. • There are still lost, replace the cables. 4. Random Loss of BIOS information, perform the following actions one at a time to ensure the computer is listed under Other Devices. 9. If ...information loss, disconnect and reconnect the power and data cables between devices. If the computer boots correctly, add the devices one by one year old, replace the CMOS battery. 2. If permanent vertical/horizontal lines or dark spots display in the same locations on...
Aspire 1420P and 1820PT Service Guide
Page 164
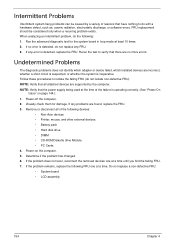
... time of the following devices: • Non-Acer devices • Printer, mouse, and other external devices • Battery pack • Hard disk drive • DIMM • CD-ROM/Diskette drive Module • PC Cards 4. If any FRU. 3. Determine if the problem has changed. 6. FRU replacement should be caused by the computer. Rerun the...
... time of the following devices: • Non-Acer devices • Printer, mouse, and other external devices • Battery pack • Hard disk drive • DIMM • CD-ROM/Diskette drive Module • PC Cards 4. If any FRU. 3. Determine if the problem has changed. 6. FRU replacement should be caused by the computer. Rerun the...
Aspire 1420P and 1820PT Service Guide
Page 211
A Antennas Removing 94, 97 B Battery Pack Removing 42 BIOS ROM type 17 vendor 17 Version 17 BIOS Utility 23-31 Advanced 26 Boot 29 Exit 30 Navigating 23 Save and ... Module Removing 47 Display 3 display hotkeys 12 E Euro Key 13 Index External Module Disassembly Flowchart 41 F Features 1 FLASH Utility 31 Flash Utility 31 FRU (Field Replaceable Unit) List 169 H Hard Disk Drive Module Removing 45 Hibernation mode hotkey 12 Hot Keys 10 I Indicators 8 Intermittent Problems 154 Internal Microphone Failure 151 Internal...
A Antennas Removing 94, 97 B Battery Pack Removing 42 BIOS ROM type 17 vendor 17 Version 17 BIOS Utility 23-31 Advanced 26 Boot 29 Exit 30 Navigating 23 Save and ... Module Removing 47 Display 3 display hotkeys 12 E Euro Key 13 Index External Module Disassembly Flowchart 41 F Features 1 FLASH Utility 31 Flash Utility 31 FRU (Field Replaceable Unit) List 169 H Hard Disk Drive Module Removing 45 Hibernation mode hotkey 12 Hot Keys 10 I Indicators 8 Intermittent Problems 154 Internal Microphone Failure 151 Internal...


