
Acer Aspire 1820PT, Aspire 1820PTZ, Aspire 1420P Quick Guide
Page 3
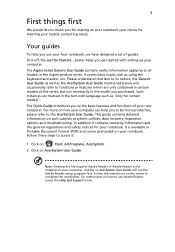
... you get started with language such as system utilities, data recovery, expansion options and troubleshooting. Please understand that due to its nature, the Generic User Guide as well as using the keyboard and audio, etc. poster helps you to be more productive, please refer to functions or features which are marked in the model you for making an Acer notebook your notebook. The Aspire Series Generic User Guide contains useful information...
... you get started with language such as system utilities, data recovery, expansion options and troubleshooting. Please understand that due to its nature, the Generic User Guide as well as using the keyboard and audio, etc. poster helps you to be more productive, please refer to functions or features which are marked in the model you for making an Acer notebook your notebook. The Aspire Series Generic User Guide contains useful information...
Acer Aspire 1820PT, Aspire 1820PTZ, Aspire 1420P Quick Guide
Page 5
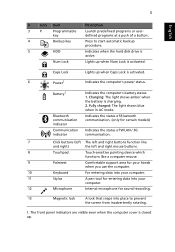
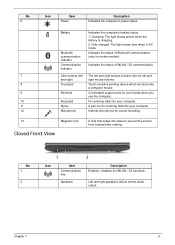
... and right mouse buttons. 8 Touchpad Touch-sensitive pointing device which functions like a computer mouse. 9 Palmrest Comfortable support area for your hands when you use the computer. 10 Keyboard For entering data into your computer. 11 Stylus A pen tool for entering data into your computer. 12 Microphone Internal microphone for certain models) Indicates the status of a button. 4 Backup key Press to prevent the screen from inadvertently rotating. 1. Indicates the status of Bluetooth communication. (only...
... and right mouse buttons. 8 Touchpad Touch-sensitive pointing device which functions like a computer mouse. 9 Palmrest Comfortable support area for your hands when you use the computer. 10 Keyboard For entering data into your computer. 11 Stylus A pen tool for entering data into your computer. 12 Microphone Internal microphone for certain models) Indicates the status of a button. 4 Backup key Press to prevent the screen from inadvertently rotating. 1. Indicates the status of Bluetooth communication. (only...
Acer Aspire 1820PT, Aspire 1820PTZ, Aspire 1420P Quick Guide
Page 6
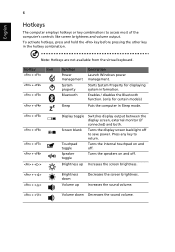
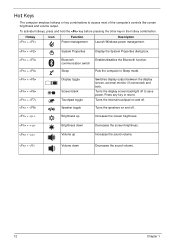
...Function Power management System property Bluetooth Sleep Description Launch Windows power management. Touchpad toggle Turns the internal touchpad on and off . Enables / disables the Bluetooth function. (only for displaying system information. Press any key to save power. Note: Hotkeys are not available from the virtual keyboard. Starts System Property for certain models) Puts the computer in the hotkey combination. Speaker toggle Turns the speakers on and off . Brightness up Decreases the screen brightness. Increases the sound volume. + < > Volume down Volume...
...Function Power management System property Bluetooth Sleep Description Launch Windows power management. Touchpad toggle Turns the internal touchpad on and off . Enables / disables the Bluetooth function. (only for displaying system information. Press any key to save power. Note: Hotkeys are not available from the virtual keyboard. Starts System Property for certain models) Puts the computer in the hotkey combination. Speaker toggle Turns the speakers on and off . Brightness up Decreases the screen brightness. Increases the sound volume. + < > Volume down Volume...
Acer Aspire 1820PT, Aspire 1820PTZ, Aspire 1420P Quick Guide
Page 12
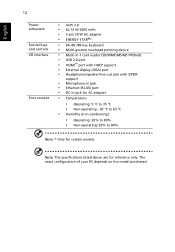
...®* • 84-/85-/88-key keyboard • Multi-gesture touchpad pointing device • Multi-in-1 card reader (SD/MMC/MS/MS PRO/xD) • USB 2.0 port • HDMI™ port with HDCP support • External display (VGA) port • Headphones/speaker/line-out jack with S/PDIF support • Microphone-in jack • Ethernet (RJ-45) port • DC-in jack for AC adapter • Temperature: • Operating: 5 °C to 35 °C •...
...®* • 84-/85-/88-key keyboard • Multi-gesture touchpad pointing device • Multi-in-1 card reader (SD/MMC/MS/MS PRO/xD) • USB 2.0 port • HDMI™ port with HDCP support • External display (VGA) port • Headphones/speaker/line-out jack with S/PDIF support • Microphone-in jack • Ethernet (RJ-45) port • DC-in jack for AC adapter • Temperature: • Operating: 5 °C to 35 °C •...
Aspire 1420P and 1820PT Service Guide
Page 7
... Diagram 3 Your Notebook Tour 4 Front View 4 Closed Front View 5 Left View 6 Right View 6 Base View 7 Rear View 8 Indicators 8 TouchPad Basics 9 Using the Keyboard 10 Lock Keys and embedded numeric keypad 10 Windows Keys 11 Hot Keys 12 Special Keys 13 Hardware Specifications and Configurations 14 System Utilities 23 BIOS Setup Utility 23 Navigating the BIOS Utility 23 Information 24 Main 25 Security 26 Boot 29 Exit 30 BIOS Flash Utility 31 DOS Flash Utility 32 WinFlash Utility 33 Remove HDD/BIOS Password Utilities 34 Removing BIOS Passwords...
... Diagram 3 Your Notebook Tour 4 Front View 4 Closed Front View 5 Left View 6 Right View 6 Base View 7 Rear View 8 Indicators 8 TouchPad Basics 9 Using the Keyboard 10 Lock Keys and embedded numeric keypad 10 Windows Keys 11 Hot Keys 12 Special Keys 13 Hardware Specifications and Configurations 14 System Utilities 23 BIOS Setup Utility 23 Navigating the BIOS Utility 23 Information 24 Main 25 Security 26 Boot 29 Exit 30 BIOS Flash Utility 31 DOS Flash Utility 32 WinFlash Utility 33 Remove HDD/BIOS Password Utilities 34 Removing BIOS Passwords...
Aspire 1420P and 1820PT Service Guide
Page 15
... models) Indicates the status of WLAN / 3G communication. 7 Click buttons (left The left and right buttons function like the left and and right) right mouse buttons. 8 Touchpad Touch-sensitive pointing device which functions like a computer mouse. 9 Palmrest Comfortable support area for your hands when you use the computer. 10 Keyboard For entering data into your computer. 11 Stylus A pen tool for entering data into your computer 12 Microphone Internal microphone...
... models) Indicates the status of WLAN / 3G communication. 7 Click buttons (left The left and right buttons function like the left and and right) right mouse buttons. 8 Touchpad Touch-sensitive pointing device which functions like a computer mouse. 9 Palmrest Comfortable support area for your hands when you use the computer. 10 Keyboard For entering data into your computer. 11 Stylus A pen tool for entering data into your computer 12 Microphone Internal microphone...
Aspire 1420P and 1820PT Service Guide
Page 18
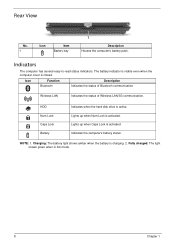
... several easy-to-read status indicators. HDD Num Lock Caps Lock Battery Indicates when the hard disk drive is charging. 2. Lights up when Num Lock is activated. Icon Function Bluetooth Description Indicates the status of Wireless LAN/3G communication. Indicates the computer's battery status. Wireless LAN Indicates the status of Bluetooth communication. Lights up when Caps Lock is closed. Charging: The battery light shows amber when the battery is active. Fully charged: The light shows green when in AC mode. 8 Chapter 1 Rear View No...
... several easy-to-read status indicators. HDD Num Lock Caps Lock Battery Indicates when the hard disk drive is charging. 2. Lights up when Num Lock is activated. Icon Function Bluetooth Description Indicates the status of Wireless LAN/3G communication. Indicates the computer's battery status. Wireless LAN Indicates the status of Bluetooth communication. Lights up when Caps Lock is closed. Charging: The battery light shows amber when the battery is active. Fully charged: The light shows green when in AC mode. 8 Chapter 1 Rear View No...
Aspire 1420P and 1820PT Service Guide
Page 22
...Brightness down Decreases the screen brightness. + < > Volume up Increases the sound volume. + < > Volume down Decreases the sound volume. 12 Chapter 1 Turns the display screen backlight off . Bluetooth Enables/disables the Bluetooth function. Turns the speakers on and off. Display toggle Screen blank Touchpad toggle Speaker toggle Switches display output between the display screen, external monitor (if connected) and both. To activate hotkeys, press and hold the key before pressing the other key in Sleep mode. Turns the internal touchpad on and off to save power...
...Brightness down Decreases the screen brightness. + < > Volume up Increases the sound volume. + < > Volume down Decreases the sound volume. 12 Chapter 1 Turns the display screen backlight off . Bluetooth Enables/disables the Bluetooth function. Turns the speakers on and off. Display toggle Screen blank Touchpad toggle Speaker toggle Switches display output between the display screen, external monitor (if connected) and both. To activate hotkeys, press and hold the key before pressing the other key in Sleep mode. Turns the internal touchpad on and off to save power...
Aspire 1420P and 1820PT Service Guide
Page 33
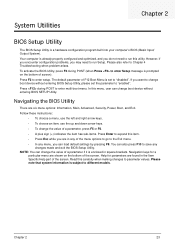
.... Press Enter to expand this utility. Follow these instructions: • To choose a menu, use the left and right arrow keys. • To choose an item, use the up and down arrow keys. • To change the value of the menu options to go to "disabled". You can load default settings by pressing F9. System Utilities Chapter 2 BIOS Setup Utility The BIOS Setup Utility is enclosed in any changes made and exit the BIOS Setup Utility...
.... Press Enter to expand this utility. Follow these instructions: • To choose a menu, use the left and right arrow keys. • To choose an item, use the up and down arrow keys. • To change the value of the menu options to go to "disabled". You can load default settings by pressing F9. System Utilities Chapter 2 BIOS Setup Utility The BIOS Setup Utility is enclosed in any changes made and exit the BIOS Setup Utility...
Aspire 1420P and 1820PT Service Guide
Page 36
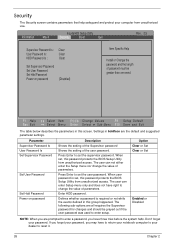
...whether a password is set , this password protects the BIOS Setup Utility from unauthorized access. Press Enter to enter a password, you are prompted to set the user password. When set , this password protects the BIOS Setup Utility from unauthorized access. Parameter Supervisor Password Is User Password Is Set Supervisor Password Set User Password Set Hdd Password Power on password [Disabled] Item Specific Help Install or Change the password and the length of the user password. Option Clear or Set Clear or Set Enabled or Disabled NOTE: When you have right to reset it. 26...
...whether a password is set , this password protects the BIOS Setup Utility from unauthorized access. Press Enter to enter a password, you are prompted to set the user password. When set , this password protects the BIOS Setup Utility from unauthorized access. Parameter Supervisor Password Is User Password Is Set Supervisor Password Set User Password Set Hdd Password Power on password [Disabled] Item Specific Help Install or Change the password and the length of the user password. Option Clear or Set Clear or Set Enabled or Disabled NOTE: When you have right to reset it. 26...
Aspire 1420P and 1820PT Service Guide
Page 37
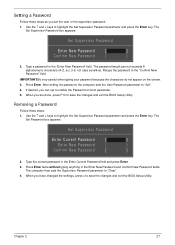
... can opt to enable the Password on the screen. 3. Type the current password in the "Enter New Password" field. Use the ↑ and ↓ keys to "Set". 4. Type a password in the Enter Current Password field and press Enter. 3. After setting the password, the computer sets the User Password parameter to highlight the Set Supervisor Password parameter and press the Enter key. Use the ↑ and ↓ keys to "Clear". 4. The Set Password box appears: Set Supervisor Password Enter Current Password [ ] Enter New Password [ ] Confirm New Password [ ] 2. The computer...
... can opt to enable the Password on the screen. 3. Type the current password in the "Enter New Password" field. Use the ↑ and ↓ keys to "Set". 4. Type a password in the Enter Current Password field and press Enter. 3. After setting the password, the computer sets the User Password parameter to highlight the Set Supervisor Password parameter and press the Enter key. Use the ↑ and ↓ keys to "Clear". 4. The Set Password box appears: Set Supervisor Password Enter Current Password [ ] Enter New Password [ ] Confirm New Password [ ] 2. The computer...
Aspire 1420P and 1820PT Service Guide
Page 38
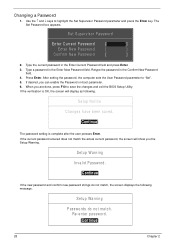
... the BIOS Setup Utility. If the current password entered does not match the actual current password, the screen will display as following message. Use the ↑ and ↓ keys to "Set". 5. Setup Warning Passwords do not match, the screen displays the following . When you can enable the Password on boot parameter. 6. Set Supervisor Password Enter Current Password [ ] Enter New Password [ ] Confirm New Password [ ] 2. Re-enter password. [Continue] 28 Chapter 2 Type a password in the Enter New Password field. Press Enter. The Set Password box appears. Changing a Password...
... the BIOS Setup Utility. If the current password entered does not match the actual current password, the screen will display as following message. Use the ↑ and ↓ keys to "Set". 5. Setup Warning Passwords do not match, the screen displays the following . When you can enable the Password on boot parameter. 6. Set Supervisor Password Enter Current Password [ ] Enter New Password [ ] Confirm New Password [ ] 2. Re-enter password. [Continue] 28 Chapter 2 Type a password in the Enter New Password field. Press Enter. The Set Password box appears. Changing a Password...
Aspire 1420P and 1820PT Service Guide
Page 40
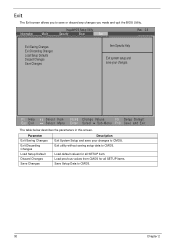
... BIOS Utility. Exit utility without saving setup data to CMOS. 30 Chapter 2 F1 Help Esc Exit Select Item F5/F6 Change Values F9 Setup Default Select Menu Enter Select Sub-Menu F10 Save and Exit The table below describes the parameters in this screen. Load default values for all SETUP item. Load previous values from CMOS for all SETUP items. Save Setup Data to CMOS. Information M a i n InsydelH20 Setup Utility Security Boot...
... BIOS Utility. Exit utility without saving setup data to CMOS. 30 Chapter 2 F1 Help Esc Exit Select Item F5/F6 Change Values F9 Setup Default Select Menu Enter Select Sub-Menu F10 Save and Exit The table below describes the parameters in this screen. Load default values for all SETUP item. Load previous values from CMOS for all SETUP items. Save Setup Data to CMOS. Information M a i n InsydelH20 Setup Utility Security Boot...
Aspire 1420P and 1820PT Service Guide
Page 153
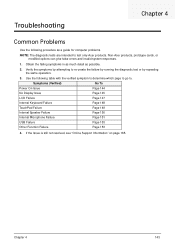
..., see "Online Support Information" on page 165. Use the following procedure as possible. 2. Symptoms (Verified) Go To Power On Issue Page 144 No Display Issue Page 145 LCD Failure Page 147 Internal Keyboard Failure Page 148 TouchPad Failure Page 149 Internal Speaker Failure Page 150 Internal Microphone Failure Page 151 USB Failure Page 153 Other Function Failure Page 153 4. Troubleshooting Chapter 4 Common Problems Use the following...
..., see "Online Support Information" on page 165. Use the following procedure as possible. 2. Symptoms (Verified) Go To Power On Issue Page 144 No Display Issue Page 145 LCD Failure Page 147 Internal Keyboard Failure Page 148 TouchPad Failure Page 149 Internal Speaker Failure Page 150 Internal Microphone Failure Page 151 USB Failure Page 153 Other Function Failure Page 153 4. Troubleshooting Chapter 4 Common Problems Use the following...
Aspire 1420P and 1820PT Service Guide
Page 155
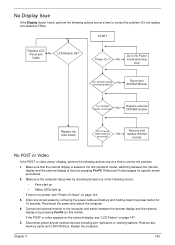
... problem. 1. Make sure the computer has power by pressing Fn+F5. Do not replace non-defective FRUs: START Replace LCD Panel and No Cable LCD Module OK? DDRAM module functional? module No POST or Video If the POST or video doesn't display, perform the following occurs: • Fans start up • Status LEDs light up If there is by removing the power cable and battery and holding down the power button for specific model procedures. 2. Disconnect power and all external devices including port...
... problem. 1. Make sure the computer has power by pressing Fn+F5. Do not replace non-defective FRUs: START Replace LCD Panel and No Cable LCD Module OK? DDRAM module functional? module No POST or Video If the POST or video doesn't display, perform the following occurs: • Fans start up • Status LEDs light up If there is by removing the power cable and battery and holding down the power button for specific model procedures. 2. Disconnect power and all external devices including port...
Aspire 1420P and 1820PT Service Guide
Page 156
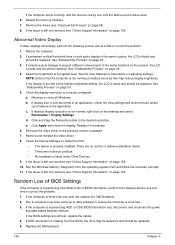
... should be replaced. Run the Windows Memory Diagnostic from the BIOS, the drive may reduce display brightness. Replace the Motherboard. 146 Chapter 4 Reseat the memory modules. 7. Reboot the computer. 2. See "Disassembly Process" on the screen), the LCD is listed under Other Devices. 9. If extensive pixel damage is not normal, right-click on page 34). 8. See the User Manual for instructions on page 34. 5. See "Disassembly Process" on adjusting settings. If desktop display resolution is...
... should be replaced. Run the Windows Memory Diagnostic from the BIOS, the drive may reduce display brightness. Replace the Motherboard. 146 Chapter 4 Reseat the memory modules. 7. Reboot the computer. 2. See "Disassembly Process" on the screen), the LCD is listed under Other Devices. 9. If extensive pixel damage is not normal, right-click on page 34). 8. See the User Manual for instructions on page 34. 5. See "Disassembly Process" on adjusting settings. If desktop display resolution is...

Aspire 1420P and 1820PT Service Guide
Page 162
... enter the BIOS Utility. c. Check the BIOS settings are set as the first boot device on the HDD and ODD are correct and that CD/DVD drive is virus free. 3. Remove any key to start to locate and resolve issues with the computer. For more information see Windows Help and Support. 9. Restore system and file settings from a known good date using up-to-date software to correct the problem. 1. HDD Not Operating Correctly If the HDD...
... enter the BIOS Utility. c. Check the BIOS settings are set as the first boot device on the HDD and ODD are correct and that CD/DVD drive is virus free. 3. Remove any key to start to locate and resolve issues with the computer. For more information see Windows Help and Support. 9. Restore system and file settings from a known good date using up-to-date software to correct the problem. 1. HDD Not Operating Correctly If the HDD...
Aspire 1420P and 1820PT Service Guide
Page 164
... power supply being used at a time. Visually check them for the system board in loop mode at a time until you find the failing FRU. 7. If the problem does not recur, reconnect the removed devices one at the time of the following devices: • Non-Acer devices • Printer, mouse, and other external devices • Battery pack • Hard disk drive • DIMM • CD-ROM/Diskette drive Module • PC Cards...
... power supply being used at a time. Visually check them for the system board in loop mode at a time until you find the failing FRU. 7. If the problem does not recur, reconnect the removed devices one at the time of the following devices: • Non-Acer devices • Printer, mouse, and other external devices • Battery pack • Hard disk drive • DIMM • CD-ROM/Diskette drive Module • PC Cards...

Aspire 1420P and 1820PT Service Guide
Page 177
Mainboard CMOS Discharge Discharging the CMOS clears all user settings and restores factory defaults. Reconnect the RTC battery and reassemble the unit. Chapter 5 167 Clearing Password Check and BIOS Recovery This section provides a procedure for clearing the password and BIOS. See "Removing the RTC Battery" on the main board clears the CMOS of all user settings. 1. Remove the RTC battery. Disassemble the notebook and take out the Mainboard. The Hardware Open Gap on page 73. 3. See "Removing the Mainboard" on page...
Mainboard CMOS Discharge Discharging the CMOS clears all user settings and restores factory defaults. Reconnect the RTC battery and reassemble the unit. Chapter 5 167 Clearing Password Check and BIOS Recovery This section provides a procedure for clearing the password and BIOS. See "Removing the RTC Battery" on the main board clears the CMOS of all user settings. 1. Remove the RTC battery. Disassemble the notebook and take out the Mainboard. The Hardware Open Gap on page 73. 3. See "Removing the Mainboard" on page...
Aspire 1420P and 1820PT Service Guide
Page 211
...12 Button Board Removing 61 C Camera Board Removing 85, 106 caps lock on indicator 8 Common Problems 144 CRT Cable Removing 115 D DIMM Module Removing 47 Display 3 display hotkeys 12 E Euro Key 13 Index External Module Disassembly Flowchart 41 F Features 1 FLASH Utility 31 Flash Utility 31 FRU (Field Replaceable Unit) List 169 H Hard Disk Drive Module Removing 45 Hibernation mode hotkey 12 Hot Keys 10 I Indicators 8 Intermittent Problems 154 Internal Microphone Failure 151 Internal Speaker Failure 150 J Jumper and Connector Locations 165 K Keyboard Removing 53 Keyboard Failure 148 L LCD Bezel...
...12 Button Board Removing 61 C Camera Board Removing 85, 106 caps lock on indicator 8 Common Problems 144 CRT Cable Removing 115 D DIMM Module Removing 47 Display 3 display hotkeys 12 E Euro Key 13 Index External Module Disassembly Flowchart 41 F Features 1 FLASH Utility 31 Flash Utility 31 FRU (Field Replaceable Unit) List 169 H Hard Disk Drive Module Removing 45 Hibernation mode hotkey 12 Hot Keys 10 I Indicators 8 Intermittent Problems 154 Internal Microphone Failure 151 Internal Speaker Failure 150 J Jumper and Connector Locations 165 K Keyboard Removing 53 Keyboard Failure 148 L LCD Bezel...


