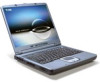
Aspire 1400 Notebook Service Guide
Page 7
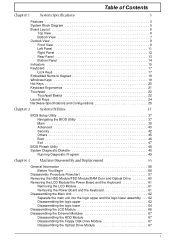
... Others 45 Boot 46 Exit 47 BIOS Phlash Utility 48 System Diagnostic Diskette 48 Running Diagnostic Program 49 Chapter 3 Machine Disassembly and Replacement 55 General Information 56 Before You Begin 56 Disassembly Procedure Flowchart 57 Removing the HDD Module/FDD Module/RAM Door and Optical Drive 60 Removing the LCD Module/the...
... Others 45 Boot 46 Exit 47 BIOS Phlash Utility 48 System Diagnostic Diskette 48 Running Diagnostic Program 49 Chapter 3 Machine Disassembly and Replacement 55 General Information 56 Before You Begin 56 Disassembly Procedure Flowchart 57 Removing the HDD Module/FDD Module/RAM Door and Optical Drive 60 Removing the LCD Module/the...

Aspire 1400 Notebook Service Guide
Page 61
... Nut screwdriver NOTE: The screws for preventing electrostatic discharge ! Flat blade screwdriver ! Chapter 3 55 When you need the following tools: ! To disassemble the computer, you remove the stripe cover, please be careful not to avoid mismatch when putting back the components. Philips screw driver ! Wrist grounding... strap and conductive mat for the different components vary in size. During the disassembly process, group the screws with the corresponding components to scrape the cover. Chapter 3 Machine...
... Nut screwdriver NOTE: The screws for preventing electrostatic discharge ! Flat blade screwdriver ! Chapter 3 55 When you need the following tools: ! To disassemble the computer, you remove the stripe cover, please be careful not to avoid mismatch when putting back the components. Philips screw driver ! Wrist grounding... strap and conductive mat for the different components vary in size. During the disassembly process, group the screws with the corresponding components to scrape the cover. Chapter 3 Machine...
Aspire 1400 Notebook Service Guide
Page 62
... signal cables from the system. 3. General Information Before You Begin Before proceeding with the disassembly procedure, make sure you do the following: 1. Remove the battery pack. 4. Please make sure that you use the right screws. NOTE: Aspire 1400 uses mylar or tape to fasten the FFC/FPC/connectors/cable, you may damage the...
... signal cables from the system. 3. General Information Before You Begin Before proceeding with the disassembly procedure, make sure you do the following: 1. Remove the battery pack. 4. Please make sure that you use the right screws. NOTE: Aspire 1400 uses mylar or tape to fasten the FFC/FPC/connectors/cable, you may damage the...
Aspire 1400 Notebook Service Guide
Page 63
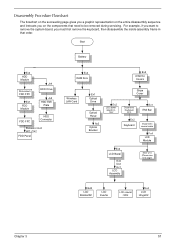
For example, if you want to remove the system board, you on the entire disassembly sequence and instructs you must first remove the keyboard, then disassemble the inside assembly frame in that need to be removed during servicing. Start Battery Ex2 HDD Module Disconnect FDD FPC Ex1 FDD Module Jx4 HDD ... Bezel Ex6 Dx2 Ex1 LCD Assembly Main Unit (Please see next page) Gx8 LCD BracketX2 LCD Inverter LCD coaxial cable Ex4 LCD HingeX2 Chapter 3 57 Disassembly Procedure Flowchart The flowchart on the succeeding page gives you a graphic representation on the components that order.
For example, if you want to remove the system board, you on the entire disassembly sequence and instructs you must first remove the keyboard, then disassemble the inside assembly frame in that need to be removed during servicing. Start Battery Ex2 HDD Module Disconnect FDD FPC Ex1 FDD Module Jx4 HDD ... Bezel Ex6 Dx2 Ex1 LCD Assembly Main Unit (Please see next page) Gx8 LCD BracketX2 LCD Inverter LCD coaxial cable Ex4 LCD HingeX2 Chapter 3 57 Disassembly Procedure Flowchart The flowchart on the succeeding page gives you a graphic representation on the components that order.
Aspire 1400 Notebook Service Guide
Page 68
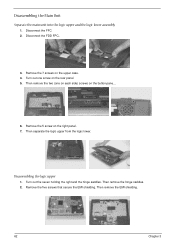
.... 7. Then separate the logic upper from the logic lower. Disconnect the FDD FPC.. 3. Then remove the EMI shielding. 62 Chapter 3 Then remove the hinge saddles. 2. Disassembling the logic upper 1. Turn out one on each side) screws on the rear panel. 5. Turn out the seven holding the right and the hinge saddles...
.... 7. Then separate the logic upper from the logic lower. Disconnect the FDD FPC.. 3. Then remove the EMI shielding. 62 Chapter 3 Then remove the hinge saddles. 2. Disassembling the logic upper 1. Turn out one on each side) screws on the rear panel. 5. Turn out the seven holding the right and the hinge saddles...
Aspire 1400 Notebook Service Guide
Page 70
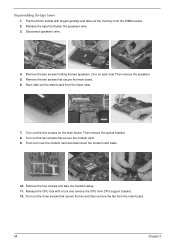
.... 3. Release the tape that secure the modem card. 9. Remove the two screws that secure the fan and then remove the fan from the lower case. 7. Disassembling the logic lower 1. Turn out the four screws on each side.Then remove the speakers. 5. One on the main board. Remove the two screws holding...
.... 3. Release the tape that secure the modem card. 9. Remove the two screws that secure the fan and then remove the fan from the lower case. 7. Disassembling the logic lower 1. Turn out the four screws on each side.Then remove the speakers. 5. One on the main board. Remove the two screws holding...

Aspire 1400 Notebook Service Guide
Page 72
Disassembling the LCD Module 1. Remove the two screwpad then turn out the two screws on LCD FPC, then disconnect the LCD FPC and remove it. 7. Disattach ...
Disassembling the LCD Module 1. Remove the two screwpad then turn out the two screws on LCD FPC, then disconnect the LCD FPC and remove it. 7. Disattach ...
Aspire 1400 Notebook Service Guide
Page 73
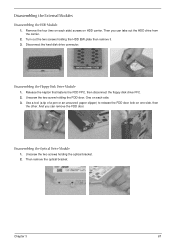
Disassembling the External Modules Disassembling the HDD Module 1. Unscrew the two screw holding the optical bracket. 2. And you can remove the FDD door. Then you can take out the HDD ...) screws on HDD carrier. Use a tool (a tip of a pen or an uncurved paper clipper) to release the FDD door lock on each side. 3. Disassembling the Optical Drive Module 1. Disassembling the Floppy Disk Drive Module 1. Then remove the optical bracket. Remove the four (two on one side, then the other. Disconnect the hard...
Disassembling the External Modules Disassembling the HDD Module 1. Unscrew the two screw holding the optical bracket. 2. And you can remove the FDD door. Then you can take out the HDD ...) screws on HDD carrier. Use a tool (a tip of a pen or an uncurved paper clipper) to release the FDD door lock on each side. 3. Disassembling the Optical Drive Module 1. Disassembling the Floppy Disk Drive Module 1. Then remove the optical bracket. Remove the four (two on one side, then the other. Disconnect the hard...
Aspire 1400 Notebook Service Guide
Page 117
... 29 computer on indicator 15 Core logic 29 CPU core voltage 25 package 25 type 25 D Index Index DIMM Combinations 26 external 60 removing 60 Disassembly Battery Pack 58 CD-ROM/DVD-ROM Module 62 Floppy Disk Drive 66 Machine 55 Procedure Flowchart 57 Display 5 DVD-ROM Interface 27 E Error Symptom...
... 29 computer on indicator 15 Core logic 29 CPU core voltage 25 package 25 type 25 D Index Index DIMM Combinations 26 external 60 removing 60 Disassembly Battery Pack 58 CD-ROM/DVD-ROM Module 62 Floppy Disk Drive 66 Machine 55 Procedure Flowchart 57 Display 5 DVD-ROM Interface 27 E Error Symptom...
Aspire 1400 User Guide
Page 104
... ABIERTO. ADVARSEL! Udskiftning må kun ske med batteri af samme fabrikat og type. CLASS 1 LASER PRODUCT CAUTION: INVISIBLE LASER RADIATION WHEN OPEN. VARO! Do not disassemble or dispose of fire or explosion. 13 Warning! Laser compliance statement The CD or DVD drive used batteries promptly. 14 Use only the proper type...
... ABIERTO. ADVARSEL! Udskiftning må kun ske med batteri af samme fabrikat og type. CLASS 1 LASER PRODUCT CAUTION: INVISIBLE LASER RADIATION WHEN OPEN. VARO! Do not disassemble or dispose of fire or explosion. 13 Warning! Laser compliance statement The CD or DVD drive used batteries promptly. 14 Use only the proper type...
Aspire 1400 User Guide
Page 105
...apparattillverkaren. Vaihda paristo ainoastaan laitevalmistajan suosittelemaan tyyppiin. This has no effect on virheellisesti asennettu. Reverse engineering or disassembly is produced with high-precision manufacturing techniques. Kassera anvãnt batteri enligt fabrikantens instruktion. VAROITUS Pä... i henhold til fabrikantens instruksjoner. Entsorgung gebrauchter Batterien nach Angaben des Herstellers. Year 2000 compliance statement The Acer Aspire 1400 series notebook computer carries the "Hardware NSTL Tested Year 2000 Compliant" logo, which certifies that is intended...
...apparattillverkaren. Vaihda paristo ainoastaan laitevalmistajan suosittelemaan tyyppiin. This has no effect on virheellisesti asennettu. Reverse engineering or disassembly is produced with high-precision manufacturing techniques. Kassera anvãnt batteri enligt fabrikantens instruktion. VAROITUS Pä... i henhold til fabrikantens instruksjoner. Entsorgung gebrauchter Batterien nach Angaben des Herstellers. Year 2000 compliance statement The Acer Aspire 1400 series notebook computer carries the "Hardware NSTL Tested Year 2000 Compliant" logo, which certifies that is intended...


