
AL1917C User's Guide
Page 1
Table of Contents Safety Rules Electrical Safety Installation Safety Cleaning Safety SPECIAL NOTES ON LCD MONITORS Components and Accessories Usage Installation Guide Adjustment of Display Operation Adjustment of Screen Attachment Plug and Play Power Saver Troubleshooting Technical Specifications Display Mode 1 1 1 1 1 2 2 2 3 4 6 6 7 7 7 8 9
Table of Contents Safety Rules Electrical Safety Installation Safety Cleaning Safety SPECIAL NOTES ON LCD MONITORS Components and Accessories Usage Installation Guide Adjustment of Display Operation Adjustment of Screen Attachment Plug and Play Power Saver Troubleshooting Technical Specifications Display Mode 1 1 1 1 1 2 2 2 3 4 6 6 7 7 7 8 9

AL1917C User's Guide
Page 2
... into the outlet, contact your electrician to make sure that no liquid permeates into the inside of the display. SPECIAL NOTES ON LCD MONITORS The following safety rules carefully when you use. Turn off the Power Switch for hours. 1 The LCD screen has effective pixels of ...is smoke, noise or smell, remove the plug immediately and contact our authorized dealer or service center. ‹ Don't touch your LCD display with LCD monitor and do not indicate a problem. Take moisture-proof and ventilation measures to the receptacle. Due to clean the display. NOTES z z z z Due...
... into the outlet, contact your electrician to make sure that no liquid permeates into the inside of the display. SPECIAL NOTES ON LCD MONITORS The following safety rules carefully when you use. Turn off the Power Switch for hours. 1 The LCD screen has effective pixels of ...is smoke, noise or smell, remove the plug immediately and contact our authorized dealer or service center. ‹ Don't touch your LCD display with LCD monitor and do not indicate a problem. Take moisture-proof and ventilation measures to the receptacle. Due to clean the display. NOTES z z z z Due...

AL1917T User's Guide
Page 1
TABLE OF CONTENTS Special notes on LCD monitors 1 Introduction 2 Features 2 Unpacking 3 Attaching/Removing the base 4 Screen position adjustment 4 Connecting the power cord 5 Safety precaution 5 Cleaning your monitor 5 Preset modes 6 Power saving 7 DDC ...7 Installation 8 User controls 9 Troubleshooting 13 Specification 14
TABLE OF CONTENTS Special notes on LCD monitors 1 Introduction 2 Features 2 Unpacking 3 Attaching/Removing the base 4 Screen position adjustment 4 Connecting the power cord 5 Safety precaution 5 Cleaning your monitor 5 Preset modes 6 Power saving 7 DDC ...7 Installation 8 User controls 9 Troubleshooting 13 Specification 14

AL1917T User's Guide
Page 2
... as a missing pixel or a pixel lit all of the time. · Due to the nature of 99.99% or more. E-1 AL1917 SPECIAL NOTES ON LCD MONITORS The following symptoms are normal with LCD monitor and do not indicate a problem. Turn off the Power Switch for hours.
... as a missing pixel or a pixel lit all of the time. · Due to the nature of 99.99% or more. E-1 AL1917 SPECIAL NOTES ON LCD MONITORS The following symptoms are normal with LCD monitor and do not indicate a problem. Turn off the Power Switch for hours.
AL1917T User's Guide
Page 3
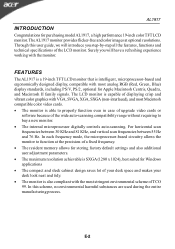
... vertical scan frequencies between 55 Hz and 76 Hz. In each frequency mode, the microprocessor-based circuitry allows the monitor to buy a new monitor. · The internal microprocessor digitally controls auto-scanning. Through this scheme, no environmental harmful substances are used during... the entire manufacturing process. AL1917 INTRODUCTION Congratulations for Apple Macintosh Centris, Quadra, and Macintosh II family signals. The LCD monitor is capable of displaying crisp and vibrant color graphics with most analog RGB (Red, Green, Blue) display standards, including PS...
... vertical scan frequencies between 55 Hz and 76 Hz. In each frequency mode, the microprocessor-based circuitry allows the monitor to buy a new monitor. · The internal microprocessor digitally controls auto-scanning. Through this scheme, no environmental harmful substances are used during... the entire manufacturing process. AL1917 INTRODUCTION Congratulations for Apple Macintosh Centris, Quadra, and Macintosh II family signals. The LCD monitor is capable of displaying crisp and vibrant color graphics with most analog RGB (Red, Green, Blue) display standards, including PS...
AL1917T User's Guide
Page 4
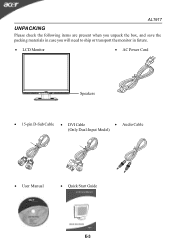
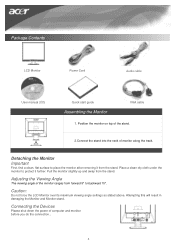
AL1917 UNPACKING Please check the following items are present when you unpack the box, and save the packing materials in case you will need to ship or transport the monitor in future. · LCD Monitor · AC Power Cord Speakers · 15-pin D-Sub Cable · DVI Cable · Audio Cable (Only Dual-Input Model) · User Manual · Quick Start Guide E-3
AL1917 UNPACKING Please check the following items are present when you unpack the box, and save the packing materials in case you will need to ship or transport the monitor in future. · LCD Monitor · AC Power Cord Speakers · 15-pin D-Sub Cable · DVI Cable · Audio Cable (Only Dual-Input Model) · User Manual · Quick Start Guide E-3

AL1917T User's Guide
Page 5
The monitor can adjust the tilt of the monitor by arrow below . AL1917 Remove: Depress the four hooks as indicated by using both of your hands to remove it. SCREEN POSITION ADJUSTMENT In oder to optimize the best viewing position, you can be adjusted to 15 degrees up or 5 degrees down as indicated first before removing the base and follow the arrow direction to hold the edges of the base. E-4 Attaching / Removing the Base Install: Align the four hooks on the bottom of the monitor with the corresponding slots on the bottom of the monitor as shown in the figure below .
The monitor can adjust the tilt of the monitor by arrow below . AL1917 Remove: Depress the four hooks as indicated by using both of your hands to remove it. SCREEN POSITION ADJUSTMENT In oder to optimize the best viewing position, you can be adjusted to 15 degrees up or 5 degrees down as indicated first before removing the base and follow the arrow direction to hold the edges of the base. E-4 Attaching / Removing the Base Install: Align the four hooks on the bottom of the monitor with the corresponding slots on the bottom of the monitor as shown in the figure below .

AL1917T User's Guide
Page 6
... either 100/120V AC or 220/240 V AC voltage area. The cord set should have the appropriate safety approvals for your area. · This monitor has a universal power supply that the power cord you use is fragile. · LAMP Disposal LAMP(S) INSIDE THIS PRODUCT CONTAIN MERCURY AND MUST BE ... OF ACCORDING TO LOCAL, STATE OR FEDERAL LAWS. FOR MORE INFORMATION, CONTACT THE ELECTRONIC INDUSTRIES ALLIANCE AT WWW.EIAE.ORG. Always put the monitor in which the equipment will be installed. FOR LAMP SPECIFIC DISPOSAL INFORMATION CHECK WWW.LAMPRECYCLE.ORG. SAFETY PRECAUTION · Avoid placing the...
... either 100/120V AC or 220/240 V AC voltage area. The cord set should have the appropriate safety approvals for your area. · This monitor has a universal power supply that the power cord you use is fragile. · LAMP Disposal LAMP(S) INSIDE THIS PRODUCT CONTAIN MERCURY AND MUST BE ... OF ACCORDING TO LOCAL, STATE OR FEDERAL LAWS. FOR MORE INFORMATION, CONTACT THE ELECTRONIC INDUSTRIES ALLIANCE AT WWW.EIAE.ORG. Always put the monitor in which the equipment will be installed. FOR LAMP SPECIFIC DISPOSAL INFORMATION CHECK WWW.LAMPRECYCLE.ORG. SAFETY PRECAUTION · Avoid placing the...

AL1917T User's Guide
Page 7
..., the user can store their preferred modes in the table below. Mode 1 VGA 2 VGA Resolution 720 x 400 640 x 480 70 Hz 60 Hz H. The monitor is suggested to 9 user modes. If the mode in use does not match one of storing up to perform the Auto Setup under Windows "Full... Screen" pattern. AL1917 PRESET MODES To reduce the need for adjustment for different modes, the monitor has default setting modes that are most commonly used as a user mode is the new display information must have 1 KHz difference for horizontal frequency or...
..., the user can store their preferred modes in the table below. Mode 1 VGA 2 VGA Resolution 720 x 400 640 x 480 70 Hz 60 Hz H. The monitor is suggested to 9 user modes. If the mode in use does not match one of storing up to perform the Auto Setup under Windows "Full... Screen" pattern. AL1917 PRESET MODES To reduce the need for adjustment for different modes, the monitor has default setting modes that are most commonly used as a user mode is the new display information must have 1 KHz difference for horizontal frequency or...

AL1917T User's Guide
Page 8
...Active OFF state back to Plug and Play with your system if your installation easier, the monitor is activated. The DDC (Display Data Channel) is around 3 seconds. The monitor supports DDC2B standard. AL1917 POWER SAVING The monitor will be driven into "Power Saving" mode by the amber-color power LED. DDC To...be kept until a control signal has been detected or the keyboard or mouse is able to ON state is a communication protocol through which the monitor automatically informs the host system about its capabilities, for example, supported resolutions and corresponding timing.
...Active OFF state back to Plug and Play with your system if your installation easier, the monitor is activated. The DDC (Display Data Channel) is around 3 seconds. The monitor supports DDC2B standard. AL1917 POWER SAVING The monitor will be driven into "Power Saving" mode by the amber-color power LED. DDC To...be kept until a control signal has been detected or the keyboard or mouse is able to ON state is a communication protocol through which the monitor automatically informs the host system about its capabilities, for example, supported resolutions and corresponding timing.
AL1917T User's Guide
Page 9
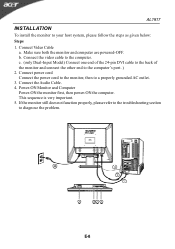
... Connect one end of the 24-pin DVI cable to the back of the monitor and connect the other end to diagnose the problem. Make sure both the monitor and computer are powered-OFF. If the monitor still does not function properly, please refer to the troubleshooting section to the computer...'s port. ) 2. Power-ON Monitor and Computer Power-ON the monitor first, then power-ON the computer. Connect Video Cable a. b. Connect the video cable to your host system, please follow the steps as given ...
... Connect one end of the 24-pin DVI cable to the back of the monitor and connect the other end to diagnose the problem. Make sure both the monitor and computer are powered-OFF. If the monitor still does not function properly, please refer to the troubleshooting section to the computer...'s port. ) 2. Power-ON Monitor and Computer Power-ON the monitor first, then power-ON the computer. Connect Video Cable a. b. Connect the video cable to your host system, please follow the steps as given ...
AL1917T User's Guide
Page 14
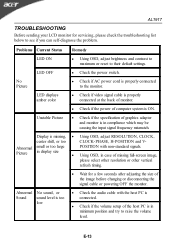
... causing the input signal frequency mismatch. E-13 Unstable Picture · Check if the specification of graphics adapter and monitor is in minimum position and try to the monitor. Problems Current Status Remedy LED ON · Using OSD, adjust brightness and contrast to maximum or reset to ...see if you can self-diagnose the problem. LED displays amber color · Check if video signal cable is properly connected at the back of monitor. · Check if the power of computer system is missing, · Using OSD, adjust RESOLUTION, CLOCK, center shift, or too CLOCK-PHASE...
... causing the input signal frequency mismatch. E-13 Unstable Picture · Check if the specification of graphics adapter and monitor is in minimum position and try to the monitor. Problems Current Status Remedy LED ON · Using OSD, adjust brightness and contrast to maximum or reset to ...see if you can self-diagnose the problem. LED displays amber color · Check if video signal cable is properly connected at the back of monitor. · Check if the power of computer system is missing, · Using OSD, adjust RESOLUTION, CLOCK, center shift, or too CLOCK-PHASE...
AL1917X User's Guide
Page 1
Table of Contents TCO99 Notice...1 FCC Statement Warning...2 Canadian DOC Notice...3 Precautions...3 Package Contents...4 Installation Instructions...4 Assembling the Monitor...4 Detaching the Monitor ...4 Adjusting the Viewing Angle ...4 Connecting the Devices ...4 Switching the Power ...5 Adjusting Display Settings ...5 External Controls ...5 OSD Options ...5 OSD Menu ...6 Brightness & Contrast ...6 Tracking ...6 Position ...6 Color ...6 Language ...
Table of Contents TCO99 Notice...1 FCC Statement Warning...2 Canadian DOC Notice...3 Precautions...3 Package Contents...4 Installation Instructions...4 Assembling the Monitor...4 Detaching the Monitor ...4 Adjusting the Viewing Angle ...4 Connecting the Devices ...4 Switching the Power ...5 Adjusting Display Settings ...5 External Controls ...5 OSD Options ...5 OSD Menu ...6 Brightness & Contrast ...6 Tracking ...6 Position ...6 Color ...6 Language ...
AL1917X User's Guide
Page 4
... Cet appareil numerique de la classe B repecte toutes les exigences du Reglement sur le materiel brouilleur du Canada. To clean LCD Monitor screen;Power off LCD Monitor and unplug the AC Cord. Spray a non-solvent cleaning solution onto a rag and clean the screen gently. 2. Do not...result in his document has been carefully checked for accuracy; This document contains proprietary information protected by an authorized technician. 5. Exposing the monitor to rain water, moisture or sunlight can severely damage it . If any form, without notice. Servicing of any nature should be...
... Cet appareil numerique de la classe B repecte toutes les exigences du Reglement sur le materiel brouilleur du Canada. To clean LCD Monitor screen;Power off LCD Monitor and unplug the AC Cord. Spray a non-solvent cleaning solution onto a rag and clean the screen gently. 2. Do not...result in his document has been carefully checked for accuracy; This document contains proprietary information protected by an authorized technician. 5. Exposing the monitor to rain water, moisture or sunlight can severely damage it . If any form, without notice. Servicing of any nature should be...
AL1917X User's Guide
Page 5
... top of the stand. 2.Connect the stand into the neck of computer and monitor before you do the connection.. Caution: Do not force the LCD Monitor over its maximum viewing angle settings as stated above. Detaching the Monitor Important First, find a clean, flat surface to backward 15°. Connecting the Devices Please shut...
... top of the stand. 2.Connect the stand into the neck of computer and monitor before you do the connection.. Caution: Do not force the LCD Monitor over its maximum viewing angle settings as stated above. Detaching the Monitor Important First, find a clean, flat surface to backward 15°. Connecting the Devices Please shut...
AL1917X User's Guide
Page 6
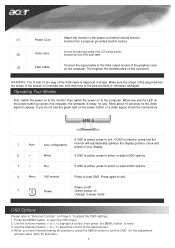
... the MENU button to appear. Then tighten the thumbscrews on the computer. If you have finished making all selections, press the MENU button to the monitor, then switch the power on Page 5. When you do not see the LED on the power button or a video signal, check the connections . Operating... Your Monitor First, switch the power on to exit the OSD. (Or the adjustment will automatically optimize the display position, clock and phase of the VGA cable...
... the MENU button to appear. Then tighten the thumbscrews on the computer. If you have finished making all selections, press the MENU button to the monitor, then switch the power on Page 5. When you do not see the LED on the power button or a video signal, check the connections . Operating... Your Monitor First, switch the power on to exit the OSD. (Or the adjustment will automatically optimize the display position, clock and phase of the VGA cable...
AL1917X User's Guide
Page 8
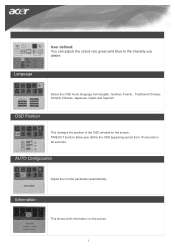
AUTO Configuration Adjust the monitor parameter automatically. Language User defined: You can adjust the colors red, green and blue to 60 seconds. TIMEOUT function allow user define the OSD appearing period from English, German, French, Traditional Chinese, Simplify Chinese, Japanese, Italian and Spanish. Information This shows brief information on the screen. OSD Position This changes the position of the OSD window on the screen. Select the OSD menu language from 10 seconds to the intensity you desire.
AUTO Configuration Adjust the monitor parameter automatically. Language User defined: You can adjust the colors red, green and blue to 60 seconds. TIMEOUT function allow user define the OSD appearing period from English, German, French, Traditional Chinese, Simplify Chinese, Japanese, Italian and Spanish. Information This shows brief information on the screen. OSD Position This changes the position of the OSD window on the screen. Select the OSD menu language from 10 seconds to the intensity you desire.

AL1917X User's Guide
Page 10
... 10 N.C. 11 N.C. 12 DDC_SDA 13 HSYNC 14 VSYNC. 15 DDC_SCL Standard Timing Table If the selected timing is NO T included in table below, this LCD monitor will go into the sleep mode.
... 10 N.C. 11 N.C. 12 DDC_SDA 13 HSYNC 14 VSYNC. 15 DDC_SCL Standard Timing Table If the selected timing is NO T included in table below, this LCD monitor will go into the sleep mode.
AL1917X User's Guide
Page 11
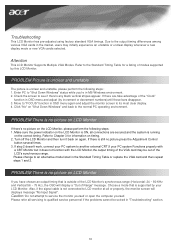
...numbers)until those bars disappear. 3. Please change to its most clear display. 4. Also, if the signal cable is supported by this LCD Monitor. PROBLEM There is no picture,press the Adjustment Control button several times. 3. Caution: Do not attempt to see if there's any black ...vertical stripes appear. Troubleshooting This LCD Monitor has pre-adjusted using factory standard VGA timings. If step 2 doesn't work, connect your PC system to qualified service personnel if the problems...
...numbers)until those bars disappear. 3. Please change to its most clear display. 4. Also, if the signal cable is supported by this LCD Monitor. PROBLEM There is no picture,press the Adjustment Control button several times. 3. Caution: Do not attempt to see if there's any black ...vertical stripes appear. Troubleshooting This LCD Monitor has pre-adjusted using factory standard VGA timings. If step 2 doesn't work, connect your PC system to qualified service personnel if the problems...
User Manual
Page 1
Table of Contents TCO03 Notice...1 FCC Statement Warning...2 Canadian DOC Notice...3 Precautions...3 Package Contents...4 Installation Instructions...4 Assembling the Monitor...4 Detaching the Monitor ...4 Adjusting the Viewing Angle ...4 Connecting the Devices ...4 Switching the Power ...5 Adjusting Display Settings ...5 External Controls ...5 OSD Options ...5 OSD Menu ...6 Brightness & Contrast ...6 Tracking ...6 Position ...6 Color ...6 Language ...
Table of Contents TCO03 Notice...1 FCC Statement Warning...2 Canadian DOC Notice...3 Precautions...3 Package Contents...4 Installation Instructions...4 Assembling the Monitor...4 Detaching the Monitor ...4 Adjusting the Viewing Angle ...4 Connecting the Devices ...4 Switching the Power ...5 Adjusting Display Settings ...5 External Controls ...5 OSD Options ...5 OSD Menu ...6 Brightness & Contrast ...6 Tracking ...6 Position ...6 Color ...6 Language ...


